The Complete Elemental Master Guide by Goldie

Elemental Master (abbrev. as EM) is the 4th class of the Sage, Professor, and Sorcerer line-up. It's a versatile class that can be played as DPS, tank, support, or whatever your preference is. It is arguably the strongest magical class at the moment.
Unlike Arch Mage, Elemental Master has a lot of utility skills (i.e. Land Protector, Dispel, Blinding Mist, Insignias, etc.) in its arsenal, making it possible for the class to leave behind defensive gears, and run full DPS while surviving most of the monsters' and bosses' skills and attacks.
Introduction
You're probably wondering why you should play Elemental Master at all. In this section, I'll be pointing out key points of both its pros and cons to help you get ready for the class, get yourself accustomed to it, and decide as early as now if you still wanna pursue playing the class after knowing its strengths and weaknesses. But first, let me share some of my wild and wistful unfiltered diaristic expression marked with brutal honesty about the class in the past in relation to now.
Gone are the 3rd job days where every magic classes, with the exception of Performers (and to some degree Soul Reaper), have the problem of being elementally-locked behind with whatever skills they have available. Sorcerers had it worst because while they have skills with different elemental properties, these are all hindered by their long cooldowns (CD). Their main skill ![]() Psychic Wave and its companion skills like
Psychic Wave and its companion skills like ![]() Diamond Dust,
Diamond Dust, ![]() Earth Grave, and
Earth Grave, and ![]() Varetyr Spear all suffered the same fate, and are locked behind an agonizing 5 seconds CD each. While their cooldowns can be reduced with Shadow Gears, and some equipment like
Varetyr Spear all suffered the same fate, and are locked behind an agonizing 5 seconds CD each. While their cooldowns can be reduced with Shadow Gears, and some equipment like ![]() Patent Shadow Staff , it still wasn't enough to have Sorcerer enter the meta as a main DPS class. Also it's important to point out that even though Psychic Wave can be endowed to the four (4) basic elements (Fire, Water, Wind, & Earth), the old elemental table wasn't exactly in favor of them. For instance, any monsters that was either Holy 4 or Dark 4 would resist your magical attacks and so most of the time you'll either stick to Neutral Psychic Wave or "overgear" your Sorcerer just so you can deal an okay amount of damage to those monsters.
Patent Shadow Staff , it still wasn't enough to have Sorcerer enter the meta as a main DPS class. Also it's important to point out that even though Psychic Wave can be endowed to the four (4) basic elements (Fire, Water, Wind, & Earth), the old elemental table wasn't exactly in favor of them. For instance, any monsters that was either Holy 4 or Dark 4 would resist your magical attacks and so most of the time you'll either stick to Neutral Psychic Wave or "overgear" your Sorcerer just so you can deal an okay amount of damage to those monsters.
Indeed, you may have experienced getting criticized and hated on by other players for joining their party as a DPS Sorcerer. You've probably been told or asked; "Can you tank for us?" or "Be a support and buff slave and let me handle everything and carry you". Or worse, "No! Don't play DPS Sorcerer! DPS Sorcerer sucks! Sorcerer sucks at PVM! The class is trash! It's the worst class DPS-wise". Well, to whoever stuck around with the class despite all the hate, I am very happy to say that the naysayers are now eating their words in shame, because now with the arrival of 4th jobs and the updated elemental table, Sorcerers have broken free of the bounds that kept them from performing to their fullest once they finally transitioned to Elemental Master!
Pros
- Skills from previous jobs and skill trees still have use and importance, particularly the utility and defensive ones.
- Elemental Master is only one of the few classes that can use and specialize Poison magic.
- One of their main skills called
 Venom Swamp has great coverage against the four (4) basic elements. Monsters with either Fire, Water, Wind, or Earth property that can't be hit, evade, or receive decreased damage from
  Conflagration,
  Lightning Land,
  Diamond Storm, and
  Terra Drive will be taken care of by Venom Swamp; thus, learning this skill will remove elemental weakness from the class.
- One of their main skills called
- EMs excel in space manipulation and crowd control (CC) skills.
- Four (4) of their skills, if you'll count Psychic Wave, are lingering and counts as DoT (Damage over Time) skills. This is useful and efficient when you're farming, as it is as simple as placing any of your DoT skills on the ground before teleporting away. You can still kill the monsters and you can still get their drops (thanks to the @autoloot feature). The only scenario I could think of where this won't be applicable, is when you're finishing a Kill Count quest. In that case you'll need to be onscreen to get the count. Apart from this, your DoT skills possess a "hit-locking" CC effect that flinches monsters and places them away from you.
- Their ultimate skill
 Elemental Buster not only acts as their 4th job equivalent of Psychic Wave, it can also be endowed to either Fire, Water, Wind, Earth, or Poison—basically assuming the elemental property of their currently summoned High Elemental Spirits; but unbeknownst to many it also acts as a CC skill! Both normal and boss monsters with the exception of MVPs hit by this skill are rendered immobile and stunned during the entire duration of the skill animation. We'll go more in-depth about Elemental Buster and its secret shenanigans once we go into the Elemental Master section, so pls. bear with me!
 *cough* Autocast Elemental Buster *cough*
- They have at least two (2) forms of mobility with the skills Lvl. 1
 Summon Ventus on Lvl. 2
  Elemental Control (Defensive Mode) and
  Psychic Stream.
- You may argue that
 Guyak Pudding is basically free and only costs 10
  Muh Coin , but having free guyak whenever you need it is a big add-on, especially for those tight on budget. And besides, not only does it boost movement speed but it also gives you +50% FLEE Rate, which greatly improves an EM's survivability.
 - EM is already a class gifted with lots of ground magical skills, above average range and AoE, and yet they were still given another mobility skill with Psychic Stream. This skill with a nine (9) cells range lets you blink/dash towards a monster or a mob of monsters making farming faster and efficient. As an example, you use Psychic Stream on a mob then proceed to autocast your Elemental Buster from the Dimension Set to kill the horde of mobs around you, while aiming Diamond Storm to another pack of mobs to maximize your range and space around you.
- You may argue that
- EMs have access to Elementals & High Elementals that would help them in various ways. We'll talk more about them in their own sections.
- Versatility. Can be played as DPS, tank, or support.
Cons
- A rotation-based class that cycles through different skills.
- No matter how strong the class is, if it's not for you then you won't have a good time playing the class. I say that because the class is not a one-button skill class when you're playing it. You'll need to cycle skills in between to farm.
- Needs attentiveness and awareness as to when will the next skill will be off-cooldown (CD), so for people who prefer to just press one (1) button or skill you may want to play other classes instead like Soul Ascetic (SA).
- High learning curve
- The class looks easy to play on paper and on first sight, but Elemental Master actually has a lot of things you need to understand first in order to effectively play the class to its best capacity.
- Needs a lot of catalysts to summon their Elementals & High Elementals, and apply their ground defensive skills which makes weight management more important than ever.
At the end of the day, I believe that every cons you'll encounter with the class will get outweighed by their pros. Now, it's up to you whether you'll commit to the class despite knowing all these things. Should you decide to continue, it'll be a pleasure to have you join me in the wonderful journey of mastering the ways of the true Elemental Master.
Magician
Overview
Magicians (colloquially called as Mages) are known to rely on magical skills to deal damage against monsters, and use specific elements based on the monsters' elemental property to exploit their weakness. In this line-up, Mages are bestowed with offensive Area of Effect (AoE) skills that will help them level-up in the early stages of the game. While supportive, defensive, and passive skills will come in handy in late-game as Elemental Master.
Among the notable skills that Mages use in their arsenal are ![]() Cold Bolt,
Cold Bolt, ![]() Fire Bolt,
Fire Bolt, ![]() Lightning Bolt, and
Lightning Bolt, and ![]() Fire Ball just to name a few. Mages predominantly use Fire Ball for leveling because of its wider AoE, splash damage effect, and low cooldown. Mages can also use the three (3) other bolt skills for leveling, but it won't be as effective and fast as using Fire Ball to level up, though they are still good skills to use especially when paired with
Fire Ball just to name a few. Mages predominantly use Fire Ball for leveling because of its wider AoE, splash damage effect, and low cooldown. Mages can also use the three (3) other bolt skills for leveling, but it won't be as effective and fast as using Fire Ball to level up, though they are still good skills to use especially when paired with ![]() Fire Wall, as this will create a protective barrier between you and the monster you are trying to kill. These bolt skills will also prove to be relevant for the other build of the Elemental Master class which is
Fire Wall, as this will create a protective barrier between you and the monster you are trying to kill. These bolt skills will also prove to be relevant for the other build of the Elemental Master class which is ![]() Spell Fist build. Mages also have access to
Spell Fist build. Mages also have access to ![]() Energy Coat which gives another layer of Defense for the class.
Energy Coat which gives another layer of Defense for the class.
Skill Tree
| Skill | Notes | Points | Type |
|---|---|---|---|
|
10 | Passive | |
|
1 | Supportive | |
|
7 | Offensive | |
|
10 | Defensive | |
|
5 | Offensive | |
|
5 / 10 | Offensive | |
|
8 | Offensive | |
|
1 | Supportive | |
|
0 / 10 | Offensive | |
|
0 / 10 | Supportive | |
|
1 / 10 | Offensive | |
|
1 / 10 | Offensive | |
|
0 | Offensive | |
|
1 | Defensive |
Recommended Skill Tree
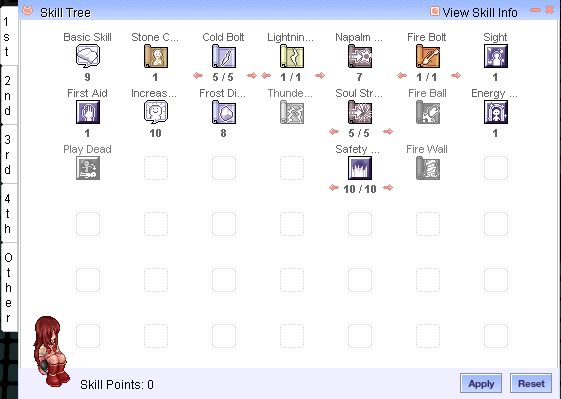
| My Personal Skill Tree Allocation for Magician |
|---|
 |
Sage
Overview
Sage is the 2nd alternate job for the Magician class. Sages have spent years studying the intrinsic and constituent character of magic and how it interacts with its environment. Instead of using the destructive capabilities of magic, they have utilized everything they have studied about its true nature by disrupting its belligerent side and bringing out its calmer psyche into the fold. Thus, Sages have gained the reputation on being known with the role of anti-Mages or as anti-Casters.
Most of their skills are used to disrupt spells of the opposing enemies, create a defensive layer on the ground that will prevent any kinds of AoE ground magical skills to deal damage unto you and your party members, and remove buffs on the enemies and debuffs on your allies that would otherwise negatively impact the run of the party if left untouched; but with a Sage on a party you can turn the tables and switch the tide of battle to you and your party's favor. While Sages shine brighter in their defensive capabilities and almost all of their skills can only be realistically be used in a PvP (Player vs. Player) scenario, they are lacking in the offensive department which makes them solely rely on their Mage offensive skills to farm and level-up effectively.
Among the notable skills in a Sage's arsenal include the ![]() Dispell,
Dispell, ![]() Magic Rod, and
Magic Rod, and ![]() Spell Breaker skills to disable monsters and MVPs rendering them crippled and weaker. And of course the bread and butter of all Sages—the
Spell Breaker skills to disable monsters and MVPs rendering them crippled and weaker. And of course the bread and butter of all Sages—the ![]() Land Protector skill that is always sought after in every party, and in every instances. This skill in my opinion is what defines the class and makes it whole and unique among the other classes. Afraid of dying in combat? Required to play with a tank to be your meat shield to eat up all of those hard hitting AoE ground magical skills? Or forced to take out some DPS gears and build tank gears in order to survive a difficult fight? Well fret not because all you'll need is Land Protector to solve all those problems!
Land Protector skill that is always sought after in every party, and in every instances. This skill in my opinion is what defines the class and makes it whole and unique among the other classes. Afraid of dying in combat? Required to play with a tank to be your meat shield to eat up all of those hard hitting AoE ground magical skills? Or forced to take out some DPS gears and build tank gears in order to survive a difficult fight? Well fret not because all you'll need is Land Protector to solve all those problems!
Besides their defensive skills, they also have supportive spells to amplify the damage output of their own elemental spells or their party members' in the form of ![]() Volcano,
Volcano, ![]() Deluge, and
Deluge, and ![]() Violent Gale. This is further enhanced by their endow skills
Violent Gale. This is further enhanced by their endow skills ![]() Flame Launcher,
Flame Launcher, ![]() Frost Weapon,
Frost Weapon, ![]() Lightning Loader, and
Lightning Loader, and ![]() Seismic Weapon which makes them essential members in a party for physical classes particularly as they can flexibly change the elements of their weapons anytime and as needed.
Seismic Weapon which makes them essential members in a party for physical classes particularly as they can flexibly change the elements of their weapons anytime and as needed.
Additionally, Sages have the ability to craft Elemental Converters (![]() Fire Elemental Converter ,
Fire Elemental Converter , ![]() Water Elemental Converter ,
Water Elemental Converter , ![]() Wind Elemental Converter , and
Wind Elemental Converter , and ![]() Earth Elemental Converter ) with their skill
Earth Elemental Converter ) with their skill ![]() Create Elemental Converter so long as you have the right materials with you. Your physical player friends would probably be interested to request you to craft some of these for them or you could craft them to sell to players cheaper than NPC price of course.
Create Elemental Converter so long as you have the right materials with you. Your physical player friends would probably be interested to request you to craft some of these for them or you could craft them to sell to players cheaper than NPC price of course.
Their skill kit will always prove useful in the later stages of the game so take your time to learn and understand the skills of the Sage branch as I try my best to explain each and one of them elaboratively and precisely. You won't regret it!
Skill Tree
| Skill | Notes | Points | Type |
|---|---|---|---|
|
10 | Passive | |
|
1 | Active | |
|
1 / 5 | Defensive | |
|
3 | Defensive | |
|
1 | Active | |
|
0 / 10 | Active | |
|
5 | Supportive | |
|
5 | Supportive | |
|
5 | Supportive | |
|
5 | Supportive | |
|
5 | Passive | |
|
5 | Supportive | |
|
5 | Supportive | |
|
5 | Supportive | |
|
5 | Defensive | |
|
5 | Supportive | |
|
0 | Active | |
|
1 | Supportive | |
|
5 | Offensive | |
|
0 / 5 | Offensive | |
|
1 | Active | |
|
1 | Active | |
|
1 | Active | |
|
1 | Active | |
|
1 | Active |
Recommended Skill Tree
| My Personal Skill Tree Allocation for Sage |
|---|
 |
Land Protector
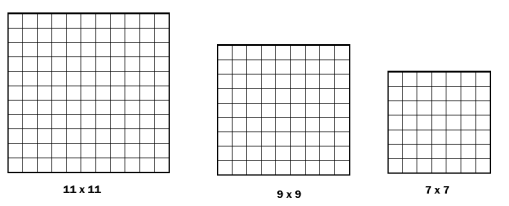
In this section, we'll be talking a lot more about the Sage skill ![]() Land Protector (LP) in-depth on how it should be properly placed, what level of LP should you use in different scenarios, and what's the extent of the "hittable zone" and "danger zone" of LP. From here on out, I'll be referring to Land Protector as LP only for simplicity's sake. Okay then, let's get going! As what can be seen from the image above, LP is divided into three (3) AoEs. Levels 1-2 LP produce the 7x7, Levels 3-4 LP produce the 9x9, while only Level 5 produces 11x11. In most situation, you'd likely use 11x11 LP most of the time whenever you'd need to put an LP underneath you to protect you or your party from strong ground magical skills from MVPs. However not all the time would you need to use 11x11.
Land Protector (LP) in-depth on how it should be properly placed, what level of LP should you use in different scenarios, and what's the extent of the "hittable zone" and "danger zone" of LP. From here on out, I'll be referring to Land Protector as LP only for simplicity's sake. Okay then, let's get going! As what can be seen from the image above, LP is divided into three (3) AoEs. Levels 1-2 LP produce the 7x7, Levels 3-4 LP produce the 9x9, while only Level 5 produces 11x11. In most situation, you'd likely use 11x11 LP most of the time whenever you'd need to put an LP underneath you to protect you or your party from strong ground magical skills from MVPs. However not all the time would you need to use 11x11.
If you're in a small party of let's say 4 or 5 then a 9x9 LP will suffice to protect you and your small party. This gets significantly reduced when you solo on your own plus your Elementals and High Elementals. When this happens, you'd only want to use 7x7 and there'll be enough space for the both of you. Now you must be wondering why this is necessary. Simply because your skills won't hit the MVP. There will be times where you'll need to land your ground AoE skills to hit the enemy and you will have a lot of those especially when you transition to Elemental Master, and when an MVP enters your LP, you'll be left disadvantaged alongside your fellow party members that spams ground AoE spells like the Arch Mages. Furthermore when you're in a party and there are ground effects you wanna clear such as ![]() Spider Web (Fiber Lock) or
Spider Web (Fiber Lock) or ![]() Demonstration (Bomb), you'll only need to use 7x7 so that you and your party's ground AoE skills won't get blocked.
Demonstration (Bomb), you'll only need to use 7x7 so that you and your party's ground AoE skills won't get blocked.
But then you're probably gonna argue, LP actually has a "hittable zone" and yes you are correct but what happens now if the MVP is placed further inside your LP then no matter where you cast your skills to the "hittable zone" of LP your skills will never reach the MVP. That's why you would need to use lower levels of LP in those kinds of situations.
"Hittable Zone" of Land Protector
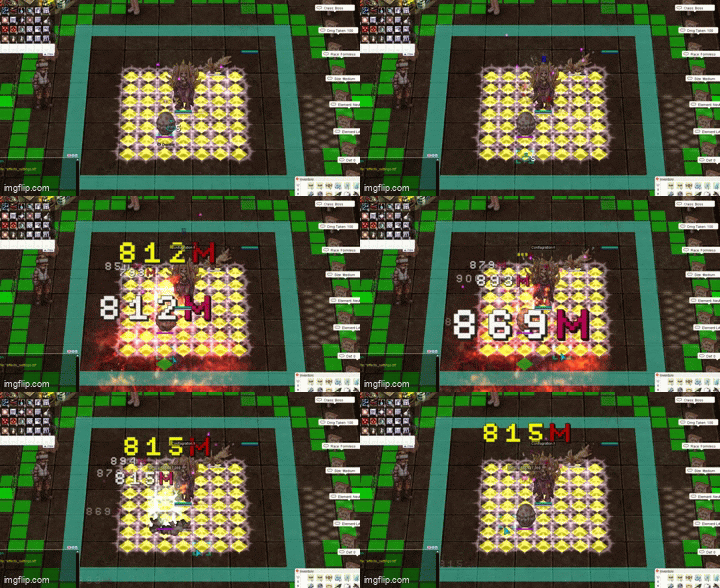
Okay now I would like you to focus your attention to the GIF above. LP doesn't provide total protection from ground AoE skills when those skills are casted right outside the furthest edge of LP. If I cast for example ![]() Conflagration on the cell right outside of LP, it will still penetrate LP and damage anyone in Conflagration's 9x9 AoE even if you're inside LP. This is the reason why most people think that LP has a "danger zone" because oftentimes they get hit by ground AoE magical skills of the MVP even when inside LP's protective cells. You are getting hit by the MVP's skills because it's most likely that they also casted their skills right outside of LP on its "hittable zone". Now it doesn't necessarily have to be one (1) cell, it could be two (2) cells or three (3) cells but depending how huge the AoE of the skills it could still reach and penetrate LP and damage you in return. Even if I casted Conflagration two (2) more cells below from the cell that I casted it from the GIF, it will still hit the dummy. A video showcasing its official behavior is documented here.
Conflagration on the cell right outside of LP, it will still penetrate LP and damage anyone in Conflagration's 9x9 AoE even if you're inside LP. This is the reason why most people think that LP has a "danger zone" because oftentimes they get hit by ground AoE magical skills of the MVP even when inside LP's protective cells. You are getting hit by the MVP's skills because it's most likely that they also casted their skills right outside of LP on its "hittable zone". Now it doesn't necessarily have to be one (1) cell, it could be two (2) cells or three (3) cells but depending how huge the AoE of the skills it could still reach and penetrate LP and damage you in return. Even if I casted Conflagration two (2) more cells below from the cell that I casted it from the GIF, it will still hit the dummy. A video showcasing its official behavior is documented here.
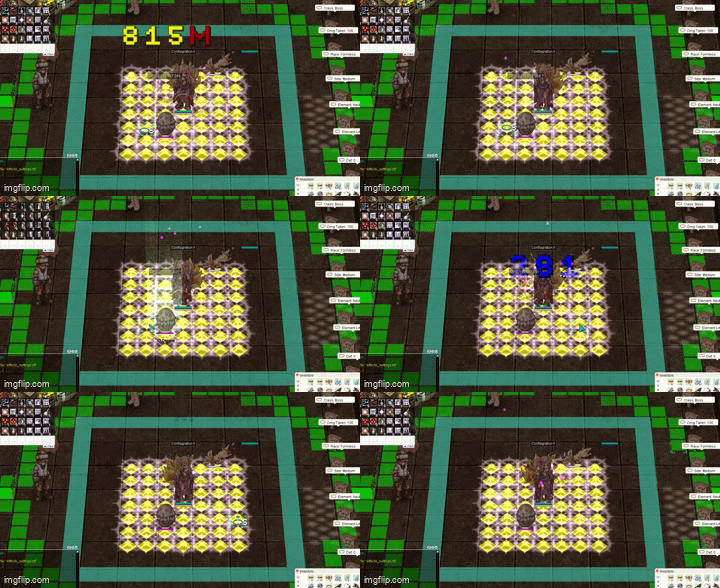
In contrast, if I cast my Conflagration on LP's protective cell itself, it won't deal any damage at all to the dummy because it didn't penetrate LP as shown in the GIF above. I would need to cast it right outside LP if I would want my skills to reach and hit the dummy. That's why in situations where surviving is more important than doing DPS, you will be required to use higher levels of LP with larger AoE. Forget about the set-ups and the insignias, just put LP underneath you so you can survive, just make sure to give a slight space for where you could cast your ground AoE skills to kill the MVP.
Proper Placement of Land Protector

When placing your LP, it's important to know what's the maximum range you can go for to readjust its positioning. This is important because when you're faced with an MVP and the MVP is in close melee range, you wouldn't want to move and lure it further to your LP since you'll need space between you and him so you can set-up your insignias while he's outside of LP. Now, LP has a three (3) cells range from the position you're standing from. Going above three (3) cells will make you move and lose your position. Be consciously aware of this as this will help you, especially once insignias are taken into consideration. More info will be discussed regarding LP's behavior in correlation with insignias in this section.
Dispell
List of Common Buffs and Debuffs Removed by Dispell
In this section of the guide, I'll only be listing the buffs and debuffs commonly seen from bosses and players. Obviously, this list won't be complete or near perfection, but if you know any more buffs and debuffs that you think should be included in the list, please feel free to add it or let me know.
I would also like to add that this list will be updated over time as I work more on the guide.
| Dispellable | ||
|---|---|---|
| Bleeding | ||
| NPC MAX PAIN | NPC AGI UP | Frozen |
| Curse | Hallucination | Silence |
Professor

Overview
Professor (alternatively known as Scholar) is the transcendent job of the Sage branch. The Professor job line-up is the direct improvement of what the Sage class is so known for. Thru rebirth and after studying the essence of magic and its inherent yet delicate nature, Professors have spent their time mastering an even greater body of knowledge which led them to learn new mystical skills that support their allies or act as a poke skill to annoy enemies.
Most of their newly learned skills revolve around mana or SP. They can now give endless supply of SP to their party members with ![]() Soul Change, and even regenerate their own SP thru the HP%-SP% based skill
Soul Change, and even regenerate their own SP thru the HP%-SP% based skill ![]() Indulge. Another SP-manipulating skill they have learned is the skill
Indulge. Another SP-manipulating skill they have learned is the skill ![]() Soul Burn, which allows Professors to effectively eliminate all of their opponent's SP which makes them an annoying foe to deal with in PvP and WoE on top of already having an annoying skill like
Soul Burn, which allows Professors to effectively eliminate all of their opponent's SP which makes them an annoying foe to deal with in PvP and WoE on top of already having an annoying skill like ![]() Dispell from their previous job as Sages. Defensively, they've also learned new skills such as
Dispell from their previous job as Sages. Defensively, they've also learned new skills such as ![]() Wall of Fog (Blinding Mist), and
Wall of Fog (Blinding Mist), and ![]() Spider Web (Fiber Lock) that complements well with
Spider Web (Fiber Lock) that complements well with ![]() Safety Wall and
Safety Wall and ![]() Deluge and with Fire Bolter builds, respectively.
Deluge and with Fire Bolter builds, respectively.
Offensively, Professors have also learned to boost their own magical power by improving on their bolt-based magical build in the form of ![]() Double Casting which lets them to cast their bolt skills twice in succession. This is one of the core skills you need to have when you're planning on playing
Double Casting which lets them to cast their bolt skills twice in succession. This is one of the core skills you need to have when you're planning on playing ![]() Spell Fist.
Spell Fist.
Skill Tree
| Skill | Notes | Points | Type |
|---|---|---|---|
|
5 | Supportive | |
|
0 / 1 | Supportive | |
|
0 / 5 | Offensive | |
|
0 / 5 | Offensive | |
|
0 | Active | |
|
1 | Defensive | |
|
1 | Defensive | |
|
0 / 5 | Active |
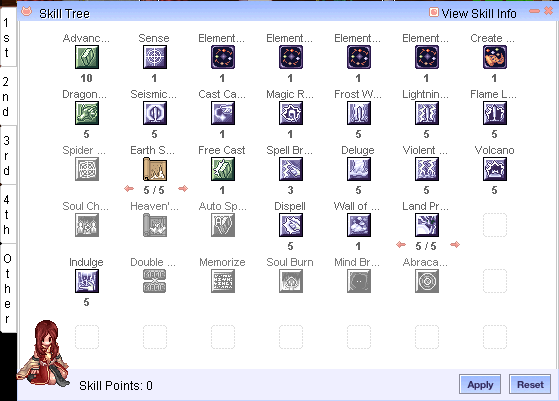
Recommended Skill Tree
| My Personal Skill Tree Allocation for Professor |
|---|
 |
Sorcerer

Overview
Sorcerer is the 3rd class of the Sage and Professor line-up. After traversing an arduous journey of learning the mystic secrets of magic and both of its treacherous and appeasing natures, Professors have undergone an even more daunting exploration to fully unveil the true constitution of magic itself. In their expedition, they've come across the spirits, known amongst the commoners as Elementals, that embody and represent the 4 Elements of Nature: the Fire Spirit Agni, the Water Spirit Aqua, the Wind Spirit Ventus, and the Earth Spirit Tera. Guided by the blessings granted to them by the great spirits of old, Professors have mastered the arts that make one deserving of the title Sorcerer.
Sorcerers have the ability to call forth the spirits of nature with their skills ![]() Summon Agni,
Summon Agni, ![]() Summon Aqua,
Summon Aqua, ![]() Summon Ventus, and
Summon Ventus, and ![]() Summon Tera. Each Elementals bestows the summoner both offensive and defensive passive effects that enabled the Sorcerer class to apply the sacred knowledge of magic they've learned as a Sage and Professor into the battlefield; thus finally enabling them to use damaging area of effect (AoE) skills in the form of
Summon Tera. Each Elementals bestows the summoner both offensive and defensive passive effects that enabled the Sorcerer class to apply the sacred knowledge of magic they've learned as a Sage and Professor into the battlefield; thus finally enabling them to use damaging area of effect (AoE) skills in the form of ![]() Psychic Wave,
Psychic Wave, ![]() Diamond Dust,
Diamond Dust, ![]() Earth Grave, and
Earth Grave, and ![]() Varetyr Spear.
Varetyr Spear.
Depending on which Elementals are summoned, each of their AoE skills are boosted in damage in correspondence to their respective elements. A summoned Lvl. 2 ![]() Summon Aqua in Lvl. 1
Summon Aqua in Lvl. 1 ![]() Elemental Control (Passive Mode) would endow its summoner's
Elemental Control (Passive Mode) would endow its summoner's ![]() Psychic Wave skill with the Water property, as well as boosting the damage output of
Psychic Wave skill with the Water property, as well as boosting the damage output of ![]() Diamond Dust and its crystallization chance which is fitting as the conjurers of Elemental spirit magic. This allowed Sorcerers to share an emotional connection with their Elementals in ways unimaginable and because of this they have developed skills to further enhance their dearest companion's capabilities with the skill
Diamond Dust and its crystallization chance which is fitting as the conjurers of Elemental spirit magic. This allowed Sorcerers to share an emotional connection with their Elementals in ways unimaginable and because of this they have developed skills to further enhance their dearest companion's capabilities with the skill ![]() Elemental Sympathy that enhanced the Elemental's survivability in battle. Sorcerers have since then developed new skills too in their kit—one that is shared between them and their Elementals. This introduced the complex Insignia System (
Elemental Sympathy that enhanced the Elemental's survivability in battle. Sorcerers have since then developed new skills too in their kit—one that is shared between them and their Elementals. This introduced the complex Insignia System ( ![]() Fire Insignia,
Fire Insignia, ![]() Water Insignia,
Water Insignia, ![]() Wind Insignia, &
Wind Insignia, & ![]() Earth Insignia) that grants varying effects to anybody standing within its AoE.
Earth Insignia) that grants varying effects to anybody standing within its AoE.
Sorcerers desiring for more knowledge and realizing there's really no way to quench their unending thirst for magic have then further divulged into the uncharted realms of Poison magic. This started the beginning stages of the so-called Poison magic and turned into a practice for the class to satiate their hunger. Albeit limited, this allowed Sorcerers to use Poison skills such as ![]() Poison Buster and
Poison Buster and ![]() Killing Cloud.
Killing Cloud.
The class to this day has never forgotten its roots coming from the Sage and Professor line-up and have honored this as they developed skills to annoy and poke enemies. ![]() Extreme Vacuum is a crowd control or root skill that immobilizes any unit that steps within its AoE.
Extreme Vacuum is a crowd control or root skill that immobilizes any unit that steps within its AoE. ![]() Arrullo is another skill that may come off as infuriating to many and acts as a debuff when used in the PvP and WoE scenes. Intrinsically, Sorcerer's AoE skills have CC effects themselves. Psychic Wave is a DoT skill that hit-locks units that enter its range; Diamond Dust crystallizes enemies rendering them immobile and silenced all the while getting increased damage against Wind property magic attacks; Varetyr Spear stuns enemies within its vicinity, and while Earth Grave doesn't apply any CC effects, it gives bleeding status effect and unveils monsters that are in hiding or cloaking state.
Arrullo is another skill that may come off as infuriating to many and acts as a debuff when used in the PvP and WoE scenes. Intrinsically, Sorcerer's AoE skills have CC effects themselves. Psychic Wave is a DoT skill that hit-locks units that enter its range; Diamond Dust crystallizes enemies rendering them immobile and silenced all the while getting increased damage against Wind property magic attacks; Varetyr Spear stuns enemies within its vicinity, and while Earth Grave doesn't apply any CC effects, it gives bleeding status effect and unveils monsters that are in hiding or cloaking state.
Skill Tree
| Skill | Notes | Points | Type |
|---|---|---|---|
|
5 | Offensive | |
|
5 | Offensive | |
|
5 | Offensive | |
|
5 | Supportive | |
|
3 | Offensive | |
|
0 / 10 | Active | |
|
0 | Defensive | |
|
0 | Active | |
|
0 | Active | |
|
0 | Offensive | |
|
0 / 5 | Supportive | |
|
3 | Supportive | |
|
0 / 5 | Active | |
|
0 / 5 | Active | |
|
3 | Active | |
|
3 | Active | |
|
3 | Active | |
|
3 | Active | |
|
3 | Active | |
|
0 | Active | |
|
1 / 2 | Active | |
|
5 | Passive | |
|
1 | Active | |
|
3 | Active | |
|
3 | Active | |
|
3 | Active | |
|
3 | Active |
Recommended Skill Tree
| My Personal Skill Tree Allocation for Sorcerer |
|---|
 |
Elemental Master

Overview
Elemental Master (EM) is the 4th class of the Sage, Professor, and Sorcerer line-up. While seeking recluse in the vast flora and fauna of Midgard where the mystical Spirits of nature resides, Sorcerers have awakened to a much stronger and greater power. As they ascertain the reason behind this sudden awakening and the closer they seek out the truth, they start to realize that the intimate bond they shared with their companion spirits, the Elementals, have also grown alongside with them leading them uncover more power thru the elements of nature.
This allowed their companion spirits to evolve and become powerful beings of their own rights. Agni evolved to the High Elemental Ardor, Aqua evolved to the High Elemental Diluvio, Ventus evolved to the High Elemental Procella, and Tera evolved to the High Elemental Terremotus. The Sorcerer's previous experimentation on the Poison element led them to awaken the vicegerent and embodiment of Poison magic of which it governs—the High Elemental Serpens. With their new form bonds and an unlikely ally with the malignant Serpens, Sorcerers themselves have evolved to the legendary Elemental Master.
Notable skills in an EM's skill kit are the skills ![]() Conflagration,
Conflagration, ![]() Diamond Storm,
Diamond Storm, ![]() Lightning Land,
Lightning Land, ![]() Terra Drive, and
Terra Drive, and ![]() Venom Swamp each of which represents the evolved High Elemental Spirits that accompany them in their adventure in the form of
Venom Swamp each of which represents the evolved High Elemental Spirits that accompany them in their adventure in the form of ![]() Summon Elemental Ardor,
Summon Elemental Ardor, ![]() Summon Elemental Diluvio,
Summon Elemental Diluvio, ![]() Summon Elemental Procella,
Summon Elemental Procella, ![]() Summon Elemental Terremotus, and
Summon Elemental Terremotus, and ![]() Summon Elemental Serpens.
Summon Elemental Serpens.
Depending which of the High Elementals are summoned to aid the Elemental Master, the corresponding element of the AoE skill that represents the High Elemental will boost its damage output. A summoned Ardor will bestow an EM with the gift of Fire and will receive increased Fire magical damage as well as amplifying Conflagration's power. With the combined strength of both the Elemental Master and High Elemental Spirit, this gives them the ability to cast their ultimate skill ![]() Elemental Buster as a symbol of their infinite bond. Elemental Buster will assume and flexibly switch element depending on the summoned High Elemental Spirit, making it possible to cast a Poison-endowed Elemental Buster when Serpens is present.
Elemental Buster as a symbol of their infinite bond. Elemental Buster will assume and flexibly switch element depending on the summoned High Elemental Spirit, making it possible to cast a Poison-endowed Elemental Buster when Serpens is present.
Elemental Masters have also developed the power to hide their spirits which makes them unnoticeable by the monsters around them with the skill ![]() Elemental Veil. This manipulation of magic to conceal their close companions also led them to master to blend in with the flow of magic , enabling them to cunningly use the psionic skill
Elemental Veil. This manipulation of magic to conceal their close companions also led them to master to blend in with the flow of magic , enabling them to cunningly use the psionic skill ![]() Psychic Stream, a pronounced antecedent of its predecessor skill Psychic Wave.
Psychic Stream, a pronounced antecedent of its predecessor skill Psychic Wave.
Skill Tree
| Skill | Notes | Points | Type |
|---|---|---|---|
|
5 / 10 | Passive | |
|
5 | Supportive | |
|
0 / 5 | Active | |
|
0 / 5 | Supportive | |
|
5 | Offensive | |
|
5 | Offensive | |
|
5 | Offensive | |
|
5 | Offensive | |
|
3 / 5 | Offensive | |
|
0 / 1 | Supportive | |
|
1 | Active | |
|
1 | Active | |
|
1 | Active | |
|
1 | Active | |
|
1 | Active | |
|
5 / 7 | Passive | |
|
10 | Offensive | |
|
1 / 5 | Offensive |
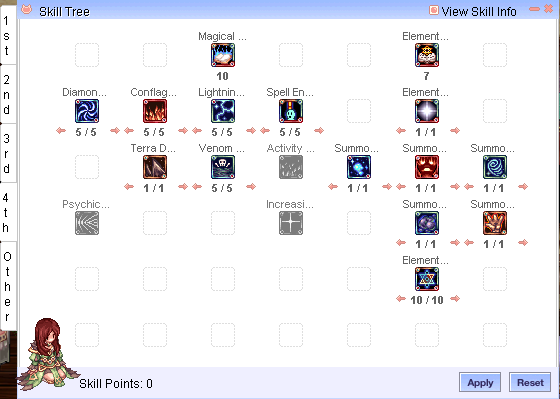
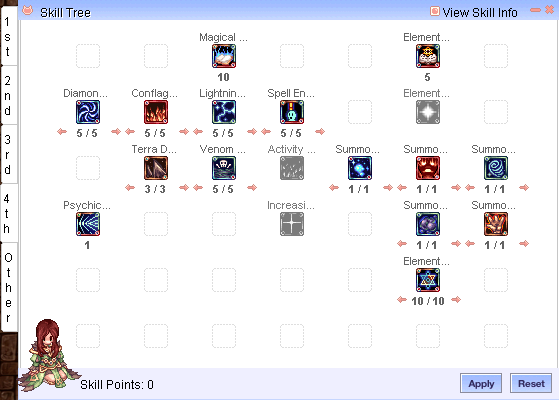
Recommended Skill Tree
| Pure DPS |
 | ||
|---|---|---|---|
| DPS + Mobility |
 | ||
| Mobility with |
 | ||
Elementals & High Elementals
For uniformity and to avoid confusion, we'll be grouping the spirit summons of the Sorcerer and Elemental Master to two (2) categories.
When referring to Elementals, this pertains to the Sorcerer's spirit summons (Agni, Aqua, Ventus, & Tera). On the other hand, High Elementals refers to the Elemental Master's spirit summons (Ardor, Diluvio, Procella, Terremotus, & Serpens). Collectively, both Elementals and High Elementals will be referred to as Spirits from here on out.
Sorcerer's Elementals could also appear in three (3) different forms and will have its own subcategory. All Lvl. 1 ![]() Summon Agni,
Summon Agni, ![]() Summon Aqua,
Summon Aqua, ![]() Summon Ventus, and
Summon Ventus, and ![]() Summon Tera will be known as their Child Forms; Lvl. 2 will be grouped into their Adolescent Forms, while Lvl. 3 will be called their Adult Forms.
Summon Tera will be known as their Child Forms; Lvl. 2 will be grouped into their Adolescent Forms, while Lvl. 3 will be called their Adult Forms.
For more detailed pieces of information about their modes (Passive, Defensive, & Offensive), check down below:
Elementals
| AGNI |  | ||
| Level 1 (Child Form) | Level 2 (Adolescent Form) | Level 3 (Adult Form) | |
| Passive mode: | Pyrotechnic:
|
Heater:
|
Tropic:
|
| Defensive mode: | Circle of Fire:
|
Fire Cloak:
|
Fire Mantle:
|
| Offensive mode: | Fire Arrow:
|
Fire Bomb:
Fire Bomb Attack:
|
Fire Wave:
Fire Wave Attack:
|
| AQUA |  |
 | |
| Level 1 (Child Form) | Level 2 (Adolescent Form) | Level 3 (Adult Form) | |
| Passive mode: | Aquaplay:
|
Cooler:
|
Chilly Air:
|
| Defensive mode: | Water Screen:
|
Water Drop:
|
Water Barrier:
|
| Offensive mode: | Ice Needle:
|
Water Screw:
Water Screw Attack:
|
Tidal Weapon:
|
| VENTUS |  |
 | |
| Level 1 (Child Form) | Level 2 (Adolescent Form) | Level 3 (Adult Form) | |
| Passive mode: | Gust:
|
Blast Mine:
|
Wild Storm:
|
| Defensive mode: | Wind Step:
|
Wind Curtain:
|
Zephyr:
|
| Offensive mode: | Wind Slash:
|
Hurricane:
Hurricane Attack:
|
Typhoon Mist:
Typhoon Mist Attack:
|
| TERA |  | ||
| Level 1 (Child Form) | Level 2 (Adolescent Form) | Level 3 (Adult Form) | |
| Passive mode: | Petrology:
|
Cursed Soil:
|
Upheaval:
|
| Defensive mode: | Solid Skin:
|
Stone Shield:
|
Power of Gaia:
|
| Offensive mode: | Stone Hammer:
|
Rock Crusher:
Rock Crusher Attack:
|
Stone Rain:
|
High Elementals
Modes
The Elementals and High Elementals are part of an Elemental Master's vast skill kit. They give offensive, defensive, and passive buffs to the summoner depending on which mode they are activated. Upon a successful summoning of your companion spirits, you have the option to place them in either Passive mode, Defensive mode, or Offensive mode. Each of these modes have uses that are essential in what makes Elemental Master a versatile class.
| Level 1
Passive Mode |
Level 2
Defensive Mode |
Level 3
Offensive Mode |
Level 4
Dismisses your Elemental and High Elemental |
| Waiting Mode | |||
Passive mode for the most part is used to buff an EM's offensive capabilities outside of its own summons. Meaning this is usually a direct buff to the summoner and not to the spirits themselves. Also starting from Sorcerer to Elemental Master, all of your spirits' Passive mode caters mostly to ![]() Psychic Wave and
Psychic Wave and ![]() Spell Fist builds and thus finds very little use when focusing on 4th job skills of EM. The only instance I could think of that it still complements 4th job skills is Serpens on Passive mode. Serpens will increase your 3rd job skill
Spell Fist builds and thus finds very little use when focusing on 4th job skills of EM. The only instance I could think of that it still complements 4th job skills is Serpens on Passive mode. Serpens will increase your 3rd job skill ![]() Killing Cloud by 1500% which if you're focusing on a Poison-centric build will be beneficial for you. Or when you're still incorporating Psychic Wave into your skill rotation cycle since its elemental property can be endowed according to the element of your currently summoned Elemental or High Elemental.
Killing Cloud by 1500% which if you're focusing on a Poison-centric build will be beneficial for you. Or when you're still incorporating Psychic Wave into your skill rotation cycle since its elemental property can be endowed according to the element of your currently summoned Elemental or High Elemental.
On the other hand, Defensive mode like Passive mode is also used to buff an EM's defensive capabilities. Spirits would endow an EM's armor property to their corresponding element. If for example you have Ardor summoned and you placed him in Defensive mode, he will change your armor property to Fire and you'll get decreased damaged against Fire property attacks but reduced resistance for the opposing element which is Water. Another good example is Lvl. 1 ![]() Summon Ventus in its Child form placed in Defensive Mode; in this mode, Ventus doesn't endow your armor to Wind but she does however give you free
Summon Ventus in its Child form placed in Defensive Mode; in this mode, Ventus doesn't endow your armor to Wind but she does however give you free ![]() Guyak Pudding effect and +50% FLEE Rate for as long as she is active.
Guyak Pudding effect and +50% FLEE Rate for as long as she is active.
Meanwhile, Offensive mode is the state where your spirits will go on an aggro or attack state. They'll randomly attack, select and cast skills they know in their skill pool at a certain chance. For most people this mode looks and sounds useless which to a degree is true since why would you want your spirits to gain aggro and get attacked when they're already too frail to begin with. But you should know that there are ways to make them tankier than even your own, and spirits gaining aggro from mobs lets you farm efficiently or stay alive as long as possible. Think of them as your own version of the Biolo's Homunculus.
The next mode that maybe most of you aren't still aware of is the Waiting Mode. Now, Waiting mode isn't under any specific Level of ![]() Elemental Control, but it's a state where your spirits can freely enter anytime. The moment you summon your spirits, they are by default in Waiting mode, and once you've placed them into any of the three (3) modes, they exit this state. To place them back into this state once again, you'll need to recast the same level of Elemental Control according to the same mode your spirits are in. If Ardor is in Passive Mode, recast Lvl. 1
Elemental Control, but it's a state where your spirits can freely enter anytime. The moment you summon your spirits, they are by default in Waiting mode, and once you've placed them into any of the three (3) modes, they exit this state. To place them back into this state once again, you'll need to recast the same level of Elemental Control according to the same mode your spirits are in. If Ardor is in Passive Mode, recast Lvl. 1 ![]() Elemental Control one more time and he'll be in Waiting mode again. During this state, your spirits don't give anything or do anything for you but they regain 2% HP/SP every 3 seconds which serves as their own healing consumable in a way acting like their own source of
Elemental Control one more time and he'll be in Waiting mode again. During this state, your spirits don't give anything or do anything for you but they regain 2% HP/SP every 3 seconds which serves as their own healing consumable in a way acting like their own source of ![]() Small Life Potion (14534) . This helps them stay longer in battles, so put them in Waiting mode as you deem fit and necessary.
Small Life Potion (14534) . This helps them stay longer in battles, so put them in Waiting mode as you deem fit and necessary.
Lastly, we have Lvl. 4 ![]() Elemental Control, which isn't even a mode or give anything good to either you or your spirits like reeaallyy. Don't ever use this skill as you'll only regret it. What it does is it kills your active spirits. I mean why? Just why would you want that? It's always easier to just cast another summoning skill if you wanna switch Elementals or High Elementals, but purposedly killing them is really such a questionable move by Gravity. Remove this in your hotkey or better yet don't ever bother getting it, it's a waste of skill point and a waste of space.
Elemental Control, which isn't even a mode or give anything good to either you or your spirits like reeaallyy. Don't ever use this skill as you'll only regret it. What it does is it kills your active spirits. I mean why? Just why would you want that? It's always easier to just cast another summoning skill if you wanna switch Elementals or High Elementals, but purposedly killing them is really such a questionable move by Gravity. Remove this in your hotkey or better yet don't ever bother getting it, it's a waste of skill point and a waste of space.
How to keep Elementals & High Elementals Alive
This is the section where I'll be explaining on how to keep our spirits alive. This is unknown to most players who hadn't played the class priorly. Only people who have played the class religiously since Day 1 as a Sorcerer during the 3rd job era would know the secret sauce on how to make your Elemental and High Elementals live their lives as your own personal tank or meat shield.
When either an Elemental or High Elemental is summoned, they inherit all of the summoner's raw stats including MaxHP%, Max DEF, Max MDef, and Max FLEE Rate. Back in those days, when a Sorcerer ran a high VIT or high AGI build, their Elementals too would have high VIT and high AGI thus making them tanky and agile. A kRO (Korea RO) video documenting this official behavior will be seen here, dating back in the year 2015. They inherit whatever stats you have at the time of summoning and they retain those stats for as long as they are active. So if you equip full tank gears that 's focused on high MaxHP%, DEF, MDef, and FLEE Rate, they will receive all of those plus some additional stats depending on the spirits' elemental property. That being said, you can make a separate swap gear for your tank gears and switch to it whenever you're gonna summon your Elementals or High Elementals. It's generally a good idea to invest in those tank gears since it'll really make your spirits tanky and thus saves you from the frustration of having to resummon a new one every time they die which drastically decrease your DPS capability, particularly as an Elemental Master.
Now since our spirits don't have their own UI unlike the Homunculus of Biolos, we will be following the following equations to formulate their individual stats:
Max HP    = [(SummonerMaxHP ÷ 3) + (SummonerINT x 10) + (SummonerJobLv x 20)] × [(SummonLv + 2) ÷ 3]
Max SP    = (SummonerMaxSP ÷ 4)
ATK (Max) = [(SummonerMaxSP) ÷ (18 ÷ SummonLv)] + (1 ~ 100)
ATK (Min) = [(SummonerMaxSP) ÷ (18 ÷ SummonLv)]
MATK      = SummonLv x [(SummonerINT ÷ 2) + (SummonerDEX ÷ 4)]
ASPD      = (SummonerDEX ÷ 10) + (SummonLv x 3) + 150
DEF       = SummonerDEF + [(SummonerBaseLv) ÷ (5 − SummonLv)]
MDEF      = SummonerMDEF + [(SummonerINT) ÷ (5 − SummonLv)]
FLEE|Flee Rate = SummonerFLEE + [(SummonerBaseLv) ÷ (5 − SummonLv)]
HIT|Hit Rate  = SummonerHIT + SummonerBaseLv
If the called Spirit is:
- Agni: increase its ATK and Hit Rate by
(SummonLv × 20)and(SummonLv × 10), respectively. - Aqua: increase its MATK and MDef by
(SummonLv × 20)and(SummonLv × 10), respectively. - Ventus: increase its MATK and FLEE Rate by
(SummonLv × 10)and(SummonLv × 20), respectively. - Tera: increase its ATK and DEF by
(SummonLv × 5)and(SummonLv × 25), respectively.
As what can be seen from the equations, all of the stats for the Elementals and High Elementals are influenced and dependent with that of the summoner's. Besides inheriting their summoner's stats, they also get additional stats based on what forms (Child, Adolescent, or Adult) they assume as well as what kind of spirit they are. Taking into consideration the MDef equation SummonerMDEF + [(SummonerINT) ÷ (5 − SummonLv)], a Level 3 Agni for example will yield higher MDef values due to having lower divisor values as compared to Lvls. 1 or 2. Although, it's uncertain or rather I haven't confirmed with [GM] Muh what would be the value for it if it's Ardor for instance since technically he is already on Adult form, and 4th job High Elementals don't have a child or adolescent form. It's even more uncertain for Serpens' case since he doesn't have any 3rd job base counterpart or maybe whatever base Elemental he was summoned from that's where he'll get his benefits from. But anyway with that in mind, you would also want to build as much HP% as you could get since in the equation for MaxHP (SummonerMaxHP ÷ 3) , your total MaxHP is divided by 3, and the only way to mitigate that is if you build tons of MaxHP% either from equips, consumables or party buffs. It's also noticeable that our Spirits don't benefit at all in our total MAtk or ATK which explains why their magical skills and basic attacks do little to nothing against monsters.
Apart from building your own stats and improving on it, you could also benefit from party buffs or class buffs. Since remember, whatever is your stats at the time of summoning, will be considered into the equation and will be inherited by your Spirits. One way of making this work is by having Performer slaves give you their buffs. Notable skills to use for that purpose are ![]() Apple of Idun,
Apple of Idun, ![]() Frigg's SongFrigg's Song,
Frigg's SongFrigg's Song, ![]() Lerad's DewLerad's Dew, the Arch Bishop skill
Lerad's DewLerad's Dew, the Arch Bishop skill ![]() Lauda Agnus, and your very own skill from the Sage skill tree
Lauda Agnus, and your very own skill from the Sage skill tree ![]() Deluge. Remember how I mentioned earlier that Deluge will make your spirits tankier? Well there you have it! From the EM branch, High Elementals will benefit from the passive
Deluge. Remember how I mentioned earlier that Deluge will make your spirits tankier? Well there you have it! From the EM branch, High Elementals will benefit from the passive ![]() Elemental Spirit Mastery, which gives some flat HP and some defensive bonuses, but only High Elementals though; Elementals don't benefit from this passive. We also have our passive from the Sorcerer branch
Elemental Spirit Mastery, which gives some flat HP and some defensive bonuses, but only High Elementals though; Elementals don't benefit from this passive. We also have our passive from the Sorcerer branch ![]() Elemental Sympathy, which acts as a final multiplier to the total MaxHP%/MaxSP% for both our Elementals and High Elementals once all the calculations are done.
Elemental Sympathy, which acts as a final multiplier to the total MaxHP%/MaxSP% for both our Elementals and High Elementals once all the calculations are done.
As an example, let's say you have a total of 1,100,000 HP and using the equation (SummonerMaxHP ÷ 3), that will be equivalent to 366,666 HP. Additionally if you have a total 196 INT and you substitute that value to the equation (SummonerINT x 10), you'll get 1,960. Lastly with the equations (SummonerJobLv x 20) and [(SummonLv + 2) ÷ 3], it'll give us values equal to 1,200 and 1.7 (assuming a High Elemental is considered in its Adult Form, could be lower if it's in Child Form; this will need confirmation first), respectively. Multiply 1,200 with 1.7 to yield a value equivalent to 2,040. Add up the remaining value of 25,000 HP from Lvl. 5 Elemental Spirit Mastery to 366,666 HP + 1960 HP + 2,040 HP. The total value 370,666 HP will then be multiplied with Lvl. 5 Elemental Sympathy's 25%, to give us the High Elemental's total HP of ≈463,333. This could be more if you used other class buffs; my basis for the 1,100,000 HP is from my high end tank gears alone.
Now for defensive stats, you could use the Performer skills ![]() Drum of Battlefield,
Drum of Battlefield, ![]() Echo Song,
Echo Song, ![]() Symphony of Lover, the High Priest skill
Symphony of Lover, the High Priest skill ![]() Assumptio, the Soul Reaper's
Assumptio, the Soul Reaper's ![]() Golem's SoulGolem Soul, the Arch Mage's
Golem's SoulGolem Soul, the Arch Mage's ![]() Crystal Impact when using Lvl. 1
Crystal Impact when using Lvl. 1 ![]() Climax, and the Sorcerer skill Lvls. 2 and 3
Climax, and the Sorcerer skill Lvls. 2 and 3 ![]() Earth Insignia. We'll have a more in-depth discussion about the Sorcerer insignias in a different section, but in a ditch Lvl. 2 Earth Insignia will give +500 flat HP & +50 DEF, while Lvl. 3 Earth Insignia will give +500 SP & +50 MDef while standing on its AoE. Remember, you have to apply these buffs unto your EM before you summon your spirits. It is also possible to directly apply the Assumptio skill on your summoned spirits but like any other buffs it will expire, unlike when you summon them while possessing all these buffs they will inherit all of it until they die or disappear.
Earth Insignia. We'll have a more in-depth discussion about the Sorcerer insignias in a different section, but in a ditch Lvl. 2 Earth Insignia will give +500 flat HP & +50 DEF, while Lvl. 3 Earth Insignia will give +500 SP & +50 MDef while standing on its AoE. Remember, you have to apply these buffs unto your EM before you summon your spirits. It is also possible to directly apply the Assumptio skill on your summoned spirits but like any other buffs it will expire, unlike when you summon them while possessing all these buffs they will inherit all of it until they die or disappear.
Now unfortunately to say but our Spirits won't benefit at all from Race%, Size%, Element%, and Protocol% reductions. So everything that you will work on your tank gears are focused on improving MaxHP%, Max DEF, Max MDef, and Max FLEE Rate.
Another defensive layer you can incorporate or use is the skill ![]() Elemental Veil, which turns your High Elementals transparent making them untargetable. As we've previously stated, this skill is good to have when you have enough points to expend; otherwise you can skip this skill since AoE skills will still damage them. When you're too cheap and would want to save your elemental catalysts, there's also
Elemental Veil, which turns your High Elementals transparent making them untargetable. As we've previously stated, this skill is good to have when you have enough points to expend; otherwise you can skip this skill since AoE skills will still damage them. When you're too cheap and would want to save your elemental catalysts, there's also ![]() Elemental Cure that heals your Elementals and High Elementals alike by taking out 10% of your HP/SP. Now, when you use this skill you might want to swap back to your tank gears by then. This is simply because you have fewer HP with your DPS gears for sure and your Spirits have higher MaxHP% than you do. Healing them with Elemental Cure while having low amount of HP will also only heal them by small amounts, whereas if you use switch to your tank gears you have more MaxHP%. The only problem with this is once you've switched to your tank gears, your HP won't be full so to solve that problem bring with you some
Elemental Cure that heals your Elementals and High Elementals alike by taking out 10% of your HP/SP. Now, when you use this skill you might want to swap back to your tank gears by then. This is simply because you have fewer HP with your DPS gears for sure and your Spirits have higher MaxHP% than you do. Healing them with Elemental Cure while having low amount of HP will also only heal them by small amounts, whereas if you use switch to your tank gears you have more MaxHP%. The only problem with this is once you've switched to your tank gears, your HP won't be full so to solve that problem bring with you some ![]() Yggdrasil Berry (607) or
Yggdrasil Berry (607) or ![]() Yggdrasil Seed (608) to restore your HP/SP. One other way to heal your spirits passively is by placing them into Waiting Mode using
Yggdrasil Seed (608) to restore your HP/SP. One other way to heal your spirits passively is by placing them into Waiting Mode using ![]() Elemental Control. Remember they are passively recovering 2% HP/SP while in this mode for every 3 seconds.
Elemental Control. Remember they are passively recovering 2% HP/SP while in this mode for every 3 seconds.
Both the Elementals and High Elementals follow the same equations in calculating their individual stats. Now the question if High Elementals have their own set of equations the answer is nobody knows but the Gravity developers. Information regarding the 4th job spirits is few and so for the meantime while we lack accurate info we'll be following the one above earlier. I could only imagine it being better for the High Elementals if they did have their own equations. As you can see, the formula didn't include the 4th jobs traits such as STA, WIS, RES, & MRES, so if in a turn of events it did somehow included those traits then our High Elementals are supposedly should be tankier than Elementals. Fret not though, because even with those traits your High Elementals are still durable. With the proper set of tank gears, my High Elementals could survive even the hardest hitting skills of MVPs such as Juncea's ![]() Meteor Storm, Schulang's
Meteor Storm, Schulang's ![]() Lord of Vermilion, Lasgand's
Lord of Vermilion, Lasgand's ![]() Heaven's Drive Heaven's Drive, Sakray's
Heaven's Drive Heaven's Drive, Sakray's ![]() Earth Strain, Sorcerer Celia's
Earth Strain, Sorcerer Celia's ![]() Psychic Wave, Rune Knight Seyren's
Psychic Wave, Rune Knight Seyren's ![]() Ignition Break, Temple Biosphere mobs'
Ignition Break, Temple Biosphere mobs' ![]() Grand Cross, the Dark Grand Crosses of the Depth Valkyries from Depth Abyss 2 as well as NPC Earthquakes from the Depth Salamanders. The only thing it can't survive so far is Betelgeuse's
Grand Cross, the Dark Grand Crosses of the Depth Valkyries from Depth Abyss 2 as well as NPC Earthquakes from the Depth Salamanders. The only thing it can't survive so far is Betelgeuse's ![]() Tetra Vortex though they can survive Tiara's, Warlock Katrinn's, and Fenrir's Tetra Vortex.
Tetra Vortex though they can survive Tiara's, Warlock Katrinn's, and Fenrir's Tetra Vortex.
Sample Clips
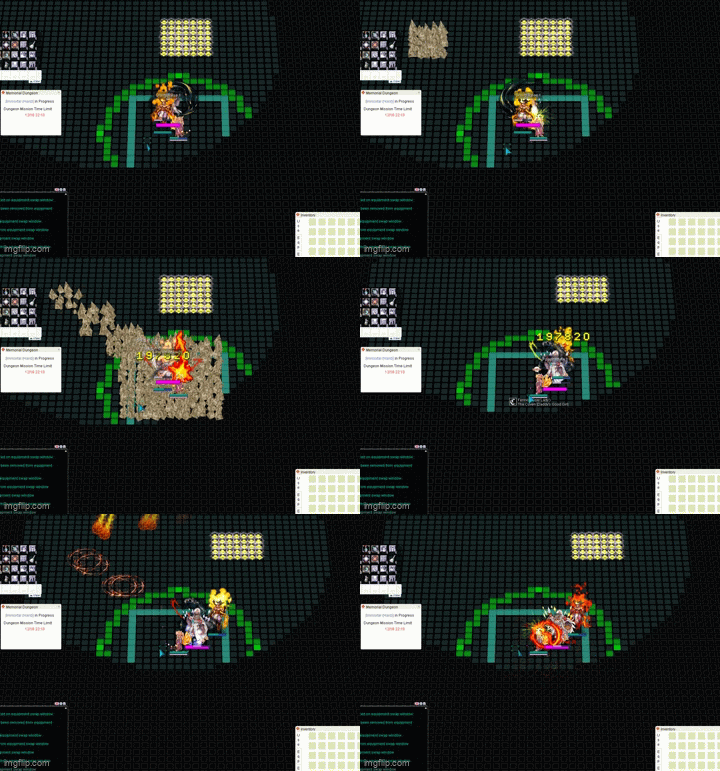
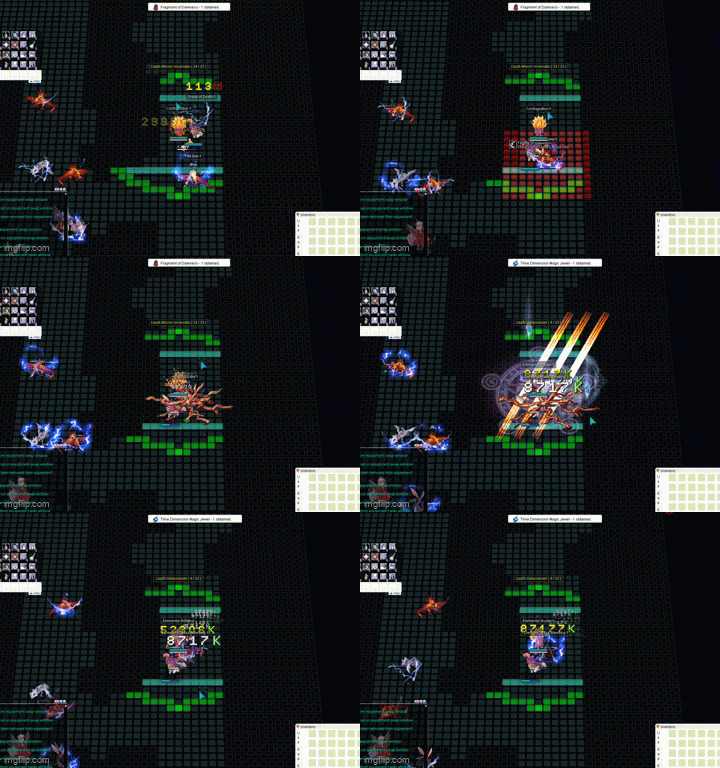
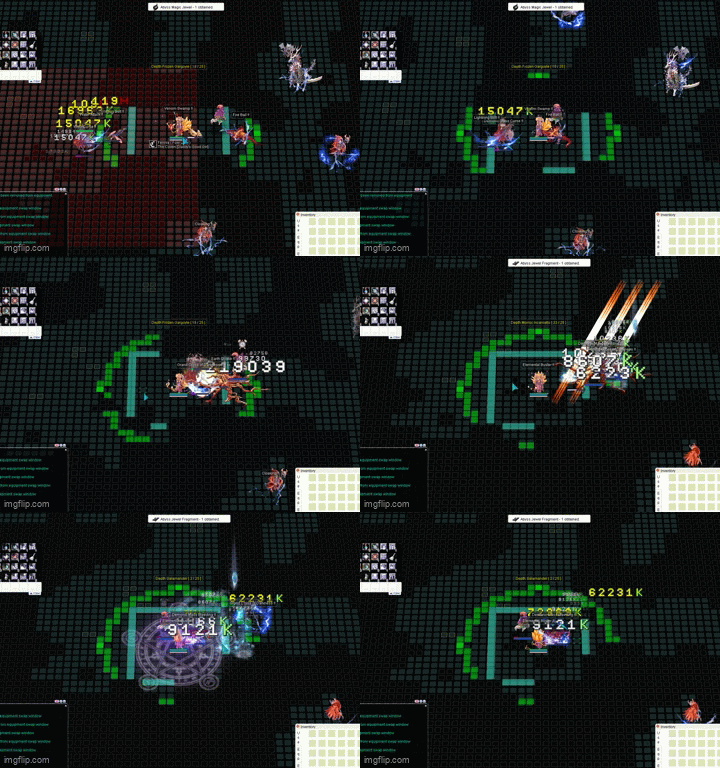
Note: In all four (4) occasions shown above, Ardor and Serpens survived some of the deadliest skills in the game casted by MVPs and boss monsters alike. The GIFs have very poor quality and I apologize for that. Hopefully I could replace them with better ones soon, but for now these will do; what's important is we know they can live long enough against the hardest hitting skills when built tanky.
Tank Gears
Okay, now that everything has been explained on how to make your Spirits survive longer, we'll now talk more about gears. I'll be giving out budget options and high-end options in this section. The high-end gears are optional, but if you have the zeny for it then I say go for it then. The gears I'll be listing down were the set of gears that has worked for me so far and made my Spirits survive and as I'm sure there are plenty of options out there.
The tank gears as good as they are to make your Spirits survive longer takes less priority than your core DPS gears. I suggest to build your tank gears last, and once you're done with your core DPS gears then that's the time to invest on these. The budget tank gears aren't as expensive as the high end tank gears and could serve as a side project if you really want to improve your Spirit's survivability much earlier.
Budget Tank Gears
| Type | Item | Notes |
|---|---|---|
| Upper | +11 or +10 to +12 |
|
| Middle |
| |
| Lower |
| |
| Armor | +12 or +12 |
|
| Weapon |
| |
| Shield | +11 to +12 |
|
| Garment | +11 or +11 |
|
| Shoe | +11 or +11 |
|
| Accessory (Right) |
| |
| Accessory (Left) |
|
The difference between Illusion Goibne set and the Snow Flower equipment has something to do with the bonuses they give. Illusion Goibne gives out more MaxHP and DEF, while Snow Flower equips give out more MDef. Whichever you deem more useful or necessary is up to you but as rule of thumb: always even out and balance your modifiers. This is something you'll be heeding to every time you build your character.
To obtain the Illusion Goibne set, you'll need to farm at Illusion of Luanda. Whereas, ![]() Illusion Silver Guard [1] (460018) is farmed at Illusion of Twins. Turning in the main board quests will reward you some
Illusion Silver Guard [1] (460018) is farmed at Illusion of Twins. Turning in the main board quests will reward you some ![]() Forgotten Heirloom (50001) and 15
Forgotten Heirloom (50001) and 15 ![]() Illusion Stone (25271) when completing any Illusion Dungeon board quests. I suggest you keep the Forgotten Heirlooms and bulk open them later for more chances of getting
Illusion Stone (25271) when completing any Illusion Dungeon board quests. I suggest you keep the Forgotten Heirlooms and bulk open them later for more chances of getting ![]() Blacksmith's Blessing (6635) . You will need the Illusion stones to enchant your Illusion Goibne set and Illusion Silver Guard; to do that, you'll need to talk to Illusion Enchanter NPC (prontera 91, 115) at Prontera (@go 0). For more details about Illusion enchanting, refer to this page. Another armor you can use is the
Blacksmith's Blessing (6635) . You will need the Illusion stones to enchant your Illusion Goibne set and Illusion Silver Guard; to do that, you'll need to talk to Illusion Enchanter NPC (prontera 91, 115) at Prontera (@go 0). For more details about Illusion enchanting, refer to this page. Another armor you can use is the ![]() VIT Soutane [1] (15399) , and pairs well with the Snow Flower equips for a good balance of DEF and MDef if you don't want to build the Illusion Goibne set. To enchant the soutane, you can the follow link here. When you choose VIT Soutane and the Snow Flower Garment/Boots over the Illusion Goibne Set, a headgear option available for you to use is the Bio 5 headgear
VIT Soutane [1] (15399) , and pairs well with the Snow Flower equips for a good balance of DEF and MDef if you don't want to build the Illusion Goibne set. To enchant the soutane, you can the follow link here. When you choose VIT Soutane and the Snow Flower Garment/Boots over the Illusion Goibne Set, a headgear option available for you to use is the Bio 5 headgear ![]() Old Wind Whisper [1] (18980) . This headgear and its enchants give an overall great boost in your Def and MDef. For more info on enchanting the Bio 5 headgear, check this page.
Old Wind Whisper [1] (18980) . This headgear and its enchants give an overall great boost in your Def and MDef. For more info on enchanting the Bio 5 headgear, check this page.
In order to get the ![]() Snow Flower Manteau [1] (480159) and
Snow Flower Manteau [1] (480159) and ![]() Snow Flower Boots [1] (470115) and enchant it, you will need to have access with Episode 19 . If up to this point you still haven't finished the Episodic quests, you can settle for Illusion Goibne in the meantime. After crafting
Snow Flower Boots [1] (470115) and enchant it, you will need to have access with Episode 19 . If up to this point you still haven't finished the Episodic quests, you can settle for Illusion Goibne in the meantime. After crafting ![]() Black Devil's Mask [1] (18603) , you'll need to slot it using the item
Black Devil's Mask [1] (18603) , you'll need to slot it using the item ![]() Spiritual Auger (6396) . You can buy this item in the Muh Shop for 4,500 Muh Points. An option for your lower headgear is the
Spiritual Auger (6396) . You can buy this item in the Muh Shop for 4,500 Muh Points. An option for your lower headgear is the ![]() Young Leaf of World Tree (Vitality) (420021) . It's dropped by the MVP in Fall of Glastheim, and you can use any of its variation; you're only after its enchants which is easily enchantable with
Young Leaf of World Tree (Vitality) (420021) . It's dropped by the MVP in Fall of Glastheim, and you can use any of its variation; you're only after its enchants which is easily enchantable with ![]() Enchant Ticket (1000874) . For more info on how to enchant Young Leaf, check this link.
Enchant Ticket (1000874) . For more info on how to enchant Young Leaf, check this link.
The right and left accessories ![]() Safety Pendant B [1] (32249) and
Safety Pendant B [1] (32249) and ![]() Safety Epaulet B [1] (32251) can be purchased from Field Manager Elmen NPC at (einbech 138, 249) right in front of Einbech Dungeon. To go here quickly, talk to the Warper NPC, choose Dungeons, pick Einbech Dungeon then just go outside of the map. He will ask 75
Safety Epaulet B [1] (32251) can be purchased from Field Manager Elmen NPC at (einbech 138, 249) right in front of Einbech Dungeon. To go here quickly, talk to the Warper NPC, choose Dungeons, pick Einbech Dungeon then just go outside of the map. He will ask 75 ![]() Dynite (25814) each in exchange for the accessories.
Dynite (25814) each in exchange for the accessories.
High End Tank Gears
| Type | Item | Notes |
|---|---|---|
| Upper | +12 to +15 |
|
| Middle |
| |
| Lower |
| |
| Armor | +12 to +15 [A] |
|
| Weapon |
| |
| Shield | +11 to +12 |
|
| Garment | +11 [A] |
|
| Shoe | +11 [A] |
|
| Accessory (Right) |
| |
| Accessory (Left) |
|
Okay so now you already got the zeny to be high-end and buy expensive tanking gears to make your Spirits survive longer? Well here are the BiS gears for that purpose!
![]() Temporal Circlet (Sorcerer) [1] (19483) can be obtained from Old Glast Heim: Challenge Mode. To know more details about the enchanting process and costs, click on the link. The
Temporal Circlet (Sorcerer) [1] (19483) can be obtained from Old Glast Heim: Challenge Mode. To know more details about the enchanting process and costs, click on the link. The ![]() Gambler's Seal [1] (410233) and
Gambler's Seal [1] (410233) and ![]() Ace of Clovers in Mouth (Defense) (420269) duo combo can be bought from Alice Twisted Madness instance and can be enchanted with
Ace of Clovers in Mouth (Defense) (420269) duo combo can be bought from Alice Twisted Madness instance and can be enchanted with ![]() Loki's Golden Coin (102676) and
Loki's Golden Coin (102676) and ![]() Loki's Advice (Defense) (102677) , respectively. To buy the enchant catalysts, talk to NPC Muzaszir (muh_market 169, 209) . He's located at the Muh Market (@go market).
Loki's Advice (Defense) (102677) , respectively. To buy the enchant catalysts, talk to NPC Muzaszir (muh_market 169, 209) . He's located at the Muh Market (@go market).
The ![]() Nebula Armor of Stamina [1] (450170) and
Nebula Armor of Stamina [1] (450170) and ![]() Stamina Signet of Star [1] (490133) can be obtained from the vending machine in front of the Constellation Tower instance and can be enchanted by talking to the enchanter NPC Azzam the Lucky (grademk 47, 181) (@go 50).
Stamina Signet of Star [1] (490133) can be obtained from the vending machine in front of the Constellation Tower instance and can be enchanted by talking to the enchanter NPC Azzam the Lucky (grademk 47, 181) (@go 50).
![]() Glade Rune Manteau [1] (480231) and
Glade Rune Manteau [1] (480231) and ![]() Glade Rune Boots [1] (470174) will be two (2) of your gears that would give enormous amount of MaxHP%. These gears can be farmed in Varmundt's Biosphere (Grass), and can be enchanted to the same NPC from earlier, Azzam the Lucky.
Glade Rune Boots [1] (470174) will be two (2) of your gears that would give enormous amount of MaxHP%. These gears can be farmed in Varmundt's Biosphere (Grass), and can be enchanted to the same NPC from earlier, Azzam the Lucky. ![]() Hero's Badge [1] (490163) is easily available and can be bought from vendors. Talk to Azzam the Lucky to enchant it.
Hero's Badge [1] (490163) is easily available and can be bought from vendors. Talk to Azzam the Lucky to enchant it.
Shadow Gears
| Type | Item | Notes |
|---|---|---|
| Shadow Armor | +10 |
|
| Shadow Weapon | +7 |
|
| Shadow Shield | +7 |
|
| Shadow Shoe | +10 |
|
| Shadow Earring (Right) | +10 |
|
| Shadow Pendant (Left) | +10 |
|
Same as with your high-end tank gears, the shadow gears for additional tanking values takes less priority and you have the option to skip them for now. You may revisit them once you're done with your core DPS gears. For more information regarding the listed Shadow Gears, check this page. To know more about Shadow Gear enchanting, visit this page or Choi's Guide to Magic.
Costume Enchant Stones
| Type | Item | Notes |
|---|---|---|
| Upper Costume |
| |
| Middle Costume |
| |
| Lower Costume |
| |
| Garment Costume |
|
The costume enchant stone combo ![]() VIT Convert Stone (Mid) (25006) +
VIT Convert Stone (Mid) (25006) + ![]() VIT Convert Stone (Low) (25008) grants a bit of VIT values for a moderate amount of +MaxHP% and remains optional and good if you can get a hands on them.
VIT Convert Stone (Low) (25008) grants a bit of VIT values for a moderate amount of +MaxHP% and remains optional and good if you can get a hands on them. ![]() Sorcerer Stone (Top) (1000672) and
Sorcerer Stone (Top) (1000672) and ![]() Minor Casting Stone (Garment) (25170) +
Minor Casting Stone (Garment) (25170) + ![]() Minor Casting Stone (Dual) (1000521) will supply the missing FCT reduction you will lose from some of your main gear equipment and would help with instant casting your summoning skills. For more info on where and how to get them, you can check this page.
Minor Casting Stone (Dual) (1000521) will supply the missing FCT reduction you will lose from some of your main gear equipment and would help with instant casting your summoning skills. For more info on where and how to get them, you can check this page.
Choosing Which High Elementals to Use for Each Content
Some High Elementals excel and perform better than the others in certain maps or areas. Here, I'll layout which High Elementals works best for different contents and explain as to why they're ideal to use on those. This is based on my experience and my recommendations, and if you prefer to use other High Elementals you may still do so.
| High Elementals | Notes | Content |
|---|---|---|
 |
|
|
 |
|
|
 |
|
|
 |
|
|
 |
|
|
 |
|
|
Insignia System
The insignias are an integral part of an Elemental Master's core gameplay, mechanics, and skill set. They impart offensive and defensive buffs to both the Elemental Master and Spirits, giving them strong advantage in fights against MVPs. They are divided into four (4) skills consisting of ![]() Fire Insignia,
Fire Insignia, ![]() Water Insignia,
Water Insignia, ![]() Wind Insignia, and
Wind Insignia, and ![]() Earth Insignia, each of which have three (3) levels that give different effects. On paper, insignias look complicated to understand but once you've broken down the utility for each one of them, you'll soon realize that they are actually pretty simple to understand. In most situations, insignias can only be realistically used in fights where your enemy only stands in one place such as MVP fights or boss fights. This is where the difficulty curve of the skills scales. Proper placement of insignias are important and knowing where and when to place them. It carefully needs patience, coordination, and setup and has a high skill requirement.
Earth Insignia, each of which have three (3) levels that give different effects. On paper, insignias look complicated to understand but once you've broken down the utility for each one of them, you'll soon realize that they are actually pretty simple to understand. In most situations, insignias can only be realistically used in fights where your enemy only stands in one place such as MVP fights or boss fights. This is where the difficulty curve of the skills scales. Proper placement of insignias are important and knowing where and when to place them. It carefully needs patience, coordination, and setup and has a high skill requirement.
Here, I will be explaining more in-depth the Insignia system and I hope at the end of this section you can finally start incorporating the insignias in your gameplay as an EM.
| INSIGNIAS | |||
|---|---|---|---|
Level 1:
Requires 1 |
Level 1:
Requires 1 |
Level 1:
Requires 1 |
Level 1:
Requires 1 |
Level 2:
Requires 2 |
Level 2:
Requires 2 |
Level 2:
Requires 2 |
Level 2:
Requires 2 |
Level 3:
Requires 3 |
Level 3:
Requires 3 |
Level 3:
Requires 3 |
Level 3:
Requires 3 |
What are Insignias & How to Use Them
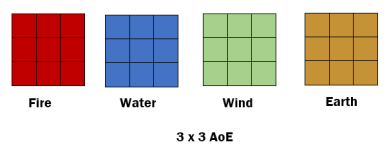
Okay, we'll be starting first with the actual area of effect (AoE) of insignias. All four insignias have an abysmal short AoE of 3x3, and they are not used in a normal field farming scenario. They are used practically in "long" MVP fights. When placing insignias underneath an MVP, you'll always have to consider the distance between you and the MVP. Since an insignia has a 3x3 AoE, you'd want the MVP to be as close to you as possible to maximize its AoE. Additionally, insignias are stationary and can't be freely readjusted unlike your LP since it has a 1 minute cooldown. In line with this, only one of each elemental insignia can be placed at a time and each level of the elemental insignias don't share the same cooldown. You'll have to decide which level of insignias you're gonna use. If you've placed your insignias on the wrong cell, you will have to wait for a minute before it's off CD so don't recklessly cast your insignias all over the place. There's also no visual indicator if an MVP is standing or affected by your insignias. Timing and strategic estimation are crucial in placing an insignia.
The elemental insignias are also divided into three (3) levels, each of which gives different buffs and debuffs. Level 1s are typically used to "debuff" the MVP standing on its AoE. Level 2s are for physical-oriented classes where they can stand on it to benefit from its "buffing effect" but that doesn't necessarily mean it can't be placed underneath the MVP too so you can maximize its "buffing effect" on you and its "debuffing effect" on the MVP (we'll talk more about what this is as we push through). Level 3s are for the magic-oriented classes and just like Level 2s, it can be placed both on you and the MVP to fully capitalize on the insignia's "buffing and debuffing effects."
Note: ANY units standing inside the insignias will benefit from its effects including monsters and MVPs.
Furthermore, insignias provide one of the strongest debuff in the game. Each insignia has the ability to boost the counter element no matter which level you use. For example, if you use ![]() Fire Insignia at any level, any units inside the insignias' 3x3 AoE will take 50% more damage against Water elemental attacks. If EMs are standing inside the Fire insignias' AoE, they, too, will receive increased damage against Water elemental attacks of the MVP. This rings true for the other elemental insignias. Okay this part is important, now if you use a Lvl. 2
Fire Insignia at any level, any units inside the insignias' 3x3 AoE will take 50% more damage against Water elemental attacks. If EMs are standing inside the Fire insignias' AoE, they, too, will receive increased damage against Water elemental attacks of the MVP. This rings true for the other elemental insignias. Okay this part is important, now if you use a Lvl. 2 ![]() Wind Insignia in a party because you have a melee class user and you plan on buffing him with its buffing effects (Endow weapon with the Wind property, +10% ASPD & +10% ATK), and since he is in melee range and you need to adjust so both of you stand inside Wind Insignia as well as the MVP and you have a
Wind Insignia in a party because you have a melee class user and you plan on buffing him with its buffing effects (Endow weapon with the Wind property, +10% ASPD & +10% ATK), and since he is in melee range and you need to adjust so both of you stand inside Wind Insignia as well as the MVP and you have a ![]() Water Insignia placed underneath both of you and the MVP; the MVP will also have its weapon element endowed to Wind which means his attacks will hit like a truck and could possibly kill you both since you two are standing on a Water Insignia. This could have been prevented if you just used a Lvl. 1 or Lvl. 3
Water Insignia placed underneath both of you and the MVP; the MVP will also have its weapon element endowed to Wind which means his attacks will hit like a truck and could possibly kill you both since you two are standing on a Water Insignia. This could have been prevented if you just used a Lvl. 1 or Lvl. 3 ![]() Wind Insignia instead and that way you could have avoided endowing the MVP's weapon to Wind. While a Lvl. 1 Wind Insignia has neutral effect on the three of you, a Lvl. 3 Wind Insignia would have boosted your Wind property magical skills like
Wind Insignia instead and that way you could have avoided endowing the MVP's weapon to Wind. While a Lvl. 1 Wind Insignia has neutral effect on the three of you, a Lvl. 3 Wind Insignia would have boosted your Wind property magical skills like ![]() Lightning Land and you would have even received +50% ACD on your Wind skills (just be sure that the MVP doesn't use any Wind skills or else he benefits from it too). Conversely, if you wanna tank Lasgand's basic attacks, and you happen to use Ardor on Lvl. 2
Lightning Land and you would have even received +50% ACD on your Wind skills (just be sure that the MVP doesn't use any Wind skills or else he benefits from it too). Conversely, if you wanna tank Lasgand's basic attacks, and you happen to use Ardor on Lvl. 2 ![]() Elemental Control (Defensive Mode) you can place a Lvl. 2
Elemental Control (Defensive Mode) you can place a Lvl. 2 ![]() Fire Insignia underneath Lasgand to forcibly endow his weapon attack to the Fire element so you can tank his hits head on.
Fire Insignia underneath Lasgand to forcibly endow his weapon attack to the Fire element so you can tank his hits head on.
So again, be mindful and strategic as to how you will place your insignias and which level of insignias you're gonna use.
Apart from those, each insignias also has the ability to heal or damage any unit by 1% HP every 5 seconds depending on their element. It will heal any units with the same element and damage any units with the opposite element. For example, if you have your High Elemental Terremotus endow your armor to the Earth property and you are standing on an Earth Insignia, you will heal 1% of your HP every 5 seconds. This goes both ways for the MVP too. If an Earth element MVP like Maya is standing on your ![]() Earth Insignia, she will also heal 1% of her HP, though this can be countered if you place a
Earth Insignia, she will also heal 1% of her HP, though this can be countered if you place a ![]() Fire Insignia, underneath her to nullify the healing effects of the elemental insignias. You can also use this effect for offensive measures too. If you're fighting a Fire element MVP like Ifrit, you can place
Fire Insignia, underneath her to nullify the healing effects of the elemental insignias. You can also use this effect for offensive measures too. If you're fighting a Fire element MVP like Ifrit, you can place ![]() Water Insignia underneath him so he'll get damaged over time by taking away 1% of his HP.
Water Insignia underneath him so he'll get damaged over time by taking away 1% of his HP.
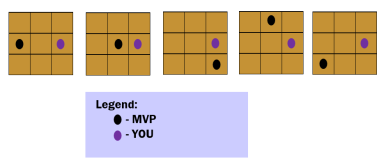
Insignias can be overlapped with one another and I mean all four (4) of them. When you want to benefit from all effects of the insignias, you must be standing at least in one of the three (3) cells available. It doesn't matter which cells you stand on so long as you and the MVP are within its AoE. Depending how far apart the MVP away from you, it's ideal you place the insignias you wanna use to purely debuff the MVP underneath him. If you plan to use an insignia both offensively and defensively, you can place it in the middle between you and the MVP so that way you are debuffing him and at the same time buffing yourself. Remember that some insignias give good effects for you too (i.e. Lvl. 3 ![]() Earth Insignia can give you +50 MDef and +25% Earth property magical damage like in the image above).
Earth Insignia can give you +50 MDef and +25% Earth property magical damage like in the image above).
Land Protector & Insignia Interaction
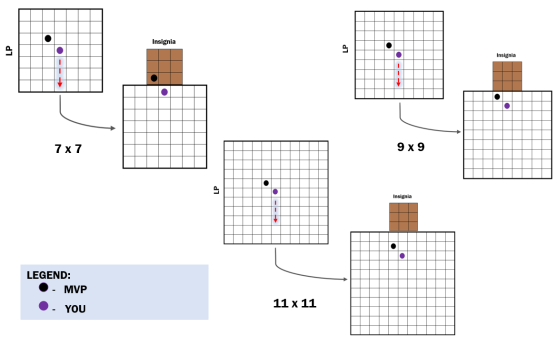
Now, let's talk about the interaction of insignias with Land Protector. Oftentimes, you will find yourself needing to place LP as a defensive layer to protect you and your Spirits from getting wiped out. But at the same time, you still want to place your insignias to speed up the fight. Well, you can do just that but it will require technique, patience, and a thorough understanding of the interaction between LP and Insignia. First, decide which level of LP you're gonna be using. If you still remember in the LP section of this guide, we've talked about how it's ideal to use Levels 1-2 LP when you're soloing instead of Levels 3-5. Well here, we're gonna be discussing the importance of one's mindful placement of LP.
In the image above, 11x11 LP despite adjusting the placement of LP three (3) cells below you, the MVP is still inside the AoE of your 11x11 LP which makes it impossible for you to put your insignias underneath the MVP. Meanwhile for the 9x9 LP after readjusting the LP three (3) cells below you, the MVP is still inside LP's AoE and you still can't place your insignias underneath the MVP. Now look on the 7x7 LP, after readjusting the LP three (3) cells below you the MVP is now outside of LP and finally you can safely place your insignias, but this is the maximum limit you can go for and one wrong estimation and adjustment of your LP can determine the fate of you and your Spirit.
With all of those things considered, having a leeway or freedom to carefully readjust LP is always the safest decision to do when you're in a rigid scenario. In such cases, you'd either be in a panic or in a rush that I am sure you won't have the time to count cells and accurately place your LP below you! What I'm trying to say now is, always think ahead and give yourself a bit of freedom to readjust your LP should you encounter problems such as this. 7x7 LP proves to be more flexible than 9x9 and 11x11 and 7x7 fulfills this condition in most scenarios. If you're in a party and you have a tank, let the the tank go outside the LP and let him be the meat shield, then you can use 11x11 or 9x9 to your heart's content. You have a party to protect so prioritize that and you have tank to get the aggro, and you have freedom to safely place your insignias underneath the MVP.
Gameplay
Skill Rotation
When playing Elemental Master, it's important to have a skill rotation cycle and you need to plan ahead of time when you're field farming, or doing instances to kill an MVP. Here I'll be listing the most commonly used skill rotation cycle that pro EMs use in their day-to-day farming sessions, and I'll be explaining each and one of them and there reasoning behind their sequencing.
I also recommend unlocking the Player commands: @lgp —> @square on —> @square 6 and then @circle. There should be blocks appearing around you in the form of a square and circle. These two (2) will serve as your guide with regards to the actual range of your skills. The circle is nine (9) cells away from you; the square is six (6) cells in all directions to represent ![]() Elemental Buster's 13x13 AoE around you. Anything that is within the range of the square will be in the range of your Elemental Buster. Whereas, the circle will serve as the maximum range you can cast your AoE skills from your position. These will be important when you're casting your skills so you'd know if you're hitting them and so that you can maximize your actual range.
Elemental Buster's 13x13 AoE around you. Anything that is within the range of the square will be in the range of your Elemental Buster. Whereas, the circle will serve as the maximum range you can cast your AoE skills from your position. These will be important when you're casting your skills so you'd know if you're hitting them and so that you can maximize your actual range.
Beginner
 Conflagration —>
  Venom Swamp —>
  Elemental Buster —>
  Lightning Land —> repeat
- When you're in the beginning stages of your journey as much as it will be for your gear progression, you still can't fully capitalize on your skill's best capabilities. You still don't have the proper gears to autocast your ultimate skill
 Elemental Buster for instance.
 - However, you can still do a skill rotation not necessarily revolving around autocasted Elemental Buster. You will still incorporate Elemental Buster though and you will manually cast the skill whenever it's off- CD. This is what I would like to call the Beginner skill rotation.
- In this skill rotation, you basically just spam all of your AoE DoT skills with the exception of Elemental Buster which is a self-casted skill around you. You start off with
 Conflagration, proceeded with
  Venom Swamp, followed by a manually casted
  Elemental Buster, and
  Lightning Land then you repeat the rotation back to Conflag.
 - By the time you repeat your skill rotation cycle, Elemental Buster is already off-CD and you get another chance to cast it. Remember that all your DoT skills and Elemental Buster have a 2 seconds CD, so keep that in mind when rotating your skills.
- I didn't include
 Psychic Stream here just yet since this one will require a bit more of practice and familiarization with the class and your core skills first before incorporating Psychic Stream into your skill cycle.
Casual Farming
 Conflagration —>
  Diamond Storm —>
  Venom Swamp AND/OR
  Lightning Land —>
  Diamond Storm —> repeat
 Lightning Land —>
  Terra Drive —>
  Venom Swamp AND/OR
  Conflagration —>
  Terra Drive —> repeat
- Already got your Dimensions combo? Great! Now you'll have lesser skills to include in your rotation. That's because the Dimensions combo
 Time Dimensions Rune Crown (Elemental Master) +
  Dimensions Elemental Magic Book lets you autocast
  Elemental Buster every time you cast
  Diamond Storm while
  Time Dimensions Rune Crown (Elemental Master) +
  Dimensions Elemental Spell Book lets you autocast Elemental Buster every time you cast
  Terra Drive so long as both combos are Grade A.
 - The main idea behind this specific skill rotation is to autocast Elemental Buster whenever you can and that mean whenever either Diamond Storm or Terra Drive is off-CD. Both DS and TD have 1 second cooldown and thus you can autocast your Elemental Buster every other second.
- You will start with your 1st DoT skill like
 Conflagration (DS combo) or
  Lightning Land (TD combo). Proceed that with either DS or TD to autocast Elemental Buster. Now while DS and TD is on CD, you have the option to cast another DoT of your choice. It's up to you if you want to cast either
  Venom Swamp or
  Conflagration and/or
  Venom Swamp or
  Lightning Land next. If you have enough ACD, you could just use both skills before DS or TD goes off-CD. I recommend at least 60% ACD for a fluid skill cycle.
DPS
 Conflagration —>
  Diamond Storm —>
  Lightning Land —>
  Venom Swamp —>
  Diamond Storm —> repeat
 Lightning Land —>
  Venom Swamp —>
  Terra Drive —>
  Conflagration —>
  Terra Drive —> repeat
- You must wondering why this part got so many skills all of a sudden but that's because this is the part where you will actually do real DPS. This is when you have all set-ups (i.e. insignias, and elemental floor buffs) considered. You don't really do DPS when farming; you burst them to smithereens.
- When setting up your insignias and elemental floor buffs, it'll be up to you how you'll place them after knowing the basics of what we've discussed from the previous sections. The only key essential part that distinguished this particular rotation is because of the skill Lvl. 3
 Wind Insignia. When underneath a Lvl. 3 Wind Insignia, you get +50% ACD reduction on all of your Wind skills such as
  Lightning Land and this gives you freedom to cast another one of your DoT skills such as
  Venom Swamp, and I'll have to stress VS specifically. I'll explain as to why. But yes, it's as if you casted another skill with like zero (0) delay or global delay thanks to that nifty +50% ACD redux.
 - Now if you're wondering why VS specifically that's because for the DS combo, you would want
 Conflagration to be on CD first so that by the time you go back to it after doing your sequenced skill rotation it's already off-CD AND it gets skill modifiers for the DS combo so it hits harder than LL. You want Conflag to be laying on the ground doing damage as you sequence your skills. Meanwhile for the TD Combo, Conflag doesn't get too many skill modifiers only from the
  Time Dimensions Rune Crown (Elemental Master) (only up to 15% assuming your crown is +15). And in this combo, VS gets more skill modifiers than Conflag so what you do is you cast your LL first, proceed to VS then TD with proced autocasted Elemental Buster then Conflag then back to TD with proced autocasted Elemental Buster and then go back to LL. Rinse and repeat.
Casual Farming with Psychic Stream
 Psychic Stream —>
  Diamond Storm —>
  Conflagration —>
  Diamond Storm —>
  Venom Swamp AND/OR
  Lightning Land —>
 Diamond Storm —> repeat
 Psychic Stream —>
  Terra Drive —>
  Lightning Land —>
  Terra Drive —>
  Venom Swamp AND/OR
  Conflagration —>
  Terra Drive —> repeat
- This sequence of skills is almost identical to the Casual farming rotation—only this time
 Psychic Stream is incorporated in your skill rotation and that will specifically be followed by either
  Diamond Storm or
  Terra Drive, both accompanied by autocast
  Elemental Buster as you do field farming.
 - Psychic Stream is a gap closer skill that will blink you towards a monster or a horde of them. When that happens, you might think it's like a suicide dive especially for a magic class such as EM. Well remember when I told you that Elemental Buster possesses a CC effect? That will come into play here.
- When you're surrounded by mobs as you dash with Psychic Stream, your answer to them is Elemental Buster. CC them AND damage them, don't ever give them a reaction time to respond. You will proceed that with one of your DoT skills like
 Conflagration (DS combo) or
  Lightning Land (TD Combo) then back to DS or TD autocasting Elemental Buster.
 - I also recommend putting your hotkey on smartcast for Psychic Stream in case you're not yet used to aiming Psychic Stream. For more info on how to set-up your turbo, follow this link.
Double Book
 Diamond Storm —>
  Dimensions Elemental Spell Book —>
  Terra Drive —>
  Dimensions Elemental Magic Book —> repeat
 Terra Drive —>
  Dimensions Elemental Magic Book —>
  Diamond Storm —>
  Dimensions Elemental Spell Book —> repeat
- If you happen to have both books and you're good at micromanaging, then this skill rotation could be for you. The main idea here is you would want to abuse the book's combo with
 Time Dimensions Rune Crown (Elemental Master) which lets you autocast
  Elemental Buster to your heart's content every time you cast
  Diamond Storm or
  Terra Drive. Though instead of only focusing on one (1) book, you'll be using both. Whether you cast DS or TD first won't matter as you'll only rotate between these two (2) skills and no other skills anymore.
 - First, you would want to designate four (4) hotkeys for your skills and books each close in proximity similar to this one

- As an example, let's say I reserved hotkeys 1–2–Q–W for DS–TD–Magic Book–Spell Book, respectively. I will press Hotkey 1 first to cast DS then switch to Spell Book by pressing Hotkey W. After which, I will cast TD then press my Hotkey Q to equip my Magic Book and then press Hotkey 1 to cast DS again. Keep repeating this 'til you fully master switching books. I myself am not good with micromanaging the Hotkeys that's why I don't use this skill rotation often despite owning the two (2) books. If you're fast with your fingers, then this skill rotation may just be for you.
Sample Clip

Note: I plan to add more visual aids such as GIFs in this section to exemplify how a proper skill rotation should be, but as of the moment I lack the knowledge how to make GIFs with better quality. It'll be a work in progress (WIP) for now. Hopefully soon though!
Stats & Traits Allocation
The status points and trait points allocation I'll be providing here are subjective and may vary per individual or user. If you feel and think you want a change of course, you may very well do so and I'll do my best to explain what are the important stats and trait you need to put more pts. on. For a much detailed info regarding stats and traits, check this page.
Stats
| Stat | Point | Notes |
|---|---|---|
| STR | 1 |
|
| AGI | 86 |
|
| VIT | 110 |
|
| INT | 130 |
|
| DEX | 0 or 130 |
|
| LUK | 4 |
|
Traits
| Traits | Point | Notes |
|---|---|---|
| POW | 0 | N/A |
| STA | 0 |
|
| WIS | 72 |
|
| SPL | 110 |
|
| CON | 110 |
|
| CRT | 0 | N/A |
Recommended Stats & Traits
| Instant Cast via Stats |
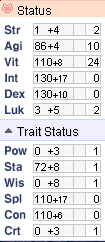 |
|---|---|
| Instant Cast via Gears (VCT%) |
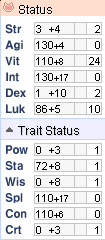 |
| Farming Build (VCT%) |
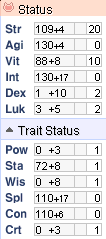 |
Leveling
For leveling, I won't be going too much into detail on this one, as there are already other guides out there that break it down thoroughly and served a complete input on where to farm best for each leveling stages. Yvonne's Guide and Choi's Guide listed all the important dungeons where people can casually level up their characters from Levels 1-99, 100-200, and 200-275. You can follow their guides as you start the leveling phase of the game. Altogether with what we've talked about regarding the class particularly on the Magician and Sorcerer sections, you can apply all of these when leveling up. I'll just go make a brief summary to refresh your recollection and give out tips on how to level up as a Mage transitioning to Sage 'til Professor, and as a Sorcerer transitioning to an Elemental Master.
Leveling as a Mage / Sage / Professor
- The first thing I need to remind you when leveling up is do not worry if you mistakenly put skill points to the wrong skills. We have Build Manager NPC Lotus (main_office 122, 169) that could reset your skill tree anytime with a very affordable cost of 5,000 zeny. And while leveling up, you will want to allocate skill points to leveling skills such as
 Fire Ball and
  Fire Wall. These two skills is what you will use as a Mage, a Sage, as a High Magician, and as a Professor. These two skills will 2-3 hits mobs in the leveling dungeons, thanks to the Eden Gears we have available.
 - To learn more about the Eden Gears, more info are provided here. Don't forget to take the Eden Board quests every time you level up on a certain level range.
- Once you've transitioned to Sage, don't forget to go back to the Eden Office and get your 2nd job weapon from NPC Labraham (moc_para01 108, 83).
- In Yvonne's guide, she didn't include Glast Heim Monastery for Level 80-99 but I'd suggest you level up here instead right after Orc Dungeon. This place is perfect for classes coming from the Mage branch as mobs here are weak against the Fire element.
- After rebirthing, follow your same routine leveling up as a Mage 'til you've reached Professor then eventually Sorcerer.
- Upon reaching 3rd job, you must first collect your Advanced Paradise Gears from NPC Louis (eden 108, 87) and NPC Labraham (moc_para01 108, 83) before continuing your leveling grind. Choi made a brief description in this section of his guide on where to farm the required materials you will need to turn-in for the Advanced Paradise Gears.
Leveling as a Sorcerer
- Now you're finally a Sorcerer, you now have more AoE skills but all of them are gated behind 5 seconds cooldown each. You have three (3) options:
- If you're new to the class and you have barely to zero resources and you don't have any friends, take the hard route of leveling up with all your skills. It may be slow but at least you'll be able to practice how to properly rotate your skills. As a Sorcerer, you are always harder to die. Why? Well because you have your own lil' Ventus to accompany you. Make sure you have
 Wind of Verdure (992) before attempting to summon our baby Ventus. You can purchase some Wind of Verdures from Dus the Smith NPC (@go 40) (paramk 53, 101) for 10,000 zeny per piece. For suggested farming areas for elemental ores such as the Wind of Verdures, refer to this section. Summon the Child form of Ventus by using the skill Lvl. 1
  Summon Ventus, and place him on Defensive Mode by using the skill Lvl. 2
  Elemental Control, and voila! You now have your own source of free
  Guyak Pudding (12710) + 50% FLEE Rate. You will survive even the most treacherous dungeons for leveling up. Just make sure to replenish Ventus' SP using the skill
  Elemental Cure every now and then since he will exit Defensive Mode if he rans out of Mana and you will lose your benefits. Putting some skill points to
  Elemental Sympathy would also help with your Ventus' sustain. One spell you could incorporate is the CC skill
  Extreme Vacuum. Root mobs with Extreme Vacuum then cast your AoE skills to them. You have at least five forms of defense in this manner—Ventus' Wind Step, Extreme Vacuum's root CC effect,
  Psychic Wave's hit-locking effect,
  Diamond Dust's crystallization, and
  Varetyr Spear's stuns; if you'll always have
  Energy Coat activated then I guess you can count that as six forms of defense then. Keep leveling up 'til you reach Elemental Master.
- Worry about the proper skill points allocation for later and maximize your AoE skills first so you could farm. Priority of skills as you level up:
- If you're new to the class and you have barely to zero resources and you don't have any friends, take the hard route of leveling up with all your skills. It may be slow but at least you'll be able to practice how to properly rotate your skills. As a Sorcerer, you are always harder to die. Why? Well because you have your own lil' Ventus to accompany you. Make sure you have
 Psychic Wave >
  Diamond Dust > Lvl.1
  Summon Ventus > Lvl.2
  Elemental Control >
  Elemental Cure >
  Extreme Vacuum >
  Earth Grave >
 Varetyr Spear >
  Elemental Sympathy
- At maximum level, your Extreme Vacuum will have a duration of 12 seconds and it is possible to summon two (2) Vacuums at the same time. Cast Extreme Vacuum whenever you would lure and horde mobs so they'll get rooted and you can safely cast your AoE skills unto them. Only cast Vacuum when it's necessary or you deem fit in the situation since it has a 5 seconds CD and not every time it'll be available for you to use; on times it is on CD, you can just kite the mobs with your skills. That being said, your skill rotation for your Sorcerer skills could go something like this:
 Extreme Vacuum (as needed) —>
  Psychic Wave —>
  Diamond Dust —>
  Earth Grave —>
  Varetyr Spear —> repeat
- Now secondly if this isn't your first character and you have some zeny to spare and you wanna ease the suffering part of leveling as a Sorcerer, you could purchase leveling up gears such as the
 Shadow Staff [2] (26118) or its enhanced version
  Patent Shadow Staff [2] (550012) . Buy whichever is available in the market, both will reduce
  Psychic Wave's CD by 1 second at +11. To further reduce its CD, you can purchase the costume enchant stones
  Professor Stone (Low) (25419) +
  Sorcerer Stone (Garment) (25420) that reduce its cooldown by another 2 seconds. In total, you'll have 3 seconds CD reduction for PW and it'll be left with 2 seconds CD. It still have a bit of CD but PW is gonna be your main skill leveling up and the frequent you get to use it the better. I still suggest following the priority of skills that I had recommended and the skills in your rotation will be reduced as you will primarily cast PW whenever it's off-CD.
 - Third and final option is to find a good soul to leech you all the way to Elemental Master. As an act of courtesy, at least provide an
 Infinite Giant Fly Wing Box (30min) (17608) [GFW] to the leecher and I'm pretty sure by this point you have collected enough
  Muh Coin (50000) either from opening
  Forgotten Heirloom (50001) or daily log-in rewards. You can purchase a GFW from the Muh Coin shop. You'll need to exchange 18 Muh Coins for 180 Muh Points. To do this, talk to the Rich Cow NPC (main_office 87, 59) in the Main Office (go 50).
Leveling as an Elemental Master
- Finally after a millennia, you're now an Elemental Master! Congrats! It's now easier to level up with your 4th skills. Get any of your 4th Job AoE skill and you'll do just fine leveling up. If you're curious as to what and how's the proper way to play EM and rotating your skills, go to this section of the guide.
Gear Progression
Generally, magical classes follow the same path of progression, and they only differ with their choice of weapon, and upper headgear. Choi has made a thorough guide for all things about a magical user's progression towards end game and it is honestly commendable. In this guide, we'll be focusing more on the Elemental Master's side of progression with core gears that an EM would need for leveling during the early stages of the game to its mid game and then finally end game. This section will also be told for the perspective of people new to the game and if this happens to be your 2nd or 3rd time to play a magic-based character then you can freely switch some of the gear recommendations per stages or skip that stage entirely.
The gears that will be listed under the early game section are those that will be used for early leveling. Early game gears will be divided into three (3) subcategories: Part I , Part II , and Part III. In Part I, you begin your gear progression with the Advanced Paradise Set you used for leveling as a Sorcerer and you are expected to do the Episodic Quests. With the Grace set you had just gotten from Episode 17.1, you will be farming for raw zeny mostly in places like Thanatos Tower Flr. 12, while doing the quests for Episode 17.2 and Episode 18 to get you ready for the next set of gears for Part II. Most of the gears here are obtained from Episode 17.2 and Episode 18, that's why the sooner you finish the episodic quests the closer you approach Part II of early game progression. Part II routine is almost similar to Part I where you will again farm for zeny to gear yourself up. Upon reaching Part III of gear progression, this is where you'll start to craft gears which you will continue to use 'til late game such as ![]() Dimensions Elemental Magic Book [2] (540079) and
Dimensions Elemental Magic Book [2] (540079) and ![]() Moan of Corruption [1] (470204) . You'll also be able to start farming popular dungeons such as Niflheim 2 and Clock Tower Unknown Basement.
Moan of Corruption [1] (470204) . You'll also be able to start farming popular dungeons such as Niflheim 2 and Clock Tower Unknown Basement.
In the mid game section, these are the gears that you should have gotten as you gradually do the remaining episodic quests and farm for resources such as ![]() Zelunium (25731) ,
Zelunium (25731) , ![]() Shadowdecon (25729) and
Shadowdecon (25729) and ![]() Etel Dust (1000322) that you will need to build up your core gears for the end game stage. Mid game gears will also serve as the base gears that will let you farm certain areas where those aforementioned resources are dropped such as Mjolnir Underground Cave and Varmundt's Biosphere.
Etel Dust (1000322) that you will need to build up your core gears for the end game stage. Mid game gears will also serve as the base gears that will let you farm certain areas where those aforementioned resources are dropped such as Mjolnir Underground Cave and Varmundt's Biosphere.
Once you have accumulated enough resources to improve on your gears, this is now the stage where you're nearing or approaching end game. This is now the part where you can finally start farming end game dungeons and instances such as Varmundt's Biosphere Depth, Varmundt's Biosphere Depth 2, Constellation Tower, or The Immortal either on your own accord or with a party. This is also the part where all the best in slot (BiS) gears for EM will be listed and be provided. Gears in this section are those that have been tested by me and are the gears that give out the strongest damage output for the class. I know most of you are only after this part and it's understandable, but I still do hope you reached this part of the guide after reading the vital pieces of information on what makes Elemental Master, as I cannot stress enough how overwhelming and complicated the class can be for the majority of the player base. That all aside, let's start on the different gear progressions.
Early Game
Part I
| Type | Item | Notes |
|---|---|---|
| Upper | +9 to +10 |
|
| Middle | or |
|
| Lower |
| |
| Armor | +9 |
|
| Weapon |
| |
| Shield | +9 to +10 |
|
| Garment | +9 |
|
| Shoe | +9 |
|
| Accessory (Right) |
| |
| Accessory (Left) |
|
In this stage of gear progression, you are in the beginning stages of gearing. With the gears you have, they are good enough to get you through as you start to do the Episodic Quests starting from Episode 17.2. To start Episode 17.2, you first need to clear Episode 17.1, and if you don't care for the lore of the game you can skip 17.1 and buy its skip ticket. You can purchase ![]() Episode 17.1 Clear Ticket (1000285) from Temporal Tina NPC (main_office 94, 59) in the main office (@go main) for 2,000,000 zeny.
Episode 17.1 Clear Ticket (1000285) from Temporal Tina NPC (main_office 94, 59) in the main office (@go main) for 2,000,000 zeny.
With the Advanced Paradise Eden gears you obtained during the leveling phase, you can still use them to farm ![]() Unknown Parts (25669) and
Unknown Parts (25669) and ![]() Cor Core (25723) from mobs in Rudus Flr. 2 (sp_rudus2 185, 258). If you don't like farming for them, you also have the option to buy them from vendors since they aren't too costly to begin with anyway . After getting the required materials to buy your Grace set, you can use
Cor Core (25723) from mobs in Rudus Flr. 2 (sp_rudus2 185, 258). If you don't like farming for them, you also have the option to buy them from vendors since they aren't too costly to begin with anyway . After getting the required materials to buy your Grace set, you can use ![]() Grace Refine Ticket (100130) to upgrade them to +9. Afterwards, you can start doing the Thanatos Tower quest so you can start farming for zeny in Flr. 12 to get you ready for the next upgrade in your gears. For more information regarding areas where you can farm zeny, you can check Choi's Prerenewal Guide to Renewal (Zeny Farming).
Grace Refine Ticket (100130) to upgrade them to +9. Afterwards, you can start doing the Thanatos Tower quest so you can start farming for zeny in Flr. 12 to get you ready for the next upgrade in your gears. For more information regarding areas where you can farm zeny, you can check Choi's Prerenewal Guide to Renewal (Zeny Farming).
When refining ![]() Illusion Morpheus's Hood [1] (19428) and
Illusion Morpheus's Hood [1] (19428) and ![]() Illusion Silver Guard [1] (460018) and to all succeeding Lvl. 1 Armors and Lvl. 4 Weapons, I suggest you use refinement tickets as this will safely refine your equipment according to the level of the refinement ticket you have. Exchange the tickets to Refine Master NPC (prontera 189, 175) at Prontera (@go 0). You'll need to have your weapon and armor equipped before he refines them for you. For more info, refer to these pages: Quick Newbie Guide and Choi's Prerenewal Guide to Renewal (Refining).
Illusion Silver Guard [1] (460018) and to all succeeding Lvl. 1 Armors and Lvl. 4 Weapons, I suggest you use refinement tickets as this will safely refine your equipment according to the level of the refinement ticket you have. Exchange the tickets to Refine Master NPC (prontera 189, 175) at Prontera (@go 0). You'll need to have your weapon and armor equipped before he refines them for you. For more info, refer to these pages: Quick Newbie Guide and Choi's Prerenewal Guide to Renewal (Refining).
The free Paradise Shadow Gears ![]() Paradise Shadow Weapon (24687) ,
Paradise Shadow Weapon (24687) , ![]() Paradise Shadow Shield (24688) ,
Paradise Shadow Shield (24688) , ![]() Paradise Shadow Armor (24689) ,
Paradise Shadow Armor (24689) , ![]() Paradise Shadow Shoes (24690) ,
Paradise Shadow Shoes (24690) , ![]() Paradise Shadow Earring (24691) , and
Paradise Shadow Earring (24691) , and ![]() Paradise Shadow Pendant (24692) are still gonna be useful and you can continue using them 'til Part III of the early game stage. As you continue your progress, you are also expected to gradually work on the Shadow Gears listed in this section as you collect resources to craft them.
Paradise Shadow Pendant (24692) are still gonna be useful and you can continue using them 'til Part III of the early game stage. As you continue your progress, you are also expected to gradually work on the Shadow Gears listed in this section as you collect resources to craft them.
Part II
| Type | Item | Notes |
|---|---|---|
| Upper | +11 |
|
| Middle | or |
|
| Lower |
| |
| Armor | +12 |
|
| Weapon | +9 |
|
| Shield | +11 |
|
| Garment | +11 |
|
| Shoe | +11 |
|
| Accessory (Right) |
| |
| Accessory (Left) |
|
At this stage, you ought to purchase the ![]() Grey Wolf Robe [1] (450178) after doing Episode 18. By finishing the Episode 18 quests, you are given a generous amount of
Grey Wolf Robe [1] (450178) after doing Episode 18. By finishing the Episode 18 quests, you are given a generous amount of ![]() Amethyst Fragment (1000405) for you to get 1. To farm more of these fragments, you can go to Oz Dungeon Flr. 2 so you can determinedly enchant your Robe with
Amethyst Fragment (1000405) for you to get 1. To farm more of these fragments, you can go to Oz Dungeon Flr. 2 so you can determinedly enchant your Robe with ![]() Wolf Orb (Shadow Spell) (310532) ,
Wolf Orb (Shadow Spell) (310532) , ![]() Wolf Orb (After Cast Delay) (310515) , and
Wolf Orb (After Cast Delay) (310515) , and ![]() Wolf Orb (Mage) Lv.2 (310507) . ACD is chosen over
Wolf Orb (Mage) Lv.2 (310507) . ACD is chosen over ![]() Wolf Orb (Mage) Lv.3 (310510) since EM is a rotation-heavy class and having more ACD would help you cycle your skills fluidly. About 60% ACD is needed in total if you wanna optimize it.
Wolf Orb (Mage) Lv.3 (310510) since EM is a rotation-heavy class and having more ACD would help you cycle your skills fluidly. About 60% ACD is needed in total if you wanna optimize it.
The boots ![]() Automatic Leg Type B [1] (470023) is obtained from Episode 17.2 and will be enchanted with
Automatic Leg Type B [1] (470023) is obtained from Episode 17.2 and will be enchanted with ![]() Automatic Orb (Spell Buster) (310122) ,
Automatic Orb (Spell Buster) (310122) , ![]() Automatic Orb (Lucky Strike) (310126) ,
Automatic Orb (Lucky Strike) (310126) , ![]() Automatic Modification Orb (Fixed Casting) (310111) . You would need Automatic modules for it so you can enchant the boots. For more details on how to obtain the boots and how to enchant them, check the given links.
Automatic Modification Orb (Fixed Casting) (310111) . You would need Automatic modules for it so you can enchant the boots. For more details on how to obtain the boots and how to enchant them, check the given links.
Another good improvement for your damage is the weapon ![]() Glacier Book (540049) . The recommended enchants
Glacier Book (540049) . The recommended enchants ![]() Glacier Flower Spell (Magical-Element) (311353) ,
Glacier Flower Spell (Magical-Element) (311353) , ![]() Glacier Flower Spell (Magical-Size) (311351) ,
Glacier Flower Spell (Magical-Size) (311351) , ![]() Glacier Flower Spell (Magical-Race) (311349) , and
Glacier Flower Spell (Magical-Race) (311349) , and ![]() Glacier Flower Spell (Magical-Race) (311349) work best when enchanted on a
Glacier Flower Spell (Magical-Race) (311349) work best when enchanted on a ![]() Glacier Staff (640033) , but then you will lose
Glacier Staff (640033) , but then you will lose ![]() Illusion Silver Guard [1] (460018) in your shield slot which helps you reach instant cast and fast casting is important for every magical class so I don't recommend enchanting on a Two-Hand staff.
Illusion Silver Guard [1] (460018) in your shield slot which helps you reach instant cast and fast casting is important for every magical class so I don't recommend enchanting on a Two-Hand staff.
Another piece of equipment you'll need to craft is the ![]() Convertible Magical Wing [1] (480125) which will help you get through most stages and you'll still be using this one 'til Mid Game so it's worth the hassle of crafting one. For more info on how to craft it, check this page. The Sinful accessories
Convertible Magical Wing [1] (480125) which will help you get through most stages and you'll still be using this one 'til Mid Game so it's worth the hassle of crafting one. For more info on how to craft it, check this page. The Sinful accessories ![]() Sinful Sapphire Ring [1] (490052) and
Sinful Sapphire Ring [1] (490052) and ![]() Sinful Sapphire Necklace [1] (490053) can be obtained from Thanatos Tower, and can be enchanted using
Sinful Sapphire Necklace [1] (490053) can be obtained from Thanatos Tower, and can be enchanted using ![]() Piece of Sin (1000257) . As you farm for raw zeny in Thanatos Flr. 12, you can exchange the fragments you loot there for Pieces of Sin and use them for enchanting. More info on how to enchant the accessories here.
Piece of Sin (1000257) . As you farm for raw zeny in Thanatos Flr. 12, you can exchange the fragments you loot there for Pieces of Sin and use them for enchanting. More info on how to enchant the accessories here.
If you're looking to slightly improve your Shadow Gears, you have the option to buy or rent the Advanced Paradise Shadow Gears from NPC Lucy (moc_para01 108, 91) (@go eden) using the currency ![]() Eden Coin (25223) . To farm Eden Coins, I suggest you start in Abyss Lake 4 and once you gain access to 17.2 Varmundt, you can transfer to Second Power Plant to farm Eden Coins much efficiently. The Advanced Paradise Shadow Gears consisting of
Eden Coin (25223) . To farm Eden Coins, I suggest you start in Abyss Lake 4 and once you gain access to 17.2 Varmundt, you can transfer to Second Power Plant to farm Eden Coins much efficiently. The Advanced Paradise Shadow Gears consisting of ![]() Sorcerer Advanced Paradise Shadow Weapon (24705) ,
Sorcerer Advanced Paradise Shadow Weapon (24705) , ![]() Advanced Paradise Shadow Shield (24693) ,
Advanced Paradise Shadow Shield (24693) , ![]() Advanced Paradise Shadow Armor (24694) ,
Advanced Paradise Shadow Armor (24694) , ![]() Advanced Paradise Shadow Shoes (24695) ,
Advanced Paradise Shadow Shoes (24695) , ![]() Advanced Paradise Shadow Earring (24696) , and
Advanced Paradise Shadow Earring (24696) , and ![]() Advanced Paradise Shadow Pendant (24697) offer a slight increase in damage and 15% more ACD, but gives 5% less VCT than your free Paradise Shadow Gears.
Advanced Paradise Shadow Pendant (24697) offer a slight increase in damage and 15% more ACD, but gives 5% less VCT than your free Paradise Shadow Gears.
Part III
| Type | Item | Notes |
|---|---|---|
| Upper | +9 [D] or [C] OR +9 to +10 [C] |
|
| Middle | or |
|
| Lower |
| |
| Armor | +12 |
|
| Weapon | +9 to +10 [C] or +9 to +10 [C] |
|
| Shield | +11 |
|
| Garment | +11 |
|
| Shoe | +11 [C] |
|
| Accessory (Right) |
| |
| Accessory (Left) |
|
You are now approaching Mid Game and there are core gears you can make as early as now as it's easy to make one and cheap to get. The books ![]() Dimensions Elemental Magic Book [2] (540079) and
Dimensions Elemental Magic Book [2] (540079) and ![]() Dimensions Elemental Spell Book [2] (540080) can be purchased from vendors for an affordable price or if there's a lack of supply you can ask any Depth 2 farmers to
Dimensions Elemental Spell Book [2] (540080) can be purchased from vendors for an affordable price or if there's a lack of supply you can ask any Depth 2 farmers to donate sell you one. You can start grading and refining these books. When refining, make sure to use ![]() Dimensions Weapon Refinement Device (102668) starting from +9. Don't start grading 'til the books are +11 for a higher chance of success.
Dimensions Weapon Refinement Device (102668) starting from +9. Don't start grading 'til the books are +11 for a higher chance of success.
One other core gear you need to craft is the ![]() Moan of Corruption [1] (470204) . MoC gets stronger as you grade it, but at this stage of the progression you must grade it to at least Grade C so you get 1 second FCT redux. With more FCT redux, you can ditch
Moan of Corruption [1] (470204) . MoC gets stronger as you grade it, but at this stage of the progression you must grade it to at least Grade C so you get 1 second FCT redux. With more FCT redux, you can ditch ![]() Cast Stone (Garment) (25067) and use the
Cast Stone (Garment) (25067) and use the ![]() Elemental Master Stone (Garment) (1001420) instead for more damage improvement.
Elemental Master Stone (Garment) (1001420) instead for more damage improvement.
![]() Vesper Headgear [1] (400111) is another piece of equipment you will need to craft. I don't recommend committing too much on this headgear as this will not be your end game headgear but it is for other classes such as our cousins the Arch Mages. While this headgear only acts as a placeholder, it still imparts a strong increase in damage. Having on Grade D is okay to have but better if you can get Grade C. You can always resell it later don't worry.
Vesper Headgear [1] (400111) is another piece of equipment you will need to craft. I don't recommend committing too much on this headgear as this will not be your end game headgear but it is for other classes such as our cousins the Arch Mages. While this headgear only acts as a placeholder, it still imparts a strong increase in damage. Having on Grade D is okay to have but better if you can get Grade C. You can always resell it later don't worry.
*When you know someone close or you know somebody in the community whom you could trust, you could ask them for a favor to craft the ![]() Time Dimensions Rune Crown (Elemental Master) [1] (400536) as early as now for you. You will just need to provide them the materials consisting of 50 pcs.
Time Dimensions Rune Crown (Elemental Master) [1] (400536) as early as now for you. You will just need to provide them the materials consisting of 50 pcs. ![]() Abyss Magic Jewel (1001552) , 50 pcs.
Abyss Magic Jewel (1001552) , 50 pcs. ![]() Time Dimension Magic Jewel (1001553) , and 75 pcs.
Time Dimension Magic Jewel (1001553) , and 75 pcs. ![]() Temporal Gemstone (25865) to craft you one. The magic jewels are drops from the Varmundt's Biosphere Depth 2 dungeon, but it can be bought from vendors in the market. On the other hand, the temporal gemstone is obtained in Old Glast Heim: Challenge Mode, but you will need higher progression of the instance before it starts dropping so it's highly advisable to just buy from vendors as well.
Temporal Gemstone (25865) to craft you one. The magic jewels are drops from the Varmundt's Biosphere Depth 2 dungeon, but it can be bought from vendors in the market. On the other hand, the temporal gemstone is obtained in Old Glast Heim: Challenge Mode, but you will need higher progression of the instance before it starts dropping so it's highly advisable to just buy from vendors as well.
Mid Game
| Type | Item | Notes |
|---|---|---|
| Upper | +9 to +10 [C] OR +10 to +11 [A] |
|
| Middle | or |
|
| Lower |
| |
| Armor | +12 |
|
| Weapon | +12 [A] or +12 [A] |
|
| Shield | +10 to +11 [C] |
|
| Garment | +12 or +9 to +10 [C] |
|
| Shoe | +9 to +10 [A] |
|
| Accessory (Right) |
| |
| Accessory (Left) |
|
Mid Game is the start where you can finally farm comfortably and considerably well on popular farming maps. You should also be finished with Episode 19 or 20 by this point and you ought to get better gears now such as ![]() Glacier Guard [1] (460040) . While this shield takes less priority than your other gears, it is fairly cheap to get and enchant. It only costs 100
Glacier Guard [1] (460040) . While this shield takes less priority than your other gears, it is fairly cheap to get and enchant. It only costs 100 ![]() Sacred Cat Whiskers (1001217) to buy one; same with enchanting it. To know more about the enchanting costs, check this page.
Sacred Cat Whiskers (1001217) to buy one; same with enchanting it. To know more about the enchanting costs, check this page.
Technically, it's not supposed to be your first exposure to Varmundt and its Biospheres since you can access it as early as you gain access to Episode 17.2 but at the current state of your gears at the time you can't farm in those areas just yet. But now that you do, you can now start upgrading your accessories to ![]() Temple Magic Ring [1] (490307) and
Temple Magic Ring [1] (490307) and ![]() Temple Rune Ring [1] (490304) . You would need to reform two (2) copies of
Temple Rune Ring [1] (490304) . You would need to reform two (2) copies of ![]() Varmundt Temple Rune Ring [1] (490301) first. They give good increase in damage so farm for them as soon as you are able to. For more info on their enchants, check this page. As stated on the table, you need not to aim for the
Varmundt Temple Rune Ring [1] (490301) first. They give good increase in damage so farm for them as soon as you are able to. For more info on their enchants, check this page. As stated on the table, you need not to aim for the ![]() Brilliant Biosphere Gem (Boss Type) (311943) and
Brilliant Biosphere Gem (Boss Type) (311943) and ![]() Brilliant Biosphere Gem (Normal Type) (311942) as it's purely RNG to get them so for now you can just settle for the different racial enchants and focus more on upgrading the 3rd and 4th slot enchants. Now if you're looking for an upgrade for your Convertible Magical Wing, you can start making your own
Brilliant Biosphere Gem (Normal Type) (311942) as it's purely RNG to get them so for now you can just settle for the different racial enchants and focus more on upgrading the 3rd and 4th slot enchants. Now if you're looking for an upgrade for your Convertible Magical Wing, you can start making your own ![]() Death Rune Manteau [1] (480233) as you farm for your two Varmundt rings as well. Death Rune Manteau needs reforming too just like the rings. The manteau starts to perform slightly better than Magical Wing at +10~+11 Grade C. For more info on how to enchant your Varmundt Rings and Death Rune Manteau, refer to this page.
Death Rune Manteau [1] (480233) as you farm for your two Varmundt rings as well. Death Rune Manteau needs reforming too just like the rings. The manteau starts to perform slightly better than Magical Wing at +10~+11 Grade C. For more info on how to enchant your Varmundt Rings and Death Rune Manteau, refer to this page.
*Provided you have completed the Dimensions combo consisting of ![]() Time Dimensions Rune Crown (Elemental Master) [1] (400536) and
Time Dimensions Rune Crown (Elemental Master) [1] (400536) and ![]() Dimensions Elemental Magic Book [2] (540079) or
Dimensions Elemental Magic Book [2] (540079) or ![]() Dimensions Elemental Spell Book [2] (540080) , you can now fully refine and grade these items. At Grade A, these equipment will unlock your true potential and will allow you to autocast your ultimate skill
Dimensions Elemental Spell Book [2] (540080) , you can now fully refine and grade these items. At Grade A, these equipment will unlock your true potential and will allow you to autocast your ultimate skill ![]() Elemental Buster which will make farming much easier for you.
Elemental Buster which will make farming much easier for you.
End Game
| Type | Item | Notes |
|---|---|---|
| Upper | +12 to +15 [A] |
|
| Middle |
| |
| Lower |
| |
| Armor | +12 to +15 [A] or +12 [A] |
|
| Weapon | +12 to +15 [A] and/or +12 to +15 [A] |
|
| Shield | +10 to +11 [C] or +12 to +14 [A] |
|
| Garment | +11 to +12 [A] |
|
| Shoe | +12 to +14 [A] |
|
| Accessory (Right) | or |
|
| Accessory (Left) |
|
End game now finally and this is the last stage of your gear progression but certainly not the last (costumes?). Here, most of the things you will do is gonna be min-maxing and striving to get the best possible enchant and upgrade on your gears. Some players settle for the bare minimum and that's fine too if you don't fancy suffering more with RNG, but you're still in end game. Moreover, this will be the stage where you'll most likely want to buy your own MVP cards either by farming them yourselves from instances or buying them from sellers. The useful MVP cards for EM are listed in the table. I suggest you get them when you have the time and budget for it; EM is an already strong class and these MVP cards scale well with EM's skills.
Gears that are new in this section are the Alice gears ![]() Mad Bunny-LT [1] (460020) ,
Mad Bunny-LT [1] (460020) , ![]() Gambler's Seal [1] (410233) , and
Gambler's Seal [1] (410233) , and ![]() Ace of Spades in Mouth (Magical) (420213) . The Mad Bunny is sought for the utility that it gives. It gives more ASPD and ACD plus 10% resistance against all element. Damage-wise, it didn't perform significantly better than
Ace of Spades in Mouth (Magical) (420213) . The Mad Bunny is sought for the utility that it gives. It gives more ASPD and ACD plus 10% resistance against all element. Damage-wise, it didn't perform significantly better than ![]() Glacier Guard [1] (460040) in my tests, but having more utility is nice to those who prefer it over damage. On the other hand, the middle and lower headgears Gambler's Seal and Ace of Spades are your next new upgrade in those slots. They were upgraded last because they give little improvement in damage as compared to the costs of crafting them and your other core gears.
Glacier Guard [1] (460040) in my tests, but having more utility is nice to those who prefer it over damage. On the other hand, the middle and lower headgears Gambler's Seal and Ace of Spades are your next new upgrade in those slots. They were upgraded last because they give little improvement in damage as compared to the costs of crafting them and your other core gears.
If you're one of those people who joined the bandwagon and only played EM because of the autocast feature that the Dimensions set gives, well this is now the part (or earlier before now) where you should have a ![]() Time Dimensions Rune Crown (Elemental Master) [1] (400536) to pair with one of your books. To craft one, you'll need to have access first to Depth Abyss 2. You will need 2,000 Reputation pts. from Varmundt's Biosphere Depth to access this dungeon. More pieces of information regarding the enchanting process on this page. Put as much attention as you can on the Dimensions Rune Crown and Dimensions Book and refine them to +15 if you can because besides allowing you the ability to autocast
Time Dimensions Rune Crown (Elemental Master) [1] (400536) to pair with one of your books. To craft one, you'll need to have access first to Depth Abyss 2. You will need 2,000 Reputation pts. from Varmundt's Biosphere Depth to access this dungeon. More pieces of information regarding the enchanting process on this page. Put as much attention as you can on the Dimensions Rune Crown and Dimensions Book and refine them to +15 if you can because besides allowing you the ability to autocast ![]() Elemental Buster, these two will also give you Elemental Buster skill modifier. At +15 for both pieces of equipment, it'll be a total of 60% Elemental Buster skill modifier! No other classes besides EM and only EM gets the privilege and the prestige of autocasting their ultimate and on top of that gets skill modifier for it, so make sure to capitalize on that.
Elemental Buster, these two will also give you Elemental Buster skill modifier. At +15 for both pieces of equipment, it'll be a total of 60% Elemental Buster skill modifier! No other classes besides EM and only EM gets the privilege and the prestige of autocasting their ultimate and on top of that gets skill modifier for it, so make sure to capitalize on that.
Then lastly, you can upgrade your armor to either ![]() Nebula Robe of Spell [1] (450173) or
Nebula Robe of Spell [1] (450173) or ![]() Engraved Soul Purification Rune Robe [1] (450284) and the endless debate whether to stick to Nebula or Engraved still remains to this day simply because Nebula is a future-proof BiS gear that will complement the Hall of Life (HoL) gears. This is also the reason why people started investing on a
Engraved Soul Purification Rune Robe [1] (450284) and the endless debate whether to stick to Nebula or Engraved still remains to this day simply because Nebula is a future-proof BiS gear that will complement the Hall of Life (HoL) gears. This is also the reason why people started investing on a ![]() Spell Signet of Star [1] (490136) as it'll be part of the HoL series. It recently had just gotten its 2nd enchant
Spell Signet of Star [1] (490136) as it'll be part of the HoL series. It recently had just gotten its 2nd enchant ![]() Star Cluster of Intelligence Lv5 (313038) in anticipation for HoL.
Star Cluster of Intelligence Lv5 (313038) in anticipation for HoL.
On the other hand, Soul Robe for the majority still outperforms Nebula since it gives +15% increased damage against bosses while Nebula does not. However, when you already have too much boss modifier, Nebula starts to perform better according to my tests. A Soul Purification Robe, the Demigod Rune Tablet, ![]() [MVP] Demigod Lasgand Card (300472) , 2 Varmundt Rings with
[MVP] Demigod Lasgand Card (300472) , 2 Varmundt Rings with ![]() Brilliant Biosphere Gem (Boss Type) enchant,
Brilliant Biosphere Gem (Boss Type) enchant, ![]() Glacier Guard [1] (460040) with
Glacier Guard [1] (460040) with ![]() Glacier Flower Meow Power (Intelligence) enchant, and a
Glacier Flower Meow Power (Intelligence) enchant, and a ![]() White Knight Egg (9134) would give over 163% Boss modifier and at that point you're experiencing diminishing returns, which is why Nebula starts performing better. If you wanna know more about diminishing returns, Choi has explained it in-depth in his Guide to Magic.
White Knight Egg (9134) would give over 163% Boss modifier and at that point you're experiencing diminishing returns, which is why Nebula starts performing better. If you wanna know more about diminishing returns, Choi has explained it in-depth in his Guide to Magic.
Shadow Gears
| Type | Item | Notes |
|---|---|---|
| Shadow Armor | +10 |
|
| Shadow Weapon | +10 |
|
| Shadow Shield | +10 |
|
| Shadow Shoe | +10 |
|
| Shadow Earring (Right) | +10 |
|
| Shadow Pendant (Left) | +10 |
|
For more information regarding the listed Shadow Gears, check this page. For Shadow Gear enchanting, you can refer to this page or Choi's Guide to Magic.
In terms of precedence, ![]() Full Tempest Shadow Earring (24665) and
Full Tempest Shadow Earring (24665) and ![]() Full Tempest Shadow Pendant (24668) takes priority over your other Shadow Gears. You would want to eliminate MDef as soon as possible and get full MDef pierce as your damage diminishes the higher the MDef of the monsters.
Full Tempest Shadow Pendant (24668) takes priority over your other Shadow Gears. You would want to eliminate MDef as soon as possible and get full MDef pierce as your damage diminishes the higher the MDef of the monsters.
Costume Enchant Stones
| Type | Item | Notes |
|---|---|---|
| Upper Costume |
| |
| Middle Costume |
| |
| Lower Costume |
| |
| Garment Costume |
|
Costume Enchant stones gives a considerable damage increase in your DPS, as well as providing good utility. These can be obtained from the Point Shop in the 2nd Floor of the Main Office (main_office 71, 315). You can get the Sorcerer stones by opening ![]() Top Box 4 (41093) ,
Top Box 4 (41093) , ![]() Mid Box 4 (41097) , and
Mid Box 4 (41097) , and ![]() Low Box 4 (41101) . For the Elemental Master stone, you will need to open
Low Box 4 (41101) . For the Elemental Master stone, you will need to open ![]() Garment 1st Box 4 (41255) . This is purely RNG and you may end up not getting your desired stone after spending 50~100 Fashion Points. If available in the market, better to just buy there.
Garment 1st Box 4 (41255) . This is purely RNG and you may end up not getting your desired stone after spending 50~100 Fashion Points. If available in the market, better to just buy there.
Magical Cards
For a more detailed list of magical cards that our class can use and that were listed on the gear sections, you can refer to Celery's Guide as she already grouped them according to elements.
Pet Suggestions
For more info on how to tame, raise, and evolve pets, check this page.
| Pet | Notes | |||
|---|---|---|---|---|
| ||||
| ||||
| ||||
| ||||
| ||||
Builds
In this section, we'll be tackling the three (3) special builds of Elemental Master: ![]() Psychic Wave,
Psychic Wave, ![]() Spell Fist, and Dragon Tank. PW and Spell Fist builds will follow almost the same set of gears from their core DPS build with a few alterations in the headgear, weapon, and shoe slots. Both builds also follow the same set of Shadow Gears and costume enchant stones with the exception for PW as it'll have its own set of costume enchant stones. On the other hand, Dragon Tank will have a whole new set of gears dedicated for tanking Dragon races such as Betelgeuse.
Spell Fist, and Dragon Tank. PW and Spell Fist builds will follow almost the same set of gears from their core DPS build with a few alterations in the headgear, weapon, and shoe slots. Both builds also follow the same set of Shadow Gears and costume enchant stones with the exception for PW as it'll have its own set of costume enchant stones. On the other hand, Dragon Tank will have a whole new set of gears dedicated for tanking Dragon races such as Betelgeuse.
Psychic Wave
Upon transitioning to Elemental Master, it is inevitable that you will solely use 4th job skills from then on, and that's because 4th job skills have higher MAtk% scaling, and they all scale with your SPL. However, your widest AoE skill is attached to the 3rd job skill of Sorcerer and that skill is called ![]() Psychic Wave. PW like your
Psychic Wave. PW like your ![]() Elemental Buster can be endowed to the four (4) basic elements—Fire, Water, Wind, or Earth plus Poison and unlike your 4th job AoE skills, PW is easily more spammable as its CD can be reduced by up to 3.5 seconds with the proper gears which only leaves you a total of 1.5 seconds. You may think it's still a bit long but actually it is not. Instead of cycling four (4) to five (5) skills, you can only do two (2) to three (3) skills with PW. You can start a rotation similar to this one:
Elemental Buster can be endowed to the four (4) basic elements—Fire, Water, Wind, or Earth plus Poison and unlike your 4th job AoE skills, PW is easily more spammable as its CD can be reduced by up to 3.5 seconds with the proper gears which only leaves you a total of 1.5 seconds. You may think it's still a bit long but actually it is not. Instead of cycling four (4) to five (5) skills, you can only do two (2) to three (3) skills with PW. You can start a rotation similar to this one:
 Psychic Wave —>
  Conflagration —>
  Psychic Wave —>
  Venom Swamp —> repeat
 Psychic Wave —>
  Conflagration —>
  Venom Swamp —>
  Psychic Wave —> repeat
 Psychic Wave —>
  Conflagration —>
  Elemental Buster —>
  Psychic Wave —> repeat
In the third example, you will have three (3) Fire AoE skills that will benefit from your cards and modifiers focused on the Fire property. The Elemental Buster here is situational and you don't really have to cast it repeatedly as it will consume 15 AP each use. When a pack of mobs surrounds you that's when you use it. Conflagration can either be Venom Swamp or Lightning Land depending on your choice of element, but the main idea still remains that you will cast PW as soon as it's available to maximize its wide AoE. You can even throw in some ![]() Psychic Stream if you so desire which is only fitting since both are psionic skills! I would like to call this build as Farming build, as this build is only realistically used for farming low to mid game dungeons such as Thanatos Tower Flr. 12, Niflheim 2, Clock Tower Unknown Basement, and Mjolnir Underground Cave. For end game dungeons such as Varmundt's Biosphere, Varmundt's Biosphere Depth, and Varmundt's Biosphere Depth 2, PW build falls flat and you're better off using your 4th job skills here. You don't really need to follow this build if it is not your cup of tea but if you're among those people who played the class as a Sorcerer in the past and played PW build like me; well, this is genuinely my love letter to them. As of today this is still my favorite build to play despite being here now in the 4th jobs era. I hope you'll consider this build and have fun with it just as I do!
Psychic Stream if you so desire which is only fitting since both are psionic skills! I would like to call this build as Farming build, as this build is only realistically used for farming low to mid game dungeons such as Thanatos Tower Flr. 12, Niflheim 2, Clock Tower Unknown Basement, and Mjolnir Underground Cave. For end game dungeons such as Varmundt's Biosphere, Varmundt's Biosphere Depth, and Varmundt's Biosphere Depth 2, PW build falls flat and you're better off using your 4th job skills here. You don't really need to follow this build if it is not your cup of tea but if you're among those people who played the class as a Sorcerer in the past and played PW build like me; well, this is genuinely my love letter to them. As of today this is still my favorite build to play despite being here now in the 4th jobs era. I hope you'll consider this build and have fun with it just as I do!
Stats
| Stat | Point | Notes |
|---|---|---|
| STR | 1 |
|
| AGI | 86 |
|
| VIT | 110 |
|
| INT | 130 |
|
| DEX | 0 or 130 |
|
| LUK | 4 |
|
Traits
| Traits | Point | Notes |
|---|---|---|
| POW | 0 | N/A |
| STA | 0 |
|
| WIS | 72 |
|
| SPL | 110 |
|
| CON | 110 |
|
| CRT | 0 | N/A |
Gears
| Type | Item | Notes |
|---|---|---|
| Upper | +12 to +15 [A] or +12 to +15 |
|
| Middle |
| |
| Lower |
| |
| Armor | +12 to +15 [A] or +12 [A] |
|
| Weapon | +12 to +15 [A] |
|
| Shield | +10 to +11 [C] or +12 to +14 [A] |
|
| Garment | +11 to +12 [A] |
|
| Shoe | +12 to +14 [A] |
|
| Accessory (Right) | or |
|
| Accessory (Left) |
|
All the equipment for a PW build share the same set of gears as your core ones; they only differ in the weapon of choice. ![]() Dim Glacier Book [1] (540056) when enchanted with
Dim Glacier Book [1] (540056) when enchanted with ![]() Glacier Flower Spell (Psychic Wave) (311225) will reduce PW's CD by 1.5 seconds and when paired with the costume enchant stones
Glacier Flower Spell (Psychic Wave) (311225) will reduce PW's CD by 1.5 seconds and when paired with the costume enchant stones ![]() Professor Stone (Low) (25419) +
Professor Stone (Low) (25419) + ![]() Sorcerer Stone (Garment) (25420) will reduce its CD further by another 2 seconds. Additively, it will reduce the CD of PW by 3.5 seconds leaving behind only 1.5 seconds. To know more about Dim Glacier weapons like where to get them and how to enchant them, more pieces of information are detailed on this page.
Sorcerer Stone (Garment) (25420) will reduce its CD further by another 2 seconds. Additively, it will reduce the CD of PW by 3.5 seconds leaving behind only 1.5 seconds. To know more about Dim Glacier weapons like where to get them and how to enchant them, more pieces of information are detailed on this page.
Meanwhile, ![]() Temporal Circlet (Sorcerer) [1] (19483) is not necessary for a PW build but if you prefer seeing more damage with PW then this headgear will give the most PW modifiers, but a
Temporal Circlet (Sorcerer) [1] (19483) is not necessary for a PW build but if you prefer seeing more damage with PW then this headgear will give the most PW modifiers, but a ![]() Time Dimensions Rune Crown (Elemental Master) [1] (400536) is still a great option as this will also increase your 4th jobs skills.
Time Dimensions Rune Crown (Elemental Master) [1] (400536) is still a great option as this will also increase your 4th jobs skills.
Costume Enchant Stones
| Type | Item | Notes |
|---|---|---|
| Upper Costume |
| |
| Middle Costume |
| |
| Lower Costume |
| |
| Garment Costume |
|
The enchants stone that give PW modifiers are ![]() Professor Stone (Top) (25417) when paired with the
Professor Stone (Top) (25417) when paired with the ![]() Sorcerer Stone (Garment) (25420) ,
Sorcerer Stone (Garment) (25420) , ![]() Sorcerer Stone (Mid) (1000673) , and the Garment stone itself. The combo that will reduce PW's CD is the
Sorcerer Stone (Mid) (1000673) , and the Garment stone itself. The combo that will reduce PW's CD is the ![]() Professor Stone (Low) (25419) and Garment stone.
Professor Stone (Low) (25419) and Garment stone.
Spell Fist
If you're looking to spice things up and wanting a different flavor in your builds, then well maybe ![]() Spell Fist is the build you're looking for! This build is more of a 'for fun' build and you can never expect it to keep up with the meta build now for Elemental Master. EMs are flexible with their choices of elements, they use all of their elemental AoEs in a skill rotation, and even their own ultimate can be endowed. But if you wanna bonk monsters to death with the power of knowledge then this section of the guide is for you! Spell Fist won't be getting gear progression stages though as I expect that by the time you invest on this fun build, you're already done with your main build as you should be.
Spell Fist is the build you're looking for! This build is more of a 'for fun' build and you can never expect it to keep up with the meta build now for Elemental Master. EMs are flexible with their choices of elements, they use all of their elemental AoEs in a skill rotation, and even their own ultimate can be endowed. But if you wanna bonk monsters to death with the power of knowledge then this section of the guide is for you! Spell Fist won't be getting gear progression stages though as I expect that by the time you invest on this fun build, you're already done with your main build as you should be.
Spell Fist build hasn't changed that much since its implementation during the 3rd job era. It's only gotten stronger like most skills that came with it and before it due to the 4th job traits. Spell Fist gameplay remains the same wherein you'll need to aim and cast your chosen elemental bolt skill first on a target then immediately apply Spell Fist. Though for the 4th jobs skill tree, it's gotten a blink skill in the form of ![]() Psychic Stream which made farming as a Spell Fist EM much tolerable. All of our High Elementals on Passive Mode also complements Spell Fist. When in Passive Mode, your bolt skills corresponding to the summoned High Elementals gets increased damage and you have a chance to autocast the highest level learned of that bolt skill. And that's the extent of what's improved with Spell Fist so far; most of the 4th job skills complement the caster build of an EM.
Psychic Stream which made farming as a Spell Fist EM much tolerable. All of our High Elementals on Passive Mode also complements Spell Fist. When in Passive Mode, your bolt skills corresponding to the summoned High Elementals gets increased damage and you have a chance to autocast the highest level learned of that bolt skill. And that's the extent of what's improved with Spell Fist so far; most of the 4th job skills complement the caster build of an EM.
I've tried Spell Fist too and built the gears needed to "make it work" but it's still haunted by the curse of being in melee range and lack of wide AoE making it hard to use while farming. Its main source of damage will be coming from outdated 1st Job Mage skills with the likes of ![]() Fire Bolt,
Fire Bolt, ![]() Cold Bolt, and
Cold Bolt, and ![]() Lightning Bolt and even though these skills will get supplemented by your
Lightning Bolt and even though these skills will get supplemented by your ![]() Auto Spell and
Auto Spell and ![]() Double Casting skills it still won't be enough as the bolts' MAtk% is comparably low than your 4th Job or even your 3rd Job skills. There are little to none existing equipment that give Spell Fist modifier too besides the
Double Casting skills it still won't be enough as the bolts' MAtk% is comparably low than your 4th Job or even your 3rd Job skills. There are little to none existing equipment that give Spell Fist modifier too besides the ![]() Sorc Night Cap , which gets outshined by
Sorc Night Cap , which gets outshined by ![]() Furious Crown (Elemental Master) that lets you autocast the 4th Job skill
Furious Crown (Elemental Master) that lets you autocast the 4th Job skill ![]() Terra Drive when paired with
Terra Drive when paired with ![]() Furious Grimoire . It's also preventing you to use strong garment cards like
Furious Grimoire . It's also preventing you to use strong garment cards like ![]() Polluted Spider Queen Card because of its side effect of you receiving more damage against all properties. With all that being said, I advise you to play this build for fun and if and only if you really know what you're going into. It'll always gonna have that charm as being a unique build to play.
Polluted Spider Queen Card because of its side effect of you receiving more damage against all properties. With all that being said, I advise you to play this build for fun and if and only if you really know what you're going into. It'll always gonna have that charm as being a unique build to play.
Stats
| Stat | Point | Notes |
|---|---|---|
| STR | 1 |
|
| AGI | 130 |
|
| VIT | 110 |
|
| INT | 130 |
|
| DEX | 0 |
|
| LUK | 4 |
|
Traits
| Traits | Point | Notes |
|---|---|---|
| POW | 0 | N/A |
| STA | 0 |
|
| WIS | 72 |
|
| SPL | 110 |
|
| CON | 110 |
|
| CRT | 0 | N/A |
Recommended Skill Tree
| Magician | 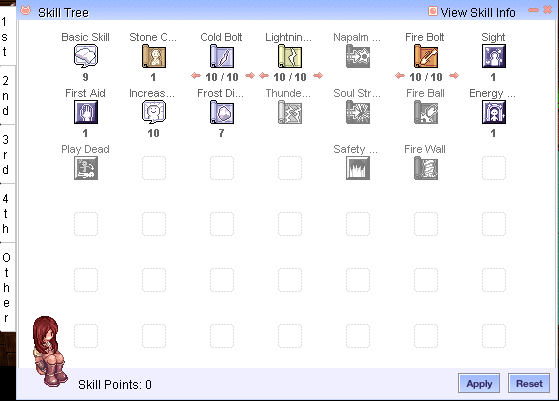 | ||||||||
|---|---|---|---|---|---|---|---|---|---|
| Sage and Professor |
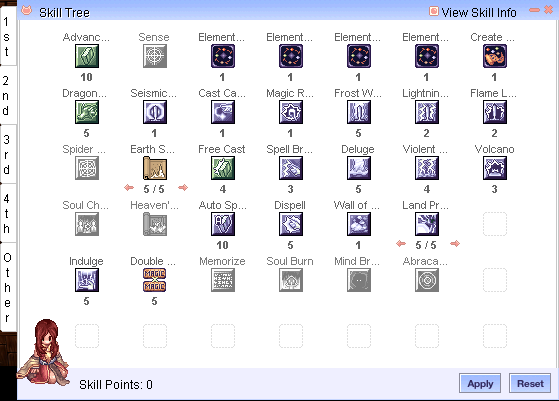 | ||||||||
| Sorcerer | 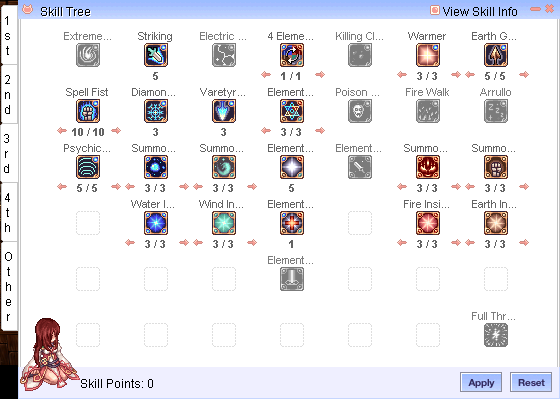 | ||||||||
| Elemental Master |
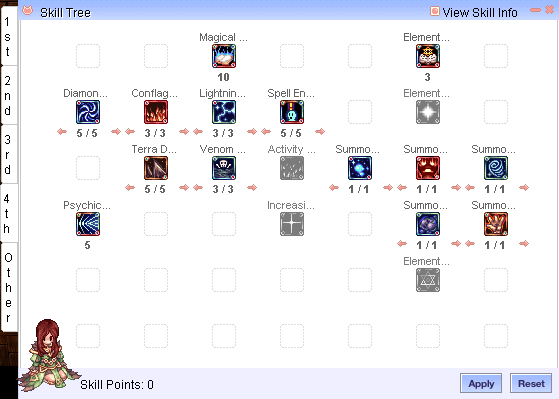 | ||||||||
Gears
| Type | Item | Notes |
|---|---|---|
| Upper | +12 to +14 [A] |
|
| Middle |
| |
| Low |
| |
| Armor | +12 to +15 [A] or +12 [A] |
|
| Weapon | +12 to +14 [A] |
|
| Shield | +10 to +11 [C] or +12 to +14 [A] |
|
| Garment | +11 to +12 [A] |
|
| Shoe | +12 to +14 [A] |
|
| Accessory | or |
|
| Accessory |
|
The gears for Spell Fist uses the same set of equipment as your gears for the Caster build. The furious set consisting of ![]() Furious Crown (Elemental Master) [1] (400662) ,
Furious Crown (Elemental Master) [1] (400662) , ![]() Furious Grimoire [2] (540091) , and
Furious Grimoire [2] (540091) , and ![]() Furious Boots [1] (470265) are your core gears for Spell Fist. The crown combos with the Furious Grimoire to autocast Lvl. 4
Furious Boots [1] (470265) are your core gears for Spell Fist. The crown combos with the Furious Grimoire to autocast Lvl. 4 ![]() Terra Drive when dealing normal melee damage; whereas the Furious Grimoire combos with Furious Boots for a chance to autocast Lvl. 4
Terra Drive when dealing normal melee damage; whereas the Furious Grimoire combos with Furious Boots for a chance to autocast Lvl. 4 ![]() Diamond Storm with an increased chance to proc it if the Boots is Grade B or higher.
Diamond Storm with an increased chance to proc it if the Boots is Grade B or higher.
And the best element to focus on this build is Water because you can maximize the skill ![]() Deluge since Earth doesn't get any elemental floor buffs and
Deluge since Earth doesn't get any elemental floor buffs and ![]() Earth Spike doesn't work with Spell Fist and isn't considered a bolt skill unfortunately. Fire is supposedly strong too but the Furious set doesn't allow us to autocast
Earth Spike doesn't work with Spell Fist and isn't considered a bolt skill unfortunately. Fire is supposedly strong too but the Furious set doesn't allow us to autocast ![]() Conflagration. Those are the key reasons why you should focus more on Water but if you need to switch elements to Earth, Fire or Wind for more coverage you may still do so.
Conflagration. Those are the key reasons why you should focus more on Water but if you need to switch elements to Earth, Fire or Wind for more coverage you may still do so.
Dragon Tank
 Betelgeuse (20994) |
Remember when I told you Elemental Master is a versatile class? That's because it's actually the best tank to use against Betelgeuse from Constellation Tower. The class with its passive ![]() Dragonology from the Sage branch gives it an inherent +20% resistance against Dragon races such as Betelgeuse, making it possible for the class to reach 100% Dragon resistance when combined with other gears with more Dragon resistances. You may follow most of this section's tank build against Alice Twisted Madness' Jabberwocky as him and Betelgeuse are both Dragons, but I cannot guarantee that the execution of your skills will be the same for both MVPs as they have their own separate mechanics.
Dragonology from the Sage branch gives it an inherent +20% resistance against Dragon races such as Betelgeuse, making it possible for the class to reach 100% Dragon resistance when combined with other gears with more Dragon resistances. You may follow most of this section's tank build against Alice Twisted Madness' Jabberwocky as him and Betelgeuse are both Dragons, but I cannot guarantee that the execution of your skills will be the same for both MVPs as they have their own separate mechanics.
Upon reaching 100% Dragon resistance, most of Betelgeuse's attacks and skills will only deal "1" damage or will be registered as "1-1-1-1" damage to your EM Tank, and increasing your defensive values further in RES, MRes, DEF, and MDef won't make a difference anymore. On another note, Betelgeuse inflicts a "fixed amount of physical damage" unto you with a value of 10,000 that is only reducible by ![]() Wall of Fog (Blinding Mist). It comes in two (2) forms: 1st one is a series of attacks wherein only the first and initial hit would inflict that 10k to you; 2nd one is a DoT attack that reduces your HP by 10k on certain intervals. General physical defensive stats like RES and DEF can't reduce these values and not even your own
Wall of Fog (Blinding Mist). It comes in two (2) forms: 1st one is a series of attacks wherein only the first and initial hit would inflict that 10k to you; 2nd one is a DoT attack that reduces your HP by 10k on certain intervals. General physical defensive stats like RES and DEF can't reduce these values and not even your own ![]() Energy Coat decreases it. However, building more HP values (eg. MaxHP or MaxHP%) would indirectly decrease the value of that 10k and placing Wall of Fogs underneath you would further cut down its value by only inflicting 75% of that 10k and thus it will only deal 7,500 damage to you; plus an added 75% chance for those hits and Betelgeuse's
Energy Coat decreases it. However, building more HP values (eg. MaxHP or MaxHP%) would indirectly decrease the value of that 10k and placing Wall of Fogs underneath you would further cut down its value by only inflicting 75% of that 10k and thus it will only deal 7,500 damage to you; plus an added 75% chance for those hits and Betelgeuse's ![]() Tetra Vortex to miss.
Tetra Vortex to miss.
Besides Betelgeuse, there are also moving traps during the 2nd and 3rd Phases of the fight. When you go near and touch any of the traps, it will inflict damage to you according to your MaxHP% in variance. The 2nd Phase traps take out about 80%~85% of your MaxHP, while the 3rd Phase traps take out about 75%~80% of your MaxHP. Like Betel's "fixed 10k damage", the traps' damage are irreducible by elemental resistances (i.e. Water/Fire Armor or ![]() Coldproof Potion /
Coldproof Potion /![]() Fireproof Potion ), defensive stats, Energy Coat, and even Wall of Fog; Land Protector won't also protect you against them. The traps also have a small chance to instantly kill you and it will not matter whether you're the tank or the DPS.
Fireproof Potion ), defensive stats, Energy Coat, and even Wall of Fog; Land Protector won't also protect you against them. The traps also have a small chance to instantly kill you and it will not matter whether you're the tank or the DPS.
Now, you may cast ![]() Land Protector underneath your party to cancel Betelgeuse's
Land Protector underneath your party to cancel Betelgeuse's ![]() Comet and
Comet and ![]() Meteor Storms, but if you have a magical DPS such as EM and AM that have ground AoE skills in your party you might want to readjust the size of your LP and its positioning so that they could also hit Betelgeuse. It's also possible to use lower levels of LP (7x7 or 9x9), but this will require coordination and communication with your team. You may cast or spam
Meteor Storms, but if you have a magical DPS such as EM and AM that have ground AoE skills in your party you might want to readjust the size of your LP and its positioning so that they could also hit Betelgeuse. It's also possible to use lower levels of LP (7x7 or 9x9), but this will require coordination and communication with your team. You may cast or spam ![]() Dispell on Betelgeuse to cancel his Max Pain, but be careful as this would lose your aggro on Betelgeuse and would also cancel your team's debuff skills such as your Cardinal's
Dispell on Betelgeuse to cancel his Max Pain, but be careful as this would lose your aggro on Betelgeuse and would also cancel your team's debuff skills such as your Cardinal's ![]() Lex Aeterna, your Arch Mage's
Lex Aeterna, your Arch Mage's ![]() Comet's Magic Intoxication, your Abyss Chaser's
Comet's Magic Intoxication, your Abyss Chaser's ![]() Raid (Sightless Mind) or your Shadow Cross'
Raid (Sightless Mind) or your Shadow Cross' ![]() Dark Claw skill, so it's best to communicate and coordinate with them first before attempting to do so. When Betel is chanting two of his long-casting magical skills like
Dark Claw skill, so it's best to communicate and coordinate with them first before attempting to do so. When Betel is chanting two of his long-casting magical skills like ![]() Comet and
Comet and ![]() Tetra Vortex, you may use your Sage skills
Tetra Vortex, you may use your Sage skills ![]() Spell Breaker and
Spell Breaker and ![]() Magic Rod to disrupt and absorb those two skills, respectively. Keep spamming Spell Breaker until you cancel his Comet skill with a 10% chance to be successful. Additionally, you will need to time Magic Rod perfectly and use it just as when he's about to finish casting Tetra Vortex or have enough ACD and ASPD for spamming if you can't estimate its timing. During the 2nd Phase, there will be Dead Souls roaming around the map and they increase Betel's Defense if left untouched. These Dead Souls are plant protocol and they only have a MaxHP of "10"; you can help your team kill the souls in the middle near you by using your Lvl. 10
Magic Rod to disrupt and absorb those two skills, respectively. Keep spamming Spell Breaker until you cancel his Comet skill with a 10% chance to be successful. Additionally, you will need to time Magic Rod perfectly and use it just as when he's about to finish casting Tetra Vortex or have enough ACD and ASPD for spamming if you can't estimate its timing. During the 2nd Phase, there will be Dead Souls roaming around the map and they increase Betel's Defense if left untouched. These Dead Souls are plant protocol and they only have a MaxHP of "10"; you can help your team kill the souls in the middle near you by using your Lvl. 10 ![]() Cold Bolt to speed up your instance farm, especially if you're doing it in duo.
Cold Bolt to speed up your instance farm, especially if you're doing it in duo.
One great strategy that you could do is to utilize the Sorcerer skill ![]() Extreme Vacuum to hold Betelgeuse in place to root him in one cell and position. This would also help when he switches aggro from you to the other party members; just be ready to save and cast your second Extreme Vacuum for those times he would cast
Extreme Vacuum to hold Betelgeuse in place to root him in one cell and position. This would also help when he switches aggro from you to the other party members; just be ready to save and cast your second Extreme Vacuum for those times he would cast ![]() Ganbantein to remove any ground skill effects including your insignias and Wall of Fogs. One way you can do to support your party is placing insignias underneath Betel. When you have another EM DPS, it's also a good tactic to coordinate with them so that they can place the insignias on the 2nd Phase, while you handle the 3rd Phase. As what we've talked about in the insignia system portion, insignias are stationary and have a 1 minute CD and thus needs careful planning and set-up.
Ganbantein to remove any ground skill effects including your insignias and Wall of Fogs. One way you can do to support your party is placing insignias underneath Betel. When you have another EM DPS, it's also a good tactic to coordinate with them so that they can place the insignias on the 2nd Phase, while you handle the 3rd Phase. As what we've talked about in the insignia system portion, insignias are stationary and have a 1 minute CD and thus needs careful planning and set-up.
Stats
| Stat | Point | Notes |
|---|---|---|
| STR | 4 |
|
| AGI | 130 |
|
| VIT | 130 |
|
| INT | 55 |
|
| DEX | 0 |
|
| LUK | 120 |
|
Traits
| Traits | Point | Notes |
|---|---|---|
| POW | 0 | N/A |
| STA | 72 |
|
| WIS | 110 |
|
| SPL | 0 |
|
| CON | 110 |
|
| CRT | 0 | N/A |
Recommended Skill Tree
| Magician | 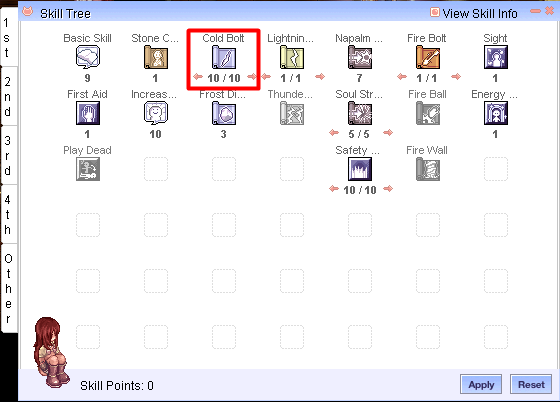 | ||||||||
|---|---|---|---|---|---|---|---|---|---|
| Sage and Professor |
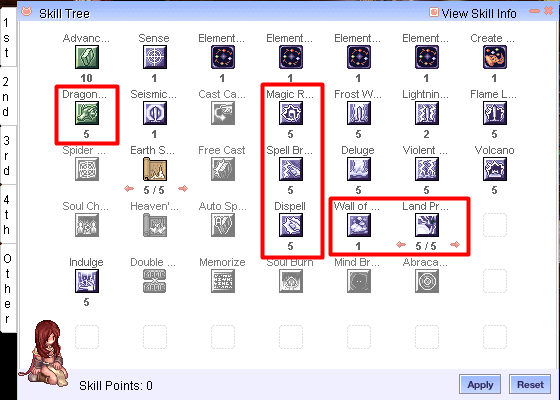 | ||||||||
| Sorcerer | 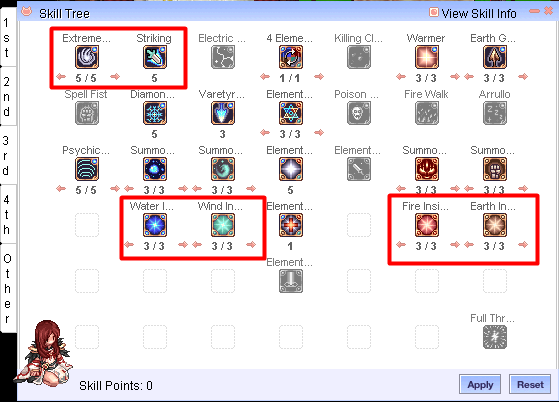 | ||||||||
| Elemental Master |
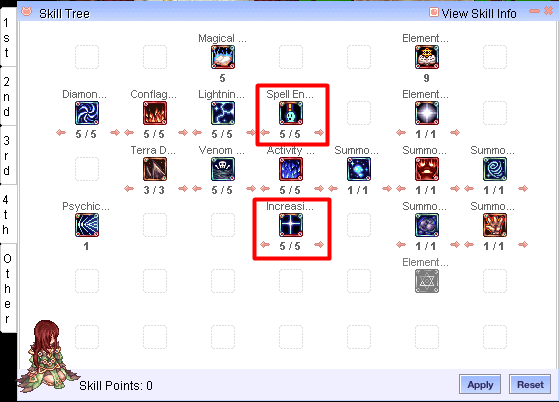 | ||||||||
Betelgeuse Tanking Gears
| Type | Item | Notes |
|---|---|---|
| Upper | +10 to +12 or +10 to +12 |
|
| Middle |
| |
| Lower | or |
|
| Armor | +10 to +12 |
|
| Weapon | +10 or +10 to +12 |
|
| Shield | +9 |
|
| Garment | +11 |
|
| Shoe | +11 |
|
| Accessory (Right) |
| |
| Accessory (Left) |
|
The Dragon set consisting of ![]() Gold Dragon Plate [1] (15393) ,
Gold Dragon Plate [1] (15393) , ![]() Dragon Scale Hood [1] (20946) , and
Dragon Scale Hood [1] (20946) , and ![]() Dragon Scale Boots [1] (22208) have built-in resistances against Dragon races plus they can be enchanted with more resistance values. Fore more info on the enchanting costs, refer to this page. The Sinful accessories
Dragon Scale Boots [1] (22208) have built-in resistances against Dragon races plus they can be enchanted with more resistance values. Fore more info on the enchanting costs, refer to this page. The Sinful accessories ![]() Sinful Topaz Ring [1] (490048) and
Sinful Topaz Ring [1] (490048) and ![]() Sinful Topaz Necklace [1] (490049) combos with the Dragon set and can be enchanted with more MaxHP% for additional tankiness. These can be obtained from Thanatos Tower. More info on how to enchant the accessories here.
Sinful Topaz Necklace [1] (490049) combos with the Dragon set and can be enchanted with more MaxHP% for additional tankiness. These can be obtained from Thanatos Tower. More info on how to enchant the accessories here.
For more added Dragon resistance, you will need to get a ![]() Magic Absorber [1] (460005) from Geffen Night Arena. To enchant the shield, you can check more info here. Whether you want to use
Magic Absorber [1] (460005) from Geffen Night Arena. To enchant the shield, you can check more info here. Whether you want to use ![]() Temporal Circlet (Sorcerer) [1] (19483) or
Temporal Circlet (Sorcerer) [1] (19483) or ![]() Old Wind Whisper [1] (18980) is up to your budget. The Circlet offers more defensive stats thanks to its
Old Wind Whisper [1] (18980) is up to your budget. The Circlet offers more defensive stats thanks to its ![]() Temporal Jewel (VIT) Lv 3 (29680) enchant while the Bio 5 headgear is much more affordable and budget-friendly.
Temporal Jewel (VIT) Lv 3 (29680) enchant while the Bio 5 headgear is much more affordable and budget-friendly.
If you need additional VCT% in your build to help you reach instant cast or more ACD to help you spam ![]() Magic Rod, you may choose
Magic Rod, you may choose ![]() Illusion Thorny Staff of Darkness [2] (550030) . However if you want to skip the RNG part of enchanting Illusion Thorny Staff of Darkness with more VCT%, you can use a +10
Illusion Thorny Staff of Darkness [2] (550030) . However if you want to skip the RNG part of enchanting Illusion Thorny Staff of Darkness with more VCT%, you can use a +10 ![]() Rod [4] (1602) instead. This is a fun one because you can do four (4)
Rod [4] (1602) instead. This is a fun one because you can do four (4) ![]() Senior Papila Cae Card (300096) and it'll give you an instant +40% VCT or be inventive and use two (2)
Senior Papila Cae Card (300096) and it'll give you an instant +40% VCT or be inventive and use two (2) ![]() Demon's Essence VIT 3 (4919) plus two (2) Senior Papila Cae Cards. The rod gives you more freedom with regards to gear choices too.
Demon's Essence VIT 3 (4919) plus two (2) Senior Papila Cae Cards. The rod gives you more freedom with regards to gear choices too.
Shadow Gears
| Type | Item | Notes |
|---|---|---|
| Shadow Armor | +10 |
|
| Shadow Weapon | +7 |
|
| Shadow Shield | +9 or +7 |
|
| Shadow Shoe | +10 |
|
| Shadow Earring (Right) | +10 or +10 |
|
| Shadow Pendant (Left) | +10 or +10 |
|
The ![]() Dragoon Shadow Shield (24057) gives 3% Dragon resistance at +9; though if you've already reached maximum Dragon resist from your main equipment, you may use other Shadow Gears in the shield slot that give general resists such as a
Dragoon Shadow Shield (24057) gives 3% Dragon resistance at +9; though if you've already reached maximum Dragon resist from your main equipment, you may use other Shadow Gears in the shield slot that give general resists such as a ![]() Master Shadow Shield (24793) . The next important piece of Shadow Gear will be the
Master Shadow Shield (24793) . The next important piece of Shadow Gear will be the ![]() Maximum Mammoth Shadow Armor (24679) and
Maximum Mammoth Shadow Armor (24679) and ![]() Maximum Mammoth Shadow Shoes (24680) to give you full immunity against knockback plus some MaxHP% to help with general tankiness. Be extra careful and attentive when wearing Shadow Gears because Betelgeuse can use the Abyss Chaser skill
Maximum Mammoth Shadow Shoes (24680) to give you full immunity against knockback plus some MaxHP% to help with general tankiness. Be extra careful and attentive when wearing Shadow Gears because Betelgeuse can use the Abyss Chaser skill ![]() Strip Shadow to remove your Shadow Gears; that's why I highly advise you to get a total of 100% Dragon resist and general tankiness outside of your Shadow Gears because in the event you get stripped you'll lose your perfect Dragon resist, knockback immunity, and other important stats. For that reason, some CT parties would bring in a Biolo for their
Strip Shadow to remove your Shadow Gears; that's why I highly advise you to get a total of 100% Dragon resist and general tankiness outside of your Shadow Gears because in the event you get stripped you'll lose your perfect Dragon resist, knockback immunity, and other important stats. For that reason, some CT parties would bring in a Biolo for their ![]() Full Shadow Protection skill to avoid problems like this.
Full Shadow Protection skill to avoid problems like this.
The rest of the Shadow Gears are only suggestions and optional if you don't have the budget for them. It goes the same for enchanting your Shadow Gears as that could get expensive, but when you have the means for it then go ahead and min-max your tank Shadow Gears.
Costume Enchant Stones
| Type | Item | Notes |
|---|---|---|
| Upper Costume |
| |
| Middle Costume |
| |
| Lower Costume |
| |
| Garment Costume |
|
Personally, I use a combination of ![]() VIT Convert Stone (Mid/Low) and
VIT Convert Stone (Mid/Low) and ![]() Variable Casting Stone (Garment) (25306) +
Variable Casting Stone (Garment) (25306) + ![]() Variable Casting Time Stone (Dual) (1000522) since I have enough FCT (from the Cast Stones, +12
Variable Casting Time Stone (Dual) (1000522) since I have enough FCT (from the Cast Stones, +12 ![]() Gold Dragon Plate , and
Gold Dragon Plate , and ![]() +
+![]() Thanatos accessories), and solved most of my VCT problems by using a +10
Thanatos accessories), and solved most of my VCT problems by using a +10 ![]() Rod carded with four (4)
Rod carded with four (4) ![]() Senior Papila Cae Cards . However if you lack FCT and VCT to instant cast your skills, you may choose to use
Senior Papila Cae Cards . However if you lack FCT and VCT to instant cast your skills, you may choose to use ![]() Sorcerer Stone (Top) (1000672) and
Sorcerer Stone (Top) (1000672) and ![]() Sorcerer Stone (Mid) (1000673) instead.
Sorcerer Stone (Mid) (1000673) instead.
Pet Suggestions
Here's a list of pets that you could journey with to help you tank Betelgeuse:
| Pet | Notes | |||
|---|---|---|---|---|
| ||||
| ||||
| ||||
Elemental Catalysts, Ores, & Stones
As an Elemental Master, you are required to either buy or farm your own elemental catalysts in order to summon your Elementals and High Elementals. Here, I'm gonna list down the farming maps I always frequent where these catalysts are accessible and abundant to make your farm easier. Forgotten Time is so far the best map to farm the elemental catalysts as all the mobs in these dungeons drop the ores and stones.
| Catalysts | Map & Monsters |
|---|---|
| |
| |
| |
| |
| |
| |
| |
|
Summary
Elemental Master is a versatile class that can play any roles. DPS, Support, or Tank you name it! That's what makes the class so interesting to begin with. Its previous branches from Mage, Sage, Professor and Sorcerer aren't completely forgotten because their skills, mostly defensive and supportive utilities, are still incorporated in an EM's gameplay and usage. EM is also a rotation-heavy class and it may not be for everybody and that's fine. There will be classes that will fit your playstyle more but with EM you'll need to have a lot of micromanaging to do. It's not only for your AoE skills but with your set-ups as well. And lastly, you have Elementals and High Elementals that will act as your companions in battle that will buff and defend you from harm. And what's more, they can survive longer if you have the proper gears for it acting like your own personal tank.
I hope I was able to make things simpler and easy to understand for all of you, and I don't expect everybody to comprehend and absorb all of these in one sitting so just take your time, relax, and have fun with the class!
Acknowledgement
I would like to extend my heartfelt gratitude to the people who helped me with my guide.
- Ripley for helping me proofread.
- [GM] Muh for helping me and giving me the equations for computing the Spirits' status values.
- Coffee/Espresso for suggesting the Illusion Goibne set as a possible alternative under the Budget Tank Gears section.
It wouldn't have come out as coherent and comprehensive as I wanted it to be if it weren't for your help so thank you so so much! <3


