Rakugaki's PvM Hyper Novice

From MuhRO
Revision as of 14:44, 18 November 2025 by G5457s (talk | contribs) (→‎Tips and Tricks: Thanks EM Dove for the Hell's Drive tempfix! :PandaAdmireWizard:)
Jump to navigation Jump to search
NOTICE This guide is still a work in progress
The Magical section is updated! But the Physical and Hybrid sections are still outdated and have erroneous (wrong) info.
Super Novice
Job base: Novice
Written By: Rakugaki


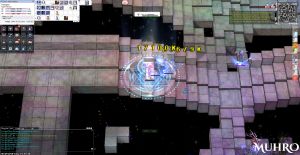
Cute and happy female Hyper Novice ready to stab things happily and cutely.

Overview

Work in progress

The Hyper Novice (HN for short) is a generalized specialist (or specialized generalist?) sort of class, focused on damage and armed with a wide variety of 1st and 2nd job skills to further enhance its capabilities while also greatly improving quality of life. This guide will hopefully help you get through the many great difficulties on the road to becoming a Hyper Novice. It is made in a way as if Hyper Novice is the first or one of the first characters you've created.

Notice: This guide is tailor-made for MuhRO. There are things here which may not be found in other servers.


Skills Overview

The powers of might and magic unite together, ready to take on the toughest monsters in the world!
Featuring GaoSuper (left)!
Hidden Skills
Skill Notes
268.png Steel Body Self buff. On death and with Base EXP at 99-99.9%, level 5 Steel Body will trigger while also fully restoring HP and SP. Think of it as an extra life. Succeeding deaths will not trigger the skill. Relogging restores the extra life. At max level 275, it prevents AP loss and will always trigger on death. If you're soloing and you still don't want to go back to your save point, bring a couple of extra Fly Wings and teleport around until you find a safe area. Relog to get the extra life back. If you think being in SB mode is more of a detriment, you can go back and click on the Healer NPC to remove it, or you can type @die and resurrect yourself with 6293.png Token of Siegfried (6293) , or wait for someone to resurrect you.

This skill will always trigger at Base Level 275. EXP cap is not required. Credits to Yami and Ocean Star for pointing this out! /ene

270.png Explosion Spirits In MuhRO, casting Fury is weird, convoluted, and really buggy.

Unlike the normal Critical Explosion, it gives +50 CRIT instead of +20, and doesn't require Spirit Spheres or anything. Very useful for Melee builds, especially those focusing on Mega Sonic Blow. This hidden skill has many perplexing mysteries, explained below.

Enter the following text in public chat (Send to all) to gain Critical Explosion status:

  • Dear angel, can you hear my voice?
  • Insert random text here
  • Help me out~ Please~ T_T
  • Insert random text here

To quickly cast, put these lines in macro (ALT+M). To cast it:

1 - Spam the chant 5x to trigger. There will be a 1-minute cooldown afterwards. If it doesn't work at all even at max level, see step 4.

2 - Spam the chant 2x so there will be a consistent 1-minute cooldown.

3 - When changing maps or relogging, repeat step 1.

4 - There will be a few occasions where it will not work at all for some reason. If this happens, change maps or relog, then try again.

5 - The 2nd line is buggy. Instead of typing your name, you can type in other things too.

6 - Even a totally new Super Novice at Base Level 45 and Job Level 1 (or 45/1), can use the chant! Free +50 CRIT that early! The ability to use it disappears at 99/99, but it is regained at 100/1 when upgrading to Expanded Super Novice.

Click on the left GIF to witness GaoSuper activating his fury from within. Click on the right GIF to witness GaoSuper also activating his fury from within. However, notice the 2nd line doesn't use his real name. HAIL GAOSUPER!!!

Bonus stats Reaching Job Level 70 without dying will grant +10 to all stats. Dying removes it, even well after.

Super Novice Spirit restores the bonus (1% chance).

Builds

With almost all first job skills and some second job skills at their disposal, Hyper Novices can be built in many different ways. This section will tackle three different kinds of builds - Mage, Physical, and Hybrid.

These builds are here for reference. You don't necessarily need to follow everything here exactly. Be free, experiment and tinker until you've built the Super Novice that suits you best.

Mage

Mage build Hyper Novice spelunking in Depth 2. Using Safety Wall against Duneyrr's Spider Web saved his life.

Click here for a more specialized and in-depth guide on Magic Hyper Novices: Psoron's Magic Hyper Novice Guide
The Super Novice can take one of two routes - Magic or Physical. The Mage Hyper Novice will go through many difficult trials along the way, but by transcending above the challenges, learning from other classes, and Breaking Rules along the way, they acquired a newfound power by improving existing skills and by combining two or more skills to form even more potent skills. I still wonder what rules are they breaking... The rules of physics, the rule of law... or the rule of er... or the rule of the letter s at the end of the plural form of rule, which is rules, but it can also be a verb attached to a singular nou- (perfectly cut nonsense blabbering).

Stats and Traits

Stat Amount Notes
STR 1+ Leftover. Mainly used for increased carrying capacity.
AGI 60-80
100+ (Judge / Conjurator Card Combo)
Used mainly for reducing animation and flinching animation time and the chances of getting inflicted by Bleeding and Sleep. Try to get 100 Total AGI for full immunity against Bleeding and Sleep.
VIT 70-90
100+ (Judge / Conjurator Card Combo)
Increases Max HP while reducing the chances of getting inflicted by Poison. Try to get 100 Total VIT for full immunity against Poison.
INT 120+
130 (Judge / Conjurator Card Combo)
Main stat. At least 120 INT and DEX are recommended for reducing Variable Cast Time to a minimum.
DEX 120+
1-9 (Judge / Conjurator Card Combo)
At least 120 INT and DEX are recommended for reducing Variable Cast Time to a minimum. When using the 300522.png Yordos Judge Card (300522) /300529.png Yortus Conjurator Card (300529) combo, leave DEX below 10 so SP Cost won't get too expensive. However, doing this requires 100% Variable Cast Time (VCT) reduction.
LUK 60-80
100+ (Judge / Conjurator Card Combo)
Leftover. Marginally increases MATK while reducing the chances of getting cursed as well as reducing its duration. Try to get 100 Total LUK for full immunity against Curse. LUK increases MATK more than DEX, so increase this a lot more when using the 300522.png Yordos Judge Card (300522) /300529.png Yortus Conjurator Card (300529) combo.
Trait Amount Notes
POW 0 Not needed. Using magic sticks to whack things is not the best idea...
STA 0-72 After getting 110 SPL and CON, adjust STA, WIS, or CRT.
WIS 0-72 After getting 110 SPL and CON, adjust STA, WIS, or CRT.
SPL 110 Primary trait. Max this for the highest possible Magic Damage.
CON 110 Secondary trait. Max this for even more Magic Damage and marginally increased survivability thanks to increased Flee.
CRT 0-72 After getting 110 SPL and CON, adjust STA, WIS, or CRT. Thanks to a buff making 28.png Heal spammable, investing into CRT instead of STA or WIS is now viable. 72 CRT almost doubles healing (e.g. 5500 to 9750), and with enough ACD and ASPD, one can spam heal to save on a lot of potions and zeny (I'm a cheapskate XD). However, a decent amount of ACD reduction (30%+) and ASPD (170+) are needed for it to be effective.

Skills

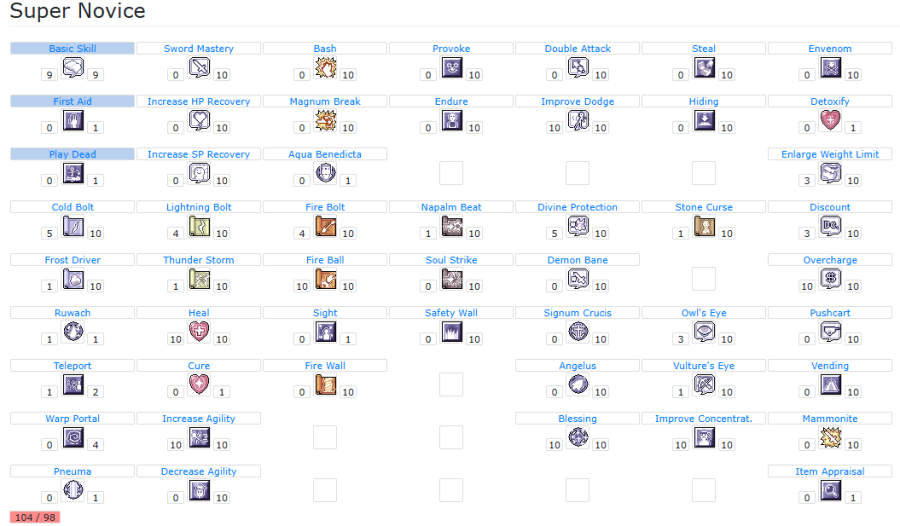
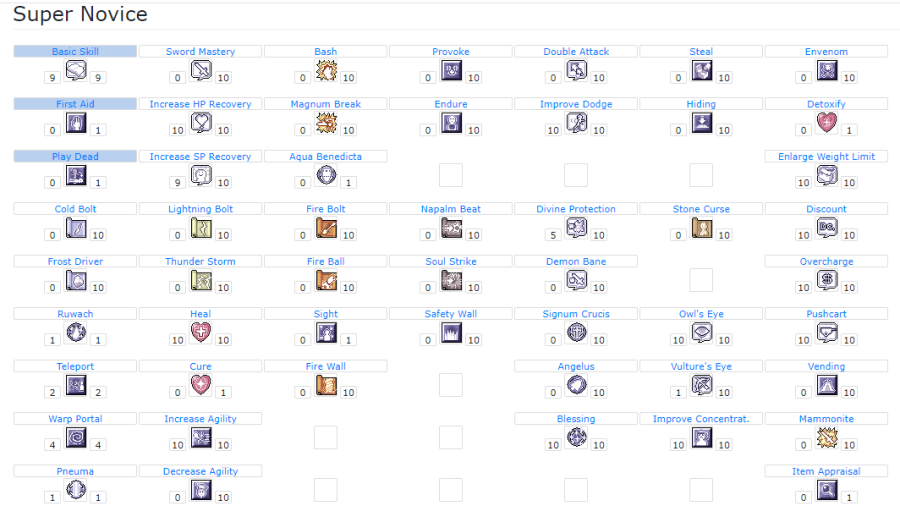
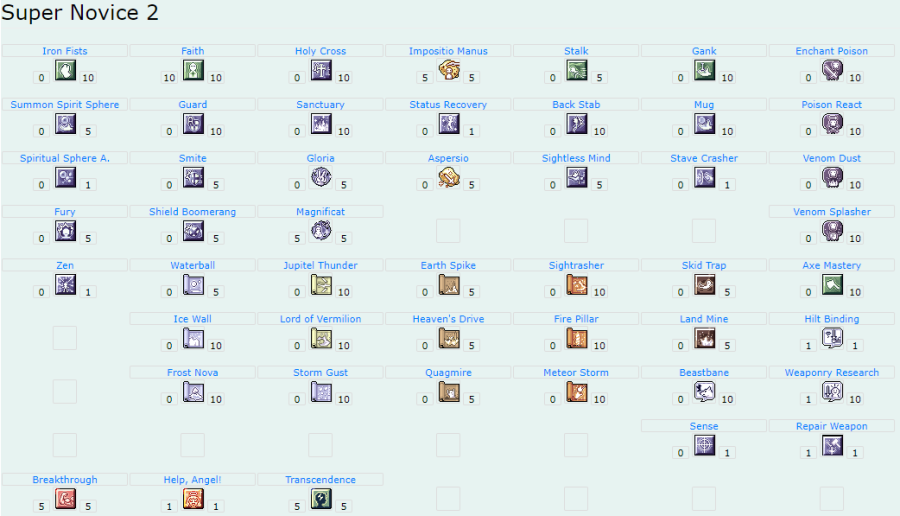
Skills: Super Novice (45-99)
Skill set overview from level 45-99.
Skill Level Notes
Super Novice
19.png Fire Bolt 4 Prerequisite for Fireball.
17.png Fire Ball 10 Your main source of damage from 45-99, especially because a lot of the quests here will revolve around purifying the undead by fire. Being quick to cast and having decent AoE are important because the pitifully low HP and SP will force you to move a lot. Usually one of the first, if not the first magic skill learned by a lot of isekai protagonists.
9.png Increase SP Recovery 5-10 Compensates for the Super Novice's puddle-deep SP pool at the early game and helps save some SP at the end-game when SP Cost skyrockets due to certain equipment and cards.
28.png Heal 3-10 Mainly for self-healing. Also helpful in healing teammates.
29.png Increase Agility 10 VERY IMPORTANT buff to get! AGI, Flee, and mobility are a must to survive as Super Novice, no thanks to the pitifully low HP pool which can result in death in 5 hits at most even with a lot of VIT.
22.png Divine Protection 5 Prerequisite for Blessing. Reduces damage from Demon and Undead race enemies.
34.png Blessing 10 Grants STR, INT and DEX bonuses. Very useful buff.
24.png Ruwach 1 Basically an improved Sight skill. Deals Holy Element magic damage to revealed enemies.
26.png Teleport 1 Save weight, money, inventory space and the grind for a Creamy Card (or the zeny to buy it)!
43.png 3 Prerequisite for Vulture's Eye.
44.png 1 Prerequisite for Attention Concentrate.
45.png Improve Concentration 10 Your main source of DEX and AGI. Max this one for reduced cast time and increased Flee for better survival.
36.png Enlarge Weight Limit 3 Increases weight capacity. Prerequisite for Discount.
37.png Discount 3 Reduces cost of buying from almost all NPCs. Prerequisite for Overcharge.
38.png Overcharge 10 Increases cost of selling to all NPCs. Helps earn zeny faster.
49.png Improve Dodge 10 Last but not least, Improve Dodge further increases Flee, therefore increasing survival by A LOT. Max this.

After getting promoted to Ex. Super Novice, reset all skills.

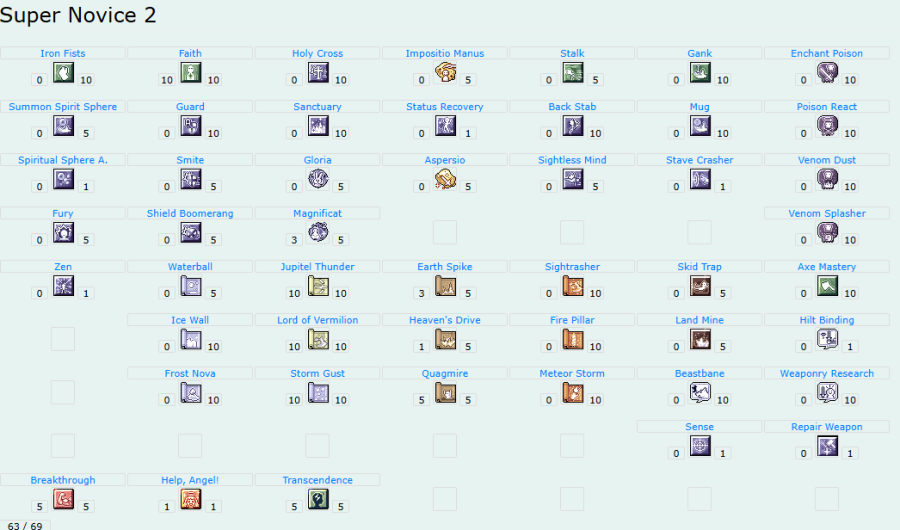
Skills: Expanded Super Novice (99-200)
There are 6 excess points - Reduce Improve Dodge to Level 4. When reaching Job Level 70, put the remaining points there.
The 6 missing points are allocated to Improve Dodge.
Skill Level Notes
Super Novice
17.png Fire Ball 10 Fireball still deals decent damage until around ~level 150. Having two Fire Condor cards can make this skill even stronger.
14.png Cold Bolt 5 Prerequisite for Frost Diver.
15.png Frost Diver 1 Prerequisite for Storm Gust.
20.png Lightning Bolt 4 Prerequisite for Thunderstorm and Jupitel Thunder.
21.png Thunder Storm 1 Prerequisite for Lord of Vermillion.
11.png Napalm Beat 1 Prerequisite for Jupitel Thunder. A cute little Ghost element poke with a tiny AoE (3x3 around the target).
28.png Heal 3-10 Mainly for self-healing. Also helpful in healing teammates.
29.png Increase Agility 10 The increased movement speed and AGI means you'll be more mobile and be able to evade and/or escape attacks easily.
22.png Divine Protection 5 Prerequisite for Blessing. Reduces damage from Demon and Undead race enemies.
34.png Blessing 10 Grants STR, INT and DEX bonuses. Very useful buff.
24.png Ruwach 1 Essentially an improved Sight skill. Deals Holy Element magic damage to revealed enemies.
26.png Teleport 1 Save weight, money, inventory space and the grind for a Creamy Card (or the zeny to buy it)!
43.png 3-10 Prerequisite for Vulture's Eye.
44.png 1 Prerequisite for Attention Concentrate.
45.png Improve Concentration 10 Your main source of DEX and AGI. Max this one for reduced cast times.
Expanded Super Novice
89.png Storm Gust 1 or 10 Deals Water Element damage and a chance to cause Frozen status over a large area while knocking around enemies. Lower levels mean lower damage but much higher Freeze chance while higher levels mean higher damage but lower Freeze chance. Use at level 1 for more crowd control. Use at level 10 for more damage.

Notice: The skill has a tendency to push enemies to the upper right.

84.png Jupitel Thunder 5-10 An improved version of Lightning Bolt with an added knockback and removed cooldown.
85.png Lord of Vermilion 10 A larger and more powerful version of Thunderstorm with an added Blind effect. It can combo with Storm Gust, preferably Level 1 for a quick Freeze. Storm Gust pushes mobs away but guarantees they'll be not too far apart while they're chasing you, which is a good opportunity to blast them away with this skill.
90.png Earth Spike 3 Prerequisite for Heaven's Drive. Essentially an Earth Bolt.
91.png 1-5 Prerequisite for Quagmire. Use this skill to reveal and damage hidden enemies that are a good distance away.
92.png Quagmire 5 Very useful utility skill that slows down enemies while also cutting their DEX and AGI, making escaping or killing mobs easier.
74.png Magnificat 5 Doubles SP Regeneration of the caster and the party. There's no Level 10 Increase SP Recovery - Magnificant alone is more than enough, as long as it's up most of the time.
248.png Faith 10 Adds up to 2000HP and increases Holy resistance by up to 50%. Every bit of HP counts.
105.png Hilt Binding 1 Prerequisite for Repair Weapon. Adds a tiny bit of STR and ATK.
107.png Weaponry Research 1 Prerequisite for Repair Weapon. Adds a tiny bit of ATK and HIT.
108.png Repair Weapon 1 Repairs weapons AND armors by using certain materials. A very handy skill when soloing and quite useful to the party if there are no Meisters and Biolos around, especially in areas where certain enemies destroy equipment.

LV 1 weapon: Iron Ore
LV 2 weapon: Iron
LV 3 weapon: Steel
LV 4 weapon: Rough Oridecon
Armors: Steel

5076.png Angel, Help me! 1 Restores 1000 HP and 350 SP per second for 20 seconds, for a grand total of 20,000 HP and 7,000 SP. Affects self and all party members within a 31x31 area. Beware of the ridiculously long 5-minute cooldown, so use wisely.
5075.png Breakthrough 5 Passive skill. Increases HP, SP, ATK and amount of healing received. Sizeable jump in bonuses from level 4 to 5.
5077.png Transcendence 5 Passive skill. Increases HP, SP, MATK and amount of healing given. Sizeable jump in bonuses from level 4 to 5.
2449.png Psychic Wave 5 Can be used only when a +7 550081.png Patent Freedom Stick [2] (550081) is equipped. A Neutral-element skill that makes life a lot easier due to its high damage.

After switching to Hyper Novice and reaching around Job Level 10+, reset all skills. Your main sources of damage will be Hyper Novice skills, augmented by 1st and 2nd job skills.

Skills: Hyper Novice - Jack Frost Nova
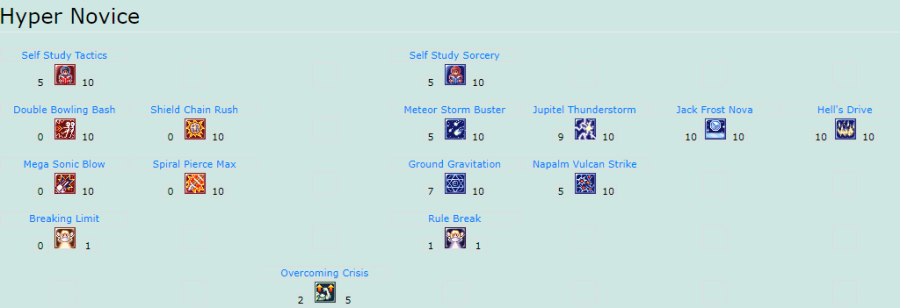
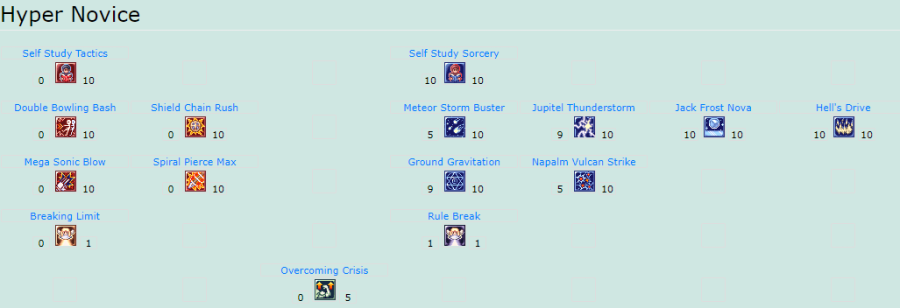
Here's my specialty - Jack Frost Nova. It takes advantage of Dim Glacier's Hell's Jack enchant, focusing on Jack Frost Nova and Hell's Drive. It also works great with the TDRC + Time Gap combo. There are two variations: a more powerful glass cannon build, and a slightly less powerful but much beefier variant. Jack Frost Nova by itself is already quite strong, but other skills can be cast while it is on a 3-second cooldown. One must know how to "piano" and properly rotate multiple skills for maximum damage.


Default skill build.
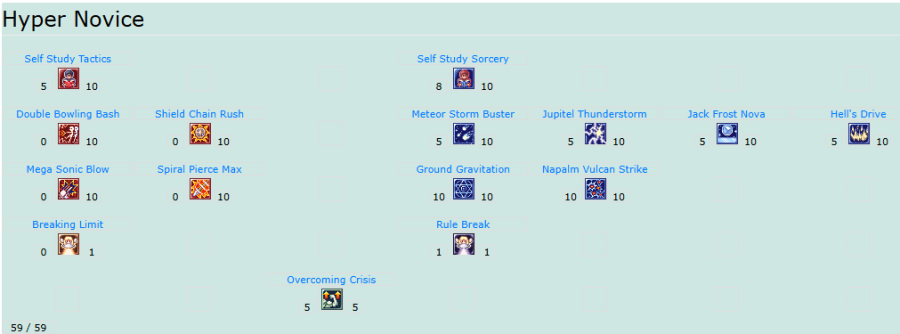
The first build has less damage (by appx. 10-15%) but has far greater survival thanks to Overcoming Crisis (OC). Even at just level 2 Overcoming Crisis, it still provides a decent boost to HP (example: from 85k to 125k), but more importantly, access to a panic / oh $$$$ button in case of emergency, as long as there is 50 AP and not on a 60-second cooldown. The bonus PATK and SMATK is the cherry on top.
The second build has more damage (appx. 10-15%), thanks to a maxed out SSS, HD and JFN. JTS is still level 9. GG is now at level 9, resulting in increased damage and significantly less ACD. However, the lack of OC results in a more fragile Glass Cannon build, losing access to an HP boost and full heal. As a result, soloing Depth 2 is still possible, but significantly more care must be taken, especially against really hard-hitting Mosquitoes and Salamanders. The panic button is gone. Be careful!
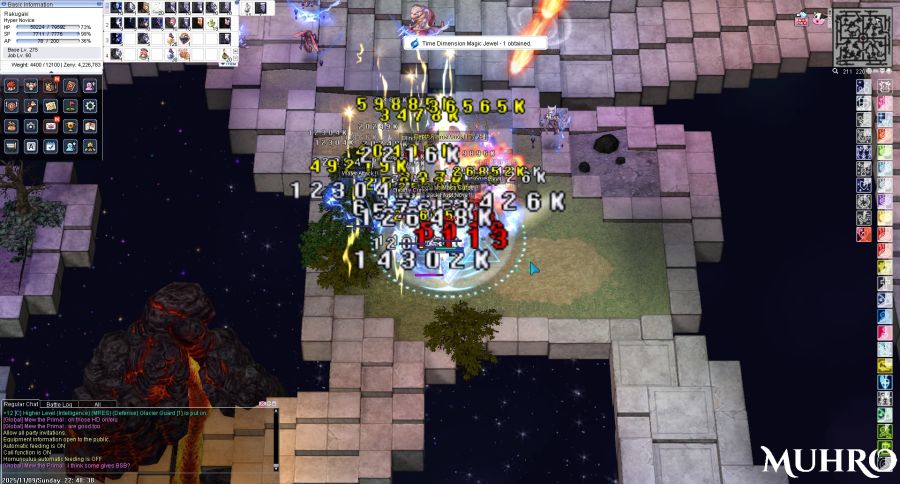
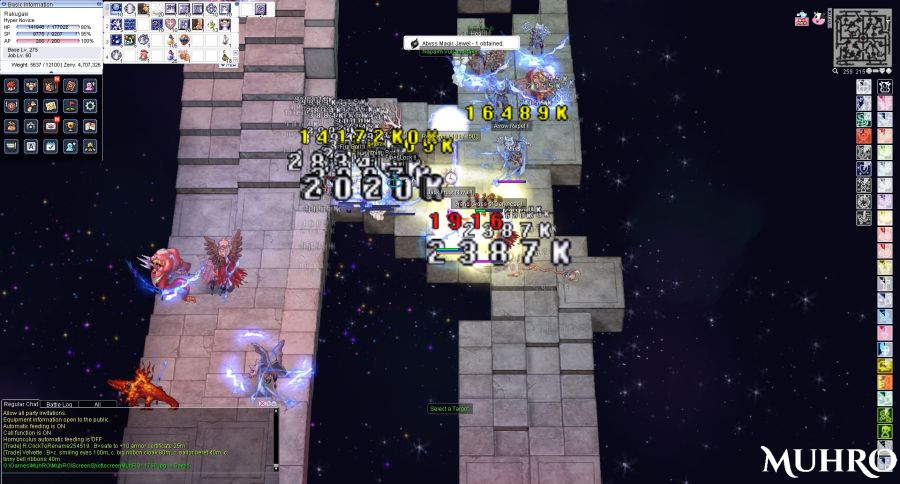
JFN Hyper Novice in Depth2.
Skill Level Notes
Hyper Novice
5450.png Self Study Sorcery 5+ Passive that adds up to 10 S.MATK. Higher levels increase the damage of all skills in the Mage tree.
5455.png Meteor Storm Buster 5 or 8 The upgraded version of Meteor Storm summons more powerful and faster meteors to rain down on enemies. The initial hit has a small 5x5 area while the explosion has a 9x9 area at level 8 and above. The first meteor will always strike the cell it's casted on. Succeeding meteors are random. At levels 8 and above, enemies at the tile this spell is casted on will receive all hits from the explosion damage.

Fixed Cast Time: 1.5 seconds
Skill cooldown: 2.5 seconds
Aftercast Delay: 0.3 seconds

5456.png Jupitel Thunderstorm 9 or 10 Jupitel Thunder and Thunderstorm combine together to summon a targeted Wind element electric storm. AoE is 9x9 at levels 9-10.

Fixed Cast Time: 1 second
Skill cooldown: 2 seconds, 1.5 seconds with 550152.png Time Gap Hyper Staff [2] (550152)
Aftercast Delay: 0.5 seconds
Max AoE of 9x9 and max of 10 hits at level 9.

5457.png Jack Frost Nova 10 A strong Water element spell that lingers in a 9x9 area at max level. Hits 12 times at max level. Inflicts the Bitter Cold status to enemies, increasing damage taken from Water element attacks.

Fixed Cast Time: 1.5 seconds
Skill cooldown: 3 seconds
Aftercast Delay: 0.3 seconds
Max AoE of 9x9 at level 6, but max number of hits (12) at level 10. Short Aftercast Delay.

5458.png Hell's Drive 5 or 10 An upgraded version of Heaven's Drive, this skill causes Earth element damage in an area around the player. Has a 9x9 area at max level. If your Dim Glacier Wand is enchanted with Hell's Jack, you can max this skill out. Needs at least 30% ACD Reduction at level 10 for full effectiveness.

Fixed Cast Time: 1 second
Skill cooldown: 2 seconds at level 5, 0.7 seconds at level 10
Aftercast Delay: 1 second
Max AoE of 9x9 at level 10. Short-ish Aftercast Delay

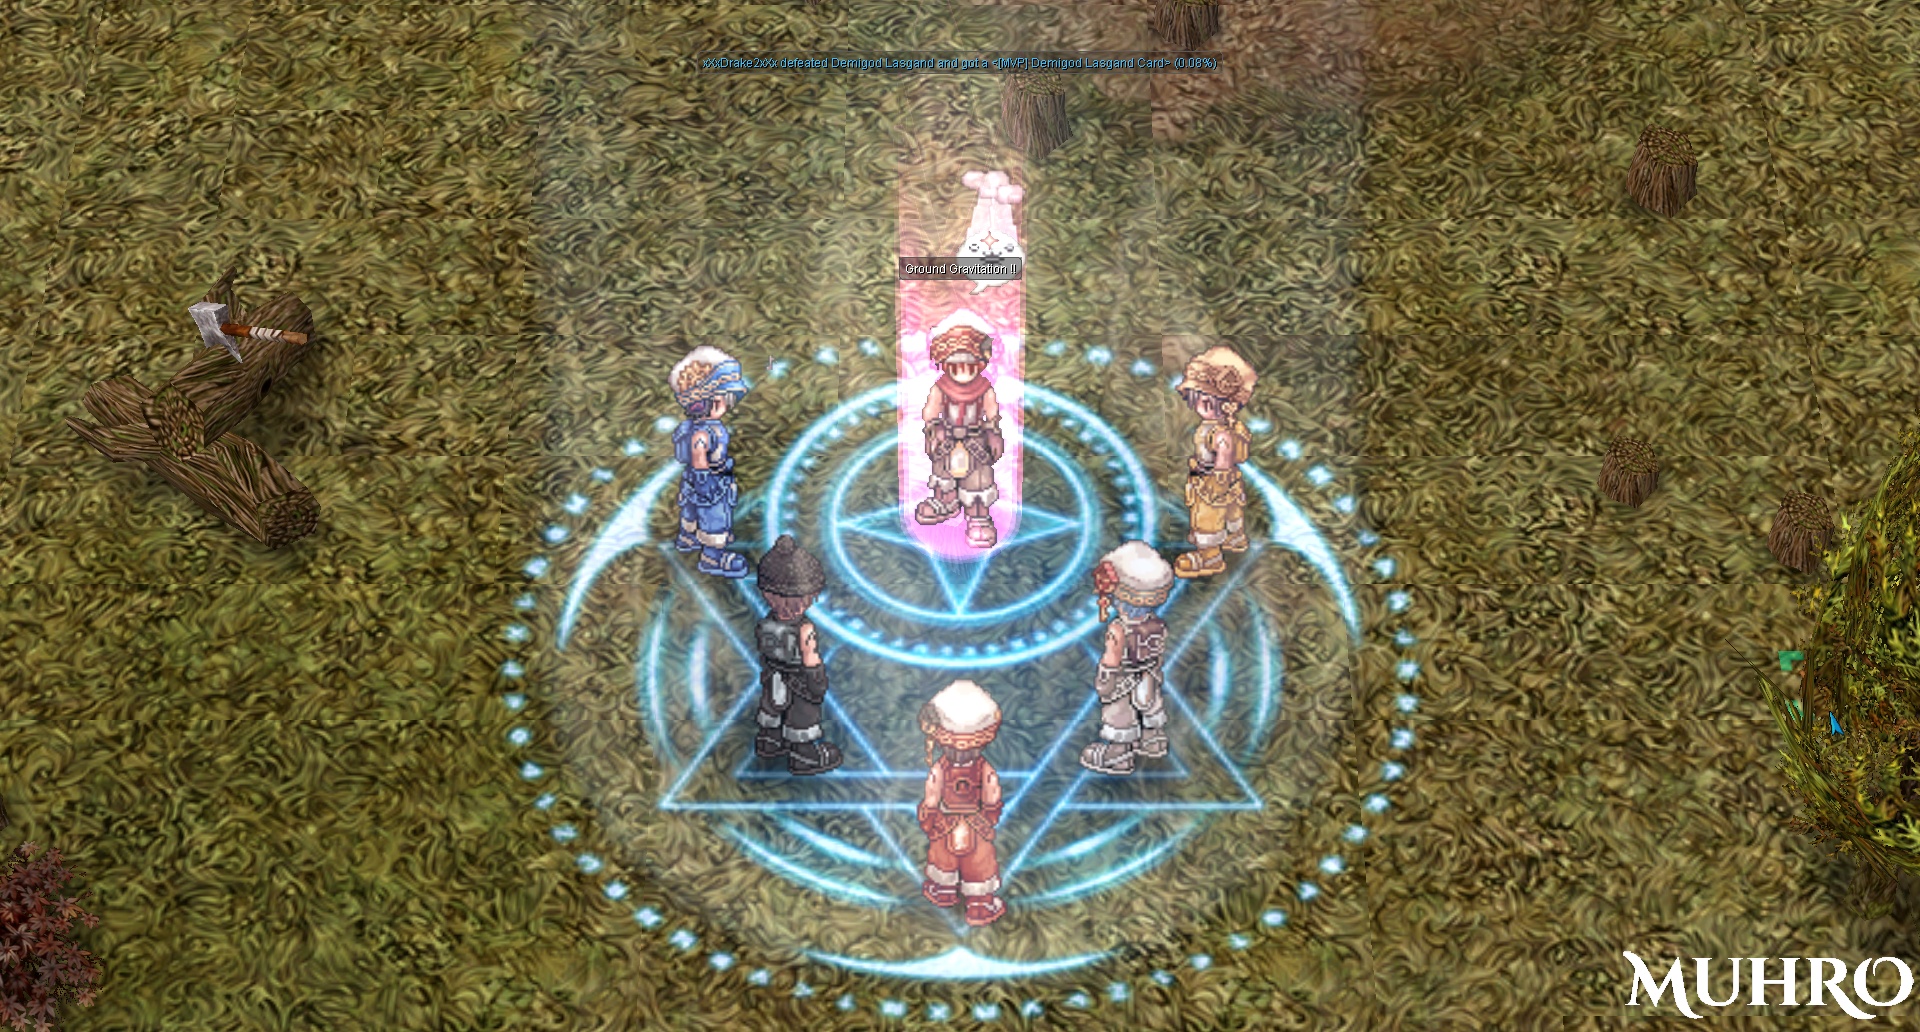
5459.png Ground Gravitation 7 - 10 An upgraded version of Gravitational Drive, Ground Gravitation summons an awesome-looking space-age symbol that causes Neutral element damage to all enemies within a 9x9 area at level 7 and above, for a duration of 5 seconds. Enemies affected receive increased damage while slowing them down. ACD is PAINFUL below level 9, so use it carefully!

Fixed Cast Time: 1.5 seconds
Skill cooldown: 5 seconds
Aftercast Delay: 1 second (level 10), UTTER PAIN below level 9
Max AoE of 9x9 at level 7. Aftercast Delay is significantly reduced at level 9 and above.

5460.png Napalm Vulcan Strike 5 A combination of Soul Strike and Napalm Vulcan, this highly spammable Ghost element spell deals damage in a 7x7 area. Requires 40% ACD reduction and at least 173 ASPD for maximum spamming.

Fixed Cast Time: 1 seconds
Skill cooldown: 0.3 seconds
Aftercast Delay: 0.5 seconds

5462.png Rule Break Optional The Mage Tree's AP skill greatly increases the damage of all skills for 5 minutes. However, because it uses up A LOT of skill points, it is up to you to decide whether to invest in this and specialize in 1-2 skills or ignore it and max 3-4 skills for more variety at the cost of reduced damage.
5505.png Overcoming Crisis Optional Overcoming Crisis is a super-duper skill that temporarily increases Max HP, PATK and SMATK, and fully restores HP. It costs a mere 50 AP to cast and has a 60-second cooldown. A fantastic panic button to prevent a terrible fate. Due to skill point constraints, mage builds will be forced to compromise and make decisions on what skills to get.
Skills: Hyper Novice - ASPD Napalm Vulcan Strike
Napalm Vulcan Strike is a build that revolves around spamming Napalm Vulcan Strike. The floor is made of floor. It becomes a "firehose" of souls when using the 400545.png Time Dimensions Rune Crown (Hyper Novice) [1] (400545) + 550133.png Dimensions Hyper Rod [2] (550133) combo, if both are Grade A. It is powerful, but requires high ACD reduction and high ASPD for maximum power. At least 40% ACD reduction and 180+ ASPD are recommended. Unlike the Jack Frost Nova build above, piano skills and proper skill rotation aren't needed. Just set up a smartkey/smartcast Turbo, open up with another skill like Ground Gravitation or Jack Frost Nova to tenderize them a bit, aim, and start spraying them with angry thoughts and/or angry souls.


Default skill build.
This build is designed to be tanky and comfy to use. NVS and an opener are maxed. In this case, the opener is Ground Gravitation. However, when you're farming in Depth1 and Depth2, Jack Frost Nova is the better opener, so annoying stripper frogs and frustratingly quake-happy salamanders are killed faster.
NVS Hyper Novice with the TDRC combo above in Depth2.
Skill Level Notes
Hyper Novice
5450.png Self Study Sorcery 5+ Passive that adds up to 10 S.MATK. Higher levels increase the damage of all skills in the Mage tree.
5455.png Meteor Storm Buster 5 The upgraded version of Meteor Storm summons more powerful and faster meteors to rain down on enemies. The initial hit has a small 5x5 area while the explosion has a 9x9 area at level 8 and above. The first meteor will always strike the cell it's casted on. Succeeding meteors are random. At levels 8 and above, enemies at the tile this spell is casted on will receive all hits from the explosion damage.

Fixed Cast Time: 1.5 seconds
Skill cooldown: 2.5 seconds
Aftercast Delay: 0.3 seconds

5456.png Jupitel Thunderstorm 5 Jupitel Thunder and Thunderstorm combine together to summon a targeted Wind element electric storm. AoE is 9x9 at levels 9-10.

Fixed Cast Time: 1 second
Skill cooldown: 2 seconds, 1.5 seconds with 550152.png Time Gap Hyper Staff [2] (550152)
Aftercast Delay: 0.5 seconds
Max AoE of 9x9 and max of 10 hits at level 9.

5457.png Jack Frost Nova 5 or 10 A strong Water element spell that lingers in a 9x9 area at max level. Hits 12 times at max level. Inflicts the Bitter Cold status to enemies, increasing damage taken from Water element attacks.

Fixed Cast Time: 1.5 seconds
Skill cooldown: 3 seconds
Aftercast Delay: 0.3 seconds
Max AoE of 9x9 at level 6, but max number of hits (12) at level 10. Short Aftercast Delay.

5458.png Hell's Drive 5 An upgraded version of Heaven's Drive, this skill causes Earth element damage in an area around the player. Has a 9x9 area at max level. If your Dim Glacier Wand is enchanted with Hell's Jack, you can max this skill out. Needs at least 30% ACD Reduction at level 10 for full effectiveness.

Fixed Cast Time: 1 second
Skill cooldown: 2 seconds at level 5, 0.7 seconds at level 10
Aftercast Delay: 1 second
Max AoE of 9x9 at level 10. Short-ish Aftercast Delay

5459.png Ground Gravitation 5 or 10 An upgraded version of Gravitational Drive, Ground Gravitation summons an awesome-looking space-age symbol that causes Neutral element damage to all enemies within a 9x9 area at level 7 and above, for a duration of 5 seconds. Enemies affected receive increased damage while slowing them down. ACD is PAINFUL below level 9, so use it carefully!

Fixed Cast Time: 1.5 seconds
Skill cooldown: 5 seconds
Aftercast Delay: 1 second (level 10), UTTER PAIN below level 9
Max AoE of 9x9 at level 7. Aftercast Delay is significantly reduced at level 9 and above.

5460.png Napalm Vulcan Strike 10 A combination of Soul Strike and Napalm Vulcan, this highly spammable Ghost element spell deals damage in a 7x7 area. Requires at least 30% ACD reduction and 174 ASPD for maximum spamming.

Fixed Cast Time: 1 seconds
Skill cooldown: 0.3 seconds
Aftercast Delay: 0.5 seconds

5462.png Rule Break Optional The Mage Tree's AP skill greatly increases the damage of all skills for 5 minutes. However, because it uses up A LOT of skill points, it is up to you to decide whether to invest in this and specialize in 1-2 skills or ignore it and max 3-4 skills for more variety at the cost of reduced damage.
5505.png Overcoming Crisis Optional Overcoming Crisis is a super-duper skill that temporarily increases Max HP, PATK and SMATK, and fully restores HP. It costs a mere 50 AP to cast and has a 60-second cooldown. A fantastic panic button to prevent a terrible fate. Due to skill point constraints, mage builds will be forced to compromise and make decisions on what skills to get.

Equipment

Equipment
Super Novice (45-99)
Item Type Way to obtain Notes
Paradise Set Equipment Set Eden Academy, Base Level 10 HIGHLY RECOMMENDED! Upon reaching Base Level 10, get the full set by going to @go 16. Go one room up, find Paradise Equipment and talk to Lothaire to get the set FOR FREE. It will serve you well until around level 100, when you'll get better version. There are other options below, but this is one of, if not the best one to use from level 10-100.
5119.png Super Novice Hat [1] (5119) Upper Headgear Lighthalzen Armory (unslotted)

Holden (slotted)

Starter Headgear. Gives +1 all stats.
2340.png Novice Breastplate [1] (2340) Armor Yuno - King's Shop Starter Armor, though it's a little expensive at 89,000 zeny. Definitely better than rags that came from the dump (2352.png Tattered Novice Ninja Suit (2352) ).
2113.png Novice Shield [1] (2113) Shield Lighthalzen Armory One of the best shields the Super Novice could ever have. Gives 20% resistance to all elements except Neutral.
2512.png Novice Manteau [1] (2512) Garment Starter Garment - gives 10% Neutral resistance.
2416.png Novice Shoes [1] (2416) Footgear Starter Shoes. Gives an HP boost.
5125.png Angel's Kiss [1] (5125) Upper Headgear Toad Part of the Angel's Set. Adds 3% SP recovery.
15012.png Puente Robe [1] (15012) Armor Orc Lady Decent starter armor. Slightly reduces fixed cast time and slightly improves the effectiveness of healing skills.
2355.png Angelic Protection [1] (2355) Armor Eclipse MDEF+20

When complete, the Angel's Set gives a sizeable boost to HP and SP. There is a small chance Lv. 1 Assumptio will be autocast if you're under attack. Beware the After Cast Delay that happens each time the skill is autocast.

2183.png Modified Angelic Guard [1] (2183) Shield Mastering Part of the Angel's Set.
20710.png Modified Angel's Cardigan [1] (20710) Garment Vagabond Wolf Part of the Angel's Set. Adds 5% HP recovery.
22015.png Advanced Angel's Reincarnation [1] (22015) Footgear Vocal Part of the Angel's Set. HP +100.
2628.png Novice Armlet [1] (2628) Accessory Izlude Armor Dealer Starter accessory. Doesn't give any stats, but at least it's slotted and cheap.
2607.png Clip [1] (2607) Dragon Fly Gives 10SP.
Expanded Super Novice (99-175)
Advanced Paradise Set Equipment Set Eden Academy, Base Level 100 Upon reaching Base Level 100, go back to where you got the Paradise Set. Talk to Louis to get the Advanced Paradise Set in exchange for a couple of monster drops or by spending 10 25223.png Eden Coin (25223) per piece.
450122.png Noblesse Super Novice Robe [1] (450122)

470017.png Noblesse Magic Boots [1] (470017)

480014.png Noblesse Magic Manteau [1] (480014)

490015.png Noblesse Magic Ring [1] (490015)

10 6919.png Token of Honor (6919) per piece. Obtained by completing 16.1 Banquet for Heroes Good until level 125. It is highly recommended to complete the 16.1 Banquet for Heroes quest chain to get this over the other armors. While it gives less MATK compared to the Flattery Robe and is designed more towards an autospell build, completing the full set gives quite a lot of bonuses, which include reduction in Variable Casting Time and Aftercast Delay, and can be further upgraded into the Imperial and Grace sets. Finally, to put the icing on the cake, they can be refined to +9 thanks to the 100128.png Noblesses Refine Ticket (100128) at a price of 10 6919.png Token of Honor (6919)
450124.png Imperial Super Novice Robe [1] (450124)

470019.png Imperial Magic Boots [1] (470019)

480017.png Imperial Magic Manteau [1] (480017)

490018.png Imperial Magic Ring [1] (490018)

10 25155.png Schwarzwald Token of Honor (25155) per piece. Obtained by completing the 16.2 Terra Gloria Good until level 150. An upgraded version of the Noblesse set. Like the Noblesse set, they can be easily refined to +9 thanks to the 100129.png Imperial Refine Ticket (100129) , at the cost of...
450126.png Grace Super Novice Robe [1] (450126)

470021.png Grace Magic Boots [1] (470021)

480019.png Grace Magic Manteau [1] (480019)

490020.png Grace Magic Ring [1] (490020)

20 25669.png Unknown Parts (25669) per piece. Obtained by completing the 17.1_Illusion Best by level 200, but these will still serve you well even at level 250 if you still don't have enough resources to get the best equipment. Each piece costs 20 25669.png Unknown Parts (25669) while the 100130.png Grace Refine Ticket (100130) costs 20 25723.png Cor Core (25723) .
550044.png Paradise Super Novice Staff (550044) Rod Eden Academy, Base Level 100 and above Go back to where you got the Paradise Set and pay Labraham 10 25223.png Eden Coin (25223) . Initially gives decent MATK but leveling up makes it significantly better. The glaring downsides - no slots and it can't be refined.
550080.png Freedom Stick [2] (550080) Bioresearch Laboratory, Base Level 100 and above An ancient rod. See the link above for more info on patenting it.
5897.png Ascendant Crown [1] (5897) Upper Headgear Cash Shop A good mid game headgear that provides a lot of bonuses.
2113.png Novice Shield [1] (2113) Shield Lighthalzen Armory One of the best early-game shields the Super Novice could ever have - gives 20% resistance to all elements except Neutral.
22008.png Temporal DEX Boots [1] (22008) Footgear Old Glast Heim When paired to Giant Faceworm Skin, it gives a boost to HP and SP. If base DEX = 120, fixed cast time -0.5 seconds. This is very important, as you need to quickly cast spells and remain mobile. Try to get the Spell enchant. The second enchant can be Muscular Endurance or Lucky Day.

NOTICE: TEMPORAL BOOTS CANNOT BE WORN BY SUPER NOVICES IN OFFICIAL RO SERVERS!

2924.png Int Glove [1] (2924) Accessory Eclage Glove Seller (10 Splendide Coins) This is the more offensive-oriented accessory. If your base INT is 110, equip two of these as it adds MATK for every 10 base INT and +1% MATK if base INT is 110.
2898.png Black Rosary [1] (2898) Nightmare Wraith Dead Gives a nice boost to MDEF (+15), reducing damage from magic attacks and the chances of being Stone Cursed and Frozen.
Expanded Super Novice (175-200)
400054.png Archmage's Courtesy [1] (400054)

400044.png Phantom of Masquerade [1] (400044)

Upper Headgear OS / OS-LT Headgears Ignoring the OS weapons bonuses, these three are pretty much the same. They boost magic damage, especially at high refines. Choose which one looks good without an upper headgear costume.
18874.png Monocle [1] (18874) Mid Headgear Owl Viscount, Owl Marquees The cheapest and "easiest" to get slotted mid headgear. Other mid headgears can be obtained via the Cash Shop, but only a few can be slotted by the 6396.png Spiritual Auger (6396) .
15377.png Illusion Armor Type B [1] (15377) Armor 17.1 Illusion An upgrade over the Grace set but only at high refines (+9) and with modification modules. Gives a large increase in MATK (+100), even more MATK at higher refines and can be enchanted. 39540.png [1] (39540) and two 39535.png [2] (39535) are recommended.
450128.png Automatic Armor Type B [1] (450128) 17.2 Sage Legacy An improved version of the Illusion Armor, it gives a sizeable increase in MATK (+125), even more MATK at higher refines and can be enchanted. While the modules have better stats, further boosting requires higher refines. Choose between 1000128.png Automatic Modification Module (Magical Force) (1000128) , 1000134.png Automatic Modification Module (Fixed Casting) (1000134) , 1000123.png Automatic Modification Module (Magic Power) (1000123) and 1000168.png Automatic Module (Shadow Spell) (1000168) .
550044.png Paradise Super Novice Staff (550044) Rod Eden Academy, Base Level 100 and above If better rods like the ones listed below are still out of reach, this humble rod will still serve you well, even beyond level 200. It deals more damage than a +15 Crimson Rod and almost the same damage as a +15 Rutilus Stick-OS with the MATK +15% enchant.
26151.png Rutilus Stick-OS [2] (26151) OS / OSAD Weapons A strong wand that gives After-Cast Delay reduction at +11, becoming even stronger with enchants. Try to get the MATK +15% enchant. The Paradise Super Novice Wand you get for FREE deals almost the same damage as this at +15. However, it does have its advantages. The Paradise SN Wand has no slots while this has 2, and it doesn't require Super Novice Soul Link to use, unlike the Welding Wand and Illusion Thorn Staff of Darkness.
550081.png Patent Freedom Stick [2] (550081) Bioresearch Laboratory An upgraded version of 550080.png Freedom Stick [2] (550080) . Refine it to +7 to gain access to level 5 2449.png Psychic Wave, which will make leveling and killing monsters a lot easier.
2113.png Novice Shield [1] (2113) Shield Lighthalzen Armory Illusion Silver Guard, Magic Absorber, Glacier Shield or Mad Bunny-LT still out of reach? The Novice Shield is still decent, thanks to its 20% resistance against all elements except Neutral. It may also help in reducing, or even fully negating Lasgand's Earth and Fire element attacks when paired with the right equipment and cards.
28942.png Cursed Knight's Shield [1] (28942) Cash Shop A good shield that provides many bonuses, especially at higher refines. Keep it at +4 if upgrading to a Purified Knight's Shield in the future.
460018.png Illusion Silver Guard [1] (460018) Illusion of Twins A good alternative to the Cursed Knight's Shield and Purified Knight's Shield, it reduces Variable Casting Time and Aftercast Delay and can be enchanted. Highly recommended to get 2 Spellbound Nives.
20934.png Illusion Engine Wing Type B [1] (20934) Garment 17.1 Illusion Max HP +1000. Adds 100 HP every 2 refine rate. Enchant with 39542.png [3] (39542) and 2 39537.png [4] (39537) modules.
480021.png Automatic Engine Wing Type B [1] (480021) 17.2 Sage Legacy Improved version of the Illusion Engine Wing. Choose between 1000136.png Automatic Modification Module (Drain Life) (1000136) , 1000125.png Automatic Modification Module (Fast) (1000125) and 1000126.png Automatic Modification Module (Caster) (1000126) .
22197.png Illusion Leg Type B [1] (22197) Footgear 17.1 Illusion Max SP +200. Adds 20 SP every 2 refine rate. Enchant with either 39531.png [5] (39531) for more survivability or 39530.png [6] (39530) for more SP, and 39541.png [7] (39541) .
22238.png Great Hero Boots [1] (22238) An obsolete and ancient pair of boots gets a modern touch-up, making it GREAT. This pair of shoes gives a lot of bonuses, especially at high refines. Best paired with a 550081.png Patent Freedom Stick [2] (550081) . Try to refine this to +11, then use the 100747.png Weapon Reform (Intermediate) (100747) to turn it to a +10 Hero Boots-LT.
470023.png Automatic Leg Type B [1] (470023) 17.2 Sage Legacy Improved version of the Illusion Leg. Enchant with the following: 1000147.png Automatic Module (Over Power) (1000147) , 1000151.png [8] (1000151) and 1000135.png Automatic Modification Module (Above All) (1000135) .
32209.png Illusion Battle chip R [1] (32209) Accessory 17.1 Illusion One of the best accessories for this build. Grants MATK +5%. 29545.png Modification Orb (Magic Healing) (29545) and 25680.png Modification Module (Spell) (25680) or 25681.png Modification Module (Attack Speed) (25681) are recommended. Get Spell for increased magic power. Get ASPD for better spell spamming, provided Variable Cast Time and After Cast Delay are kept to a minimum.
32210.png Illusion Battle chip L [1] (32210) One of the best accessories for this build. Grants MATK +5%. 29546.png Modification Orb (Magic Soul) (29546) and 25680.png Modification Module (Spell) (25680) or 25681.png Modification Module (Attack Speed) (25681) are recommended. Get Spell for increased magic power. Get ASPD for better spell spamming, provided Variable Cast Time and After Cast Delay are kept to a minimum.
490026.png Automatic Battle Chip R [1] (490026) 17.2 Sage Legacy An improved version of the Illusion Battle Chip. Choose between 1000139.png Automatic Modification Module (Magic Soul) (1000139) , 1000115.png Automatic Modification Module (Spell) (1000115) , 1000116.png Automatic Modification Module (Attack Speed) (1000116) and 1000144.png Automatic Module (Unlimited Vital) (1000144) .
490027.png Automatic Battle Chip L [1] (490027) An improved version of the Illusion Battle Chip. Choose between 1000140.png Automatic Modification Module (Power Force) (1000140) , 1000115.png Automatic Modification Module (Spell) (1000115) , 1000116.png Automatic Modification Module (Attack Speed) (1000116) and 1000144.png Automatic Module (Unlimited Vital) (1000144) .
Hyper Novice (200-230)
400263.png Great Magician's Ceremonial Crown-LT [1] (400263)

400265.png Phantom Cap-LT [1] (400265)

Upper Headgear OS / OS-LT Headgears Upgraded versions of OS Headgears. Boosts magic damage, especially at high refines. Choose which one looks good without an upper headgear costume.
410092.png Cor Core Booster [1] (410092) Middle Headgear Rudus Boosts all elemental Magic Damage while reducing Variable Cast Time and After-Cast Delay. The slotted version's bonus is a bit less. Pair with 420003.png CD in Mouth (420003) for more Magic Damage, but try not to whack stuff and trigger Soul Strike and its ACD. Unlike the three mid-headgears below, it cannot be enchanted.
420003.png CD in Mouth (420003) Lower Headgear Boosts all elemental Magic Damage when paired with 410092.png Cor Core Booster [1] (410092) , but try not to auto-whack stuff and trigger Soul Strike and its ACD.
450178.png Grey Wolf Robe [1] (450178) Armor Gray Wolf Equipment An improved version of the Automatic Armor, it gives a large increase in MATK (+130), even more MATK at higher refines and can be enchanted. While the modules have better stats, further boosting requires higher refines.
450207.png Snow Flower Robe [1] (450207) Issgard Equipment A much better version of the Automatic Armor Type-B and Gray Wolf Robe, thanks to higher stats and the ability to choose which enchants you want. No RNG shenanigans.
550057.png Fortified Rod [2] (550057) Rod Amicitia A level 5 weapon that boosts 5456.png Jupitel Thunderstorm and 5455.png Meteor Storm Buster damage. Try refining this to +8.
550075.png Rutilus Stick-OSAD [2] (550075) OS / OSAD Weapons A stronger and sadder version of the 26151.png Rutilus Stick-OS [2] (26151) , providing better After-Cast Delay reduction, less Variable Cast Time and a permanent 30% boost to Neutral and Fire element damage instead of a random limited-duration buff.
550069.png Glacier Wand (550069) Issgard Equipment A non-slotted wand that can be enchanted four times, making it a decently powerful weapon until the dimmer but more powerful 550089.png Dim Glacier Wand [1] (550089) is obtained.
460018.png Illusion Silver Guard [1] (460018) Shield Illusion of Twins A good alternative to the Cursed Knight's Shield and Purified Knight's Shield, it reduces Variable Casting Time and Aftercast Delay and can be enchanted. Highly recommended to refine this to +11 and get 2 Spellbound Nives.
460005.png Magic Absorber [1] (460005) Geffen Night Arena Increases Magical Damage and provides some MDEF. Can be enchanted. Try getting enchants that ignore the MDEF of Normal or Boss monsters, preferably Boss monsters.
480090.png Grey Wolf Muffler [1] (480090) Garment Gray Wolf Equipment Improved version of the Illusion Engine Wing and Automatic Engine Wing.
480160.png Snow Flower Muffler [1] (480160) Issgard Equipment Improved version of the Gray Wolf Muffler.
480125.png Convertible Magical Wing [1] (480125) Convertible Wings A significantly upgraded version of the Excellion Wing, tuned to greatly boost magic power, especially when refined and paired with either Deep Blue Sunglasses and Victory Wing Ears.
470094.png Hero Boots-LT [1] (470094) Footgear The current final form of the Ancient Hero Boots, this pair of shiny shoes gives quite a lot of bonuses, especially at high refines and better grades. It's an upgrade over the Automatic Leg B-type at high refines AND when paired with the 550082.png Freedom Stick-LT [2] (550082) . Try to aim for a +11 Grade C at least.
470088.png Grey Wolf Shoes [1] (470088) Gray Wolf Equipment Improved version of the Illusion Leg and Automatic Leg.
470116.png Snow Flower Shoes [1] (470116) Issgard Equipment Improved version of the Gray Shoes.
490052.png Sinful Sapphire Ring [1] (490052)

490064.png Brilliant Light Sapphire Ring [1] (490064)

Accessory (Right) Thanatos Tower These two are almost virtually identical to each other. Both give additional MATK and ASPD. Best paired with their necklace counterparts for the ACD and FCT reduction.
490053.png Sinful Sapphire Necklace [1] (490053)

490065.png Brilliant Light Sapphire Necklace [1] (490065)

Accessory (Left)
Hyper Novice (230-275)
400111.png Vesper Headgear [1] (400111) Upper Headgear Juperos F2 near entrance One of the best upper headgears for this build. Refining and grading it results in a significant increase in damage. Grade it to at least B for the 0.5-second FCT reduction, so you can replace 25067.png Cast Stone (Garment) (25067) , 25170.png Minor Casting Stone (Garment) (25170) and 1000521.png Minor Casting Stone (Dual) (1000521) for something better.
410080.png Deep Blue Sunglasses [1] (410080) Middle Headgear Verus A cool-looking slotted Middle Headgear that can be enchanted. Reduces Variable Cast Time. Try to get MATK enchants.
400002.png Victory Wing Ears [1] (400002) Amicitia (0.05%) A cool-looking slotted Middle Headgear that can be enchanted. Reduces After-Cast Delay. Try to get MATK enchants.
420066.png Orbs of Survival-LT (420066) Lower Headgear Rock Ridge Lower headgear that boosts magical damage while reducing variable casting time.
450271.png Dim Glacier Robe [1] (450271) Armor 20 The Immortal An armor that gives a lot of power, sufficient for the late-game, but lacking in the end-game. It can be easily graded, because it doesn't need an exorbitant amount of zeny and expensive 6635.png Blacksmith's Blessing (6635) to refine. Try obtaining a +12 Grade C. Currently can be purchased from player vendors at cheap prices.
550089.png Dim Glacier Wand [1] (550089) Rod Issgard Equipment 2nd best-in-slot weapon despite having just 1 slot. It can have three very powerful enchants of your choosing, which means no RNG nonsense. It can be easily graded as well, because it doesn't need an exorbitant amount of zeny and expensive 6635.png Blacksmith's Blessing (6635) to refine.
460040.png Glacier Guard [1] (460040) Shield Episode 20 Easy to get and fully enchant - the rewards from 20 The Immortal is enough to obtain one and fully enchant. Upgrade it to Grade C and refine it to +10. Focusing on the more defensive enchants provides A LOT of damage reduction plus a HUGE quality of life improvement - 10% reduced VCT and over 100 Hard MDEF. Having over 100 Hard MDEF means complete immunity to a myriad of bad status effects, like getting Stoned, Frozen, and more!
480284.png Dim Glacier Muffler [1] (480284) Garment 20 The Immortal This muffler doesn't emit greenhouse gases, but it does emit a lot of power, sufficient for the late-game but lacking in the end-game. It can be easily graded, because it doesn't need an exorbitant amount of zeny and expensive 6635.png Blacksmith's Blessing (6635) to refine. Try obtaining a +12 Grade C. Currently can be purchased from player vendors at cheap prices.
480233.png Death Rune Manteau [1] (480233) Varmundt's Biosphere A powerful manteau that grows stronger the higher its refinement and grade. The 10% After-Cast Delay reduction at Grade A makes skill rotation a lot easier, especially when Ground Gravitation is part of the rotation.
470198.png Dim Glacier Shoes [1] (470198) Footgear 20 The Immortal A pair of shoes that gives a lot of power, sufficient for the late-game but lacking in the end-game. It can be easily graded, because it doesn't need an exorbitant amount of zeny and expensive 6635.png Blacksmith's Blessing (6635) to refine. Try obtaining a +12 Grade C. Currently can be purchased from player vendors at cheap prices. Despite its many benefits like reduced FCT, it is but a stopgap to the wonderful, wonderful moaning that's to come.
470204.png Moan of Corruption [1] (470204) Sunken Ship Climbing and/or moaning noises not included. One of, if not the best footgear due to the FCT reduction and MATK bonuses, but at the cost of increased SP consumption. It is highly recommended to give this thing a C-grade at the very least for the big 1-second Fixed Cast Time reduction. Grade A is definitely the best, because SPL is one of the major factors affecting all of the skills' damage.
490304.png Temple Rune Ring [1] (490304) Accessory (Right) Upper Headgear One of the best-in-slot accessories. EXPENSIVE to enchant!
490307.png Temple Magic Ring [1] (490307) Accessory (Left) One of, if not the best-in-slot accessories. EXPENSIVE to enchant!
Hyper Novice 275+
400545.png Time Dimensions Rune Crown (Hyper Novice) [1] (400545) Upper Headgear Depth 2 One of the best upper headgears for this build and can be used in Physical builds. Enchanting it is EXPENSIVE, thanks to utterly infuriating RNG.
400724.png Yorscalp Crown of Judgment [1] (400724) 21 Age of Heroes Probably the best upper headgear for Wind and Water focused builds. While it doesn't pair with 550152.png Time Gap Hyper Staff [2] (550152) , the combo with 300601.png Lee Card (300601) with a fully enchanted +12 and above Grade A crown more than makes up for it, making it more powerful than 400545.png Time Dimensions Rune Crown (Hyper Novice) [1] (400545) , especially when 313427.png Warrant of Bailiff (313427) 's effects proc, which is almost fully guaranteed because of 5457.png Jack Frost Nova and 5459.png Ground Gravitation's multiple hits.
410233.png Gambler's Seal [1] (410233) Middle Headgear Alice Twisted Madness Get VCT, ACD, MATK or S.MATK enchants.
420213.png Ace of Spades in Mouth (Magical) (420213) Lower Headgear Get INT and S.MATK or VCT. ASPD can be useful for 5460.png Napalm Vulcan Strike-focused builds.
450284.png Engraved Soul Purification Rune Robe [1] (450284) Armor Varmundt's Biosphere Depth The 2nd best-in-slot armor will serve you well until all the stars align. Grants copious amounts of MATK and magical damage, especially at higher grades and higher refines.
450173.png Nebula Robe of Spell [1] (450173) Constellation Tower The best-in-slot armor, but only if all the stars align. 450284.png Engraved Soul Purification Rune Robe [1] (450284) by itself is a lot more powerful, so stick to it in the meantime. But once you obtain a 480351.png Circulation of Life Autumn [1] (480351) with the 313018.png Life of Autumn (Intelligence) (313018) enchant, 490136.png Spell Signet of Star [1] (490136) with 313038.png Star Cluster of Intelligence Lv5 (313038) , and 490485.png Signet of Circulation Autumn [1] (490485) with 312996.png Signet of Spell Lv5 (312996) , there will be a huge increase in power, at the cost of some survivability. But with such power, almost everything drops dead, and that in itself is a form of "survivability" - just kill'em fast before they kill you fast.
550133.png Dimensions Hyper Rod [2] (550133) Rod Depth2 If you're level 250 and above, you can skip 550089.png Dim Glacier Wand [1] (550089) and get this weapon if you like, because it's easier to enchant and has 2 slots. It can have two powerful enchants of your choosing, no RNG nonsense. Boosts 5455.png Meteor Storm Buster and 5458.png damage.

When paired with 400545.png Time Dimensions Rune Crown (Hyper Novice) [1] (400545) , it greatly boosts 5460.png Napalm Vulcan Strike damage and has a 50% chance to autocast 5220.png Soul Vulcan Strike, but requires high ASPD (175+), ACD reduction (30% and above), and smartcast for maximum effectiveness. 5457.png Jack Frost Nova and 5456.png Jupitel Thunderstorm are still decently strong even if this weapon doesn't buff them at all.

550152.png Time Gap Hyper Staff [2] (550152) Time Gap Weapons Most powerful and best-in-slot weapon, but can be difficult to obtain. It can have two powerful enchants of your choosing, no RNG nonsense. Greatly boosts 5457.png Jack Frost Nova and 5456.png Jupitel Thunderstorm when paired with 400545.png Time Dimensions Rune Crown (Hyper Novice) [1] (400545) .
460020.png Mad Bunny-LT [1] (460020) Shield Alice Twisted Madness The more offensive-oriented shield. Upgrade it to at least Grade D for the damage reduction, but it is highly recommended to max it out at Grade A and refine it to +12 to take advantage of the 300379.png Renovated Upper Rgan (300379) .
460040.png Glacier Guard [1] (460040) Episode 20 The more defensive-oriented shield. Upgrade it to Grade C and refine it to +12 to take advantage of 300379.png Renovated Upper Rgan (300379) 's damage reduction bonuses. Focusing on the more defensive enchants provides A LOT of damage reduction plus a HUGE quality of life improvement - 10% reduced VCT and over 100 Hard MDEF. The 10% reduced VCT will come in handy when using the 300522.png Yordos Judge Card (300522) /300529.png Yortus Conjurator Card (300529) combo, while having over 100 Hard MDEF means complete immunity to a myriad of bad status effects, like getting Stoned, Frozen, and more!
480351.png Circulation of Life Autumn [1] (480351) Garment Garden of Time - Divine Beast's Cloak: Autumn Best-in-slot Garment, becoming even stronger when all the stars align. See the 450173.png Nebula Robe of Spell [1] (450173) above for more info.
470204.png Moan of Corruption [1] (470204) Footgear Sunken Ship Climbing and/or moaning noises not included. Refine to +14 or higher for the best results.
490136.png Spell Signet of Star [1] (490136) Accessory (Right) Constellation Tower The best-in-slot accessory, but it is very expensive to enchant due to extremely maddening RNG. When using the 300522.png Yordos Judge Card (300522) /300529.png Yortus Conjurator Card (300529) combo, equipping this is HIGHLY RECOMMENDED due to the VCT reduction from the two 310711.png Star of Spell Lv.5 (310711) enchants. DEX can be reduced to 1, negating the combo's eye-watering SP Cost increase due to Base DEX, which can be used in boosting other stats, while also freeing up some skill points - less points to Owl's Eye can be used elsewhere.
490485.png Signet of Circulation Autumn [1] (490485) Accessory (Left) Garden of Time - Circulation of Life Accessories The other best-in-slot accessory, but it is very expensive to enchant due to extremely maddening levels of RNG. Best paired with 480351.png Circulation of Life Autumn [1] (480351) .
Hyper Novice 285+ (Future, currently unobtainable here)
400991.png [9] (400991) Headgear ??? Headgear that greatly boosts the Hyper Novice's ability to effectively manipulate Wind and Water. Significantly boosts Wind and Water Magic Damage and the equivalent skills 5456.png Jupitel Thunderstorm and 5457.png Jack Frost Nova. It must be graded and refined to A and at least +12, and it must absolutely be paired with a Grade A +12 550177.png [10] (550177) . Pairing them will result in 5462.png Rule Break granting an extra effect to the two aforementioned skills for half of its duration (150 seconds). 5456.png Jupitel Thunderstorm will autocast Level 5 2453.png Extreme Vacuum on the target. 5457.png Jack Frost Nova will autocast Level 5 5216.png Rain of Crystal where you stand. This is the best-in-slot headgear for Wind and/or Water-focused Hyper Novices.
550177.png [11] (550177) Weapon ??? Significantly boosts Wind and Water Magic Damage and the equivalent skills 5456.png Jupitel Thunderstorm and 5457.png Jack Frost Nova. It must be graded and refined to A and at least +12, and it must absolutely be paired with a Grade A +12 400991.png [12] (400991) . The combo's downside is 5462.png Rule Break must be active at all times and must be reactivated every 150 seconds for its effects to stay up and running.
470337.png Dimension World Spell Shoes [1] (470337) Footgear ??? Boosts magic power and almost all elemental magic damage except for Undead and Ghost. Increases overall magic power by itself, but enchanting it makes it SIGNIFICANTLY more powerful. This cold and wet pair of shoes is the most likely successor to the 470204.png Moan of Corruption [1] (470204) when fully enchanted. The moaning stops. The wet socks start.
470338.png Dimension World Magic Shoes [1] (470338) ??? Boosts magic power and almost all elemental magic damage except for Water and Poison. Increases overall magic power by itself, but enchanting it makes it SIGNIFICANTLY more powerful. This hot and sweaty pair of shoes is the most likely successor to the 470204.png Moan of Corruption [1] (470204) when fully enchanted. The moaning stops. The acrid, foul smell starts.
Shadow Equipment
Beginner Shadow Gear Shadow Gear Set @go eden, Lucy Starter shadow set
Advanced Shadow Gear Provides 50% DEF and MDEF pierce. Advanced Shadow Gear that's good until the mid-late game. Requires Base Level 100. Can be rented for 20 25223.png Eden Coin (25223) per week or 30 25223.png Eden Coin (25223) per piece, 80 25223.png Eden Coin (25223) for the class-specific weapon.
24883.png Full Spell Shadow Armor (24883)
24884.png Full Spell Shadow Shoes (24884)
Shadow Armor, Shadow Shoes Shadow Gear Shadow armor and shoes that increase magical damage.
24753.png Magical Spell Shadow Weapon (24753)
24754.png Magical Spell Shadow Shield (24754)
Shadow Weapon, Shadow Shield Combos with the Magical Spell Armor and Shoes. Enchant with MATK and Spell for damage, or Heal% and H.PLUS or CRT for additional healing and less potion use, or a mix of both for balance. Grab these two for more power.
24282.png Super Novice Shadow Weapon (24282)
24318.png Super Novice Shadow Shield (24318)
Shadow Weapon, Shadow Shield When both are refined to +9, they grant numerous bonuses that improve quality of life in exchange for decreased power, by around 5-10% compared to 24753.png Magical Spell Shadow Weapon (24753) and 24754.png Magical Spell Shadow Shield (24754) above. Gain increased HP, SP, stats, ASPD, and SP recovery while decreasing VCT and SP consumption. This more basic combo actually makes 5460.png Napalm Vulcan Strike builds stronger due to the ASPD increase compared to 24753.png Magical Spell Shadow Weapon (24753) and 24754.png Magical Spell Shadow Shield (24754) . Meanwhile, 5456.png Jupitel Thunderstorm or 5457.png Jack Frost Nova builds will feel "lighter", because spamming multiple spells becomes faster and easier with increased ASPD, which also makes responding to whatever comes your way even better. It also works very well with the 300522.png Yordos Judge Card (300522) /300529.png Yortus Conjurator Card (300529) combo, providing a lot of VCT reduction so you won't have to deal with the obscene SP costs due to high DEX! Now that's a lotta damage quality of life improvements! Enchant with MATK against monster size or ASPD. Use these for more utility.

24665.png Full Tempest Shadow Earring (24665)
24668.png Full Tempest Shadow Pendant (24668)
Shadow Ring, Shadow Earring Provides full MDEF penetration when both pieces are +9 and above. Enchant with MATK and Spell for damage, or Heal% and H.PLUS or CRT for additional healing and less potion use, or a mix of both for balance.
24800.png Master Shadow Armor (24800)
24792.png Master Shadow Weapon (24792)
24793.png Master Shadow Shield (24793)
24801.png Master Shadow Shoes (24801)
24802.png Master Shadow Earring (24802)
24803.png Master Shadow Pendant (24803)
Shadow Gear Set Deals slightly less damage compared to the three 2-sets above, but pierces through MRES. Enchant with the spell of your choosing and SPL.
24946.png Thunder Buster Shadow Armor (24946)
24792.png Master Shadow Weapon (24792)
24793.png Master Shadow Shield (24793)
24947.png Thunder Buster Cannon Shadow Shoes (24947)
24944.png Vulcan Jack Shadow Earring (24944)
24945.png Vulcan Jack Shadow Pendant (24945)
An improved version of the Master Shadow Set, tailored for Magic Hyper Novices. Increases the damage of all skills except Hell's Drive and Ground Gravitation. Enchant with the spell of your choosing and SPL.
Quality of Life Equipment
At level 100 and above, there are three pieces of equipment that'll make life easier. Switch to these equipment, activate the skill, then switch back to your default equipment. Example:
Life of Quality Equipment
Item Type Way to obtain Notes
19204.png Racing Cap (Super Novice) [1] (19204) Upper Headgear Hugel Race, Base Level 100 This headgear is tedious to get and may require multiple alts to speed things up, but it is so, so worth it. Fully enchanting it will grant use of level 3 2478.png Cart Boost, basically a free 12710.png Guyak Pudding (12710) but can be removed with skills like 92.png Quagmire and 30.png Decrease Agility. Still a huge quality of life upgrade. Just switch to this headgear, activate 2478.png Cart Boost for a big speed boost, then switch back to your default headgear.
19154.png Arch Angeling Balloon (19154) Lower Headgear 23135.png Poring Capsule (23135) Increases EXP gained and drop rate by 5%. Enables the use of Level 1 54.png Resurrection. Save tens of thousands of zeny while rescuing your loved ones from a terrible fate, while also preserving the environment by preventing the overharvesting of 610.png Yggdrasil Leaf (610) , all while experiencing things slightly faster and getting a tiny bit more stuff at the same time!
28900.png Royal Guard Shield [1] (28900) Shield 16.1 Banquet for Heroes, 800 6919.png Token of Honor (6919) Enables use of level 1 2315.png Shield Spell, restoring 3% of Max HP every 3 seconds for 90 seconds, for a total of 90% Max HP in 90 seconds. Increases survivability and slightly reduces the use of 28.png Heal and potions.
2576.png Adventurer's Backpack [1] (2576) of 1013.png Greed Garment of 1013.png Greed Equipment Crafting of 1013.png Greed I'LL BEGIN BY ACTIVATING MY POT BACKPACK OF 1013.png Greed!!! THIS LETS ME DRAW AT LEAST 2 ITEMS LITTERED ON THE GROUND AND ADD THEM TO MY INVENTORY!!! BUT I'M NOT DONE YET!!! BY SENDING MY BACKPACK OF 1013.png Greed BACK TO MY INVENTORY, IT WILL ALLOW ME TO RE-USE THE GARMENT I HAVE PREVIOUSLY EQUIPPED, THUS ENDING MY TURN!!! 1013.png Greed!!11111!
20802.png Teleport Amistr Bag [1] (20802)
20803.png Heal Amistr Bag [1] (20803)
20804.png Greed Amistr Bag [1] (20804)
20805.png Increase Agility Amistr Bag [1] (20805)
20806.png Magnum Break Amistr Bag [1] (20806)
20807.png Endure Amistr Bag [1] (20807)
20808.png Sight Amistr Bag [1] (20808)
Garment Hello! Do you love pets? Don't tell me, show me! SHOW ME!!! REEEEEEE perfectly cut scream These bags grant various skills that improve quality of life, like teleporting or having another backpack THAT MAKES YOU DRAW AT LEAST 2 ITEMS LITTERED ON THE GROUND.

Cards and Pets

Cards and Costume Stones
Card Slot Notes
27310.png Plaga Card (27310)

4600.png Lichtern Yellow Card (4600)
4586.png Tikbalang Card (4586)
4597.png Lichtern Blue Card (4597)
4599.png Lichtern Red Card (4599)
4598.png Lichtern Green Card (4598)

Headgear These cards increase elemental damage. Put them in high refine headgears.
  • Plaga: Neutral
  • Green: Earth
  • Tikbalang: Wind
  • Blue: Water
  • Red: Fire
  • Yellow: Ghost
300251.png Plagarion Card (300251)

300259.png Fulgor Card (300259)
300255.png Litus Card (300255)
300257.png Vanilaqus Card (300257)
300256.png Fillia Card (300256)

These cards increase elemental damage at the cost of slightly increasing SP Consumption. Put them in low refine or slotted middle headgears.
  • Plagarion: Neutral
  • Fulgor: Earth
  • Litus: Wind
  • Vanilaqus: Water
  • Fillia: Fire
27328.png Birth and Death Card (27328) Early-game card. It can be paired with multiple cards for more bonuses.
300359.png Ice Gangu Card (300359) Increases Water Element Magic Damage at the cost of increasing SP consumption. Further increases MATK when paired with 300361.png Ice Straw Card (300361) . Works best with Jack Frost Nova.
300174.png Melted Poring Card (300174) If you can already deal tons of damage but want a little more survivability, use this card. Increases HP by 10%.
4241.png Archangeling Card (4241) Doubles HP and SP recovery is Base LUK is 77 and above. Helps mitigate some of the sky-high SP consumption at the end-game.
300308.png Meyer Lugenburg Card (300308) Armor At the cost of increased SP consumption, gain 4% all property magic damage every 3 refine rate. Try to +12 the armor this card is slotted into. Best paired with a 300424.png Friedrich S. Heine Card (300424) card.
300361.png Ice Straw Card (300361) Increases Water Element Magic Damage. When paired with 300359.png Ice Gangu Card (300359) , MATK +10%. Good for Jack Frost Nova.
300376.png Two Eyes Dollocaris (300376) Requires a +12 level 2 armor to bring out its full potential. Gives a lot of RES and MRES and is one of the best defensive armor cards. If you already deal a ton of damage but want some more survivability, get this card.
4023.png Baby Desert Wolf Card (4023) Early-game cheap card which can be paired with the 27328.png Birth and Death Card (27328) for increased MATK.
4392.png Observation Card (4392) When paired with an Eldest card at level 200+ and with at least 120 Base INT, Ghost element damage is increased. Good for Napalm Vulcan Strike.
300529.png Yortus Conjurator Card (300529) At the cost of reduced HP and an abhorrently repugnant increase in SP Cost depending on Base DEX, it increases MATK. When combined with certain garment cards (see below), it greatly boosts various elements' power. It is HIGHLY RECOMMENDED to find a way to have close to or 100% VCT Reduction before using this card combo, so DEX can be kept below 10 and the extra points can be used elsewhere.
300472.png [MVP] Demigod Lasgand Card (300472) A Lasgandious MVP card that greatly boosts magic damage against boss-type enemies at the cost of reduced HP. Lasgandaciously lasgandious against late-game enemies. Lasgand.
27196.png Nihil M. Heine Card (27196) Weapon Early-mid game card that boosts damage against small monsters.
27289.png Soul Fragment Card (27289) Early-mid game card that boosts damage against Medium-sized monsters.
27286.png Colorful Teddy Bear Card (27286) Early-mid game card that boosts damage against Large monsters.
4394.png Solace Card (4394) When paired with a Smile Giver card at level 200+ and with at least 120 Base INT, Neutral element damage is increased. Good for Ground Gravitation.
27384.png Mutating White Knight Card (27384) Mid-game card that substantially boosts magic damage against medium and large-sized enemies. Best paired with Mutated Khalitzburg Knight card.
300114.png Spell Addicted Plaga Card (300114)

300140.png Abysmal Sropho Card (300140)
300010.png Arch Plasma Card (300010)
27324.png Brinaranea Card (27324)
300124.png Blue Pitaya Card (300124)
27320.png E-EA1L Card (27320)
300106.png Red Pitaya Card (300106)
300009.png Spectrum Plasma Card (300009)

These cards boost elemental damage, especially at high refines.
  • Magic Poisoned Plaga: Neutral.
  • Deep Sea Sropho: Wind, but cheaper
  • Arch Plasma: Wind
  • Brinaranea: Water, but slightly cheaper and without the need for high refines.
  • Blue Pitaya: Water
  • E-EA1L: Fire, but cheaper
  • Red Pitaya: Fire
  • Spectral Plasma: Ghost
300442.png Deadsera Card (300442) Boosts all-element Magic Damage, meaning it's all the weapon element cards above merged into one. It matches the above cards by giving a 30% bonus at +12 and level 200. One of the best weapon cards. Dead sera sera, whatever will be, will be.
300455.png Copo Card (300455) A card that increases magical damage against cute little enemies. But when inserted into a Level 5 weapon, it can also deal increased magical damage against medium-sized enemies. When paired with 300458.png Icewind Card (300458) , it can also deal magical damage against big bad enemies.
300601.png Lee Card (300601) One of the best card for Wind and Water builds, especially when paired with a +12 and above Grade A 400724.png Yorscalp Crown of Judgment [1] (400724) . Significantly boosts 5456.png Jupitel Thunderstorm and 5457.png Jack Frost Nova damage.
27356.png Frozen Gargoyle Card (27356) Shield The cheap, slightly inferior version of Khalitzburg Knight and Mutated Khalitzburg cards. Get it if you're on a tight budget. 25% damage reduction from Medium and Large monsters, but receive 5% more damage from small monsters.
27385.png Mutating Khalitzburg Card (27385) Best paired with Mutated White Knight Card. Gives 25% damage reduction against Physical and Magical damage from Medium and Large Monsters (30% if paired with MWK) plus additional MDEF. Increases overall survivability as long as the monster isn't Small.
4413.png Hodremlin Card (4413) Reduces damage from Small, Medium and Large mobs by 15%. It also has a chance to increase Perfect Dodge by 30 if you're attacked.
300379.png Renovated Upper Rgan (300379) A Hodremlin Card, but better... if your shield is a level 2, like 460040.png Glacier Guard [1] (460040) , and is refined to +12.
27176.png Swamp Cramp Card (27176) Garment A decent garment card, good for early-mid game. MATK +3 and ASPD +1% for every 10 base INT. If base INT is 120 and above, MATK +40. Increases ASPD, making spell spamming faster.
300123.png Purple Pitaya Card (300123)

4629.png Arc Elder Card (4629)
300149.png Abysmal Phen Card (300149)
27167.png Faceworm Larva Card (27167)
4657.png Nightmare Ancient Mummy Card (4657)
300372.png Cave Flower Card (300372)

These cards reduces Neutral element damage while boosting elemental magical attacks. The higher the refine level, the better.
  • Purple Pitaya: Neutral
  • Arc Elder: Earth
  • Deep Sea Phen: Wind
  • Faceworm Larva: Water
  • Nightmare Ancient Mummy: Fire
  • Cave Flower (not implemented): Ghost
300269.png Eldest Card (300269) When paired with a Dame of Sentinel card at level 200+ and with at least 120 Base INT, Ghost element damage is increased. Good for Napalm Vulcan Strike.
300273.png Smile Card (300273) When paired with a Lady Solace card at level 200+ and with at least 120 Base INT, Neutral element damage is increased. Good for Ground Gravitation.
300260.png Napeo Card (300260) The garment cards above are specialized to boost a particular element. This one however, boosts all elements simply by giving LOTS of MATK but under the condition of having 125 Base INT. Use this for a more all-around damage increase across all skills.
300375.png One Eye Dollocaris Card (300375) Requires a +12 level 2 Garment to reach its full potential. Increases damage of Holy, Shadow, Neutral and Ghost elements. Good for Napalm Vulcan Strike and Ground Gravitation.
300424.png Friedrich S. Heine Card (300424) Best paired with the armor card 300308.png Meyer Lugenburg Card (300308) for a 5% all property magic damage bonus. Compared to the specialized elemental garment cards above, it deals a very teeny-tiny bit less damage (around 2%), but it is made up by boosting all elements significantly at the cost of reduced Neutral Element resistance. Increases all property magic damage by 5%, and is further increased by 4% every 2 refine rate. Try to +12 the garment this card is slotted into.
300521.png Yordos Investigator Card (300521) Significantly boosts Fire, Neutral, Shadow, Holy, and Ghost Element magic damage. Good for those focusing on Meteor Storm Buster, Ground Gravitation, and Napalm Soul Vulcan. Best paired with 300529.png Yortus Conjurator Card (300529) .
300522.png Yordos Judge Card (300522) Significantly boosts Wind, Water, Earth, Poison, and Undead Element magic damage. Good for those focusing on Jupitel Thunderstorm, Jack Frost Nova, and Hell's Drive. Best paired with 300529.png Yortus Conjurator Card (300529) .
27362.png [MVP] Polluted Queen Spider Card (27362) Grants a HUGE 100% bonus to Water and Earth magical damage, perfectly complementing a Dim Glacier Wand with 2 Hell's Jack enchants. If you have tons of luck or tons of money, try getting this.
4576.png [MVP] Gioia Card (4576) Grants a HUGE 100% bonus to Wind and Ghost magical damage, half-perfectly complementing a Dim Glacier Wand with 2 Meteor Thunder enchants. If you have tons of luck or tons of money, try getting this.
27249.png Archi Card (27249) Footgear Max HP +500, ATK, MATK, Hit and Flee +15. A good all-around footgear card for the early game. Obtained at the Geffen Magic Tournament.
300177.png Midnight Archi Card (300177) A better version of the original Arhi. Increases physical AND magic damage to all size enemies by 5%, HP +1000 and Flee +35. Obtained at the Geffen Night Arena.
4658.png Nightmare Verit Card (4658) Boosts MATK, especially at high refines. Good for a more even spread of damage across all elements.
27255.png Ordre Card (27255) Good for Wind and Water focused builds.
27253.png Geffen Thief Card (27253) Good for Fire focused builds.
27250.png Dio Anemos Card (27250) Good for Neutral and Earth focused builds.
27179.png Coyote Card (27179) Early-game card that prevents cast interruption with no penalties to Variable and Fixed Cast Time, but at the cost of reduced Max HP and SP.
300458.png Icewind Card (300458) At the cost of increased SP Consumption, it grants some nice bonuses, especially when paired with a 300455.png Copo Card (300455) . Insert this into a Level 2 Footgear, like 470204.png Moan of Corruption [1] (470204) . Again, that pair of shoes does not come with climbing noises.
4077.png Phen Card (4077)

4327.png Bloody Butterfly Card (4327)

Accessory These cards prevent cast interruption at the cost of increasing Variable Cast Time. A good early-game card until Fixed and Variable Cast Times are reduced to a minimum.
27026.png Fire Condor Card (27026) An early-game card that greatly boosts Fire Ball damage. Best to have two of these for an easier early-game.
4577.png Elvira Card (4577)

300222.png Firewind Kite Card (300222)
27125.png Headless Mule Card (27125)
300364.png Calmaring Card (300364)
27161.png Mavka Card (27161)
300216.png Lava Toad Card (300216)
300211.png Ash Toad Card (300211)
27262.png D.Y Card (27262)
300218.png Ashhopper Card (300218)
300006.png Jeweliant Card (300006)
300267.png Crow Baron Card (300267)
300268.png Crow Duke Card (300268)

These cards boost elemental damage.
  • Elvira: Wind and Ghost (20%)
  • Firewind Kite: Wind (35%) Left accessory
  • Headless Mule: Water (20%)
  • Calmaring: Water (35%)
  • Mavka: Fire and Earth (20%)
  • Lava Toad: Fire (35%) Left accessory
  • Ash Toad: Earth (35%) Left accessory
  • Ashhopper: Neutral (35%) Left accessory
  • Dwigh: Neutral (20%)
  • Jewelry Ant (Left accessory only): Neutral (30% but needs to be paired with 4336.png Ungoliant Card (4336)
  • Crow Baron (level 200+): Fire and Wind (15%)
  • Crow Duke (level 200+): Water and Earth (15%, MATK +5%)
300243.png Lude Gal Card (300243) Boosts MATK. Use two of these for a more even spread of damage across all elements.
1000857.png Archbishop Stone (Top) (1000857)

1000859.png Archbishop Stone (Low) (1000859)
25709.png Archbishop Stone (Garment) (25709)

Upper costume headgear, low costume headgear, garment costume The more offensive set. Despite not being an Archbishop, Hyper Novices can gain its magic damage bonuses with these three.
25170.png Minor Casting Stone (Garment) (25170)

25067.png Cast Stone (Garment) (25067)

Garment costume These two reduce Fixed Cast Time by 0.3 and 0.5 seconds respectively. Replace these with something better once your equipment can substantially reduce Fixed Cast Time.
1001329.png Super Novice Stone (Low) (1001329) Lower costume headgear This lower headgear costume stone grants bonus +15% Magic Element damage for 5 minutes after using Angel Help Me!
1001327.png Super Novice Stone (Top) (1001327)

25454.png High Wizard Stone (Mid) (25454)
1001326.png Super Novice Stone (Garment) (1001326)

Upper costume headgear, mid costume headgear, garment costume Using these costume stones grants access to Judex. High Wizard Stone increases Judex's damage. It can help make leveling more tolerable, especially at level 150 when paired with a +7 550081.png Patent Freedom Stick [2] (550081) .
1001327.png Super Novice Stone (Top) (1001327)

1001328.png Super Novice Stone (Mid) (1001328)
1001329.png Super Novice Stone (Low) (1001329)
1001489.png Hyper Novice Stone (Garment) (1001489)

Upper costume headgear, mid costume headgear, low costume headgear, garment costume The Hyper Novice set boosts Water, Wind, and Ghost element damage and its related skills, Jack Frost Nova, Jupitel Thunderstorm and Napalm Vulcan Strike. Max out Jack Frost Nova and Self Study Sorcery to reap its full benefits. However, reports of an upcoming skill may slightly reduce this combo's effectiveness, as it requires level 5 Self Study Tactics from the Physical Tree. Be a more powerful glass cannon, or a more tanky kind of mage with slightly less damage.
Pets

The following pets below are most suited for this build, with their bonuses when Loyal. Check the Pet System on how to obtain and feed a pet.

  • 9104.png Roween Egg (9104) : MATK +3%. Don't have the time, patience and money to get an Am Mut? Get this Hyena instead.
  • 9089.png Am Mut Egg (9089) : MATK +4%. The mainstream go-to pet for mage builds.
  • 9088.png Angeling Egg (9088) : Max HP +2%, Heal Bonus +8%. For slightly increased survivability and healing, a guardian made out of Odin's sweat with wings.
  • 9134.png White Knight Egg (9134) : MATK +5%, SMATK +2, increases magical damage against Boss monsters by 5%. The best pet for magic builds. Evolve a 9133.png Mutated White Knight Egg (9133) to get this. The best pet for this build.

Tips and Tricks

Leveling (WIP)
WORK IN PROGRESS, placeholder, may contain suboptimal info
Strategy
The Mage Build Hyper Novice is quite a challenge to level up due to Super Novice magic spells dealing adorable damage unless there's smart investment involved. However, upon becoming Hyper Novice, the damage increases exponentially, and that's when its true power starts showing.


Super Novice:

  • Super Novice has absolutely atrocious HP and SP pools until level 99. Without the help of equipment and costumes like 20307.png C. Beginner Cap (20307) , your HP and SP will be less than 1000 and 300 respectively. Because of this, your primary survival stat is AGI, not VIT. All the VIT and DEF in the world won't do much if you have a mere ~1000 HP. It's better to evade attacks instead of taking a hit with such low HP.
  • Focus more on hit-and-run tactics by leveling up quick-cast skills like 17.png Fire Ball instead of slow-casting bolt spells.
  • Skills like 12.png Safety Wall and 25.png Pneuma 25.png Pneuma iei will help you survive in dangerous situations but will cost a lot of skill points. It will be useful for quite a long time, even all the way until you're a Hyper Novice if you use them well.
  • DEX will be your primary stat, very closely followed by INT, so Variable Casting Time will be reduced.
  • Be very judicious in your movements and casting. You'll find yourself running out of SP very quickly or dying in just a single CRIT attack from Orc Zombies if you're not careful!
  • Always be on the move! Keep moving, don't get hit, and survive! Once you reach Base Level 99, you'll get an extra +2000 Max HP for your troubles.
  • Don't upgrade to Ex. Super Novice until you reach Job Level 99.


Ex. Super Novice

  • This is the deadly part, and I think a lot of people who try the class will give up here. The struggle IS REAL especially if Hyper Novice is the first or one of the first characters you make. Correct me if I'm wrong though!
  • Soloing isn't too difficult from 100-150, then the difficulty ramps up quickly at 150 onwards due to the lack of strong 3rd job skills. Level 5 2449.png Psychic Wave will make life a lot easier, but it needs a +7 550081.png Patent Freedom Stick [2] (550081) , and it can be obtained here: Ancient Hero / Patent / Hero-LT Weapons. Once you break through this challenging phase, especially if you don't have 550081.png Patent Freedom Stick [2] (550081) , you'll feel a MASSIVE surge of power once you become a Hyper Novice and reach Job Level 7 and above.
  • As you gain levels, allocate more points to DEX in order to reduce VCT (Variable Cast Time) as much as possible, with INT not far behind. It is highly recommended to do the episode quests listed above, as they'll give you access to equipment sets that can reduce your VCT by up to 10% (Grace Set) and FCT (Fixed Cast Time) by 0.5 seconds, which is very helpful considering the long 1.5-second FCT of AoE skills like 89.png Storm Gust and 85.png Lord of Vermilion, and the even more abhorrent VCT of some skills reaching up to freaking 6.3 seconds! At least it isn't as bad as Fenrir, who can take a full minute to cast 2454.png Varetyr Spear.
  • AGI is still your primary survival stat, but some VIT can now help with a much better HP pool. Most monsters up to level 200 can have up to around ~550 Hit at most. Try to have 550 Flee or more if possible. Type @mi monstername for more info on a particular monster.
    • If Hit - Flee = 100 or more, you'll ALWAYS be hit.
    • But even if you think having tons of FLEE is going to work, it isn't, because there is a FLEE PENALTY. If at 3 monsters are attacking you, there's a 10% penalty, so 500 Flee becomes 450. 4 monsters - 20% penalty, until the maximum 100% penalty at 12 or more monsters.
  • In a party setting, You'll be the secondary support, providing crowd control and extra buffs and heals. Quagmire, Storm Gust and Sightrasher will be your main crowd control skills. Once you see the tank and its lures approaching, cast Quagmire on the mobs to slow them down in order for the DPSes more easily dispose of them. Also watch out if the tank lured too many or if there are monsters coming from the side and rear - use Sightrasher to push them away or Storm Gust to freeze them in place. From time to time, you may also buff your teammates, provide additional heals with your cute Heals.


Hyper Novice

Magic Hyper Novices are very reliant on skill and sometimes buff rotation for maximum damage and effectiveness. All skills have completely different elements (duh Raku), ACD, CD, VCT, and FCT, making proper rotation quite tricky, especially in fast-moving situations like farming in Depth1 and Depth2. Below are some suggested skill and buffing rotations. Slashed skills mean they're optional or can be inserted into the combo with sufficient ACD reduction and ASPD, preferably over 40% and above 174 respectively.


Buffing rotation:
Every 90 seconds: 74.png Magnificat, 66.png Impositio Manus, 2315.png Shield Spell, 2478.png Cart Boost in any order
Every 180 seconds: 45.png Improve Concentration, 34.png Blessing, 29.png Increase Agility, then 74.png Magnificat, 66.png Impositio Manus, 2315.png Shield Spell, 2478.png Cart Boost, in any order
To make buffing rotations easier, you can remove one or more of the following skills, indicated by a slash. 2478.png Cart Boost cannot be removed, unless you have an oversupply of 12710.png Guyak Pudding (12710) . If you have sufficient SP regeneration or a lot of SP potions, remove 74.png Magnificat. If you think MATK+25 is too insignificant, remove 66.png Impositio Manus. If you have HP regeneration, sufficient healing, or lots of HP potions, remove 2315.png Shield Spell.


Skill rotation 1:
5457.png Jack Frost Nova build based on the skill build above with end-game gear - 400545.png Time Dimensions Rune Crown (Hyper Novice) [1] (400545) + 550152.png Time Gap Hyper Staff [2] (550152) combo.
This rotation requires at least 30% ACD and 160 ASPD. The idea is to cram as many skills as possible within the duration of 5457.png Jack Frost Nova. This is the best rotation I found so far when testing DPS in dummies. When in actual combat, adjust accordingly.
(Start) 5457.png Jack Frost Nova > 5456.png Jupitel Thunderstorm > 5459.png Ground Gravitation > 5458.png Hell's Drive > 5456.png Jupitel Thunderstorm ---> 5457.png Jack Frost Nova > 5458.png Hell's Drive > 5456.png Jupitel Thunderstorm > 5458.png Hell's Drive > 5458.png Hell's Drive (End)(Repeat)


Skill rotation 2:
5457.png Jack Frost Nova build based on the skill build above with late-game gear - fully enchanted 550089.png Dim Glacier Wand [1] (550089) with 400111.png Vesper Headgear [1] (400111) .
This is the best rotation I found so far when testing DPS in dummies. When in actual combat, adjust accordingly.
(Start) 5457.png Jack Frost Nova > 5456.png Jupitel Thunderstorm >5459.png Ground Gravitation > 5458.png Hell's Drive x3 ---> 5457.png Jack Frost Nova > 5456.png Jupitel Thunderstorm > 5458.png Hell's Drive x4 (End)(Repeat)


Skill rotation 3 (WIP):
5460.png Napalm Vulcan Strike build - 400545.png Time Dimensions Rune Crown (Hyper Novice) [1] (400545) + 550133.png Dimensions Hyper Rod [2] (550133) combo.
Start with an opener to soften up the mobs a bit, followed by spamming the skill until the opener's duration ends. Spray enemies with a barrage of angry thoughts. If 400545.png Time Dimensions Rune Crown (Hyper Novice) [1] (400545) + 550133.png Dimensions Hyper Rod [2] (550133) are equipped, add angry souls to the mix. When in actual combat, adjust accordingly.
(Start) 5457.png Jack Frost Nova or 5459.png Ground Gravitation then spam 5460.png Napalm Vulcan Strike (End)(Repeat)


Strategy Depth 1
The strategy here is mainly for those who can deal just enough damage to survive here alone and if there are no D1 parties at the moment.

1 - Get powerful-enough equips (check Equipment 230-275 above) and have at least 60,000HP.

2 - Use 23204.png Brilliant Protection Scroll (23204) so you won't get 1-shot by some mobs, especially the Fatums (dwarf) and Kapha (green fishermen). 50035.png The One Potion (50035) is even better.

3 - If your DPS is just merely adequate to survive here, prioritizing which monster to kill will make things easier.

  • Enemy no. 1 - Lava Toads. If you see even just one, KILL IT ASAP! If they get near, they will STRIP your equipment one by one. They will almost always strip your shield first, followed your armor. If you have a friend or alt Biolo that can cast 479.png Full Chemical Protection, this is still enemy no. 1 because if they get close, they can do a surprise CRIT Attack that actually hits like a truck. Again, KILL LAVA TOADS THE MOMENT YOU SEE THEM!
  • Enemy no. 2 - Fatums. They have powerful Wind-Element Spells but they can be interrupted. They will often initiate with 20.png Lightning Bolt, and it hits rather hard. If you see one, interrupt it immediately, then kill it.
  • Enemy no. 3 - The Waterborne, Kapha and Anolian. Kapha usually doesn't initiate with 86.png Water Ball, but they'll eventually do it. If you see it casting, interrupt it. Anolian has two deadly skills, 136.png Sonic Blow, 2447.png Diamond Dust, but will use them only if they get close. All will usually result in death or close to it. Stay away from the Anolian. Zap'em both dead.
  • Enemy no. 4 - The Pullers, Skeleton Archer and Dragon Tail. These two can occasionally cast Grasp of Death, teleporting you to their location. Skeleton Archer seems to use Grasp of Death more frequently than Dragon Tail, but Dragon Tail hits harder and has a much higher HIT rate. Grasp of Death is infuriating at best, but can result in dragging you back to the enemy mosh pit and result in death at worst. Though sometimes, they can actually save your life.
  • Enemy no. 5 - The Bogdowns, Sting and Pom Spider, because they can bog you down. Stings can occasionally cast 92.png Quagmire, removing 29.png Increase Agility, 45.png Improve Concentration, and 2478.png Cart Boost and reducing DEX and AGI. Really annoying because you need to recast those skills, but 12710.png Guyak Pudding (12710) fixes that problem. Pom Spiders can occasionally cast 405.png Spider Web (Fiber Lock) when attacked, sticking you in place for 8 seconds. If your character can't move for some reason, kill the spider quickly, especially if a huge horde is nearby.
  • Enemy no. 6 - Retribution, Wood Goblin, Holy Skogul, Dark Pinguicula, Fire Frilldora. They're not as threatening as the others I guess, but watch out for Holy Skogul's 18.png Fire Wall.
Strategy Depth 2
The strategy here is mainly for those who can deal just enough damage to survive here alone and if there are no D2 parties at the moment.

1 - get powerful equips (check Equipment 230-275 above, but 275+ is recommended) and have at least 80,000HP.

2 - Use 23204.png Brilliant Protection Scroll (23204) so you won't get 1-shot by Moskrillos and Salamanders. 50035.png The One Potion (50035) is significantly better.

3 - If your DPS is just merely adequate to survive here, prioritizing which monster to kill will make things easier.

  • Enemy no. 1 - Salamanders. KILL ON SIGHT, even if they're alone! These annoying fire lizards are almost always the main reason for dying here due to Earthquake. But if they don't cast Earthquake first, then their CRIT Attack is almost a guaranteed kill. Again, KILL ON SIGHT!!!
  • Enemy no. 2 - The Graspers/Pullers, Frozen Gargoyle and Ancient Tree. In a place where mobs hit like a truck with a serious urge to isekai, and can occasionally "combo" with the Fiber Lockers, getting pulled to the wrong place at the wrong time can be certain death. Kill these two, especially the more dangerous and Grasp-Happy Gargoyle that can cast 88.png Frost Nova.
  • Enemy no. 3 - The Windborne Moskrillo and Blue Acidus. Prepare for trouble, and make it double! They are mostly on the same priority as The Pullers simply because they hit hard. They are deadly in their own unique ways. Moskrillo has a powerful 20.png Lightning Bolt and an even more powerful CRIT Attack, but they're rather squishy compared to others. The Blue Acidus is tankier, but can potentially deal as much as damage as Moskrilli/Moskrillos, because they tend to cast 21.png Thunder Storm and 84.png Jupitel Thunder in quick succession.
  • Enemy no. 4 - The Fiber Lockers, Duneyrr and Ancient Tree. Mostly applies to Duneyrr because my goodness, they cast 405.png Spider Web (Fiber Lock) like it's going out of style! By themselves, they're not that threatening. But when surrounded, they can prevent escaping from a sticky situation by causing a sticky situation, especially when there are Pullers around.


  • Enemy no. 5 - Naga. They have 57.png Brandish Spear, but 86.png Water Ball is more threatening. Having high FLEE isn't a problem with high CON trait and AGI stat, and they usually don't initiate with Water Ball. Still, kill them quickly because they will eventually cast Water Ball.
  • Enemy no. 6 - Morroc Incarnation. This false angel is a serious problem only if you have insufficient LUK. They usually initiate with Wide Curse, so have at least 100 Total LUK. That leaves Dark Grand Cross, but thankfully, it is cast only after Wide Curse is cast, and takes a good 2 seconds to do so.
  • Enemy no. 7 - Dollocaris and Flame Ghost. They don't really do all that much I think. Dollocaris is kinda tanky and can cast a ghost and an earth skill. Flame Ghost is just sneaky, but don't really do that much damage.


Physical

File:PhysHN .jpg
Physical build Hyper Novice treating dangerous monsters as if they're bowling pins.
File:PhysHN .jpg
Placeholder screenshot

For a better and more comprehensive guide on Physical Build Hyper Novices, check out Melee Hyper Novice Guide by Jetago

(Description WIP) - The Super Novice can take one of two routes - Mage or Physical. The Physical Hyper Novice will have to deal with the inherent limitations of the Super Novice, having lower HP and SP than most other classes. However, by learning from other classes and improving their most notable skills, they Break through the Super Novice's Limits, transcending from Super into Hyper, and I got writer's block.

Stats and Traits

Stat Amount Notes
STR 100-120 Main stat. Increases ATK and carrying capacity.
AGI 60-100 Increases Attack Speed for greater damage and Flee for increased survivability while reducing the chances of getting inflicted by Bleeding and Sleep. Try to get 100 total AGI for full immunity against Bleeding and Sleep.
VIT 70-80 Increases Max HP while reducing the chances of getting Poisoned and Stunned. Try to get 100 total VIT for full immunity against Poison and Stun.
INT 70-80 Increases Max HP while reducing the chances of getting Silenced. Try to get 100 total INT for full immunity against Blind and Silence.
DEX 60-80 / 120 (Ranged Hyper Novice builds) Increases Hit rate and minimum damage. For ranged builds, it is highly recommended to get sufficient INT and DEX to minimize Variable Cast Time when spamming Shield Chain Rush and Spiral Pierce Max.
LUK 60-80 / 120-125 (Mega Sonic Blow builds) Increases CRIT Rate for even more damage and Perfect Dodge for even more survivability. Marginally increases Flee, Hit and overall damage as well. For Mega Sonic Blow builds, raise LUK to 120 (or 125 with 300261.png Galensis Card (300261) ) to get as much CRIT Rate as possible while waiting for level 275 to access the Super Novice chant (see Hidden Skills above).
Trait Amount Notes
POW 110 Primary trait. Max this for the highest possible damage.
STA Optional If more RES is needed and there are still some points to spare, grab a few points here.
WIS Optional If more MRES is needed and there are still some points to spare, grab a few points here.
SPL 0 Absolutely unnecessary, because screaming out "Mega Sonic Blow !!" again and again in a berserk rage doesn't really conjure violent earthquakes, howling blizzards, scary lightning storms, or world-ending meteor showers. It just makes eliminating enemies a lot more satisfying.
CON 72-110 Highly recommended secondary trait. Increases Physical Damage and Hit while also providing a bit more survivability in the form of Flee. Those leaning more towards Double Bowling Bash may max this Trait.
CRT 72-110 Highly recommended secondary trait for those focused on Mega Sonic Blow, its CRIT DMG dependent on this trait. Those leaning more towards Mega Sonic Blow may max this Trait. Also buffs Heal, resulting in some potions saved.

Skills

Skills: Physical

The example build below is an HP-leech focused build that sacrifices a little bit of power in exhcnage for increased survivability. It is ideal for slaughtering hordes of mobs, especially when a lack of power is compensated by increased survivability. Heal one's self by hurting others. The more, the merrier. But in exhcnage, become a slave to the RNG gods.

Skill Level Notes
Super Novice
48.png Double Attack Optional At level 10, add a 70% chance to double attack while increasing Hit by 10%.

Optional. With a Sidewinder card, it enables Double Attack on any weapon. Get this if you want more single-target damage.

50.png Steal 5 Steal items from one target. Prerequisite for Hiding.
51.png Hiding 1 Causes the player to become invisible, but unable to move. Use this to escape a losing battle. It is useless against Insect and Demon race and Boss monsters. Prerequisite for Tunnel Drive.
28.png Heal 3 Mainly for self-healing purposes.
29.png Increase Agility 10 At level 10, +12 AGI and +25% movement speed for 240 seconds (4 minutes).

Makes you evade most physical attacks better, move faster and attack quicker. Max this one.

31.png Aqua Benedicta 1 Fills up an Empty Bottle with Holy Water. Requires the player to be standing on water for this to work. Saves up to 200z per Holy Water bottle.
34.png Blessing Optional Makes you hit harder and more accurately. Optional.
9.png Increase SP Recovery Optional Optional. If you need better SP management or if your main source of damage leans more towards spamming "Raid", then it's good to invest some skill points here.
45.png Improve Concentration 10 At level 10, it increases DEX and AGI by 12% for 240 seconds (4 minutes).

Your main source of DEX and AGI at higher levels. Max this.

24.png Ruwach 1 Reveals and deals Holy Element magic damage to hidden enemies.
26.png Teleport 1 Save weight, money, inventory space and the grind for items that enable it!
11.png Napalm Beat Optional Prerequisite for Soul Strike and Safety Wall.
13.png Soul Strike Optional Prerequisite for Safety Wall.
12.png Safety Wall Optional While it's optional, it is still a very handy skill and can be a life-saver in a pinch. Aside from blocking physical attacks at melee range, it can also prevent armor from getting broken from melee Armor Break attacks and shadow equipment from getting stripped. It can also block attacks reflected by Max Pain at melee range too!

Consumes 1 Blue Gemstone for each wall created, not the number of times the skill is cast.

Expanded Super Novice
210.png Snatcher (Gank) 4 Automatically steals something from an enemy while attacking. The success chance depends on the level of "Steal" learned.
213.png Tunnel Drive (Stalk) 2 Moving while hiding makes escaping or positioning for a raid easier.
211.png Steal Coin (Mug) 4 Steals zeny from an enemy. Higher levels means higher levels of success. This will draw the aggression of the enemy, because obviously it is very mad that you stole some of its hard-earned money.
212.png Back Stab 2 Usable only when facing the enemy's back. Causes physical damage that never misses, but it will make the enemy look back at you very angrily because it got back-stabbed.
213.png Tunnel Drive (Stalk) 5 Requires being hidden before use. This is your main source of damage. Causes physical damage to all enemies in a 7x7 area around you and chance to cause Blind and Stun. For 10 seconds, it increases damage, both physical and magical, to affected enemies by 30% for non-bosses and 15% for MVPs.

The skill is almost spammable, having no cooldown or after-cast delay. Just alternate Hide and Raid as quickly as possible. MuhRO's Turbo makes this significantly, significantly easier. See below on how to set this up the bomb. However, beware that getting hit will Hiding will reveal your location and will interrupt your Raid spamming.

66.png Impositio Manus 3 Increases the ATK and MATK of all party members by up to 25 for 120 seconds.
68.png Aspersio 1-5 Endows a target's weapon with the Holy property. Consumes 1 Holy Water per use.
90.png Earth Spike Optional Prerequisite for Quagmire.
91.png Optional Prerequisite for Quagmire.
92.png Quagmire Optional Optional. If you need enemies to slow down and chill before properly setting up their deaths via Raid spamming, take this skill. Note that a maximum of 3 Quagmires can be active at a time.
5075.png Breakthrough 5 More HP, SP and received healing is always better. Max this.
5076.png Angel, Help me! Optional Restores 1000 HP and 350 SP per second for 20 seconds, for a grand total of 20,000 HP and 7,000 SP. Affects self and all party members within a 31x31 area. When a party needs help to get out of a bad situation, this can help quite a lot. Beware of the ridiculously long 5-minute cooldown, so use this wisely.
5077.png Transcendence Optional More HP, SP and healing power is always welcome. For this build, it is optional. Get this if more HP and SP are needed.
Hyper Novice (WIP)
5449.png Self Study Tactics 5-10 Passive that ddds up to P.ATK +10. Higher levels increase the damage of all skills in the Physical tree.
5451.png Double Bowling Bash 7-10 A powerful but rather clunky melee skill which deals damage in a 7x7 area around the target and knocks them back. More enemies caught results in more damage - at least 3 enemies are needed for maximum damage. However, its knockback is finicky and unpredictable. If there are 3 or less mobs, it will always push them back. If there are at least 4 mobs, sometimes they're knocked back, other times they're not.
5452.png Mega Sonic Blow 7-10 A spammable single-target melee skill that can CRIT, perfect for those pesky mobs which love to Agi Up. Supposedly has a chance to Stun the target. Despite the description, its CRIT Rate is actually dependent on CRIT Rate, not the CRT trait.
5453.png Shield Chain Rush 7-10 A spammable ranged physical attack which hits enemies in a 7x7 area around the target, applying a debuff that increases damage received by 10% (not applicable to boss monsters). Supposedly it can slow enemies down, but it seems like it's bugged for now.
5454.png Spiral Pierce Max 7-10 A spammable single-target ranged attack with the ability to immobilize for 2 seconds. The larger the enemy, the less damage dealt.
5461.png Breaking Limit 1 Significantly increases the damage of all skills in the Physical tree.

Equipment

Equipment

You can use Eden Gear or choose from the list below...

Item Type Way to obtain Notes
Super Novice
34805.png [13] (34805) Chest Eden Academy, Base Level 10 HIGHLY RECOMMENDED! Upon reaching Base Level 10, use the Paradise Physical Set provided by Eden Academy. It will serve you well until around level 100 when you'll get the better version. There are other options below, but this is one of, if not the best one to use from level 10-100.
5119.png Super Novice Hat [1] (5119) Upper Headgear Lighthalzen Armory (unslotted)

Holden (slotted)

Starter Headgear. Gives +1 all stats.
18776.png Modified Angel's Kiss [1] (18776) Upper Headgear Toad Part of the Angel's Set. Adds 3% SP recovery.
2340.png Novice Breastplate [1] (2340) Armor Yuno - King's Shop Starter Armor, though it's a little expensive at 89,000 zeny. At least you're no longer wearing stinky rags that came from the dump (2352.png Tattered Novice Ninja Suit (2352) ).
15012.png Puente Robe [1] (15012) Armor Orc Lady Slightly reduces fixed cast time and slightly improves the effectiveness of healing skills.
2355.png Angelic Protection [1] (2355) Armor Eclipse MDEF+20

When complete, the Angel's Set gives a boost to HP and SP. There is a small chance Lv. 1 Assumptio will be autocast if you're under attack. The After Cast Delay that happens each time the skill is autocast makes equipping the whole set not too good.

2113.png Novice Shield [1] (2113) Shield Lighthalzen Armory The combination of having frighteningly low HP until level 98 and the massive -10 ASPD penalty makes wearing a shield more of a detriment, reducing your damage while not providing enough protection despite its awesome 20% resistance to all elements except Neutral bonus. It will become much better at higher levels, so save it for later until you have way more HP and ASPD to compensate.
2183.png Modified Angelic Guard [1] (2183) Shield Mastering Part of the Angel's Set.
2512.png Novice Manteau [1] (2512) Garment Lighthalzen Armory Starter Garment - gives 10% Neutral resistance.
20710.png Modified Angel's Cardigan [1] (20710) Garment Vagabond Wolf Part of the Angel's Set. Adds 5% HP recovery.
2416.png Novice Shoes [1] (2416) Footgear Lighthalzen Armory Starter Shoes. Gives an HP boost.
22015.png Advanced Angel's Reincarnation [1] (22015) Footgear Vocal Part of the Angel's Set. HP +100.
2628.png Novice Armlet [1] (2628) Accessory Izlude Armor Dealer Starter accessory for Novices. Doesn't give any stats, but at least it's slotted and cheap.
2607.png Clip [1] (2607) Accessory Dragon Fly Gives 10SP. Because Super Novices have really low SP early on, every bit counts.
Expanded Super Novice (99-175)
35108.png [14] (35108) Chest Eden Academy, Base Level 100 Upon reaching Base Level 100, you'll be given this chest, which contains a set of advanced Eden Armors which will suffice until you progress through the Eden Academy quest chain and earn enough 25223.png Eden Coin (25223) to get the full Noblesse Set (see below) or after finishing a couple of quests which will give the Noblesse Set for free.
450122.png Noblesse Super Novice Robe [1] (450122)

470017.png Noblesse Magic Boots [1] (470017)

480014.png Noblesse Magic Manteau [1] (480014)

490015.png Noblesse Magic Ring [1] (490015)

Equipment Set 10 6919.png Token of Honor (6919) per piece. Obtained by completing the account-wide Eden Academy questline. Good until level 125. It is highly recommended to complete the 16.1 Banquet for Heroes quest chain to get this over the other armors. While it gives less MATK compared to the Flattery Robe and is designed more towards an autospell build, completing the full set gives quite a lot of bonuses, which include reduction in Variable Casting Time and Aftercast Delay, and can be further upgraded into the Imperial and Grace sets. Finally, to put the icing on the cake, they can be refined to +9 thanks to the 100128.png Noblesses Refine Ticket (100128) at a price of 10 6919.png Token of Honor (6919)
450124.png Imperial Super Novice Robe [1] (450124)

470019.png Imperial Magic Boots [1] (470019)

480017.png Imperial Magic Manteau [1] (480017)

490018.png Imperial Magic Ring [1] (490018)

Equipment Set 10 25155.png Schwarzwald Token of Honor (25155) per piece. Obtained by completing the 16.2 Terra Gloria quest line. Good until level 150. An upgraded version of the Noblesse set. Like the Noblesse set, they can be easily refined to +9 thanks to the 100129.png Imperial Refine Ticket (100129) , at the cost of...
450126.png Grace Super Novice Robe [1] (450126)

470021.png Grace Magic Boots [1] (470021)

480019.png Grace Magic Manteau [1] (480019)

490020.png Grace Magic Ring [1] (490020)

Equipment Set 20 25669.png Unknown Parts (25669) per piece. Obtained by completing the 17.1_Illusion questline. Best by level 200, but these will still serve you well even at level 250 if you still don't have enough resources to get the best equipment. An upgraded version of the Imperial set, this is the pinnacle of Eden Academy equipment. Each piece costs 20 25669.png Unknown Parts (25669) while the 100130.png Grace Refine Ticket (100130) costs 20 25723.png Cor Core (25723) .
450185.png Advanced Paradise Suit (450185)

470069.png Paradise Luxury Boots (470069)

Armor and Shoes Eden Academy, level 100 Strangely enough, equipping these two instead of their +9 Grace equivalents will deal more damage in most situations! However, there are no card slots and they cannot be upgraded. It is free and surprisingly effective. They're good until you obtain a +7 Patent Blessed Knife or reach level 200, when the Grace set's slots get a big advantage in the form of the Shelter/Happiness Giver card combo for Melee builds or Observation/Empathizer card combo for Ranged builds.
510039.png Paradise Super Novice Dagger (510039) Weapon Eden Group Initially gives decent ATK but leveling up makes it significantly better. It is surprisingly powerful, dealing more damage than a +15 Crimson Mace and +15 Crimson Dagger! Best of all, IT IS FREE! This humble dagger will serve you well, even beyond level 200 if much better weapons are still out of reach. The glaring downsides - no slots and it can't be refined.
18776.png Modified Angel's Kiss [1] (18776) Upper Headgear Reno (@go 36), 20 Pure Energy Crystals Part of the Advanced Angel's Set. Gives a more SP recovery over the normal version.
5358.png Pecopeco Wing Ears (5358) Mid Headgear Gold Coins Adds a little bit of AGI and MDEF for slightly increased survivability.
15068.png Advanced Angelic Protection [1] (15068) Armor Reno (@go 36), 20 Pure Energy Crystals MDEF+30

When complete, the Advanced Angel's Set gives even better bonuses compared to the normal version, though the HP and SP boost remains the same. There is a small chance Lv. 1 Assumptio will be autocast if you're under attack. Take note of the After Cast Delay that happens each time the skill is autocast.

15116.png Airship Armor (15116) Armor Airship Assault No slot, but it gives a bit of MDEF and a large boost to HP and SP, especially when the set is complete.
28705.png Crimson Dagger [2] (28705) Dagger Desert Wolf, Pasana, Porcellio, Skeleton General, Sleeper, Whikebain An easy-to-get dagger with good attack power, becoming stronger the higher your Base Level and the weapon's refine rate. However, its damage somewhat falls off the larger the enemy (100% - 75% - 50% damage against small, medium and large-sized enemies respectively).
16040.png Crimson Mace [2] (16040) Mace Am Mut, Earth Petite, Erend, Marionette, Kobold Leader, Li Me Mang Ryang / Jing Guai, Solider An easy-to-get mace with good attack power, becoming stronger the higher your Base Level and the weapon's refine rate. This has less overall damage unless carded with Sidewinder. It has better size modifiers compared to the dagger (75% - 100% - 100% damage against small, medium and large-sized enemies respectively) and it has a less severe Attack Speed penalty as well (-10 vs -15).
2183.png Modified Angelic Guard [1] (2183) Shield Reno (@go 36), 20 Pure Energy Crystals Part of the Advanced Angel's Set.
2113.png Novice Shield [1] (2113) Shield Lighthalzen Armory You may or may not wear a shield. Novices and Super Novices have a huge -10 Attack Speed penalty. Equip a shield only if more Defense is needed or if ASPD is good enough.
20710.png Modified Angel's Cardigan [1] (20710) Garment Reno (@go 36), 20 Pure Energy Crystals Part of the Advanced Angel's Set. Gives more HP recovery over the normal version.
20743.png Airship Manteau [1] (20743) Garment Airship Assault An improved version of the Novice Manteau, it adds Flee and reduced cast time in addition to Neutral resist.
22015.png Advanced Angel's Reincarnation [1] (22015) Footgear Reno (@go 36), 20 Pure Energy Crystals Part of the Advanced Angel's Set. Gives a bigger HP boost plus an added SP boost over the normal version.
22046.png Airship's Boots (22046) Footgear Airship Assault Use this to complete the Airship set. Gives an ASPD boost.
2921.png Dex Glove (2921) Accessory Eclage Glove Seller (10 Splendide Coins) If your base STR is 110, equip two of these as it adds ATK for every 10 base STR and +1% ATK if base STR is 110.
175-200
5897.png Ascendant Crown [1] (5897) Upper Headgear Cash Shop A very good headgear that provides a lot of bonuses, especially at higher refines.
18874.png Monocle [1] (18874) Mid Headgear Owl Viscount, Owl Marquees The cheapest and "easiest" to get slotted mid headgear. Other mid headgears can be obtained in the Cash Shop, but only a few can be slotted, via the 6396.png Spiritual Auger (6396) .
5361.png Gangster Scarf (5361) Lower Headgear Cash Shop

Custom Headgear Quests

Gives ATK+5.
15376.png Illusion Armor Type A [1] (15376) Armor Illusion This is an improvement over the Grace set only at +9 and with modification modules. Gives a large increase in ATK (+100), more ATK at higher refines, a boost to ASPD (+10%) at +7 and gives bonuses depending on which Illusion Engine Wing and Leg Type equipped. Recommended enchants are 39540.png [15] (39540) and two 39534.png [16] (39534) .
510039.png Paradise Super Novice Dagger (510039) Weapon Eden Group Initially gives decent ATK but leveling up makes it significantly better. It is surprisingly powerful, dealing more damage than a +15 Crimson Mace and +15 Crimson Dagger! Best of all, IT IS FREE! This humble dagger will serve you well, even beyond level 200 if much better weapons are still out of reach. The two glaring downsides - no slots and it can't be refined.
16043.png Meteor Strike [2] (16043) Mace Meteor Strike Quest A f****** heavy-a** mace weapon where its power depends on the level of certain skills. At the cost of skill flexibility, it grants a huge increase to ATK while also being cheaper than a +15 Crimson Mace or +15 Vicious Mind Mace.
16040.png Crimson Mace [2] (16040) Mace Am Mut, Earth Petite, Erend, Marionette, Kobold Leader, Li Me Mang Ryang / Jing Guai, Solider Compared to the Vicious Mind Mace, this has less ATK and no enchants but has 2 slots, allowing for more options for carding. Get a Neutral element mace. At +15, it deals slightly less damage (around 3%) than a +4 Meteor Strike. While significantly more expensive, the greatest benefits are increased versatility and weight savings (2000 weight saved!). You're not carrying an overloaded Class-8 Peterbilt Truck on one hand anymore!
500007.png Hypocrisy Machine [3] (500007) One-Handed Sword Broken Security Beta, Verporte If the Patent Blessed Knife is too expensive, then this is a really good choice. Due to the Super Novice's HUGE -17 ASPD penalty when wielding One-Handed Swords, it is highly recommended to refine this to +7 for the 20% ASPD boost. Very good for any Physical build, whether it is spamming Raid, autoattacking, or throwing Shield Chains if you have the Super Power Shadow Set (see below) to enable it.
510071.png Patent Blessed Knife [2] (510071) Dagger Ancient Hero This patented and blessed knife is the most expensive choice for this level range, but it makes life a lot easier because it enables the use of Level 10 2284.png Fatal Menace FATAL MENAS™ at +7. Despite its size modifier issues because it's a knife, it is still one of the best choices for this level range despite the price.
2113.png Novice Shield [1] (2113) Shield Lighthalzen Armory If a Cursed Knight Shield is still out of reach, then this cheap and cutesy shield will serve you well, thanks to its 20% resistance to all elements except Neutral. Just make sure you have enough ASPD to compensate for the huge -10 ASPD penalty when wearing shields.
460017.png Illusion Guard [1] (460017) Shield Illusion of Twins Grants ASPD and Perfect Hit and can be enchanted. Get this if you're still lacking ASPD.
28942.png Cursed Knight's Shield [1] (28942) Shield Cash Shop A nice shield that provides many bonuses, especially at higher refines. Highly recommended to keep it at +4 in case you want to upgrade it to a Purified Knight's Shield.
20718.png Gigant Snake Skin [1] (20718) Garment Faceworm's Nest Recommended to obtain at least a +10 with pure STR or a mix of AGI and STR enchants. Gives lots of DEF and various stats.
20933.png Illusion Engine Wing Type A [1] (20933) Garment Illusion Increases HP by 1000 and adds 100 HP every 2 refine rate. At +7, it increases attack speed. Enchant it with 1 39537.png [17] (39537) and 2 39539.png [18] (39539) .
2576.png Adventurer's Backpack [1] (2576) Garment Gold Coins for the Vending Machine (@go 36), Monster Hunter Shop, Valor Badges from Battlegrounds When refined to +7 and +9, it gives bonuses depending on which base stat is at least 90. Try getting this, especially at +9.
22011.png Temporal LUK Boots [1] (22011) Footgear Old Glast Heim

Temporal Boots

When paired with a Giant Faceworm Skin, it gives a boost to HP and SP. If base LUK = 120, Crit Damage +30% and MDEF +5. Greatly boosts autoattack damage. Having 120 LUK to get the increased Crit Damage also increases ATK, Flee, Crit and Perfect Dodge in the process. This is good for autoattack CRIT builds.

NOTICE: TEMPORAL BOOTS CANNOT BE WORN BY SUPER NOVICES IN OFFICIAL RO SERVERS!

22196.png Illusion Leg Type A [1] (22196) Accessory Illusion Max SP +200. Adds 20 SP every 2 refine rate. Enchant with either 39531.png [19] (39531) for more survivability or 39530.png [20] (39530) for more SP, and 39550.png [21] (39550) or 39551.png [22] (39551) for increased damage.
22238.png Great Hero Boots [1] (22238) Footgear An obsolete and ancient pair of boots gets a modern touch-up, making it GREAT. This pair of shoes gives a lot of bonuses, especially at high refines. Best paired with a 510071.png Patent Blessed Knife [2] (510071) . Try to refine this to +11, then use the 100747.png Weapon Reform (Intermediate) (100747) to turn it to a +10 Hero Boots-LT.
2963.png Physical Enhancer Ring [1] (2963) Accessory Geffen Magic Tournament ATK +5%. Enchant this with a mix of CRIT damage and ASPD. Adjust accordingly.
52228.png [23] (52228) Accessory Fall of Glast Heim ATK +10%. ATK +25 and Hit +10 when equipped with King Schmidt's Suit and Manteau. When paired with 4877.png Speed of Light (4877) , 29587.png Flash (29587) and 4864.png Fatal Lv2 (4864) are recommended enchants to further boost CRIT damage.
42207.png [24] (42207) Accessory Illusion ATK +5%. 25696.png Modification Module (Drain Life) (25696) , 25681.png Modification Module (Attack Speed) (25681) and 25682.png Modification Module (Fatal) (25682) are recommended enchants.
42208.png [25] (42208) Accessory Illusion ATK +5%. 39544.png [26] (39544) , 25681.png Modification Module (Attack Speed) (25681) and 25682.png Modification Module (Fatal) (25682) are recommended enchants.
24318.png Super Novice Shadow Shield (24318) Shadow Gear High Rank Shadow Gear Highly recommended to get this, as it provides a lot of nice bonuses depending on which skills are leveled. Max Owl's Eye to reduce Variable Casting Time and if if necessary, max Double Attack for faster ASPD.
24282.png Super Novice Shadow Weapon (24282) Shadow Gear High Rank Shadow Gear Highly recommended to get this, as it provides a lot of nice bonuses depending on which skills are leveled. Max Sword Mastery to further pierce DEF.
Hyper Novice (WIP)
5897.png Ascendant Crown [1] (5897) Upper Headgear Cash Shop A very good headgear that provides a lot of bonuses, especially at higher refines. It doesn't give as much damage as the Endeavor Coin EVT headgears below, leaning more towards surviving and staying a bit longer in battle.
34281.png [27] (34281) Headgear Endeavor Tokens shop in @go 50, 2nd floor Ignoring the OS weapons bonuses, this is the only one that boosts Melee damage. To easily get them to +10, refine them to +4, buy a couple of 35160.png [28] (35160) for 3 32417.png [29] (32417) a piece, because it will refine them to +7 - 10 at random.
34278.png [30] (34278)

34280.png [31] (34280)
34284.png [32] (34284)

Headgear Endeavor Tokens shop in @go 50, 2nd floor Ignoring the OS weapons bonuses, these three are pretty much the same. They boost ranged physical damage, especially at high refines. Choose which one looks good without an upper headgear costume. To easily get them to +10, refine them to +4 and buy a couple of 35160.png [33] (35160) for 3 32417.png [34] (32417) a piece, because it will refine them to +7 - 10 at random.
410080.png Deep Blue Sunglasses [1] (410080) Middle Headgear Requires a non-slotted 410079.png Deep Blue Sunglasses (410079) and 6396.png Spiritual Auger (6396) to slot. A cool-looking slotted Middle Headgear that can be enchanted. Try to get ATK enchants.
400002.png Victory Wing Ears [1] (400002) Middle Headgear Requires a non-slotted 400001.png Victory Wing Ears (400001) and 6396.png Spiritual Auger (6396) to slot. A cool-looking slotted Middle Headgear that can be enchanted. Try to get ATK enchants. This is slightly more preferrable to the Deep Blue Sunglasses because of the Aftercast Delay reduction.
18754.png Blood Sucker (18754) Lower Headgear 28620.png [35] (28620) A hideous-looking lower headgear that increases survivability by adding a small chance (3%) to lifesteal (5% of damage dealt as HP) when physically attacking at the cost of completely stopping HP and SP regeneration.
450127.png Automatic Armor Type A [1] (450127) Armor Illusion Improved version of the Illusion Armor. Gives a large increase in ATK (+125), more ATK at higher refines, a boost to ASPD (+15%) at +7 and gives bonuses depending on which Illusion Engine Wing and Leg Type equipped. Choose between 1000134.png Automatic Modification Module (Fixed Casting) (1000134) , 1000122.png Automatic Modification Module (Attack Power) (1000122) , 1000129.png Automatic Modification Module (Attacker Force) (1000129) , 1000131.png Automatic Modification Module (Critical Force) (1000131) .
510054.png Fortified Edge [2] (510054) Dagger Broken Security Beta, Verporte A level 5 weapon that boosts 5451.png Double Bowling Bash damage. Refine this to +8.
510039.png Paradise Super Novice Dagger (510039) Dagger Eden Group If better weapons like the ones listed below are still way out of reach, this humble dagger will still serve you well, even beyond level 200. It deals more damage than a +15 Crimson Mace, +15 Crimson Dagger and about as much damage as a +8 Fortified Edge. As the content gets tougher though, start saving Zeny and materials for better weapons.
500007.png Hypocrisy Machine [3] (500007) One-Handed Sword Broken Security Beta, Verporte One of, if not the best weapons for Physical Build Hyper Novices, ranged or melee. An indestructible sword (not applicable to refining) that grows stronger the more it is refined while having an awesome quirk - it has 3 card slots instead of the usual 2. Refine this weapon to infinity +11 and beyond.
510072.png Blessed Knife-LT [2] (510072) Dagger Ancient Hero Currently the most powerful evolution of the Blessed Knife, it grows stronger the more it is refined and graded. Level 10 Fatal Menace is granted at +7, just like its lesser Patent form. Best paired with 470094.png Hero Boots-LT [1] (470094)

This part needs testing: +11 Blessed Knife-LT vs +12 Hypocrisy Machine, so this is purely theory and speculation: Unless you have a 28946.png Purified Knight's Shield [1] (28946) with the "Remove Size Penalty" enchant or 24150.png Infinity Shadow Earring (24150) and 24151.png Infinity Shadow Pendant (24151) with a combined refine of +15, its damage will be on par or just negligibly higher compared to a Hypocrisy Machine at best, even when comboed with Hero Boots-LT. Then there's the fact that it has just 2 slots compared to the Hypocrisy Machine's 3.

500046.png Poenitentia Orbis [2] (500046) One-Handed Sword Tomb of Remorse A sword that boosts 5453.png Shield Chain Rush and 5451.png Double Bowling Bash damage, especially at higher refines and grades.
2113.png Novice Shield [1] (2113) Shield Lighthalzen Armory If a Purified Knight's Shield, Illusion Guard or Illusion Silver Guard are still out of reach, then this cheap and cutesy shield will still serve you well, thanks to its 20% resistance to all elements except Neutral.
460017.png Illusion Guard [1] (460017) Shield Illusion of Twins Grants ASPD and Perfect Hit and can be enchanted. Get this if you're still lacking ASPD.
28946.png Purified Knight's Shield [1] (28946) Shield Cash Shop A fantastic shield that provides many bonuses, especially at higher refines. Try to get the "Remove weapon's size penalty enchant", AKA free Drake Card, especially when you plan on using the 510072.png Blessed Knife-LT [2] (510072) as your main weapon.
460018.png Illusion Silver Guard [1] (460018) Shield Cash Shop Reduces VCT and ACD depending on refine rate. While it doesn't have the Purified Knight's Shield's Drake Card enchant, its VCT and ACD reductions are still very useful for all builds.
480020.png Automatic Engine Wing Type A [1] (480020) Garment Sage's Legacy Improved version of the Illusion Engine Wing. Increases HP by 1500 and adds 100 HP every 2 refine rate. At +7, it increases attack speed. Choose between 1000125.png Automatic Modification Module (Fast) (1000125) , 1000127.png Automatic Modification Module (Critical) (1000127) and 1000143.png Automatic Modification Module (All Force) (1000143) .
480124.png Convertible Physical Wing [1] (480124) Garment Sunken Sands A significantly upgraded version of the Excellion Wing, tuned to greatly boost physical power, especially when refined and paired with either Deep Blue Sungasses and Victory Wing Ears. A good all-rounder, whether melee or ranged.
480197.png Convertible Critical Wing [1] (480197) Garment Sunken Sands A significantly upgraded version of the Excellion Wing, tuned to greatly boost physical power and critical damage, especially when refined and paired with either Deep Blue Sungasses and Victory Wing Ears. Best for builds focused on Mega Sonic Blow.
470022.png Automatic Leg Type A [1] (470022) Shoes Sage's Legacy Improved version of the Illusion Leg. Max SP +250. Adds 20 SP every 2 refine rate. Choose between 1000119.png Automatic Modification Module (Vital) (1000119) , 1000120.png Automatic Modification Module (Mental) (1000120) , 1000135.png Automatic Modification Module (Above All) (1000135) , 1000149.png Automatic Module (Lucky Strike) (1000149) or 1000150.png [36] (1000150) for increased damage.
470094.png Hero Boots-LT [1] (470094) Footgear The current final form of the Ancient Hero Boots, this pair of shiny shoes gives quite a lot of bonuses, especially at high refines and better grades. It's an upgrade over the Automatic Leg A-type at high refines AND when paired with the 510072.png Blessed Knife-LT [2] (510072) . Try to aim for a +11 Grade C at least.
490024.png Automatic Booster R [1] (490024) Accessory Sage's Legacy Improved version of the Illusion Booster. ATK +5% and MSP +5%. Choose between 1000137.png Automatic Modification Module (Drain Soul) (1000137) , 1000116.png Automatic Modification Module (Attack Speed) (1000116) and 1000117.png Automatic Modification Module (Fatal) (1000117) and 1000144.png Automatic Module (Unlimited Vital) (1000144) .
490025.png Automatic Booster L [1] (490025) Accessory Sage's Legacy Improved version of the Illusion Booster. ATK +5% and MSP +5%. 1000138.png Automatic Modification Module (Magic Healing) (1000138) , 1000116.png Automatic Modification Module (Attack Speed) (1000116) and 1000117.png Automatic Modification Module (Fatal) (1000117) and 1000144.png Automatic Module (Unlimited Vital) (1000144) .
24619.png Super Power Shadow Weapon (24619) Shadow Gear Ancient Laboratory An improved version of the already really good Super Novice Shadow Gauntlet and the centerpiece of the Super Power Shadow Set. For Hyper Novices, only this is needed. The brooch and bangle are unnecessary.

Unlike what the description says, it DOES NOT need the Super Power Shadow Bangle and Brooch below to get the DEF pierce, just this glove and the SN Shadow Shield below and the refine rate of both. Type @battlestats or @bs to confirm.

24318.png Super Novice Shadow Shield (24318) Shadow Gear go 15 Highly recommended to get this, as it provides a lot of nice bonuses depending on which skills are leveled. Max Owl's Eye to reduce Variable Casting Time and if necessary, max Double Attack for faster ASPD.
24150.png Infinity Shadow Earring (24150)

24151.png Infinity Shadow Pendant (24151)

Shadow Gear go 15 Nullifies all annoying and pesky weapon size penalties if both have a total refine of 15 and above. If getting the "Remove weapon's size penalty" enchant on a PKS is too elusive or if the PKS isn't the best for you, then these two will do the trick.
Quality of Life Equipment
At level 100 and above, there are three pieces of equipment that'll make life easier. Switch to these equipment, activate the skill, then switch back to your default equipment. Example:
Life of Quality Equipment
Item Type Way to obtain Notes
19204.png Racing Cap (Super Novice) [1] (19204) Upper Headgear Hugel Race, Base Level 100 This headgear is tedious to get and may require multiple alts to speed things up, but it is so, so worth it. Fully enchanting it will grant use of level 3 2478.png Cart Boost, basically a free 12710.png Guyak Pudding (12710) but can be removed with skills like 92.png Quagmire and 30.png Decrease Agility. Still a huge quality of life upgrade. Just switch to this headgear, activate 2478.png Cart Boost for a big speed boost, then switch back to your default headgear.
19154.png Arch Angeling Balloon (19154) Lower Headgear 23135.png Poring Capsule (23135) Increases EXP gained and drop rate by 5%. Enables the use of Level 1 54.png Resurrection. Save tens of thousands of zeny while rescuing your loved ones from a terrible fate, while also preserving the environment by preventing the overharvesting of 610.png Yggdrasil Leaf (610) , all while experiencing things slightly faster and getting a tiny bit more stuff at the same time!
28900.png Royal Guard Shield [1] (28900) Shield 16.1 Banquet for Heroes, 800 6919.png Token of Honor (6919) Enables use of level 1 2315.png Shield Spell, restoring 3% of Max HP every 3 seconds for 90 seconds, for a total of 90% Max HP in 90 seconds. Increases survivability and slightly reduces the use of 28.png Heal and potions.
2576.png Adventurer's Backpack [1] (2576) of 1013.png Greed Garment of 1013.png Greed Equipment Crafting of 1013.png Greed I'LL BEGIN BY ACTIVATING MY POT BACKPACK OF 1013.png Greed!!! THIS LETS ME DRAW AT LEAST 2 ITEMS LITTERED ON THE GROUND AND ADD THEM TO MY INVENTORY!!! BUT I'M NOT DONE YET!!! BY SENDING MY BACKPACK OF 1013.png Greed BACK TO MY INVENTORY, IT WILL ALLOW ME TO RE-USE THE GARMENT I HAVE PREVIOUSLY EQUIPPED, THUS ENDING MY TURN!!! 1013.png Greed!!11111!
20802.png Teleport Amistr Bag [1] (20802)
20803.png Heal Amistr Bag [1] (20803)
20804.png Greed Amistr Bag [1] (20804)
20805.png Increase Agility Amistr Bag [1] (20805)
20806.png Magnum Break Amistr Bag [1] (20806)
20807.png Endure Amistr Bag [1] (20807)
20808.png Sight Amistr Bag [1] (20808)
Garment Hello! Do you love pets? Don't tell me, show me! SHOW ME!!! REEEEEEE perfectly cut scream These bags grant various skills that improve quality of life, like teleporting or having another backpack THAT MAKES YOU DRAW AT LEAST 2 ITEMS LITTERED ON THE GROUND.

Cards and Pets

Cards and Costume Stones
Card Slot Notes
4468.png Dark Pinguicula Card (4468)

4458.png Duneyrr Card (4458)

Headgear Early-game ATK-boosting card. Both give +10 ATK. Dark Pinguicula adds a chance of dropping Guillotine Cross (GX) poison herbs, while Duneyrr adds a chance of increasing ASPD.
30150.png [37] (30150) Headgear One of the best Headgear cards, especially when paired with the Deep Sea Merman Card. Insert this in high refine headgears. Max HP -5%, ATK +1% for every 3 refine rate.
40015.png C. Tag EM (40015) Headgear Boosts ATK in exchange for reduced HP and SP. If you don't have a Deep Sea Merman card, use two of this card. If you have a Deep Sea Merman card to pair with Deep Sea King Dramoh, insert this in a slotted middle headgear.
27328.png Birth and Death Card (27328) Headgear Early-game card dropped by all Bios Island non-boss monsters. Increases maximum HP by 500 and maximum SP by 50 at the cost of receiving 50% more damage from Angel Race monsters. For this build, it is best paired with a Desert Wolf Card.

When equipp?ed with Orc Baby Card, reduces damage taken from neutral property by 5%, Flee + 5.

When equipped with Baby Desert Wolf Card, Int + 3, MaxSP + 100, Matk + 5%.

When equipped with Familiar Card, Atk + 15, increase physical damage against shadow property enemies by 20%.

When equipped with Orc Warrior Card, reduce damage taken from demihuman race enemies by 15%.

When equipped with Desert Wolf Card, increases physical damage against medium and large enemies by 15%.

When equipped with Phen Card, reduces variable casting time by 25%.

When equipped with Orc Zombie Card, Hit + 15, Flee + 15, i?ncrease critical damage by 15%.

When equipped with Verit Card, MaxHP + 4%, MaxSP + 4%.

When equipped with Magalodon Card, Def + 100.

27288.png Pitman Worker Card (27288) Armor Early-mid game card. Increases Hit and ATK.
4393.png Shelter Card (4393) Armor Every 18 Base STR = +1 INT. When paired with Template:C, it further increases Melee Physical Damage by 15% and for every 40 Base STR.
4392.png Observation Card (4392) Armor Every 18 Base VIT = +1 DEX. When paired with Template:C, it further increases Ranged Physical Damage by 15% and for every 40 Base DEX.
300310.png Helmut Lugenburg Card (300310) Armor Increases melee and ranged physical damage by 4% every 3 refine rate. If having 120 Base STR or DEX is a bit too much and you want more stat flexibility, this is a very good alternative, especially when paired with Template:C for melee builds or Template:C for ranged builds. Try to +12 the armor this card is slotted in. All of these bonuses come at a cost of 10% increased SP Consumption.
4082.png Desert Wolf Card (4082) Weapon ATK +5 and increases damage to Small monsters by 15%. When combined with the Corrupt Life Card, damage to Medium and Large monsters is increased by 15%. If you don't have the zeny or Contaminated Magic to get the White Knight and Khalitzburg Knight cards, this is a cheap alternative.
4117.png Sidewinder Card (4117) Weapon Enables Double Attack when using non-dagger weapons, scaling by the level learned.
4115.png Hunter Fly Card (4115) Weapon Use this card if more survivability is needed. Adds a 3% chance to leech HP from enemies based on 15% of the amount of damage dealt.
31024.png Immortal Cursed Knight Card (31024) Weapon Boosts attack and adds a small chance to autocast Level 5 Ignition Break while physically attacking, resulting in sporadic bursts of damage. Good for autoattack builds but is heavily reliant on RNG.
27339.png Ghostring of Chaos Card (27339) Weapon This card is good for One-Handed swords, as it fully compensates for their size penalty against Small and Large monsters. If you have a Hypocrisy Machine, use this until you refine it to +9, then find better cards.
300231.png Diligent Soldier Andre Card (300231) Weapon This card is good for good for one-handed Axes as it compensates for their size penalty against Small and Medium-sized monsters. If you have a Purified Knight's Shield with the "Remove weapon's size penalty" enchant, then look for better cards. Now for the big question. Is there a decent One-Handed Axe a Hyper Novice can use?
300420.png Labyrinth Berzebub Card (300420) Weapon This card is good for Maces and especially good for daggers as it compensates for their size penalty against Large monsters. If you have a Purified Knight's Shield with the "Remove weapon's size penalty" enchant, then look for better cards.
4608.png White Knight Card (4608) Weapon Best paired with Khalitzburg Knight card. Gives +20% more damage to Medium and Large monsters. When comboed with Khalitzburg Knight, it gives 15% more damage and also reduces 5% more damage from Medium and Large monsters.
300263.png Rekenber Guard Card (300263) Weapon When inserted in daggers and one-handed swords, it increases ATK and Melee Physical Damage, even moreso if you're level 200+ and the weapon is highly refined.
4609.png Khalitzburg Knight Card (4609) Shield Gives 25% damage reduction from Medium and Large Monsters (30% if paired with WK) plus additional DEF. Greatly increases overall survivability as long as the monster isn't Small.
300240.png Gan Ceann Card (300240) Shield A much cheaper version of the expensive Mutated Khalitzburg card with slighty worse effects, namely the 5% increased damage taken from Small monsters.
4413.png Hodremlin Card (4413) Shield A good all-around damage reducing card. Reduces damage from Small, Medium and Large mobs by 15%. It also has a chance to increase Perfect Dodge by 30 if you're attacked.
4588.png Wakwak Card (4588) Garment Early-game damage boosting card. +5 ATK for every 10 base STR. If you have 120 base STR, it means +60 ATK.
27176.png Swamp Cramp Card (27176) Garment Mid-game damage boosting card. +3 ATK and +1% ASPD for every 10 base STR. If base STR is 120 and above, +40 ATK. If you have 120 base STR, that means +70 ATK and +12% ASPD.
300271.png Happy Card (300271) Garment One of, if not the best card for Melee Physical builds. Increases Melee Physical Damage at the cost of reducing Max SP. Melee Physical Damage is further increased when paired with a Template:C and every 40 Base STR.
300270.png Empathize Card (300270) Garment One of, if not the best card for Ranged Physical builds. Increases Ranged Physical Damage at the cost of reducing Max SP. Ranged Physical Damage is further increased when paired with a Template:C and every 40 Base DEX.
300422.png Catherine Gaebolg Card (300422) Garment If having 120 Base STR is a bit too much and you want more stat flexibility, use this card over the Happiness Giver. Best paired with the armor card Template:C for a 5% melee physical damage bonus. Increases melee physical damage by 5%, and is further increased by 4% every 2 refine rate. Try to +12 the garment this card is slotted in. All of these bonuses come at a cost of 10% reduction in Neutral Element resistance.
300426.png Crux Findel Card (300426) Garment If having 120 Base DEX is a bit too much and you want more stat flexibility, use this card over the Empathizer. Best paired with the armor card Template:C for a 5% ranged physical damage bonus. Increases ranged physical damage by 5%, and is further increased by 4% every 2 refine rate. Try to +12 the garment this card is slotted in. All of these bonuses come at a cost of 10% reduction in Neutral Element resistance.
27249.png Archi Card (27249) Footgear Max HP +500, ATK, MATK, Hit and Flee +15. A good all-around footgear card. Obtained at the Geffen Magic Tournament.
27251.png Geffen Gangster Card (27251) Footgear Critical Damage +3%, ASPD 5%. The increased critical damage synergizes well with Super Novice Fury. Obtained at the Geffen Magic Tournament.
27252.png Geffen Thug Card (27252) Footgear Critical Damage +5%, ASPD 3%. The increased critical damage synergizes well with Super Novice Fury. Obtained at the Geffen Magic Tournament.
27258.png Ipodus Card (27258) Footgear ATK+3%, increases ASPD by 5%. Makes this build hit harder and faster. Obtained at the Geffen Magic Tournament.
27256.png Blut Hase Card (27256) Footgear ATK+3%, increases long ranged physical damage by 5%. Obtained at the Geffen Magic Tournament. Good for ranged builds.
30144.png [38] (30144) Footgear ATK +4 every 15 Base STR. When combined with 30150.png [39] (30150) , increases Critical Damage by 15%.
27183.png Gigantes Card (27183) Accessory ATK+20. If Base STR is 120 and above, additional ATK+20. Comes at the cost of decreased ASPD (-3%).
300108.png Sewage Venenum Card (300108) Accessory Increases HP and Fatal Menace damage. Further increases Fatal Menace damage when comboed with 27172.png Scimitar Cowraiders Card (27172) and 300097.png Aries Card (300097) cards. This combo is best used when your main weapon is a Patent Blessed Knife or Blessed Knife-LT. Very good for leveling from 175 onwards, but not the best for the end-game.
27171.png Revolver Cowraiders Card (27171) Accessory STR +4, ATK +4%. Further increases your attack power, especially when combined with the Shotgun Buffalo Bandit Card (STR+3 and ATK+3%). Place the accessory equipped with this card on the right side.
27170.png Shotgun Cowraiders Card (27170) Accessory AGI +7, Hit +7. When combined with Revolver Buffalo Bandit Card, it adds an additional STR +3 and ATK +3%. A good card that increases AGI for faster ASPD and hit to further augment your already really high hit rate. Place the accessory equipped with this card on the left side.
300242.png Ghost Cube Card (300242) Accessory Boosts ATK and HP. This is the best-in-slot accessory card. Grab a pair of these incredibly cheap but incredibly effective cards for stronger bash, smash, pierce and blow.
25207.png Enhanced SP Absorb Stone (Top) (25207)

25208.png Enhanced SP Absorb Stone (Garment) (25208)

Upper costume headgear, garment costume If you need a bit more survivability in exchange for slightly reduced damage or if buying thousands of Concentrated Golden Syrup Potions is burning hole in your wallet, then these can help. Best paired with an Incubus Pet and other SP-leeching effects.
25210.png Enhanced HP Absorb Stone (Top) (25210)

25209.png Enhanced HP Absorb Stone (Garment) (25209)

Upper costume headgear, garment costume If you need a bit more SP leeching in exchange for slightly reduced damage or if buying thousands of Concentrated Blue Syrup Potions is burning hole in your wallet, then these can help. Best paired with a Succubus Pet and other HP-leeching effects.
1000377.png Melee Stone (Top) (1000377)

1000378.png Melee Stone (Mid) (1000378)
1000379.png Melee Stone (Low) (1000379)

Upper costume headgear, middle costume headgear, lower costume headgear These three boost melee damage.
25304.png Critical Stone (Top) (25304)

25060.png Critical Stone (Mid) (25060)
25305.png Critical Stone (Low) (25305)

Upper costume headgear, middle costume headgear, lower costume headgear These three boost Critical Damage. Good for builds focused on Mega Sonic Blow or autoattacking.
1000375.png Ranged Stone (Top) (1000375)

25061.png Ranged Stone (Mid) (25061)
1000376.png Ranged Stone (Low) (1000376)

Upper costume headgear, middle costume headgear, lower costume headgear These three boost ranged damage.
1001328.png Super Novice Stone (Mid) (1001328) Mid costume headgear This mid headgear costume stone is not yet implemented.
25710.png Paladin Stone (Top) (25710)

25492.png Stalker Stone (Low) (25492)
1001326.png Super Novice Stone (Garment) (1001326)

Upper costume headgear, lower costume headgear, garment costume 2005.png Dea Staff [1] (2005) This garment costume stone is not yet implemented. When paired with a Stalker Onyx and a Paladin Onyx, its bonuses are not yet implemented. However, you got to spin it to win it to know It.
Pets
The following pets below are most suited for this build, with their bonuses when Loyal. Check the Pet System on how to obtain and feed a pet.
  • 9002.png Drops Egg (9002) : Hit+3, ATK+3
  • 9005.png Picky Egg (9005) : STR+1, ATK+5
  • 9090.png Little Isis Egg (9090) : ATK+4%
  • 9097.png Diabolic Egg (9097) : ATK and MATK +2%, HP and SP +1%, chance autocast level 3 Fire Bolt when doing melee physical damage
  • 9098.png Earth Deleter Egg (9098) : AGI+3, ASPD+3% (delay after attack)
  • 9052.png Incubus Egg (9052) : Add a 3% chance to drain SP based on 1% of the damage dealt.
  • 9055.png Succubus Egg (9055) : Add a 3% chance to drain HP based on 5% of the damage dealt.
  • 9121.png Orc Hero Egg (9121) : ATK+7%, Crit Damage +3% when loyal
  • 9126.png Kiel-D-01 Egg (9126) : ASPD+7%, Hit+18, Melee Physical Damage +5% when loyal. Good for melee builds

Tips and Tricks

Strategy (WIP)
The Physical Build Hyper Novice is about repeatedly spamming a variety of skills berserker style, shredding enemies into Chef's Kiss mincemeat.


Super Novice:

  • You can focus on hard-hitting skills like Bash and Mammonite, or deal sustained damage over time with Double Attack. Both can be amplified with Provoke and Magnum Break.
  • Like in the Mage build above, Safety Wall will still be your wall of safety in dangerous situations if you wish to have it, but it will cost a lot of skill points.
  • Go for a more or less even spread of STR, AGI and DEX, with AGI and DEX being a little higher for increased survivability and actually landing hits. Add some INT to the side for SP Recovery and better Heals. Put remaining points into VIT or LUK, whichever is preferable.
  • Watch your surroundings and always be ready to move out of harm's way. Archer-type monsters will can snipe from a distance and will often land hits, while mage-types like Evil Druid can cast a spell out of nowhere, and it can be potentially fatal.

When in a party... I have writer's block.


Ex. Super Novice When soloing, I get writer's block!

In a party setting, I also get writer's block!


Hyper Novice WORK IN PROGRESS!!! Shielding, throwing, never for defending. Hard head, bowling ball, striking not sparing. Sonically blowing, spiral piercing, stops the mega fighting.


Hybrid (Experimental Alice Hard tentacle farmer, meme in progress)

A really brave and foolish Hyper Novice attempts Alice Hard. This build is so meme omg ahahahahahahaha!
Equipment swapping (ALT+D) made this possible. Notice the Physical equipment is significantly weaker compared to the Magical one. Adjusting stats somewhat compensates for this. The stats not shown in the screenshot are: 112 STR, 102 AGI, 100 VIT, 100 INT, 100 DEX, 100 LUK, 110 POW, 0 STA WIS SPL, 110 CON, 72 CRT. Pet used is Succubus for HP leech. There is 0 SPL because the magic equipment is way more than enough to clear the Spades.

(Description WIP) - The late-game Hybrid build combines the best of both worlds. While it doesn't have access to AP skills, it more than makes up in versatility, especially in certain places where both physical and magical attacks are required. In Alice Hard, it is good for tentacle farming, but the damage isn't enough yet for the MVPs. But hey, solo tentacle farming is now possible at least! This build is so meme omg...

Stats and Traits

Stat Amount Notes
STR 100+ or 120 Depending on which gears are less powerful, adjust STR or INT accordingly.
AGI 80+ Used mainly for reducing flinching animation time and the chances of getting inflicted by Bleeding and sleep.
VIT 80+ Increases Max HP while reducing the chances of getting inflicted by Poison.
INT 100+ or 120 Depending on which gears are less powerful, adjust STR or INT accordingly.
DEX 100+ or 1-9 DEX is needed for Hit, while also raising a bit of ATK and MATK. If you have 100% VCT reduction, leave this below 10.
LUK 80+ Get at least 100 Total LUK for immunity against Curse. Raise it further if more CRIT is needed for Mega Sonic Blow.
Trait Amount Notes
POW 0-110 Adjust POW or SPL accordingly depending on which gears are less powerful.
STA 0 No STA or WIS will be used for this build. There are ways to compensate reduced RES and MRES, such as increased healing or skills like Autoguard.
WIS 0 No STA or WIS will be used for this build. There are ways to compensate reduced RES and MRES, such as increased healing or MDEF.
SPL 0-110 Adjust POW or SPL accordingly depending on which gears are less powerful.
CON 50-110 Adjust CON or CRT accordingly. More CON means more Flee, a bit more damage, but less healing and C.Rate.
CRT 50-80 Adjust CON or CRT accordingly. More CRT means more C.Rate and healing, but less Flee and damage if not using 5452.png Mega Sonic Blow

Skills

Skills: Super Novice
Skill Level Notes
Super Novice
19.png Fire Bolt 4 Prerequisite for Fireball.
17.png Fire Ball 6-10 Deals decent Fire damage in a 5x5 AoE around the target and has a quick cast time. Very useful in taking out Earth and Undead enemies and good in the very early game.
10.png Sight 1 Reveals enemies around you for a short duration. Prerequisite for Sightrasher.
14.png Cold Bolt 5 Prerequisite for Frost Diver.
15.png Frost Diver 1 Prerequisite for Storm Gust.
20.png Lightning Bolt 4 Prerequisite for Thunderstorm and Jupitel Thunder.
21.png Thunder Storm 1 Prerequisite for Lord of Vermillion.
11.png Napalm Beat 1 Prerequisite for Jupitel Thunder. A cute little Ghost element poke with a tiny AoE (3x3 around the target).
16.png Stone Curse 1 Prerequisite for Earth Spike.
9.png Increase SP Recovery 5-10 Compensates for the Super Novice's very low SP pool.
28.png Heal 3-10 Mainly for self-healing. Also helpful in healing teammates.
29.png Increase Agility 10 The increased movement speed and AGI means you'll be more mobile and be able to evade and/or escape attacks easily.
22.png Divine Protection 5 Prerequisite for Blessing. Reduces damage from Demon and Undead race enemies.
34.png Blessing 10 Grants STR, INT and DEX bonuses. Very useful buff.
24.png Ruwach 1 Essentially an improved Sight skill. Deals Holy Element magic damage to revealed enemies.
26.png Teleport 1 Save weight, money, inventory space and the grind for a Creamy Card (or the zeny to buy it)!
12.png Safety Wall Optional Requires Level 7 Napalm Beat and Level 5 Soul Strike. While it's optional, it is still a very handy skill and can be a life-saver in a pinch. Aside from blocking physical attacks at melee range, it can also prevent armor from getting broken from melee Armor Break attacks and shadow equipment from getting stripped. It can also block attacks reflected by Max Pain at melee range too!
43.png 3 Prerequisite for Vulture's Eye.
44.png 1 Prerequisite for Attention Concentrate.
45.png Improve Concentration 10 Your main source of DEX and AGI. Max this one for reduced cast times.
Expanded Super Novice
81.png Sightrasher 2 Utility skill that deals Fire damage and pushes enemies away from you. Requires Sight to be active before use. Use this to push back enemies away from you or party member/s getting mobbed to death. This is a very effective means of escape when combined with Quagmire.
83.png Meteor Storm 10 Bombards an area with meteors, dealing Fire Element damage.
89.png Storm Gust 1 or 10 Deals Water Element damage and a chance to cause Frozen status over a large area while knocking around enemies. Lower levels means lower damage but much higher chances of freezing while higher levels means higher damage but much lower chances of freezing. Keep it at level 1 for crowd control purposes. Max it to level 10 if more damage is desired.

Notice: The skill has a tendency to push enemies to the upper right at the default orientation.

84.png Jupitel Thunder 5-10 An improved version of Lightning Bolt with an added knockback and removed cooldown.
85.png Lord of Vermilion 10 This is a larger and more powerful version of Thunderstorm with an added Blind effect. It can combo with Storm Gust. Storm Gust pushes mobs away but guarantees they'll be not too far apart while they're chasing you, which is a good opportunity to blast them away with this skill.
90.png Earth Spike 3 Prerequisite for Heaven's Drive. Essentially an Earth Bolt.
91.png 1-5 Prerequisite for Quagmire. Use this skill to reveal and damage hidden enemies that are a good distance away.
92.png Quagmire 5 Very useful utility skill that slows down enemies while also cutting their DEX and AGI. This makes escaping or killing mobs easier.
66.png Impositio Manus Optional Provides additional Weapon ATK and MATK to you and the whole party.
74.png Magnificat 5 Doubles SP Regeneration of the caster and the party. When combined with the skill Increase SP Recovery, SP consumption becomes almost a non-issue, which means less zeny spent, big weight savings and most importantly, very little to no fear of spamming spells.
248.png Faith Optional Adds up to 2000HP and increases Holy resistance by up to 50%. Get this when more HP is needed.
249.png Auto Guard Optional If survival and not dying too much are one of the top priorities, get this skill, preferably maxed.
5076.png Angel, Help me! 1 Restores 1000 HP and 350 SP per second for 20 seconds, for a grand total of 20,000 HP and 7,000 SP. Affects self and all party members within a 31x31 area. When a party needs help to get out of a bad situation, this can help quite a lot. Beware of the ridiculously long 5-minute cooldown, so use this wisely.
5075.png Breakthrough Optional Passive skill. Increases HP, SP, ATK and amount of healing received. Sizeable jump in bonuses from level 4 to 5. If even more HP is needed, get this skill.
5077.png Transcendence 5 Passive skill. Increases HP, SP, MATK and healing power. Sizeable jump in bonuses from level 4 to 5. Increases MATK, HP, SP and healing power. A must-have.

After switching to Hyper Novice and reaching around Job Level 10+, reset all skills. Your main sources of damage will be Hyper Novice skills, augmented by 1st and 2nd job skills.

Skills: Hyper Novice (Example build - Jack Frost Nova)
There will be skill points remaining, so spend them on whichever is most beneficial to you. In my case, I chose to use the extra skill points on Safety Wall and Faith for more survivability and Enlarge Weight Limit to compensate for having Noodle Arms.
Skill Level Notes
Super Novice
9.png Increase SP Recovery 10 Increases SP recovery over time. If Super Novice Shadow Gauntlet is equipped, max this, because each level gives 3% MDEF pierce to normal mobs, a maximum of 30% at level 10.
28.png Heal 10 Mainly for self-healing. Also helpful in healing teammates.
29.png Increase Agility 10 The increased movement speed and AGI means you'll be more mobile and be able to evade and/or escape attacks easily.
22.png Divine Protection 5 Prerequisite for Blessing. Reduces damage from Demon and Undead race enemies.
34.png Blessing 10 Grants STR, INT and DEX bonuses. Very useful buff.
24.png Ruwach 1 Essentially an improved Sight skill. Deals Holy Element magic damage to revealed enemies.
26.png Teleport 1 Save weight, money, inventory space, the grind for a Creamy Card and crafting Teleport Shadow Armors! So much zeny saved in the long run!
12.png Safety Wall Optional Requires Level 7 Napalm Beat and Level 5 Soul Strike. While it's optional, it is still a very handy skill and can be a life-saver in a pinch. Aside from blocking physical attacks at melee range, it can also prevent armor from getting broken from melee Armor Break attacks and shadow equipment from getting stripped. It can also block attacks reflected by Max Pain at melee range too!
43.png 10 Prerequisite for Vulture's Eye. Highly recommended to max to more easily achieve 100% Variable Cast Time reduction.
44.png 1 Prerequisite for Attention Concentrate.
45.png Improve Concentration 10 Your main source of DEX and AGI. Max this one for reduced cast times.
Expanded Super Novice
66.png Impositio Manus Optional Provides additional ATK and MATK to you and the whole party.
74.png Magnificat Optional Doubles SP Regeneration of the caster and the party. When combined with the skill Increase SP Recovery, SP consumption becomes almost a non-issue, which means less zeny spent, big weight savings and most importantly, very little to no fear of spamming spells.
248.png Faith Optional Adds up to 2000HP and increases Holy resistance by up to 50%. Get this when more HP and Holy resistance are needed.
249.png Auto Guard Optional If survival and not dying too much are some of the top priorities, get this skill, preferably maxed.
5076.png Angel, Help me! 1 Restores 1000 HP and 350 SP per second for 20 seconds, for a grand total of 20,000 HP and 7,000 SP. Affects self and all party members within a 31x31 area. When a party needs help to get out of a bad situation, this can help quite a lot. Beware of the ridiculously long 5-minute cooldown, so use this wisely.
5075.png Breakthrough 5 Passive skill. Increases HP, SP, ATK and amount of healing received. Sizeable jump in bonuses from level 4 to 5. If even more HP is needed, get this skill.
5077.png Transcendence 5 Passive skill. Increases HP, SP, MATK and healing power. Sizeable jump in bonuses from level 4 to 5. Increases MATK, HP, SP and healing power. A must-have.
108.png Repair Weapon 1 Requires level 1 105.png Hilt Binding and level 1 107.png Weaponry Research

Repairs weapons AND ARMORS. Bring a few Steel and Rough Oridecon just in case so you don't have to go back to your save point or ask a Meister for repairs. Quality of life! Sad that it doesn't repair equipment broken by refining though.

All skills except for Rule Break in the Hyper Novice mage tree have 10 points. Feel free to choose which skills you want to speceialize in. I went for a mix of Wind and Water elements and got Rule Break for even more damage.

Skill Level Notes
Hyper Novice
248.png Faith 7 or 9 Passive that adds up to 10 S.MATK. Higher levels increase the damage of all skills in the Mage tree.
5455.png Meteor Storm Buster 5 or 8 The upgraded version of Meteor Storm summons more powerful and faster meteors to rain down on enemies. The initial hit has a small 5x5 area while the explosion has a 9x9 area.

Fixed Cast Time: 1.5 seconds
Skill cooldown: 2.5 seconds
No Aftercast Delay

5456.png Jupitel Thunderstorm 9 Jupitel Thunder and Thunderstorm combine together to summon a targeted Wind element electric storm. AoE is 9x9 at levels 9-10.

Fixed Cast Time: 1 second
Skill cooldown: 2 seconds
Very short Aftercast Delay

5457.png Jack Frost Nova 10 A strong Water element spell that lingers in a 9x9 area at max level. Inflicts the Bitter Cold status to enemies, increasing damage taken from Water element attacks. Hits 12 times.

Fixed Cast Time: 1.5 seconds
Skill cooldown: 3 seconds
Short Aftercast Delay

5458.png 5 or 10 An upgraded version of Heaven's Drive, this skill causes Earth element damage in an area around the player. Has a 9x9 area at max level. If your Dim Glacier Wand is enchanted with Hell's Jack, you can max this skill out.

Fixed Cast Time: 1 second
Skill cooldown: 2 seconds at level 5, 0.7 seconds at level 10 Short-ish Aftercast Delay

5459.png Ground Gravitation 7 An upgraded version of Gravitational Drive, Ground Gravitation summons an awesome-looking space-age symbol that causes Neutral element damage to all enemies within a 9x9 area at max level. Enemies affected receive increased damage while slowing them down.

Fixed Cast Time: 1.5 seconds
Skill cooldown: 5 seconds
Significant Aftercast Delay! Be careful when using this skill!

5460.png Napalm Vulcan Strike 5 A combination of Soul Strike and Napalm Vulcan, this highly spammable Ghost element spell deals damage in a 7x7 area.

Fixed Cast Time: 1 seconds
Skill cooldown: 0.3 seconds
Short Aftercast Delay

5462.png Rule Break Optional The Mage Tree's AP skill significantly increases the damage of all skills for 5 minutes. However, because it uses up A LOT of skill points, it is up to you to decide whether to invest in this and specialize in 1-2 skills or ignore it and max 3-4 skills for more variety at the cost of reduced damage.

Equipment

Equipment
Super Novice
Item Type Way to obtain Notes
Paradise Set Chest Eden Academy, Base Level 100 'HIGHLY RECOMMENDED! Upon reaching Base Level 10. get the full set by going to @go 16. Go one room up, find Paradise Equipment and talk to Lothaire to get the set FOR FREE. It will serve you well until around level 100, when you'll get better version. There are other options below, but this is one of, if not the best one to use from level 10-100.
5119.png Super Novice Hat [1] (5119) Upper Headgear Lighthalzen Armory (unslotted)

Holden (slotted)

Starter Headgear. Gives +1 all stats.
18776.png Modified Angel's Kiss [1] (18776) Upper Headgear Toad Part of the Angel's Set. Adds 3% SP recovery.
2340.png Novice Breastplate [1] (2340) Armor Yuno - King's Shop Starter Armor, though it's a little expensive at 89,000 zeny. Definitely better than rags that came from the dump (2352.png Tattered Novice Ninja Suit (2352) ).
15012.png Puente Robe [1] (15012) Armor Orc Lady Decent starter armor. Slightly reduces fixed cast time and slightly improves the effectiveness of healing skills.
2355.png Angelic Protection [1] (2355) Armor Eclipse MDEF+20

When complete, the Angel's Set gives a sizeable boost to HP and SP. There is a small chance Lv. 1 Assumptio will be autocast if you're under attack. Beware the After Cast Delay that happens each time the skill is autocast.

2113.png Novice Shield [1] (2113) Shield Lighthalzen Armory One of the best shields the Super Novice could ever have. Gives 20% resistance to all elements except Neutral.
2183.png Modified Angelic Guard [1] (2183) Shield Mastering Part of the Angel's Set.
2512.png Novice Manteau [1] (2512) Garment Lighthalzen Armory Starter Garment - gives 10% Neutral resistance.
20710.png Modified Angel's Cardigan [1] (20710) Garment Vagabond Wolf Part of the Angel's Set. Adds 5% HP recovery.
2416.png Novice Shoes [1] (2416) Footgear Lighthalzen Armory Starter Shoes. Gives an HP boost.
22015.png Advanced Angel's Reincarnation [1] (22015) Footgear Vocal Part of the Angel's Set. HP +100.
2628.png Novice Armlet [1] (2628) Accessory Izlude Armor Dealer Starter accessory. Doesn't give any stats, but at least it's slotted and cheap.
2607.png Clip [1] (2607) Accessory Dragon Fly Gives 10SP.
Expanded Super Novice (99-175)
Advanced Paradise Set Chest Eden Academy, Base Level 100 Upon reaching Base Level 100, go back to where you got the Paradise Set. Talk to Louis to get the Advanced Paradise Set in exchange for a couple of monster drops or by spending 10 25223.png Eden Coin (25223) per piece.
450122.png Noblesse Super Novice Robe [1] (450122)

470017.png Noblesse Magic Boots [1] (470017)

480014.png Noblesse Magic Manteau [1] (480014)

490015.png Noblesse Magic Ring [1] (490015)

Equipment Set 10 6919.png Token of Honor (6919) per piece. Obtained by completing the account-wide Eden Academy questline. Good until level 125. It is highly recommended to complete the 16.1 Banquet for Heroes quest chain to get this over the other armors. While it gives less MATK compared to the Flattery Robe and is designed more towards an autospell build, completing the full set gives quite a lot of bonuses, which include reduction in Variable Casting Time and Aftercast Delay, and can be further upgraded into the Imperial and Grace sets. Finally, to put the icing on the cake, they can be refined to +9 thanks to the 100128.png Noblesses Refine Ticket (100128) at a price of 10 6919.png Token of Honor (6919)
450124.png Imperial Super Novice Robe [1] (450124)

470019.png Imperial Magic Boots [1] (470019)

480017.png Imperial Magic Manteau [1] (480017)

Template:Item List

Equipment Set 3 25223.png Eden Coin (25223) per piece. Obtained by completing the account-wide Eden Academy quest chain. Good until level 150. An upgraded version of the Noblesse set, this costs triple the price but it introduces the player to enchanting. Like the Noblesse set, they can be easily refined to +9 thanks to the 100129.png Imperial Refine Ticket (100129) , for the low cost of just 3 25223.png Eden Coin (25223) !
450126.png Grace Super Novice Robe [1] (450126)

470021.png Grace Magic Boots [1] (470021)

480019.png Grace Magic Manteau [1] (480019)

490020.png Grace Magic Ring [1] (490020)

Equipment Set 20 25669.png Unknown Parts (25669) per piece. Obtained by completing the 17.1_Illusion questline. Best by level 200, but these will still serve you well even at level 250 if you still don't have enough resources to get the best equipment. An upgraded version of the Imperial set, this is the pinnacle of Eden Academy equipment. Each piece costs 20 25669.png Unknown Parts (25669) while the 100130.png Grace Refine Ticket (100130) costs 20 25723.png Cor Core (25723) .
550044.png Paradise Super Novice Staff (550044) Rod Eden Academy, Base Level 100 and above Go back to where you got the Paradise Set and pay Labraham 10 25223.png Eden Coin (25223) . Initially gives decent MATK but leveling up makes it significantly better. It is surprisingly strong, dealing more damage than a +15 Crimson Rod and a +8 Fortified Rod. This humble Rod will serve you well, even beyond level 200 if much better rods are still out of reach. The glaring downsides - no slots and it can't be refined.
5897.png Ascendant Crown [1] (5897) Upper Headgear Cash Shop A good mid game headgear that provides a lot of bonuses.
15068.png Advanced Angelic Protection [1] (15068) Armor Reno (@go 36), 20 Pure Energy Crystals MDEF+30

When complete, the Advanced Angel's Set gives even better bonuses compared to the normal version, though the HP and SP boost remains the same. There is a small chance Lv. 1 Assumptio will be autocast if you're under attack. Beware of the After Cast Delay that happens each time the skill is autocast.

1680.png Crimson Rod [2] (1680) Rod Bathory, Laurell Weinder Gives a good amount of MATK at high refines. Better to use this as material for making other things instead of refining it to +15.
2113.png Novice Shield [1] (2113) Shield Lighthalzen Armory One of the best early-game shields the Super Novice could ever have - gives 20% resistance to all elements except Neutral.
{{#item20718}} Garment Faceworm's Nest Gives lots of DEF, some MDEF and various stats.

Get at least a +10 with a mix of DEX (bigger priority) and INT enchants for reduced variable cast time.

22008.png Temporal DEX Boots [1] (22008) Footgear Old Glast Heim

Temporal Boots

When paired to Giant Faceworm Skin, it gives a boost to HP and SP. If base DEX = 120, fixed cast time -0.5 seconds. This is very important, as you need to quickly cast spells and remain mobile. Try to get the Spell enchant. The second enchant can be Muscular Endurance or Lucky Day.

NOTICE: TEMPORAL BOOTS CANNOT BE WORN BY SUPER NOVICES IN OFFICIAL RO SERVERS!

2924.png Int Glove [1] (2924) Accessory Eclage Glove Seller (10 Splendide Coins) This is the more offensive-oriented accessory. If your base INT is 110, equip two of these as it adds MATK for every 10 base INT and +1% MATK if base INT is 110.
2898.png Black Rosary [1] (2898) Accessory Nightmare Wraith Dead Gives a nice boost to MDEF (+15), reducing damage from magic attacks and the chances of being Stone Cursed and Frozen.
Expanded Super Novice 175-200
19428.png Illusion Morpheus's Hood [1] (19428)

20948.png Illusion Morpheus's Shawl [1] (20948)

32239.png Illusion Morpheus's Bracelet [1] (32239)

32238.png Illusion Morpheus's Ring [1] (32238)

Equipment Set Illusion of Labyrinth Early-mid game set. It can be further boosted with an 550030.png Illusion Thorny Staff of Darkness [2] (550030) but it requires Template:Skill Info to use.

For this level range, try to get both the Hood and Shawl to at least +7. This can be done easily by obtaining or buying 100423.png Labyrinth Refinement Box (100423) , which will refine them at +7 - 10 at random.

18848.png Lush Rose [1] (18848) Upper Headgear Horror Toy Factory, 300 7642.png Bloody Coin (7642) Gives a good amount of MATK and can be very easily refined to +9 and above, thanks to 35551.png [40] (35551) , obtained by purchasing it from the Master of Coin at the Main Office's 2nd floor.
18874.png Monocle [1] (18874) Mid Headgear Owl Viscount, Owl Marquees The cheapest and "easiest" to get slotted mid headgear. Other mid headgears can be obtained via the Cash Shop, but only a few can be slotted by the 6396.png Spiritual Auger (6396) .
15377.png Illusion Armor Type B [1] (15377) Armor Illusion This is an upgrade over the Grace set but only at high refines (+9) and with modification modules. Gives a large increase in MATK (+100), even more MATK at higher refines and can be enchanted. 39540.png [41] (39540) and two 39535.png [42] (39535) are recommended.
550044.png Paradise Super Novice Staff (550044) Rod Eden Academy, Base Level 100 and above If better rods like the ones listed below are still out of reach, this humble rod will still serve you well, even beyond level 200. It deals more damage than a +15 Crimson Rod and almost the same damage as a +15 Rutilus Stick-OS with the MATK +15% enchant.
1680.png Crimson Rod [2] (1680) Rod Illusion A strong wand that gives After-Cast Delay reduction at +11, becoming even stronger with enchants. Try to get the MATK +15% enchant. The Paradise Super Novice Wand you get for FREE deals almost the same damage as this at +15. However, it does have its advantages. The Paradise SN Wand has no slots while this has 2, and it doesn't require Super Novice Soul Link to use, unlike the Welding Wand and Illusion Thorn Staff of Darkness.
550080.png Freedom Stick [2] (550080) Rod Ancient Hero A really good rod which gives a boost to MATK, especially at high refines. If it is still too difficult to obtain, the Paradise Super Novice Wand will suffice.
550030.png Illusion Thorny Staff of Darkness [2] (550030) Rod Illusion of Twins Early-mid game rod that gives a lot of bonuses, especially when paired with an 19428.png Illusion Morpheus's Hood [1] (19428) . For this level range, refine both to at least a +7.

To easily get to +7, refine it to +4, obtain or buy 100699.png Twins Refinement Box (100699) and it will be refined to +7 - 10 at random. There is the downside and hassle of requiring Template:Skill Info from a Soul Linker to equip and re-equip, but the copious bonuses are well worth the hassle. Hassle.

2113.png Novice Shield [1] (2113) Shield Lighthalzen Armory Cursed Knight Shield or Illusion Silver Guard still out of reach? The Novice Shield is still decent, thanks to its 20% resistance against all elements except Neutral.
28942.png Cursed Knight's Shield [1] (28942) Shield Cash Shop A good shield that provides many bonuses, especially at higher refines. Keep it at +4 if upgrading to a Purified Knight's Shield in the future.
460018.png Illusion Silver Guard [1] (460018) Shield Illusion of Twins A good alternative to the Cursed Knight's Shield and Purified Knight's Shield, it reduces Variable Casting Time and Aftercast Delay and can be enchanted. Highly recommended to get 2 Spellbound Nives.
20934.png Illusion Engine Wing Type B [1] (20934) Garment Illusion Max HP +1000. Adds 100 HP every 2 refine rate. Enchant with 39542.png [43] (39542) and 2 39537.png [44] (39537) modules.
22197.png Illusion Leg Type B [1] (22197) Footgear Illusion Max SP +200. Adds 20 SP every 2 refine rate. Enchant with either 39531.png [45] (39531) for more survivability or 39530.png [46] (39530) for more SP, and 39541.png [47] (39541) .
42209.png [48] (42209) Accessory Illusion One of the best accessories for this build. Grants MATK +5%. 39545.png [49] (39545) and 25680.png Modification Module (Spell) (25680) or 25681.png Modification Module (Attack Speed) (25681) are recommended. Get Spell for increased magic power. Get ASPD for better spell spamming, provided Variable Cast Time and After Cast Delay are kept to a minimum.
42210.png [50] (42210) Accessory Illusion One of the best accessories for this build. Grants MATK +5%. 39546.png [51] (39546) and 25680.png Modification Module (Spell) (25680) or 25681.png Modification Module (Attack Speed) (25681) are recommended. Get Spell for increased magic power. Get ASPD for better spell spamming, provided Variable Cast Time and After Cast Delay are kept to a minimum.
Hyper Novice 200-240
19428.png Illusion Morpheus's Hood [1] (19428)

20948.png Illusion Morpheus's Shawl [1] (20948) 32239.png Illusion Morpheus's Bracelet [1] (32239) 32238.png Illusion Morpheus's Ring [1] (32238)

Equipment Set Illusion of Labyrinth Completing the highly affordable Illusion Morpheus' Set and refining the Hood and Shawl to +9 and above gives a significant increase to MATK while reducing annoyances like Skill Interruption, Aftercast Delay and Cast Times. The set can be further boosted with an 550030.png Illusion Thorny Staff of Darkness [2] (550030) (or Illusion TSOD for short) but it requires Template:Skill Info to use.

For this level range, try to get a +10 Hood, +10 Shawl and +10 Illusion TSOD, then refine the weapon to +12 so you'll get most of the benefits without spending too much Zeny and dealing with too much RNG Minorous-poop. Once you're ready, refine both the Hood and Shawl to +11 and enchant them both with 29100.png Master Archer Lv10 (29100) or 29101.png Adamantine Lv1 (29101)

34279.png [52] (34279)

34282.png [53] (34282)
34283.png [54] (34283)

Upper Headgear Endeavor Tokens shop in @go 50, 2nd floor Ignoring the OS weapons bonuses, these three are pretty much the same. They boost magic damage, especially at high refines. Choose which one looks good without an upper headgear costume. To easily get them to +10, refine them to +4 and buy a couple of 35160.png [55] (35160) for 3 32417.png [56] (32417) a piece, because it will refine them to +7 - 10 at random.
18849.png Celine's Ribbon [1] (18849) Upper Headgear Horror Toy Factory, +9 18848.png Lush Rose [1] (18848) and 1000 7642.png Bloody Coin (7642) Part of the Celine set. Each enemy killed by magic restores 200 HP. Drains 50 HP every 5 seconds, but that shouldn't be a problem at this point. It is highly recommended to refine it to at least +12 to easily get the Dress' maximum bonus, which requires a total refine rate of +23. This is made relatively easy thanks to 35551.png [57] (35551) , obtained by purchasing it from the Master of Coin at the Main Office's 2nd floor. Pair it with the full set to experience the full power.
410080.png Deep Blue Sunglasses [1] (410080) Middle Headgear Requires a non-slotted 410079.png Deep Blue Sunglasses (410079) and 6396.png Spiritual Auger (6396) to slot. A cool-looking slotted Middle Headgear that can be enchanted. Try to get MATK enchants.
400002.png Victory Wing Ears [1] (400002) Middle Headgear Requires a non-slotted Template:Item List and 6396.png Spiritual Auger (6396) to slot. A cool-looking slotted Middle Headgear that can be enchanted. Try to get MATK enchants.
32200.png [58] (32200) Lower Headgear Custom Headgear Quests Gives a tiny little bit of extra stats, MATK and MDEF.
32201.png [59] (32201) Lower Headgear Headgear Awakening Requires 32200.png [60] (32200) . Gives more extra stats and Perfect Dodge in exchange for losing MDEF.
450128.png Automatic Armor Type B [1] (450128) Armor Sage's Legacy An improved version of the Illusion Armor, it gives a large increase in MATK (+125), even more MATK at higher refines and can be enchanted. While the modules have better stats, further boosting requires higher refines. Choose between 1000128.png Automatic Modification Module (Magical Force) (1000128) , 1000134.png Automatic Modification Module (Fixed Casting) (1000134) , 1000123.png Automatic Modification Module (Magic Power) (1000123) and 1000168.png Automatic Module (Shadow Spell) (1000168) .
26162.png Welding Wand [2] (26162) Rod Einbech Dungeon 3 Note: Template:Skill Info and Base Level 96 are required to equip this!"

A good upgrade over the Crimson Rod at high refines. Despite the Level 170 requirement, Super Novices with the SN Spirit buff can equip this at level 96. Even if the buff expires, it will remain equipped unless when logging off or dying and switching maps. Dying on the same map will not unequip - use Siegfried's Token or ask a someone to revive and the weapon will still be equipped.

550030.png Illusion Thorny Staff of Darkness [2] (550030) Rod Illusion of Twins A powerful rod that gives A LOT of bonuses, especially when paired with an 19428.png Illusion Morpheus's Hood [1] (19428) . It can be enchanted by using 100004.png Fantasy Resonance Stone at Dawn (100004) There is the downside and hassle of requiring Template:Skill Info from a Soul Linker to equip and re-equip, but the copious bonuses are well worth the hassle. Hassle.
550057.png Fortified Rod [2] (550057) Rod Amicitia Dungeon A level 5 weapon that boosts Template:Skill Info and Template:Skill Info damage. Try refining this to +8.
1680.png Crimson Rod [2] (1680) Rod Illusion A strong rod that gives After-Cast Delay reduction at +11, becoming even stronger with enchants. Try to get the MATK +15% enchant. The Paradise Super Novice Wand you get for FREE deals almost the same damage as this at +15. However, it does have its advantages. The Paradise SN Wand has no slots while this has 2, and it doesn't require Super Novice Soul Link to use, unlike the Welding Wand and Illusion Thorn Staff of Darkness.
550069.png Glacier Wand (550069) Rod Issgard A non-slotted wand that can be enchanted four times, making it a decently powerful weapon until the dimmer but more powerful 550089.png Dim Glacier Wand [1] (550089) is obtained.
28946.png Purified Knight's Shield [1] (28946) Shield Cash Shop An upgrade of the Cursed Knight's Shield, this purely fantastic shield provides many bonuses, especially at higher refines. The enchants are better too. Try to get the enchant that ignores the MDEF of Boss Monsters.
460018.png Illusion Silver Guard [1] (460018) Shield Illusion of Twins A good alternative to the Cursed Knight's Shield and Purified Knight's Shield, it reduces Variable Casting Time and Aftercast Delay and can be enchanted. Highly recommended to refine this to +11 and get 2 Spellbound Nives.
480021.png Automatic Engine Wing Type B [1] (480021) Garment Sage's Legacy Improved version of the Illusion Engine Wing. Choose between 1000136.png Automatic Modification Module (Drain Life) (1000136) , 1000125.png Automatic Modification Module (Fast) (1000125) and 1000126.png Automatic Modification Module (Caster) (1000126) .
470023.png Automatic Leg Type B [1] (470023) Footgear Sage's Legacy Improved version of the Illusion Leg. Enchant with the following: 1000147.png Automatic Module (Over Power) (1000147) , 1000151.png [61] (1000151) and 1000135.png Automatic Modification Module (Above All) (1000135) .
22238.png Great Hero Boots [1] (22238) Footgear An obsolete and ancient pair of boots gets a modern touch-up, making it GREAT. This pair of shoes gives a lot of bonuses, especially at high refines. Best paired with a 550081.png Patent Freedom Stick [2] (550081) . Try to refine this to +11, then use the 100747.png Weapon Reform (Intermediate) (100747) to turn it to a +10 Hero Boots-LT.
490026.png Automatic Battle Chip R [1] (490026) Accessory Sage's Legacy An improved version of the Illusion Battle Chip. Choose between 1000139.png Automatic Modification Module (Magic Soul) (1000139) , 1000115.png Automatic Modification Module (Spell) (1000115) , 1000116.png Automatic Modification Module (Attack Speed) (1000116) and 1000144.png Automatic Module (Unlimited Vital) (1000144) .
490027.png Automatic Battle Chip L [1] (490027) Accessory Sage's Legacy An improved version of the Illusion Battle Chip. Choose between 1000140.png Automatic Modification Module (Power Force) (1000140) , 1000115.png Automatic Modification Module (Spell) (1000115) , 1000116.png Automatic Modification Module (Attack Speed) (1000116) and 1000144.png Automatic Module (Unlimited Vital) (1000144) .
24318.png Super Novice Shadow Shield (24318) Shadow Gear High Rank Shadow Gear Highly recommended to get this, as it provides a lot of nice bonuses depending on which skills are leveled. Max Template:Skill Info to reduce Variable Casting Time.
24282.png Super Novice Shadow Weapon (24282) Shadow Gear High Rank Shadow Gear Highly recommended to get this, as it provides a lot of nice bonuses depending on which skills are leveled. Max Template:Skill Info to further pierce MDEF.
Hyper Novice 240-260
400246.png Bacsojin Doll Hat-LT [1] (400246) Upper Headgear Endeavor Token - EVT Refine Hammer A powerful headgear that provides large amounts of MATK, especially at higher refines and grades. Try to aim for at least Grade C, but Grade B is highly recommended.
400154.png Survival Circlet-LT [1] (400154) Sunken Sands Upper Headgear Provides copious amounts of bonuses to MATK, magic elemental damage and ACD reduction, especially at higher refines, higher grades and when paired to the Survival Orb-LT. Highly recommended to get it to Grade B. This is one of, if not the best headgears for this build.
400111.png Vesper Headgear [1] (400111) Upper Headgear Somewhere in jupe_2 Currently the best-in-slot headgear. Refining and grading this results in a significant increase in damage. Grade this to B for the 0.5-second FCT reduction, so you can replace 25067.png Cast Stone (Garment) (25067) , 25170.png Minor Casting Stone (Garment) (25170) and 1000521.png Minor Casting Stone (Dual) (1000521) for something better.
410080.png Deep Blue Sunglasses [1] (410080) Middle Headgear Requires a non-slotted 410079.png Deep Blue Sunglasses (410079) and 6396.png Spiritual Auger (6396) to slot. A cool-looking slotted Middle Headgear that can be enchanted. Try to get MATK enchants.
400002.png Victory Wing Ears [1] (400002) Middle Headgear Requires a non-slotted 400001.png Victory Wing Ears (400001) and 6396.png Spiritual Auger (6396) to slot. A cool-looking slotted Middle Headgear that can be enchanted. Try to get MATK enchants.
410017.png Battle Processor [1] (410017) Middle Headgear Requires a non-slotted 410016.png Battle Processor (410016) and 6396.png Spiritual Auger (6396) to slot. The most offensive-oriented of the three mid headgears. Try to get MATK or elemental magic bonuses.
32200.png [62] (32200) Lower Headgear Custom Headgear Quests Gives a tiny little bit of extra stats, MATK and MDEF.
32201.png [63] (32201) Lower Headgear Headgear Awakening Requires 32200.png [64] (32200) . Gives more extra stats and Perfect Dodge in exchange for losing MDEF.
18536.png Foxtail (18536) Lower Headgear Sunken Sands MATK +10 and FCT -0.1 sec. Helps with FCT issues.
420066.png Orbs of Survival-LT (420066) Lower Headgear Sunken Sands Lower headgear that boosts magical damage while reducing variable casting time. The best lower headgear for this build, but very difficult to obtain.
450128.png Automatic Armor Type B [1] (450128) Armor Sage's Legacy Refine this to +11 and choose between 1000134.png Automatic Modification Module (Fixed Casting) (1000134) , 1000123.png Automatic Modification Module (Magic Power) (1000123) and most especially 1000168.png Automatic Module (Shadow Spell) (1000168) .
450178.png Grey Wolf Robe [1] (450178) Armor Direction of Prayer This is better than the Automatic Armor B-Type... if RNG is on your side. Otherwise, stick to the AAB.
450179.png Celine's Dress [1] (450179) Armor Nightmare Toy Factory This old, bloody dress is one of the best armors for this build. It is highly recommended to refine this to +12 and equip the whole set to reap its full benefits.
550082.png Freedom Stick-LT [2] (550082) Rod Ancient Hero The current final form of the Freedom Stick is this Level 5 beast. Enables use of Level 5 Template:Skill Info at +7 and while it is focused on boosting Earth and Neutral element damage, pairing it with the Hero Boots-LT plus the added S.MATK at higher refines and grades makes it really good even for spells that aren't Earth and Neutral. A good upgrade over the Illusion Thorn Staff of Darkness at high refines and good enchants. Aim for at least a +11 Grade C and best paired with 470094.png Hero Boots-LT [1] (470094)
550062.png Poenitentia Ferrum [2] (550062) Rod Tomb of Remorse If 5457.png Jack Frost Nova and 5455.png Meteor Storm Buster are your main skills, then this rod is very good at boosting their damage, especially at higher refines and grades.
550089.png Dim Glacier Wand [1] (550089) Rod Issgard Best-in-slot weapon despite having just 1 slot. It can have three very powerful enchants of your choosing, which means no RNG nonsense. It can be easily graded as well, because it doesn't need an exorbitant amount of zeny and expensive 6635.png Blacksmith's Blessing (6635) to refine.
28946.png Purified Knight's Shield [1] (28946) Shield Cash Shop An upgrade of the Cursed Knight's Shield, this purely fantastic shield provides many bonuses, especially at higher refines. The enchants are better too. Try to get the enchant that ignores the MDEF of Boss Monsters.
460018.png Illusion Silver Guard [1] (460018) Shield Illusion of Twins A good alternative to the Cursed Knight's Shield and Purified Knight's Shield, it reduces Variable Casting Time and Aftercast Delay and can be enchanted. Highly recommended to refine this to +11 and get 29100.png Master Archer Lv10 (29100) or 29101.png Adamantine Lv1 (29101) .
20966.png Temporal Int Manteau [1] (20966) Garment Legacy of Glast Heim - Temporal Stat Manteaus A powerful manteau that grows stronger the higher its refinement. Aim for at least +9 and get MATK or Aftercast Delay enchants.
480125.png Convertible Magical Wing [1] (480125) Garment Sunken Sands A significantly upgraded version of the Excellion Wing, tuned to greatly boost magic power, especially when refined and paired with either Deep Blue Sungasses and Victory Wing Ears.
470094.png Hero Boots-LT [1] (470094) Footgear The current final form of the Ancient Hero Boots, this pair of shiny shoes gives quite a lot of bonuses, especially at high refines and better grades. It's an upgrade over the Automatic Leg B-type at high refines AND when paired with the 550082.png Freedom Stick-LT [2] (550082) . Try to aim for a +11 Grade C at least.
470204.png Moan of Corruption [1] (470204) Footgear One of, if not the best-in-slot footgear due to the huge FCT reduction and MATK bonuses. Climbing noises not included. It is highly recommended to give this thing a C-grade at the very least for the big 1-second Fixed Cast Time reduction.
470122.png Beast's Leather Shoes [1] (470122) Footgear Compared to the Moan of Corruption, this gives less power but more survivability. Grade it to C and refine it to +11.
490052.png Sinful Sapphire Ring [1] (490052)

490064.png Brilliant Light Sapphire Ring [1] (490064)

Accessory (Right) Thanatos Tower These two are almost virtually identical to each other. Both give additional MATK and ASPD. Best paired with their necklace counterparts for the ACD and FCT reduction.
490053.png Sinful Sapphire Necklace [1] (490053)

490065.png Brilliant Light Sapphire Necklace [1] (490065)

Accessory (Left) Thanatos Tower These two are almost virtually identical to each other. Both give additional MATK and VCT reduction. Best paired with their ring counterparts for the ACD and FCT reduction.
490163.png Hero's Badge [1] (490163) Accessory (Left) Sunken Sands It isn't much at first glance, but its power is unleashed when enchanted and when paired with an enchanted Hero Boots-LT.
2980.png Evil Thread Glove [1] (2980) Accessory Horror Toy Factory Part of the Celine set. Enables use of Level 1 Template:Skill Info
34697.png [65] (34697) Accessory Nightmare Toy Factory Part of the Celine set.
24282.png Super Novice Shadow Weapon (24282) Shadow Gear High Rank Shadow Gear Highly recommended to get this, as it provides a lot of nice bonuses depending on which skills are leveled. Max Template:Skill Info to further pierce MDEF.
24616.png Super Magic Shadow Shield (24616) Shadow Gear Faceworm's Nest The centerpiece of the Super Magic Shadow Set and the next upgrade to the Super Novice Shadow Shield. Combining the 24282.png Super Novice Shadow Weapon (24282) (with level 10 Template:Skill Info of course) and this shield results in A LOT of MDEF pierce. 40% Racial MDEF pierce from this, 30% Normal MDEF pierce from the Gauntlet if Template:Skill Info is level 10, and an extra 3% Normal MDEF pierce per refine rate of the Gauntlet. To get Boss MDEF pierce though, you need to enchant a 28946.png Purified Knight's Shield [1] (28946) with the "Ignore MDEF of Boss Monsters" enchant.

Unlike what the description says, it DOES NOT need the Super Magic Shadow Cape and Boots below to get the elemental damage bonuses, just the required refine level. Additionally, while the description in-game says that it ignores Physical Defense, it actually ignores Magic Defense. Finally, the MDEF pierce comes from this shield, the Super Novice Shadow Gauntlet and their refine levels, EXCLUDING the other two items below. Type @battlestats or @bs to confirm.

Quality of Life Equipment
At level 100 and above, there are three pieces of equipment that'll make life easier. Switch to these equipment, activate the skill, then switch back to your default equipment. Example:
Life of Quality Equipment
Item Type Way to obtain Notes
19204.png Racing Cap (Super Novice) [1] (19204) Upper Headgear Hugel Race, Base Level 100 This headgear is tedious to get and may require multiple alts to speed things up, but it is so, so worth it. Fully enchanting it will grant use of level 3 2478.png Cart Boost, basically a free 12710.png Guyak Pudding (12710) but can be removed with skills like 92.png Quagmire and 30.png Decrease Agility. Still a huge quality of life upgrade. Just switch to this headgear, activate 2478.png Cart Boost for a big speed boost, then switch back to your default headgear.
19154.png Arch Angeling Balloon (19154) Lower Headgear 23135.png Poring Capsule (23135) Increases EXP gained and drop rate by 5%. Enables the use of Level 1 54.png Resurrection. Save tens of thousands of zeny while rescuing your loved ones from a terrible fate, while also preserving the environment by preventing the overharvesting of 610.png Yggdrasil Leaf (610) , all while experiencing things slightly faster and getting a tiny bit more stuff at the same time!
28900.png Royal Guard Shield [1] (28900) Shield 16.1 Banquet for Heroes, 800 6919.png Token of Honor (6919) Enables use of level 1 2315.png Shield Spell, restoring 3% of Max HP every 3 seconds for 90 seconds, for a total of 90% Max HP in 90 seconds. Increases survivability and slightly reduces the use of 28.png Heal and potions.
2576.png Adventurer's Backpack [1] (2576) of 1013.png Greed Garment of 1013.png Greed Equipment Crafting of 1013.png Greed I'LL BEGIN BY ACTIVATING MY POT BACKPACK OF 1013.png Greed!!! THIS LETS ME DRAW AT LEAST 2 ITEMS LITTERED ON THE GROUND AND ADD THEM TO MY INVENTORY!!! BUT I'M NOT DONE YET!!! BY SENDING MY BACKPACK OF 1013.png Greed BACK TO MY INVENTORY, IT WILL ALLOW ME TO RE-USE THE GARMENT I HAVE PREVIOUSLY EQUIPPED, THUS ENDING MY TURN!!! 1013.png Greed!!11111!
20802.png Teleport Amistr Bag [1] (20802)
20803.png Heal Amistr Bag [1] (20803)
20804.png Greed Amistr Bag [1] (20804)
20805.png Increase Agility Amistr Bag [1] (20805)
20806.png Magnum Break Amistr Bag [1] (20806)
20807.png Endure Amistr Bag [1] (20807)
20808.png Sight Amistr Bag [1] (20808)
Garment Hello! Do you love pets? Don't tell me, show me! SHOW ME!!! REEEEEEE perfectly cut scream These bags grant various skills that improve quality of life, like teleporting or having another backpack THAT MAKES YOU DRAW AT LEAST 2 ITEMS LITTERED ON THE GROUND.

Cards and Pets

Cards and Costume Stones
Card Slot Notes
27310.png Plaga Card (27310)

4600.png Lichtern Yellow Card (4600)
4586.png Tikbalang Card (4586)
4597.png Lichtern Blue Card (4597)
4599.png Lichtern Red Card (4599)
4598.png Lichtern Green Card (4598)

Headgear These cards increase elemental damage. Put them in high refine headgears.
  • Plaga: Neutral
  • Green: Earth
  • Tikbalang: Wind
  • Blue: Water
  • Red: Fire
  • Yellow: Ghost
300251.png Plagarion Card (300251)

300259.png Fulgor Card (300259)
300255.png Litus Card (300255)
300257.png Vanilaqus Card (300257)
300256.png Fillia Card (300256)

Headgear These cards increase elemental damage at the cost of slightly increasing SP Consumption. Put them in low refine or slotted middle headgears.
  • Plagarion: Neutral
  • Fulgor: Earth
  • Litus: Wind
  • Vanilaqus: Water
  • Fillia: Fire
27328.png Birth and Death Card (27328) Headgear Dropped by all Bios Island non-boss monsters. A budget card with bonus effects depending on which card it is paired to. Good for the early-mid game.
27396.png Isaac Wigner Card (27396) Headgear Hate the excruciatingly long After-Cast Delay of Ground Gravitation or do you want to spam spells a bit faster? Then this card can help! Reduces ACD by 5%.
300174.png Melted Poring Card (300174) Headgear If you can already deal tons of damage but want a little more survivability, use this card. Increases HP by 10%.
4409.png Agav Card (4409) Armor MATK +5% and DEF -10. One of the best Armor Cards except when focusing on Ground Gravitation, a Neutral Element skill.
300308.png Meyer Lugenburg Card (300308) Armor Currently the best-in-slot card. At the cost of increased SP consumption, gain 4% all property magic damage every 3 refine rate. Try to +12 the armor this card is slotted into. Best paired with a 300424.png Friedrich S. Heine Card (300424) card.
27114.png Ominous Solider Card (27114) Armor If the Friedrich S. Heine card is more than enough for you to deal tons of damage, then this card will increase your odds of surviving a fatal blow. Increases HP by 10%, add 1% every 3 refine rate. DEF +100 and VIT +3 at level 160+.
300254.png Amitera Card (300254) Armor If the Friedrich S. Heine card is more than enough for you to deal tons of damage, then this card will increase your odds of surviving a fatal blow. Increases HP by 10%. Add 10% more HP at level 200+. Compared to the Ominous Solider card above, you get more HP but no DEF bonus.
4023.png Baby Desert Wolf Card (4023) Armor Early-game cheap card which can be paired with the Corrupt Life Card for increased MATK.
27101.png Sweet Nightmare Card (27101) Armor MATK +20. Uninterruptible casting outside of WoE.
4392.png Observation Card (4392) Armor When paired with an Eldest card at level 200+ and with at least 120 Base INT, Ghost element damage is increased. Good for Napalm Vulcan Strike.
27196.png Nihil M. Heine Card (27196) Weapon Early-mid game card that boosts damage against small monsters.
27289.png Soul Fragment Card (27289) Weapon Early-mid game card that boosts damage against Medium-sized monsters.
27286.png Colorful Teddy Bear Card (27286) Weapon Early-mid game card that boosts damage against Large monsters.
4394.png Solace Card (4394) Weapon When paired with a Smile Giver card at level 200+ and with at least 120 Base INT, Neutral element damage is increased. Good for Ground Gravitation.
27384.png Mutating White Knight Card (27384) Weapon Expensive late-game card that substantially boosts magic damage against medium and large-sized enemies. Best paired with Mutated Khalitzburg Knight card.
300114.png Spell Addicted Plaga Card (300114)

40140.png C. Helm of Faith (SC) (40140)
40010.png [66] (40010)
27324.png Brinaranea Card (27324)
300124.png Blue Pitaya Card (300124)
27320.png E-EA1L Card (27320)
300106.png Red Pitaya Card (300106)
40009.png [67] (40009)

Weapon These cards boost elemental damage, especially at high refines.
  • Magic Poisoned Plaga: Neutral.
  • Deep Sea Sropho: Wind, but cheaper
  • Arch Plasma: Wind
  • Brinaranea: Water, but slightly cheaper and without the need for high refines.
  • Blue Pitaya: Water
  • E-EA1L: Fire, but cheaper
  • Red Pitaya: Fire
  • Spectral Plasma: Ghost
27385.png Mutating Khalitzburg Card (27385) Shield The cheap, slightly inferior version of Khalitzburg Knight and Mutated Khalitzburg cards. Get this if you're on a tight budget. 25% damage reduction from Medium and Large monsters, but receive 5% more damage from small monsters.
27385.png Mutating Khalitzburg Card (27385) Shield Best paired with Mutated White Knight Card. Gives 25% damage reduction against Physical and Magical damage from Medium and Large Monsters (30% if paired with MWK) plus additional MDEF. Increases overall survivability as long as the monster isn't Small.
4413.png Hodremlin Card (4413) Shield Reduces damage from Small, Medium and Large mobs by 15%. It also has a chance to increase Perfect Dodge by 30 if you're attacked. If it procs, the additional Perfect Dodge makes you much harder to hit. An all-around good damage reducing card.
27176.png Swamp Cramp Card (27176) Garment A decent garment card, good for early-mid game. MATK +3 and ASPD +1% for every 10 base INT. If base INT is 120 and above, MATK +40. Increases ASPD, making spell spamming faster.
300123.png Purple Pitaya Card (300123)

4629.png Arc Elder Card (4629)
30149.png [68] (30149)
27167.png Faceworm Larva Card (27167)
4657.png Nightmare Ancient Mummy Card (4657)
300372.png Cave Flower Card (300372)

Garment These cards reduces Neutral element damage while boosting elemental magical attacks. The higher the refine level, the better.
  • Purple Pitaya: Neutral
  • Arc Elder: Earth
  • Deep Sea Phen: Wind
  • Faceworm Larva: Water
  • Nightmare Ancient Mummy: Fire
  • Cave Flower (not implemented): Ghost
300269.png Eldest Card (300269) Garment When paired with a Dame of Sentinel card at level 200+ and with at least 120 Base INT, Ghost element damage is increased. Good for Napalm Vulcan Strike.
300273.png Smile Card (300273) Garment When paired with a Lady Solace card at level 200+ and with at least 120 Base INT, Neutral element damage is increased. Good for Ground Gravitation.
300260.png Napeo Card (300260) Garment The garment cards above are specialized to boost a particular element. This one however, boosts all elements simply by giving LOTS of MATK but under the condition of having 125 Base INT. Use this for a more all-around damage increase across all skills.
300424.png Friedrich S. Heine Card (300424) Garment Currently the best in slot garment card. Best paired with the armor card 300308.png Meyer Lugenburg Card (300308) for a 5% all property magic damage bonus. Compared to the specialized elemental garment cards above, it deals a very teeny-tiny bit less damage (around 2%), but it is made up by boosting all elements significantly at the cost of reduced Neutral Element resistance. Increases all property magic damage by 5%, and is further increased by 4% every 2 refine rate. Try to +12 the garment this card is slotted into.
27249.png Archi Card (27249) Footgear Max HP +500, ATK, MATK, Hit and Flee +15. A good all-around footgear card. Obtained at the Geffen Magic Tournament.
27249.png Archi Card (27249) Footgear A better version of the original Arhi. Increases physical AND magic damage to all size enemies by 5%, HP +1000 and Flee +35. Obtained at the Geffen Night Arena.
4658.png Nightmare Verit Card (4658) Footgear Boosts MATK, especially at high refines. Good for a more even spread of damage across all elements.
27255.png Ordre Card (27255) Footgear Good for Wind and Water focused builds.
27253.png Geffen Thief Card (27253) Footgear Good for Fire focused builds.
27250.png Dio Anemos Card (27250) Footgear Good for Neutral and Earth focused builds.
27179.png Coyote Card (27179) Footgear Early-game card that prevents cast interruption with no penalties to Variable and Fixed Cast Time, but at the cost of reduced Max HP and SP.
4077.png Phen Card (4077)

4327.png Bloody Butterfly Card (4327)

Accessory These cards prevent cast interruption at the cost of increasing Variable Cast Time. A good early-game card until Fixed and Variable Cast Times are reduced to a minimum.
27026.png Fire Condor Card (27026) Accessory An early-game card that greatly boosts Fire Ball damage. Best to have two of these for an easier early-game.
4577.png Elvira Card (4577)

300222.png Firewind Kite Card (300222)
27125.png Headless Mule Card (27125)
300364.png Calmaring Card (300364)
27161.png Mavka Card (27161)
300216.png Lava Toad Card (300216)
300211.png Ash Toad Card (300211)
27262.png D.Y Card (27262)
300218.png Ashhopper Card (300218)
40000.png C. Cheshire Ears (purple) (40000)
300267.png Crow Baron Card (300267)
300268.png Crow Duke Card (300268)

Accessory These cards boost elemental damage.
  • Elvira: Wind and Ghost (20%)
  • Firewind Kite: Wind (35%) Left accessory
  • Headless Mule: Water (20%)
  • Calmaring: Water (35%) Not yet implemented, Left accessory
  • Mavka: Fire and Earth (20%)
  • Lava Toad: Fire (35%) Left accessory
  • Ash Toad: Earth (35%) Left accessory
  • Ashhopper: Neutral (35%) Left accessory
  • Dwigh: Neutral (20%)
  • Jewelry Ant (Left accessory only): Neutral (30% but needs to be paired with 4336.png Ungoliant Card (4336)
  • Crow Baron (level 200+): Fire and Wind (15%)
  • Crow Duke (level 200+): Water and Earth (15%, MATK +5%)
300243.png Lude Gal Card (300243) Accessory Boosts MATK. Use two of these for a more even spread of damage across all elements.
1000528.png Magic Power Stone (Top) (1000528)

1000529.png Magic Power Stone (Mid) (1000529)
1000530.png Magic Power Stone (Low) (1000530)

Upper costume headgear, mid costume headgear, lower costume headgear These three boost elemental damage and must be together for maximum effectiveness.
25170.png Minor Casting Stone (Garment) (25170)

25067.png Cast Stone (Garment) (25067)

Garment costume These two reduce FCT by 0.3 and 0.5 seconds respectively. They're important because the FCT of a lot of HN magic spells is 1.5 seconds.
1001329.png Super Novice Stone (Low) (1001329) Lower costume headgear This lower headgear costume stone is not yet implemented.
1001327.png Super Novice Stone (Top) (1001327)

25454.png High Wizard Stone (Mid) (25454)
1001326.png Super Novice Stone (Garment) (1001326)

Upper costume headgear, mid costume headgear, garment costume 2038.png Judex
Pets

The following pets below are most suited for this build, with their bonuses when Loyal. Check the Pet System on how to obtain and feed a pet.

  • 9089.png Am Mut Egg (9089) : MATK +4%. The mainstream go-to pet for mage builds.
  • 9122.png Gloom Under Night Egg (9122) : MATK +40, increases Ghost and Fire magic damage by 7%. The main luxurious go-to pet for mage builds.
  • 9088.png Angeling Egg (9088) : Max HP +2%, Heal Bonus +8%. For slightly increased survivability and healing, a guardian made out of Odin's sweat with wings.

Tips and Tricks

Strategy (WIP)
How to solo Alice Hard hmmmm... Need at least 5B DPS due to some MVPs having autorecovery, which means THREE different kinds of gears. That's on top of the Fenrir-like AOEs like Earth Strain and Comet... Plants do EQ, worms powerup... Equipment switch... Hmmmmmm..... Info obtained from Mew's Alice Hard run... Ranged DPS is going to be a problem due to it being weaker than Melee and Magic... Hmm......
Cult