Rakugaki's PvM Hyper Novice: Difference between revisions
(→Equipment: Added some future equipment that will maybe arrive 1 year from now kekw emote, modified wording on Glacier Guard at 230-275) |
(→Tips and Tricks: Expanded D1 and D2 strategy when having merely adequate equipment, added WIP buffing and skill rotations, added easter egg hidden story of what ALWAYS causes Rakugaki to die in Depth2, and it's glorious "teamwork" by the Depth2 mobs ahahahahahaha) |
||
| Line 1,505: | Line 1,505: | ||
<u>Hyper Novice</u> | <u>Hyper Novice</u> | ||
WORK IN PROGRESS!!! Break the Rule of Er and destroy all who bring you down. Don't let them go, let them gravitate to you. Devastate their mental health, freeze them to the core, shock them with baleful thunder and call forth the wrath of the skies | |||
WORK IN PROGRESS!!! Break the Rule of Er and destroy all who bring you down. Don't let them go, let them gravitate to you. Devastate their mental health, freeze them to the core, shock them with baleful thunder and call forth the wrath of the skies until they're no more. Beat the already dead horse by summoning the wrath of the skies and command the earth to swallow it whole, driving them down to a place worse than the deepest depths of the darkest despair. | |||
'''WIP:''' | |||
Buffing rotation:<br> | |||
Every 90 seconds: Magni, Impo, Shield Spell, Cart Boost<br> | |||
Every 180 seconds: Improve Concentration, Increase AGI, Blessing, Magni, Impo, Shield Spell, Cart Boost | |||
Skill rotation (Based on the skill build above, ~100% VCT reduction and 1.5sec FCT reduction, 30% or better ACD reduction):<br> | |||
(start) JFN > JT > GG > JT // JFN > JT > HD > JT > HDx2 (end)(repeat from the start) | |||
|- | |- | ||
| Line 1,512: | Line 1,523: | ||
{| class="mw-collapsible wikitable mw-collapsed" style="width:100%" | {| class="mw-collapsible wikitable mw-collapsed" style="width:100%" | ||
|- | |- | ||
! style="background-color:#ADD8E6; color:Black; width: 100% " |Strategy Depth 1 | ! style="background-color:#ADD8E6; color:Black; width: 100% " |Strategy Depth 1 | ||
|- | |- | ||
| | |The strategy here is mainly for those who can deal just enough damage to survive here alone and if there are no D1 parties at the moment. | ||
1 - Get powerful-enough equips (check Equipment 230-275 above) and have at least 60,000HP. | |||
2 - Use {{#item:23204}} so you won't get 1-shot by some mobs, especially the Fatums (dwarf) and Kapha (green fishermen). {{#item:50035}} is even better. | |||
3 - If your DPS is just merely adequate to survive here, prioritizing which monster to kill will make things easier. | |||
*'''Enemy no. 1 - Lava Toads.''' If you see even just one, KILL IT ASAP! If they get near, they will STRIP your equipment one by one. They will almost always strip your shield first, followed your armor. If you have a friend or alt Biolo that can cast {{#skill:479}}, this is still enemy no. 1 because if they get close, they can do a surprise CRIT Attack that actually hits like a truck. Again, KILL LAVA TOADS THE MOMENT YOU SEE THEM! | |||
*'''Enemy no. 2 - Fatums.''' They have powerful Wind-Element Spells but they can be interrupted. They will often initiate with {{#skill:20}}, and it hits rather hard. If you see one, interrupt it immediately, then kill it. | |||
*'''Enemy no. 3 - The Waterborne, Kapha and Anolian.''' Kapha usually doesn't initiate with {{#skill:86}}, but they'll eventually do it. If you see it casting, interrupt it. Anolian has two deadly skills, {{#skill:136}}, {{#skill:2447}}, but will use them only if they get close. All will usually result in death or close to it. Stay away from the Anolian. Zap'em both dead. | |||
*'''Enemy no. 4 - The Pullers, Skeleton Archer and Dragon Tail.''' These two can occasionally cast Grasp of Death, teleporting you to their location. Skeleton Archer seems to use Grasp of Death more frequently than Dragon Tail, but Dragon Tail hits harder and has a much higher HIT rate. Grasp of Death is infuriating at best, but can result in dragging you back to the enemy mosh pit and result in death at worst. Though sometimes, they can actually save your life. | |||
*Enemy no. 5 - The Bogdowns, Sting and Pom Spider, because they can bog you down. Stings can occasionally cast {{#skill:92}}, removing {{#skill:29}}, {{#skill:45}}, and {{#skill:2478}} and reducing DEX and AGI. Really annoying because you need to recast those skills, but {{#item:12710}} fixes that problem. Pom Spiders can occasionally cast {{#skill:405}} when attacked, sticking you in place for 8 seconds. If your character can't move for some reason, kill the spider quickly, especially if a huge horde is nearby. | |||
*Enemy no. 6 - Retribution, Wood Goblin, Holy Skogul, Dark Pinguicula, Fire Frilldora. They're not as threatening as the others I guess, but watch out for Holy Skogul's {{#skill:18}}. | |||
|- | |- | ||
|} | |} | ||
| Line 1,544: | Line 1,544: | ||
{| class="mw-collapsible wikitable mw-collapsed" style="width:100%" | {| class="mw-collapsible wikitable mw-collapsed" style="width:100%" | ||
|- | |- | ||
! style="background-color:#ADD8E6; color:Black; width: 100% " |Strategy Depth 2 | ! style="background-color:#ADD8E6; color:Black; width: 100% " |Strategy Depth 2 | ||
|- | |- | ||
| | |The strategy here is mainly for those who can deal just enough damage to survive here alone and if there are no D2 parties at the moment. | ||
1 - get powerful equips (check Equipment 230-275 above, but 275+ is recommended) and have at least 80,000HP. | |||
2 - Use {{#item:23204}} so you won't get 1-shot by Moskrillos and Salamanders. {{#item:50035}} is significantly better. | |||
3 - If your DPS is just merely adequate to survive here, prioritizing which monster to kill will make things easier. | |||
*'''Enemy no. 1 - Salamanders. KILL ON SIGHT, even if they're alone!''' These annoying fire lizards are almost always the main reason for dying here due to Earthquake. But if they don't cast Earthquake first, then their CRIT Attack is almost a guaranteed kill. Again, KILL ON SIGHT!!! | |||
*'''Enemy no. 2 - The Graspers/Pullers, Frozen Gargoyle and Ancient Tree.''' In a place where mobs hit like a truck with a serious urge to isekai, and can occasionally "combo" with the Fiber Lockers, getting pulled to the wrong place at the wrong time can be certain death. Kill these two, especially the more dangerous and Grasp-Happy Gargoyle that can cast {{#skill:88}}. | |||
*'''Enemy no. 3 - The Windborne Moskrillo and Blue Acidus.''' Prepare for trouble, and make it double! They are mostly on the same priority as The Pullers simply because they hit hard. They are deadly in their own unique ways. Moskrillo has a powerful {{#skill:20}} and an even more powerful CRIT Attack, but they're rather squishy compared to others. The Blue Acidus is tankier, but can potentially deal as much as damage as Moskrilli/Moskrillos, because they tend to cast {{#skill:21}} and {{#skill:84}} in quick succession. | |||
*'''Enemy no. 4 - The Fiber Lockers, Duneyrr and Ancient Tree. Mostly applies to Duneyrr''' because my goodness, they cast {{#skill:405}} like it's going out of style! By themselves, they're not that threatening. But when surrounded, they can prevent escaping from a sticky situation by causing a sticky situation, especially when there are Pullers around. | |||
<!--Here's a true story that happened to my main SN Rakugaki multiple times: He attempts to escape a huge horde. Duneyrr casts Spider Web. He gets stuck for 8 seconds. Two or more Duneyrrs casting Spider Web? Make that 16 seconds because their duration stacks for some reason. A Gargoyle grasps him back but somehow he still can't move, even if the spider web is all the way over there. He breaks free of the sticky, but he has less than 100 Hard MDEF, and a Gargoyle casts Frost Nova. Or if he has less than 100 Total LUK, a Morroc Incarnation casts Wide Curse. Or he has less than 100 Hard MDEF and 100 Total LUK, and he's both Frozen and Cursed! He's Frozen in place, or can barely even move, or both, and there's a Salamander (or a huge horde) nearby. Salamander casts Earthquake, and he's STILL NOT DEAD thanks to the Hyper Novice's extra life. But because {{#skill:268}} drastically reduces movement speed, there's no escaping the massive horde stampeding towards him. One more spider web sticks him in place, the sheer amount of REALLY ANGRY monsters overwhelms his 90% damage reduction, and his fate is sealed. COMBO KILL!!! ALL THE MONSTERS IN DEPTH2 ARE CHEERING!!! THE VERDICT - 10 10 9001!!! --> | |||
*Enemy no. 5 - Naga. They have {{#skill:57}}, but {{#skill:86}} is more threatening. Having high FLEE isn't a problem with high CON trait and AGI stat, and they usually don't initiate with Water Ball. Still, kill them quickly because they will eventually cast Water Ball. | |||
*Enemy no. 6 - Morroc Incarnation. This false angel is a serious problem only if you have insufficient LUK. They usually initiate with Wide Curse, so have at least 100 Total LUK. That leaves Dark Grand Cross, but thankfully, it is cast only after Wide Curse is cast, and takes a good 2 seconds to do so. | |||
*Enemy no. 7 - Dollocaris and Flame Ghost. They don't really do all that much I think. Dollocaris is kinda tanky and can cast a ghost and an earth skill. Flame Ghost is just sneaky, but don't really do that much damage. | |||
|- | |- | ||
|} | |} | ||
Revision as of 17:58, 12 October 2025
| CAUTION | This guide is still a work in progress |
|---|---|
| The Magical section is updated for the most part, but the Physical and Hybrid sections are still outdated and have erroneous (wrong) info |
| Super Novice | |
|---|---|

| |
| Job base: | Novice |
| Written By: | Rakugaki |

Overview
Work in progress
The Hyper Novice (HN for short) is a generalized specialist (or specialized generalist?) sort of class, focused on damage and armed with a wide variety of 1st and 2nd job skills to further enhance its capabilities while also greatly improving quality of life. This guide will hopefully help you get through the many great difficulties on the road to becoming a Hyper Novice. It is made in a way as if Hyper Novice is the first or one of the first characters you've created.
Notice: This guide is tailor-made for MuhRO. There are things here which may not be found in other servers.
Skills Overview

Featuring GaoSuper (left)!
Builds
With almost all first job skills and some second job skills at their disposal, Hyper Novices can be built in many different ways. This section will tackle three different kinds of builds - Mage, Physical, and Hybrid.
These builds are here for reference. You don't necessarily need to follow everything here exactly. Be free, experiment and tinker until you've built the Super Novice that suits you best.
Mage
Click here for a more specialized and in-depth guide on Magic Hyper Novices: Psoron's Magic Hyper Novice Guide
(Description WIP) - The Super Novice can take one of two routes - Mage or Physical. The Mage Hyper Novice will go through many difficult trials along the way, but by transcending above the challenges, learning from other classes and Breaking the Rules along the way, they triumph, going from Super to Hyper, and I got writer's block. I still wonder what rules are they breaking... The rules of physics, the rule of law... or the rule of er... I don't know.
Stats and Traits
| Stat | Amount | Notes |
|---|---|---|
| STR | 1+ | Leftover. Mainly used for increased carrying capacity. |
| AGI | 60-80 100+ (Judge / Conjurator Card Combo) |
Used mainly for reducing animation and flinching animation time and the chances of getting inflicted by Bleeding and Sleep. Try to get 100 Total AGI for full immunity against Bleeding and Sleep. |
| VIT | 70-90 100+ (Judge / Conjurator Card Combo) |
Increases Max HP while reducing the chances of getting inflicted by Poison. Try to get 100 Total VIT for full immunity against Poison. |
| INT | 120+ 130 (Judge / Conjurator Card Combo) |
Main stat. At least 120 INT and DEX are recommended for reducing Variable Cast Time to a minimum. |
| DEX | 120+ 1-9 (Judge / Conjurator Card Combo) |
At least 120 INT and DEX are recommended for reducing Variable Cast Time to a minimum. When using the |
| LUK | 60-80 100+ (Judge / Conjurator Card Combo) |
Leftover. Marginally increases MATK while reducing the chances of getting cursed as well as reducing its duration. Try to get 100 Total LUK for full immunity against Curse. LUK increases MATK more than DEX, so increase this a lot more when using the |
| Trait | Amount | Notes |
|---|---|---|
| POW | 0 | Not needed. Using magic sticks to whack things is not the best idea... |
| STA | 0-72 | After getting 110 SPL and CON, adjust STA, WIS, or CRT. |
| WIS | 0-72 | After getting 110 SPL and CON, adjust STA, WIS, or CRT. |
| SPL | 110 | Primary trait. Max this for the highest possible Magic Damage. |
| CON | 110 | Secondary trait. Max this for even more Magic Damage and marginally increased survivability thanks to increased Flee. |
| CRT | 0-72 | After getting 110 SPL and CON, adjust STA, WIS, or CRT. Thanks to a buff making Heal spammable, investing into CRT instead of STA or WIS is now viable. 72 CRT almost doubles healing (e.g. 5500 to 9750), and with enough ACD and ASPD, one can spam heal to save a lot of potions and zeny. However, a decent amount of ACD reduction (40%+) and ASPD (165+) are needed for it to be effective. |
Skills
| Skills: Super Novice (45-99) | |||||||||||||||||||||||||||||||||||||||||||||||||||||||
|---|---|---|---|---|---|---|---|---|---|---|---|---|---|---|---|---|---|---|---|---|---|---|---|---|---|---|---|---|---|---|---|---|---|---|---|---|---|---|---|---|---|---|---|---|---|---|---|---|---|---|---|---|---|---|---|

| |||||||||||||||||||||||||||||||||||||||||||||||||||||||
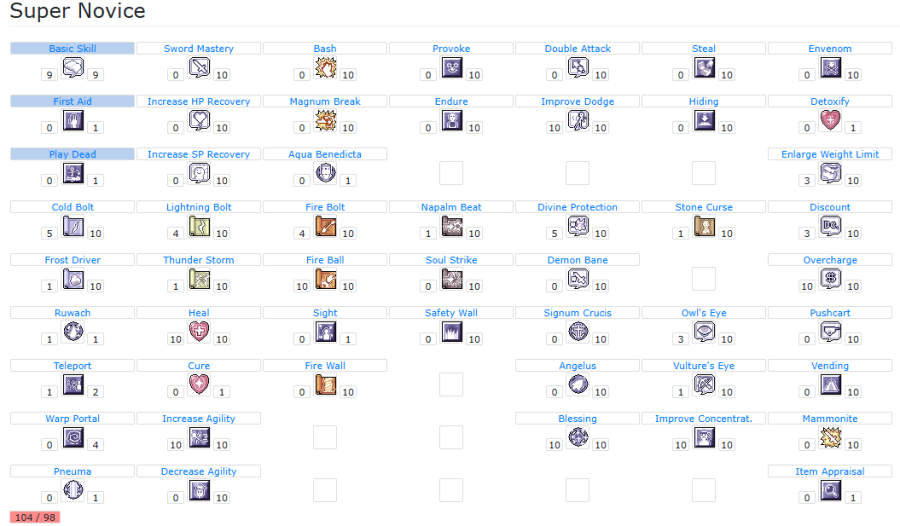
After getting promoted to Ex. Super Novice, reset all skills.
| Skills: Expanded Super Novice (99-200) | |||||||||||||||||||||||||||||||||||||||||||||||||||||||||||||||||||||||||||||||||||||||||||||||||||||
|---|---|---|---|---|---|---|---|---|---|---|---|---|---|---|---|---|---|---|---|---|---|---|---|---|---|---|---|---|---|---|---|---|---|---|---|---|---|---|---|---|---|---|---|---|---|---|---|---|---|---|---|---|---|---|---|---|---|---|---|---|---|---|---|---|---|---|---|---|---|---|---|---|---|---|---|---|---|---|---|---|---|---|---|---|---|---|---|---|---|---|---|---|---|---|---|---|---|---|---|---|---|
| |||||||||||||||||||||||||||||||||||||||||||||||||||||||||||||||||||||||||||||||||||||||||||||||||||||
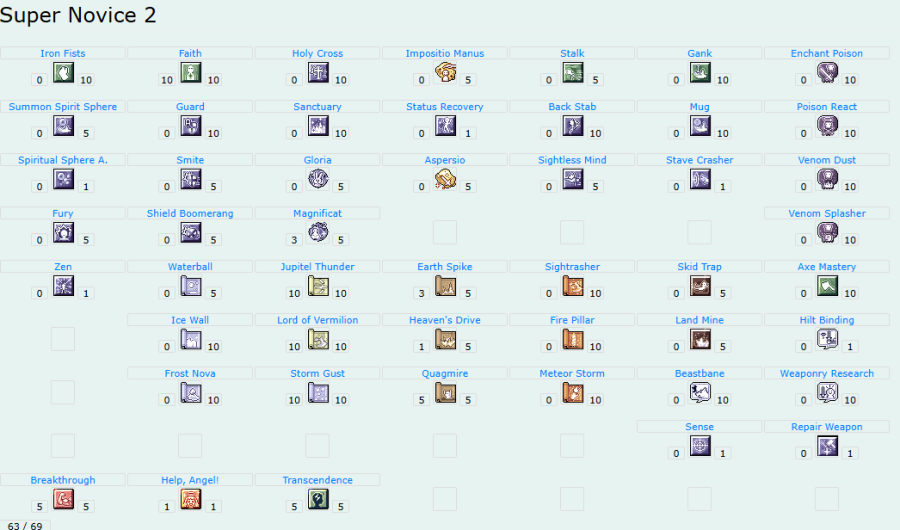
After switching to Hyper Novice and reaching around Job Level 10+, reset all skills. Your main sources of damage will be Hyper Novice skills, augmented by 1st and 2nd job skills.
| Skills: Hyper Novice (Example build - Jack Frost Nova / Hell's Jack) | ||||||||||||||||||||||||||||||||||||||||||||||||||||||||||||||||||||||||||||||||||||||||||||||||||||||
|---|---|---|---|---|---|---|---|---|---|---|---|---|---|---|---|---|---|---|---|---|---|---|---|---|---|---|---|---|---|---|---|---|---|---|---|---|---|---|---|---|---|---|---|---|---|---|---|---|---|---|---|---|---|---|---|---|---|---|---|---|---|---|---|---|---|---|---|---|---|---|---|---|---|---|---|---|---|---|---|---|---|---|---|---|---|---|---|---|---|---|---|---|---|---|---|---|---|---|---|---|---|---|
| Here's my build. It takes advantage of Dim Glacier's Hell's Jack enchant, focusing on Jack Frost Nova and Hell's Drive. It also works great with the TDRC + Time Gap combo. There are two variations: a more powerful glass cannon build, and a slightly less powerful but much beefier variant. More comments below the screenshots.
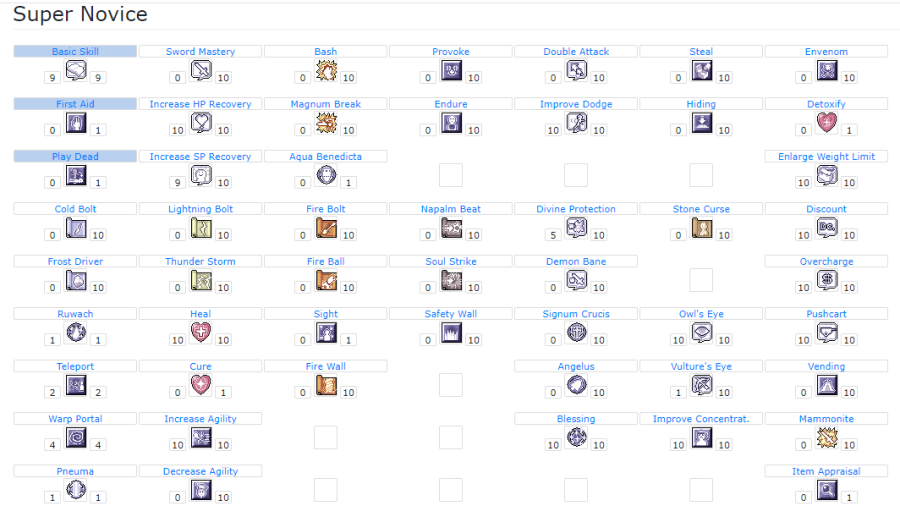 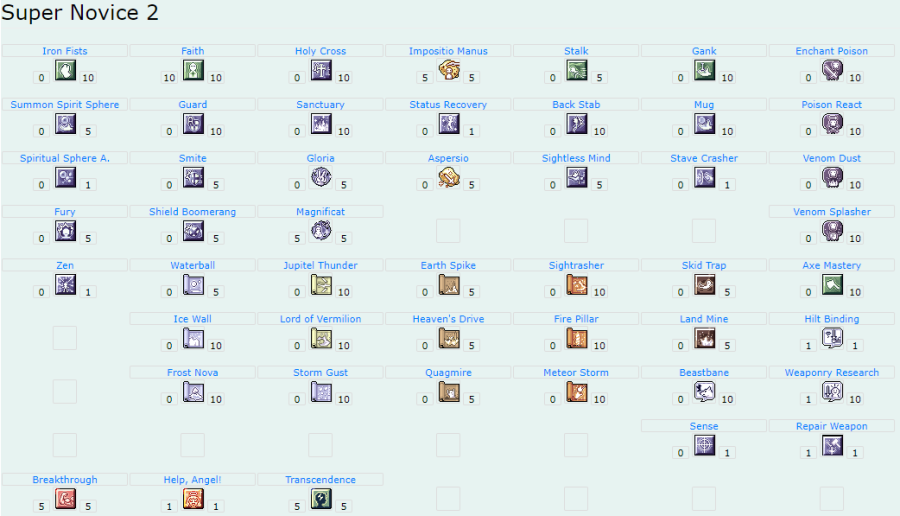 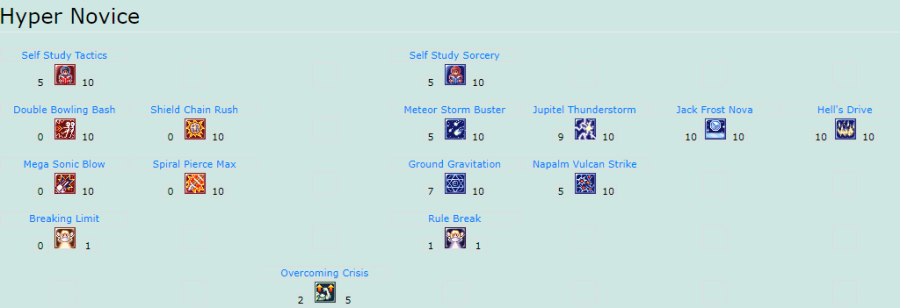 However, there are compromises resulting in around 10-15% less damage. Self Study Sorcery (SSS) is down to level 5. The main skills Hell's Drive (HD) and Jack Frost Nova (JFN) are maxed, Jupitel Thunderstorm (JTS) is down to level 9, and Ground Gravitation (GG) is down to level 7. JTS has max hits and AoE at level 9, while GG has max AoE at level 7. Despite the reduced damage, soloing Depth 2 (with adequate equipment) is very possible and relatively comfy, with a Brilliant Protection Scroll and Thunderproof Potion of course. 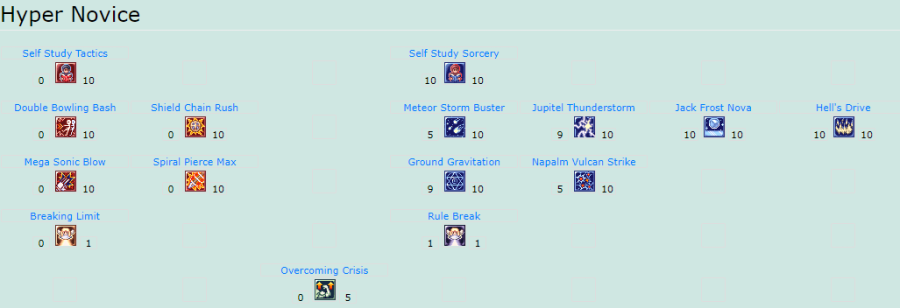
All skills except for Rule Break in the Hyper Novice mage tree have 10 points. Feel free to choose which skills you want to specialize in. I went for a mix of Wind and Water elements and got Rule Break for even more damage.
| ||||||||||||||||||||||||||||||||||||||||||||||||||||||||||||||||||||||||||||||||||||||||||||||||||||||
Equipment
| Equipment | |||||||||||||||||||||||||||||||||||||||||||||||||||||||||||||||||||||||||||||||||||||||||||||||||||||||||||||||||||||||||||||||||||||||||||||||||||||||||||||||||||||||||||||||||||||||||||||||||||||||||||||||||||||||||||||||||||||||||||||||||||||||||||||||||||||||||||||||||||||||||||||||||||||||||||||||||||||||||||||||||||||||||||||||||||||||||||||||||||||||||||||||||||||||||||||||||||||||||||||||||||||||||||||||||||
|---|---|---|---|---|---|---|---|---|---|---|---|---|---|---|---|---|---|---|---|---|---|---|---|---|---|---|---|---|---|---|---|---|---|---|---|---|---|---|---|---|---|---|---|---|---|---|---|---|---|---|---|---|---|---|---|---|---|---|---|---|---|---|---|---|---|---|---|---|---|---|---|---|---|---|---|---|---|---|---|---|---|---|---|---|---|---|---|---|---|---|---|---|---|---|---|---|---|---|---|---|---|---|---|---|---|---|---|---|---|---|---|---|---|---|---|---|---|---|---|---|---|---|---|---|---|---|---|---|---|---|---|---|---|---|---|---|---|---|---|---|---|---|---|---|---|---|---|---|---|---|---|---|---|---|---|---|---|---|---|---|---|---|---|---|---|---|---|---|---|---|---|---|---|---|---|---|---|---|---|---|---|---|---|---|---|---|---|---|---|---|---|---|---|---|---|---|---|---|---|---|---|---|---|---|---|---|---|---|---|---|---|---|---|---|---|---|---|---|---|---|---|---|---|---|---|---|---|---|---|---|---|---|---|---|---|---|---|---|---|---|---|---|---|---|---|---|---|---|---|---|---|---|---|---|---|---|---|---|---|---|---|---|---|---|---|---|---|---|---|---|---|---|---|---|---|---|---|---|---|---|---|---|---|---|---|---|---|---|---|---|---|---|---|---|---|---|---|---|---|---|---|---|---|---|---|---|---|---|---|---|---|---|---|---|---|---|---|---|---|---|---|---|---|---|---|---|---|---|---|---|---|---|---|---|---|---|---|---|---|---|---|---|---|---|---|---|---|---|---|---|---|---|---|---|---|---|---|---|---|---|---|---|---|---|---|---|---|---|---|---|---|---|---|---|---|---|---|---|---|---|---|---|---|---|---|---|---|---|---|---|---|---|---|---|---|---|---|---|---|---|---|---|---|---|---|---|---|---|---|---|---|---|---|---|---|---|---|---|---|
Super Novice (45-99)
| |||||||||||||||||||||||||||||||||||||||||||||||||||||||||||||||||||||||||||||||||||||||||||||||||||||||||||||||||||||||||||||||||||||||||||||||||||||||||||||||||||||||||||||||||||||||||||||||||||||||||||||||||||||||||||||||||||||||||||||||||||||||||||||||||||||||||||||||||||||||||||||||||||||||||||||||||||||||||||||||||||||||||||||||||||||||||||||||||||||||||||||||||||||||||||||||||||||||||||||||||||||||||||||||||||
| Quality of Life Equipment | |||||||||||||||||||
|---|---|---|---|---|---|---|---|---|---|---|---|---|---|---|---|---|---|---|---|
| At level 100 and above, there are three pieces of equipment that'll make life easier. Switch to these equipment, activate the skill, then switch back to your default equipment. | |||||||||||||||||||
Life of Quality Equipment
| |||||||||||||||||||
Cards and Pets
| Cards and Costume Stones | ||||||||||||||||||||||||||||||||||||||||||||||||||||||||||||||||||||||||||||||||||||||||||||||||||||||||||||||||||||||||||||||||||||||||||||||||||||||||||||||||||
|---|---|---|---|---|---|---|---|---|---|---|---|---|---|---|---|---|---|---|---|---|---|---|---|---|---|---|---|---|---|---|---|---|---|---|---|---|---|---|---|---|---|---|---|---|---|---|---|---|---|---|---|---|---|---|---|---|---|---|---|---|---|---|---|---|---|---|---|---|---|---|---|---|---|---|---|---|---|---|---|---|---|---|---|---|---|---|---|---|---|---|---|---|---|---|---|---|---|---|---|---|---|---|---|---|---|---|---|---|---|---|---|---|---|---|---|---|---|---|---|---|---|---|---|---|---|---|---|---|---|---|---|---|---|---|---|---|---|---|---|---|---|---|---|---|---|---|---|---|---|---|---|---|---|---|---|---|---|---|---|---|---|---|
|
| Pets |
|---|
|
The following pets below are most suited for this build, with their bonuses when Loyal. Check the Pet System on how to obtain and feed a pet.
|
Tips and Tricks
| Leveling |
|---|
| Work in progress |
| Strategy (WIP) |
|---|
| The Mage Build Hyper Novice is quite a challenge to level up due to Super Novice magic spells dealing adorable damage unless there's heavy investment involved. However, upon becoming Hyper Novice, the damage increases exponentially, and that's when its true power starts showing.
When soloing, I get writer's block! In a party setting, You'll be the secondary support, providing crowd control and extra buffs and heals. Quagmire, Storm Gust and Sightrasher will be your main crowd control skills. Once you see the tank and its lures approaching, cast Quagmire on the mobs to slow them down in order for the DPSes more easily dispose of them. Also watch out if the tank lured too many or if there are monsters coming from the side and rear - use Sightrasher to push them away or Storm Gust to freeze them in place. From time to time, you may also buff your teammates, provide additional heals with your cute Heals.
WORK IN PROGRESS!!! Break the Rule of Er and destroy all who bring you down. Don't let them go, let them gravitate to you. Devastate their mental health, freeze them to the core, shock them with baleful thunder and call forth the wrath of the skies until they're no more. Beat the already dead horse by summoning the wrath of the skies and command the earth to swallow it whole, driving them down to a place worse than the deepest depths of the darkest despair. WIP: Buffing rotation:
|
| Strategy Depth 1 |
|---|
| The strategy here is mainly for those who can deal just enough damage to survive here alone and if there are no D1 parties at the moment.
1 - Get powerful-enough equips (check Equipment 230-275 above) and have at least 60,000HP. 2 - Use 3 - If your DPS is just merely adequate to survive here, prioritizing which monster to kill will make things easier.
|
| Strategy Depth 2 |
|---|
| The strategy here is mainly for those who can deal just enough damage to survive here alone and if there are no D2 parties at the moment.
1 - get powerful equips (check Equipment 230-275 above, but 275+ is recommended) and have at least 80,000HP. 2 - Use 3 - If your DPS is just merely adequate to survive here, prioritizing which monster to kill will make things easier.
|
Physical
For a better and more comprehensive guide on Physical Build Hyper Novices, check out Melee Hyper Novice Guide by Jetago
(Description WIP) - The Super Novice can take one of two routes - Mage or Physical. The Physical Hyper Novice will have to deal with the inherent limitations of the Super Novice, having lower HP and SP than most other classes. However, by learning from other classes and improving their most notable skills, they Break through the Super Novice's Limits, transcending from Super into Hyper, and I got writer's block.
Stats and Traits
| Stat | Amount | Notes |
|---|---|---|
| STR | 100-120 | Main stat. Increases ATK and carrying capacity. |
| AGI | 60-100 | Increases Attack Speed for greater damage and Flee for increased survivability while reducing the chances of getting inflicted by Bleeding and Sleep. Try to get 100 total AGI for full immunity against Bleeding and Sleep. |
| VIT | 70-80 | Increases Max HP while reducing the chances of getting Poisoned and Stunned. Try to get 100 total VIT for full immunity against Poison and Stun. |
| INT | 70-80 | Increases Max HP while reducing the chances of getting Silenced. Try to get 100 total INT for full immunity against Blind and Silence. |
| DEX | 60-80 / 120 (Ranged Hyper Novice builds) | Increases Hit rate and minimum damage. For ranged builds, it is highly recommended to get sufficient INT and DEX to minimize Variable Cast Time when spamming Shield Chain Rush and Spiral Pierce Max. |
| LUK | 60-80 / 120-125 (Mega Sonic Blow builds) | Increases CRIT Rate for even more damage and Perfect Dodge for even more survivability. Marginally increases Flee, Hit and overall damage as well. For Mega Sonic Blow builds, raise LUK to 120 (or 125 with |
| Trait | Amount | Notes |
|---|---|---|
| POW | 110 | Primary trait. Max this for the highest possible damage. |
| STA | Optional | If more RES is needed and there are still some points to spare, grab a few points here. |
| WIS | Optional | If more MRES is needed and there are still some points to spare, grab a few points here. |
| SPL | 0 | Absolutely unnecessary, because screaming out "Mega Sonic Blow !!" again and again in a berserk rage doesn't really conjure violent earthquakes, howling blizzards, scary lightning storms, or world-ending meteor showers. It just makes eliminating enemies a lot more satisfying. |
| CON | 72-110 | Highly recommended secondary trait. Increases Physical Damage and Hit while also providing a bit more survivability in the form of Flee. Those leaning more towards Double Bowling Bash may max this Trait. |
| CRT | 72-110 | Highly recommended secondary trait for those focused on Mega Sonic Blow, its CRIT DMG dependent on this trait. Those leaning more towards Mega Sonic Blow may max this Trait. Also buffs Heal, resulting in some potions saved. |
Skills
| Skills: Physical | ||||||||||||||||||||||||||||||||||||||||||||||||||||||||||||||||||||||||||||||||||||||||||||||||||||||||||||||||||
|---|---|---|---|---|---|---|---|---|---|---|---|---|---|---|---|---|---|---|---|---|---|---|---|---|---|---|---|---|---|---|---|---|---|---|---|---|---|---|---|---|---|---|---|---|---|---|---|---|---|---|---|---|---|---|---|---|---|---|---|---|---|---|---|---|---|---|---|---|---|---|---|---|---|---|---|---|---|---|---|---|---|---|---|---|---|---|---|---|---|---|---|---|---|---|---|---|---|---|---|---|---|---|---|---|---|---|---|---|---|---|---|---|---|---|
|
The example build below is an HP-leech focused build that sacrifices a little bit of power in exhcnage for increased survivability. It is ideal for slaughtering hordes of mobs, especially when a lack of power is compensated by increased survivability. Heal one's self by hurting others. The more, the merrier. But in exhcnage, become a slave to the RNG gods.
| ||||||||||||||||||||||||||||||||||||||||||||||||||||||||||||||||||||||||||||||||||||||||||||||||||||||||||||||||||
Equipment
| Equipment | ||||||||||||||||||||||||||||||||||||||||||||||||||||||||||||||||||||||||||||||||||||||||||||||||||||||||||||||||||||||||||||||||||||||||||||||||||||||||||||||||||||||||||||||||||||||||||||||||||||||||||||||||||||||||||||||||||||||||||||||||||||||||||||||||||||||||||||||||||||||||||||||||||||||||||||||||||||||||||||||||||||||||||||||||||||||||||||||||
|---|---|---|---|---|---|---|---|---|---|---|---|---|---|---|---|---|---|---|---|---|---|---|---|---|---|---|---|---|---|---|---|---|---|---|---|---|---|---|---|---|---|---|---|---|---|---|---|---|---|---|---|---|---|---|---|---|---|---|---|---|---|---|---|---|---|---|---|---|---|---|---|---|---|---|---|---|---|---|---|---|---|---|---|---|---|---|---|---|---|---|---|---|---|---|---|---|---|---|---|---|---|---|---|---|---|---|---|---|---|---|---|---|---|---|---|---|---|---|---|---|---|---|---|---|---|---|---|---|---|---|---|---|---|---|---|---|---|---|---|---|---|---|---|---|---|---|---|---|---|---|---|---|---|---|---|---|---|---|---|---|---|---|---|---|---|---|---|---|---|---|---|---|---|---|---|---|---|---|---|---|---|---|---|---|---|---|---|---|---|---|---|---|---|---|---|---|---|---|---|---|---|---|---|---|---|---|---|---|---|---|---|---|---|---|---|---|---|---|---|---|---|---|---|---|---|---|---|---|---|---|---|---|---|---|---|---|---|---|---|---|---|---|---|---|---|---|---|---|---|---|---|---|---|---|---|---|---|---|---|---|---|---|---|---|---|---|---|---|---|---|---|---|---|---|---|---|---|---|---|---|---|---|---|---|---|---|---|---|---|---|---|---|---|---|---|---|---|---|---|---|---|---|---|---|---|---|---|---|---|---|---|---|---|---|---|---|---|---|---|---|---|---|---|---|---|---|---|---|---|---|---|---|---|---|---|---|---|---|---|---|---|---|---|---|---|---|---|---|---|---|---|---|
|
You can use Eden Gear or choose from the list below...
| ||||||||||||||||||||||||||||||||||||||||||||||||||||||||||||||||||||||||||||||||||||||||||||||||||||||||||||||||||||||||||||||||||||||||||||||||||||||||||||||||||||||||||||||||||||||||||||||||||||||||||||||||||||||||||||||||||||||||||||||||||||||||||||||||||||||||||||||||||||||||||||||||||||||||||||||||||||||||||||||||||||||||||||||||||||||||||||||||
| Quality of Life Equipment | |||||||||||||||||||
|---|---|---|---|---|---|---|---|---|---|---|---|---|---|---|---|---|---|---|---|
| At level 100 and above, there are three pieces of equipment that'll make life easier. Switch to these equipment, activate the skill, then switch back to your default equipment. | |||||||||||||||||||
Life of Quality Equipment
| |||||||||||||||||||
Cards and Pets
| Cards and Costume Stones | |||||||||||||||||||||||||||||||||||||||||||||||||||||||||||||||||||||||||||||||||||||||||||||||||||||||||||||||||||||||||||||||||||||||
|---|---|---|---|---|---|---|---|---|---|---|---|---|---|---|---|---|---|---|---|---|---|---|---|---|---|---|---|---|---|---|---|---|---|---|---|---|---|---|---|---|---|---|---|---|---|---|---|---|---|---|---|---|---|---|---|---|---|---|---|---|---|---|---|---|---|---|---|---|---|---|---|---|---|---|---|---|---|---|---|---|---|---|---|---|---|---|---|---|---|---|---|---|---|---|---|---|---|---|---|---|---|---|---|---|---|---|---|---|---|---|---|---|---|---|---|---|---|---|---|---|---|---|---|---|---|---|---|---|---|---|---|---|---|---|---|
|
| Pets |
|---|
The following pets below are most suited for this build, with their bonuses when Loyal. Check the Pet System on how to obtain and feed a pet.
|
Tips and Tricks
| Strategy (WIP) |
|---|
| The Physical Build Hyper Novice is about repeatedly spamming a variety of skills berserker style, shredding enemies into Chef's Kiss mincemeat.
When in a party... I have writer's block.
In a party setting, I also get writer's block!
|
Hybrid (Experimental, work in progress)
(Description WIP) - The late-game Hybrid build combines the best of both worlds. While it doesn't have access to AP skills, it more than makes up in versatility, especially in certain places where both physical and magical attacks are required. This build is so meme omg...
Stats and Traits
| Stat | Amount | Notes |
|---|---|---|
| STR | 100+ or 120 | Depending on which gears are less powerful, adjust STR or INT accordingly. |
| AGI | 80+ | Used mainly for reducing flinching animation time and the chances of getting inflicted by Bleeding and sleep. |
| VIT | 80+ | Increases Max HP while reducing the chances of getting inflicted by Poison. |
| INT | 100+ or 120 | Depending on which gears are less powerful, adjust STR or INT accordingly. |
| DEX | 100+ or 1-9 | DEX is needed for Hit, while also raising a bit of ATK and MATK. If you have 100% VCT reduction, leave this below 10. |
| LUK | 80+ | Get at least 100 Total LUK for immunity against Curse. Raise it further if more CRIT is needed for Mega Sonic Blow. |
| Trait | Amount | Notes |
|---|---|---|
| POW | 70-100 | Adjust POW or SPL accordingly depending on which gears are less powerful. |
| STA | 0 | No STA or WIS will be used for this build. There are ways to compensate reduced RES and MRES, such as increased healing or skills like Autoguard. |
| WIS | 0 | No STA or WIS will be used for this build. There are ways to compensate reduced RES and MRES, such as increased healing or skills like Autoguard. |
| SPL | 70-100 | Adjust POW or SPL accordingly depending on which gears are less powerful. |
| CON | 70-100 | Adjust CON or CRT accordingly. More CON means more Flee, a bit more damage, but less healing and C.Rate. |
| CRT | 70-100 | Adjust CON or CRT accordingly. More CRT means more C.Rate and healing, but less Flee and damage if not using Mega Sonic Blow. |
Skills
| Skills: Super Novice | ||||||||||||||||||||||||||||||||||||||||||||||||||||||||||||||||||||||||||||||||||||||||||||||||||||||||||||||||||||
|---|---|---|---|---|---|---|---|---|---|---|---|---|---|---|---|---|---|---|---|---|---|---|---|---|---|---|---|---|---|---|---|---|---|---|---|---|---|---|---|---|---|---|---|---|---|---|---|---|---|---|---|---|---|---|---|---|---|---|---|---|---|---|---|---|---|---|---|---|---|---|---|---|---|---|---|---|---|---|---|---|---|---|---|---|---|---|---|---|---|---|---|---|---|---|---|---|---|---|---|---|---|---|---|---|---|---|---|---|---|---|---|---|---|---|---|---|
| ||||||||||||||||||||||||||||||||||||||||||||||||||||||||||||||||||||||||||||||||||||||||||||||||||||||||||||||||||||
After switching to Hyper Novice and reaching around Job Level 10+, reset all skills. Your main sources of damage will be Hyper Novice skills, augmented by 1st and 2nd job skills.
| Skills: Hyper Novice (Example build - Jack Frost Nova) | |||||||||||||||||||||||||||||||||||||||||||||||||||||||||||||||||||||||||||||||||||||||||||||||||||
|---|---|---|---|---|---|---|---|---|---|---|---|---|---|---|---|---|---|---|---|---|---|---|---|---|---|---|---|---|---|---|---|---|---|---|---|---|---|---|---|---|---|---|---|---|---|---|---|---|---|---|---|---|---|---|---|---|---|---|---|---|---|---|---|---|---|---|---|---|---|---|---|---|---|---|---|---|---|---|---|---|---|---|---|---|---|---|---|---|---|---|---|---|---|---|---|---|---|---|---|
There will be skill points remaining, so spend them on whichever is most beneficial to you. In my case, I chose to use the extra skill points on Safety Wall and Faith for more survivability and Enlarge Weight Limit to compensate for having Noodle Arms.
All skills except for Rule Break in the Hyper Novice mage tree have 10 points. Feel free to choose which skills you want to speceialize in. I went for a mix of Wind and Water elements and got Rule Break for even more damage.
| |||||||||||||||||||||||||||||||||||||||||||||||||||||||||||||||||||||||||||||||||||||||||||||||||||
Equipment
| Equipment | |||||||||||||||||||||||||||||||||||||||||||||||||||||||||||||||||||||||||||||||||||||||||||||||||||||||||||||||||||||||||||||||||||||||||||||||||||||||||||||||||||||||||||||||||||||||||||||||||||||||||||||||||||||||||||||||||||||||||||||||||||||||||||||||||||||||||||||||||||||||||||||||||||||||||||||||||||||||||||||||||||||||||||||||||||||||||||||||||||||||||||||||||||||||||||||||||||||||||||||||
|---|---|---|---|---|---|---|---|---|---|---|---|---|---|---|---|---|---|---|---|---|---|---|---|---|---|---|---|---|---|---|---|---|---|---|---|---|---|---|---|---|---|---|---|---|---|---|---|---|---|---|---|---|---|---|---|---|---|---|---|---|---|---|---|---|---|---|---|---|---|---|---|---|---|---|---|---|---|---|---|---|---|---|---|---|---|---|---|---|---|---|---|---|---|---|---|---|---|---|---|---|---|---|---|---|---|---|---|---|---|---|---|---|---|---|---|---|---|---|---|---|---|---|---|---|---|---|---|---|---|---|---|---|---|---|---|---|---|---|---|---|---|---|---|---|---|---|---|---|---|---|---|---|---|---|---|---|---|---|---|---|---|---|---|---|---|---|---|---|---|---|---|---|---|---|---|---|---|---|---|---|---|---|---|---|---|---|---|---|---|---|---|---|---|---|---|---|---|---|---|---|---|---|---|---|---|---|---|---|---|---|---|---|---|---|---|---|---|---|---|---|---|---|---|---|---|---|---|---|---|---|---|---|---|---|---|---|---|---|---|---|---|---|---|---|---|---|---|---|---|---|---|---|---|---|---|---|---|---|---|---|---|---|---|---|---|---|---|---|---|---|---|---|---|---|---|---|---|---|---|---|---|---|---|---|---|---|---|---|---|---|---|---|---|---|---|---|---|---|---|---|---|---|---|---|---|---|---|---|---|---|---|---|---|---|---|---|---|---|---|---|---|---|---|---|---|---|---|---|---|---|---|---|---|---|---|---|---|---|---|---|---|---|---|---|---|---|---|---|---|---|---|---|---|---|---|---|---|---|---|---|---|---|---|---|---|---|---|---|---|---|---|---|---|---|---|---|---|---|---|---|---|---|---|---|---|---|---|---|---|---|---|---|---|---|---|---|---|---|---|
Super Novice
| |||||||||||||||||||||||||||||||||||||||||||||||||||||||||||||||||||||||||||||||||||||||||||||||||||||||||||||||||||||||||||||||||||||||||||||||||||||||||||||||||||||||||||||||||||||||||||||||||||||||||||||||||||||||||||||||||||||||||||||||||||||||||||||||||||||||||||||||||||||||||||||||||||||||||||||||||||||||||||||||||||||||||||||||||||||||||||||||||||||||||||||||||||||||||||||||||||||||||||||||
| Quality of Life Equipment | |||||||||||||||||||
|---|---|---|---|---|---|---|---|---|---|---|---|---|---|---|---|---|---|---|---|
| At level 100 and above, there are three pieces of equipment that'll make life easier. Switch to these equipment, activate the skill, then switch back to your default equipment. | |||||||||||||||||||
Life of Quality Equipment
| |||||||||||||||||||
Cards and Pets
| Cards and Costume Stones | |||||||||||||||||||||||||||||||||||||||||||||||||||||||||||||||||||||||||||||||||||||||||||||||||||||||||||||||||||||||||||||||||
|---|---|---|---|---|---|---|---|---|---|---|---|---|---|---|---|---|---|---|---|---|---|---|---|---|---|---|---|---|---|---|---|---|---|---|---|---|---|---|---|---|---|---|---|---|---|---|---|---|---|---|---|---|---|---|---|---|---|---|---|---|---|---|---|---|---|---|---|---|---|---|---|---|---|---|---|---|---|---|---|---|---|---|---|---|---|---|---|---|---|---|---|---|---|---|---|---|---|---|---|---|---|---|---|---|---|---|---|---|---|---|---|---|---|---|---|---|---|---|---|---|---|---|---|---|---|---|---|---|---|
|
| Pets |
|---|
|
The following pets below are most suited for this build, with their bonuses when Loyal. Check the Pet System on how to obtain and feed a pet.
|
Tips and Tricks
| Strategy (WIP) |
|---|
| How to solo Alice Hard hmmmm... |
| Cult |
|---|
|
