The Performer's Life By Conga Lyne: Difference between revisions
| (One intermediate revision by the same user not shown) | |||
| Line 231: | Line 231: | ||
Note: A +11 A grade Dimensions Instrument will be your first major increase in damage, followed by an A-Grade +10 fully enchanted Nebula Robe, and then an A-Grade well-refined Moan of Corruption.<br> | Note: A +11 A grade Dimensions Instrument will be your first major increase in damage, followed by an A-Grade +10 fully enchanted Nebula Robe, and then an A-Grade well-refined Moan of Corruption.<br> | ||
Additionally, the moment you can get a Time Dimensions Rune Crown, it will easily double your dps output even with endgame gears, I strongly recommend making one the moment you have enough reputation for it.<br> | |||
Remember not to neglect cheaper equipment while you work towards these major pieces. | Remember not to neglect cheaper equipment while you work towards these major pieces. | ||
Revision as of 06:43, 24 April 2024
Introduction
Hi, I'm Conga Lyne, a performer main, hopefully this guide will help you along your journey playing the performer classes!
Take note, I haven't achieve complete endgame gears as of writing and will update this guide periodically as I progress.
This guide will also focus on magical dps Performer, specifically the skill Metallic Fury, I will be focusing on the skill as it is spammable, has a large AoE, can be any element and has low entry requirements.
If you need any direct help, you can most likely find me in the #archer channel on discord or as "Conga lyne MtF" ingame, I might take a while to respond so sending an RODex may be more convenient for both of us.
With all that said, let's get into it.
Leveling
Going from level 0 to 200 is your first major goal, silver arrows will be the most useful throughout most areas of play.
Something that will help you significantly early on is eden group gear, you can attain eden group equipment by first joining the eden group after talking to Secretary Lime Evenor (moc_para01 27, 35), and then talking to the various equipment masters at (moc_para01 107, 79).
Start from the bottom and work your way towards the top, I recommend gathering the items for Louis's free advanced items, but find it easier to spend 10 eden group coins on Labraham's advanced weapon.
You can use the @wd <item name>, and @wi <monster name> commands to find where to locate the required materials.
You can get normal eden group equipment at any level and advanced eden group equipment at level 100.
| Level | Map | Quests | Notes |
|---|---|---|---|
| 0-10 | Prontera Plains (prt_fild08 340, 215) | None | |
| 10-40 | Ant Hell
(anthell01 35, 262) |
none | Focus on killing the eggs as they won't fight back. |
| 40-70 | Orc Dungeon
(orcsdun01 32, 170) |
None | |
| 70-99 | Glastheim Monastery
(gl_church 156, 7) |
Eden Board level 70-99 board quest (15x Wraith & Evil Druid)
(moc_para01 40, 38) |
|
| 100-130 | Illusion of Moonlight
(pay_d03_i 140, 44) |
100x of any type in Illusion of Moonlight
(pay_d03_i 153, 33) |
|
| 130-160 | Illusion of Vampire
(gef_d01_i 115, 216) |
100x of any type in Illusion of Vampire
(gef_d01_i 124, 237) |
|
| 160-200 | Verus Outskirts
(ver_tunn 13, 35) |
Hunt 50x recon robot
(moc_para01 52, 37) |
If you find someone offering a level 180+ leech and you're level 180 or above, I recommend taking their offer.
When this happens, you want to accept the illusion of underwater board quests in the main office (main_office 123, 36), go to illusion of underwater floor 2 (speak to Jerry in illusion of underwater floor 1), wait until the quest is finished, turn in your quest for exp, and repeat until the leech is finished or you reach your desired level. Remember to change your job at level 200! If they specifically say they're doing einbech 3 instead, then just navigate to einbech 3. (ein_dun02 25, 250) Also at level 180, you can turn in Thanatos fragments for exp at the main office quest board, you won't be able to farm these items yourself but can usually purchase them from other players at a cheap price. |
| 200-220 | Illusion of Underwater Floor 2
(iz_d05_i 142, 188) |
100x of any type in Illusion of Underwater Floor 2
(main_office 123, 36) |
Niflheim Dungeon floor 1 is a much faster place to level up, but you'll want gear that can hit at least 20m dps before trying to tackle it. |
| 220+ | Abyss Lakes Floor 4
(abyss_04 169, 160) |
All Abyss Lakes 4 quests
(main_office 123, 36) Hunt 240x of any type in Abyss floor 4 (moc_para01 52, 37) |
This is also a convenient way to farm eden coins
Once you have proper endgame gear, you can farm Varmundt Depths floor 1 when you're level 250 |
Recommended leveling skills:
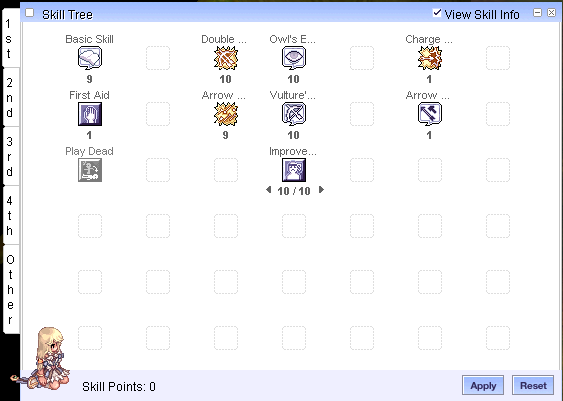
- 1st job: Double Strafe, Arrow Shower
- 2nd job: Throw Arrow, Arrow Vulcan
- 3rd job: Reverberation
- 4th job: Metallic Fury
After you have a reliable zeny income, you can make a +10 ![]() Bow [4] (1702) and fill it with
Bow [4] (1702) and fill it with ![]() Bow Guardian Card (4428) to make leveling up future Performers a lot faster.
Bow Guardian Card (4428) to make leveling up future Performers a lot faster.
Gameplay & Skills
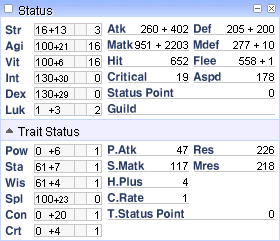
For stats, you want to max int, dex and spl
You should get a healthy amount of vit & agi for durability and fast animation speed, and dumb left over points into str, wis and sta for carry weight & additional durability.
There aren't any specific tricks to pay attention to when playing Troubadour or Trouvere, just remember to keep your buffs up.
The songs you choose however, do matter.
 Owl's Eye
 Vulture's Eye
 Improve Concentration
Starting on 1st job and working our way to 4th, we'll max out our passive skills and attention concentrate for as many stat buffs as possible from the archer job, leftover job points can be dumped into the 1st job damage skills.
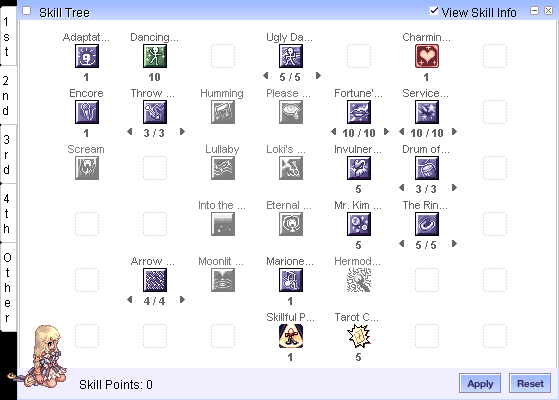
On 2nd job and onwards our skills will vary depending on the gender.
 Poem of Bragi and
  Assassin Cross of Sunset
 Fortune's Kiss and
  Service For You
 Skillful Professional Musician
 Dancing Lesson or
  Musical Lesson
For Male performers, you should get Poem of Bragi and your favourite song of choice (I recommend Assassin Cross of Sunset for GM events)
For Female performers, you should get Fortune's Kiss and Service For You, you won't use Fortune's Kiss outside of party play, but Service For You will be very useful for SP conservation while farming.
Skillful Professional Musician is also a critical skill to get for both classes, as well as reaching max level with Dance Lessons for more passive stat bonuses.
 Metallic Sound
 Lesson
 Swing Dance or
  Echo Song
 Frigg's Song
 Song of Mana
 Unlimited Humming Voice
 Reverberation
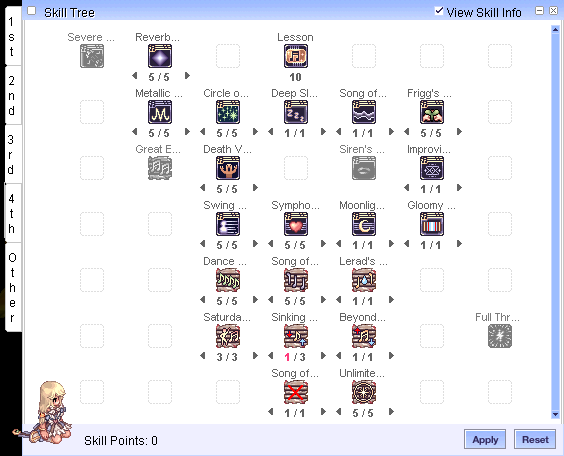
For 3rd job, you should get Metallic Sound to level 5 as we'll need it for later, additionally, reach max level with Voice Lessons.
Depending on your gender, you'll either be getting Swing Dance or Echo Song.
Make sure to also grab Frigg's Song, Song of Mana and Unlimited Humming Voice.
Song of mana will be very useful for farming dungeons as it can single handedly supply your mana if continuously recast when off cooldown.
Unlimited humming voice will be useful for when we need a large amount of damage, such as when fighting an MVP or powerful group of mobs.
Frigg's Song will likely only be used when fighting enemies who deal a large amount of damage such as Depths mobs and is useful for those circumstances.
Reverberation is also a useful skill to have for GM events.
 Metallic Fury
 Sound Blend
 Stage Manner
 Sonata of Kvasir
 Mystic Symphony
 Serenade of Jawaii
 March of Prontera
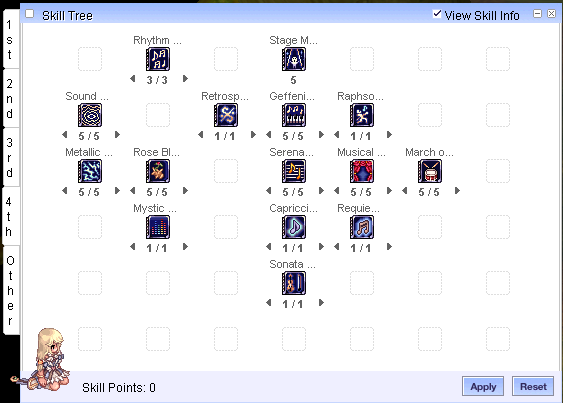
Finally for 4th job, we mainly care about maxing Metallic Fury, Sound Blend and Stage Manners.
Sound Blend will be critical for killing bosses and strong enemies as it puts a debuff on it's victims which causes them to take increased damage from Metallic Fury.
Also be sure to grab Mystic Symphony and Sonata of Kvasir, afterwards you can grab as many songs as you like.
I recommend assigning Serenade of Jawaii and March of Prontera to max level as well, as they will be your main 4th job buff skills for yourself and your party.
They won't be as significant as most 2nd and 3rd job skills are, but will provide useful benefits and become stronger if a fellow performer is in your party!
Gameplay (Arrows)
As stated in the previous section, there aren't too many tricks to be aware of, just be sure to keep your buffs up and you'll be fine.
The only thing to be weary of is what arrow you currently have equipped as it will determine what element Metallic Fury uses.
Some enemies are immune to certain elements, while others may take 200% damage when using the right element against them.
Every enemy has a unique element you'll need to be conscious of which you can check using @mi <monstername> ingame (for example @mi Moonlight Flower), or by searching them on Divine Pride.
For the most part, holy damage is generally effective against almost all creatures except holy element enemies.
I recommend keeping different arrows on your hotbar to quickly swap between them when needed, as you can easily double your damage by using the right arrow or loose 75% of it by using the wrong one.
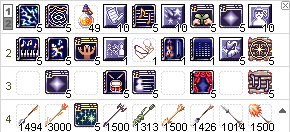
Use whatever feels most comfortable for you.
Gameplay (Maximizing Damage from Skills)
Metallic fury is our bread and butter for doing damage, however by itself it can only do so much.
Let's say we have a Metallic fury which can hit for 100k damage, ignoring gear completely this is good, but we can do much better.
First we'll cast Sound Brand on our target, this will increase the damage of our Metallic Fury on them from 100k to 120k, this is a fantastic boost against bosses but not so useful against regular mobs as it'll take more time than it's worth to cast sound brand on all of them.
If we need more damage we can use Unlimited Humming Voice to increase our total damage by 40%, turning our 100k damage Metallic Fury into a 140k damage Metallic fury which is effective against all mobs.
Of course, we can combine these for a multiplicative bonus of 168% damage for a 168k damage Metallic Fury, without even taking elemental vulnerabilities into account which will provide us with even more damage.
As always also remember to add on Serenade of Jawaii for extra damage on top!
Stat Goals
Most classes will need to hit certain amounts of fixed cast time or after cast delay before maximizing their damage, but performers only need 20% After Cast Delay (ACD) to get the most out of their main dps skill Metallic Fury.
Poem of Bragi can provide 30% for free, but is only accessible to male performers.
If you are pursuing the path of being a Trouvere rather than a Troubadour, you will need to find a way to achieve 20% ACD through equipment alone.
New Wave Sunglasses are very useful for giving 10% ACD and an illusion Silver Guard can provide an additional 5% if refined to +10 using Illusion Refinement Boxes.
The remaining after cast delay reduction can be achieve through dim glacier weapons, but can prove to be very expensive to obtain early on.
A cheaper option to consider might be the Sinful accessories as their set bonus provides 5% ACD reduction and do not need to be enchanted to provide this effect.
Combining New Wave Sun Glasses, Sinful Accessories and a +10 Illusion Silver Guard, you can achieve 20% ACD as a trouvere without Poem of Bragi.
Here are some other potential combinations to reach 20% ACD:
- Convertible Magical Wing + Victory Wing Ears
- 15%: Convertible Magical Wing + Victory Wing Ears Combo
- 4% Victory Wing Ears
- Note: This will only grant 19% ACD, but you'll only be short by 0.05 seconds so it will only have a small impact on dps.
- Dim Glacier + Thanatos Accessories
- 15% : Dim Glacier (Magical Grade 5)
- 5% : Thanatos accessories combo
- Dim Glacier + Mad Bunny-LT
- 15% : Dim Glacier (Magical Grade 5)
- 5% Mad Bunny-LT[A] or Mad Bunny-LT Enchantment
- Death Rune Manteau + Shield + Isaac Wigner
- 10% : Death Rune Manteau[A]
- 5% : +10 Illusion Silver Guard or Mad Bunny-LT[A] or Mad Bunny-LT Enchantment
- 5% : Isaac Wigner
- Isaac Wigner + Illusion Silver Guard + New Wave Sunglasses
- 5% : Isaac Wigner
- 5% : +10 Illusion Silver Guard
- 10% : New Wave Sunglasses
- Other items of note
- 1% - 10% : Gambler's Seal can be enchanted for variable amounts of ACD reduction.
- 5% : Reload Stone (Dual)
After achieving 20% After Cast Delay reduction you're free to pump damage as high as you can, which is exactly what we'll be doing.
Gear Progression
Based off Celery's Gear Progression Table
For female performers, remember you only need to reach 20% ACD with your equipment, pick whichever combination is most convenient for you to hit 20%!
Note: A +11 A grade Dimensions Instrument will be your first major increase in damage, followed by an A-Grade +10 fully enchanted Nebula Robe, and then an A-Grade well-refined Moan of Corruption.
Additionally, the moment you can get a Time Dimensions Rune Crown, it will easily double your dps output even with endgame gears, I strongly recommend making one the moment you have enough reputation for it.
Remember not to neglect cheaper equipment while you work towards these major pieces.
| Gear Slots | Beginner | Early Game | Mid Game | Endgame | Post-Endgame |
|---|---|---|---|---|---|
| Upper Headgear | Advanced Eden Headgear | Wickebine's Black Cat Ears-LT +7 Ungraded will be good enough. |
Wickebine's Black Cat Ears-LT | Vesper Helm Note: You should only switch off of wickebine's black cat ears after obtaining full tempest shadow gear, as you will otherwise loose large amounts damage due to not having mdef pierce to bypass monster's mdef stat. |
Time Dimensions Rune Crown (Troubadour & Trouvere) Note: As of writing, you'll need to wiggle your mouse to maximize your dps with the crown/weapon set bonus. |
| Middle Headgear | New Wave Sunglasses (If female)
Sealed Chain (If male, any card or EoE Int3) |
New Wave Sunglasses (If female)
Victory Wing Ears (If female and using Convertible Magical Wing) |
New Wave Sunglasses (If female and can't reach 20% acd without) | Gambler's Seal | |
| Lower Headgear | Poring Family Balloon | Poring Family Balloon | Ace of Spades | Ace of Spades | |
| Armor | Advanced Eden Armor | Gray Wolf Robe Unenchanted is fine for now |
Gray Wolf Robe | Nebula Robe of Spell | Soul Purification Rune Robes Note: You'll need enchantments on the Rune Robes for them to be better than the Nebula Robe. |
| Weapon | Advanced Eden Weapon | Advanced Eden Weapon | Glacier Weapon
Dimensions Weapon (Violin/Ribbon) |
Dimensions Weapon (Violin/Ribbon) Note: You only need to get this to +12 [A]-Grade |
Dimensions Weapon (Violin/Ribbon) Note: You'll need the Time Dimensions Rune Crown and Weapon together to unlock the weapon's true potential. |
| Shield | Illusion Silver Guard | Mad Bunny
Illusion Silver Guard (If female) |
Mad Bunny - LT
Illusion Silver Guard (If female or the shield has 2x rune of intellect enchants) |
Mad Bunny - LT Note: While the Magical Enchantment technically provides the maximum possible damage output, it will only increase your damage by around 1%. | |
| Garment | Advanced Eden Garment | Gray Wolf Robe
Grace Magic Manteau (If female) |
Temporal Manteau
Grace Magic Manteau (If female) Convertible Magical Wing (Combines with Victory Wing Ears for 15% ACD) |
Varmundt Death Rune Manteau +9 [C] Grade |
Varmundt Death Rune Manteau +11-+12 [A]-Grade |
| Footgear | Advanced Eden Footgear | Gray Wolf Footgear Unenchanted is fine for now. |
Moan of Corruption +9 [D]-Grade |
Moan of Corruption +11 [A]-Grade |
Moan of Corruption +11 [A]-Grade |
| Accessory Right | Advanced Eden Accessory Right | Sinful or Brilliant Light accessories | Sinful or Brilliant Light accessories | Varmundt Temple Rings Note: Enchanting these will provide a very small damage increase at a high price. |
Varmundt Temple Rings |
| Accessory Left | Advanced Eden Accessory Left | Sinful or Brilliant Light accessories | Sinful or Brilliant Light accessories | Varmundt Temple Rings Note: Enchanting these will provide a very small damage increase at a high price. |
Varmundt Temple Rings |
| Pet Egg | Mutating White Knight Egg | White Knight Egg | White Knight Egg | ||
| Shadow Gear | Full Tempest Shadow Gear (Accessories) | Full Tempest Shadow Gear (Accessories)
Spell/Full Spell Shadow Gear (Weapon/Armor/Shield/Boots) | |||
| Costume Enchants | Arch Bishop Stones in Top, Low and Garment 1 slots | Arch Bishop Stones in Top, Low and Garment 1 slots | Arch Bishop Stones in Top, Low and Garment 1 slots |
Card Progression
Based off Celery's Gear Progression Table
| Gear Slots | Normal | MVP | Notes |
|---|---|---|---|
| Headgear |
|
||
| Armor | Two-Eye Dollocaris should only be used on +12 armor, as it will provide curses instead of boons otherwise. Exercise caution when using the Meyer Lugenberg card, as it can cause SP consumption to be higher than what is sustainable with Song of Mana, which can be troublesome if farming without a | ||
| Weapon | |||
| Shield | Modified Senior Rgan should only be used on a +12 shield, as it will provide curses instead of boons otherwise. You will also be sacrificing a very small amount of damage using Senior Rgan by breaking the white knight/khalitzburg combo, but will gain a significant boost to your survivability in return. | ||
| Garment | Any 100% elemental boost card, best being Himmelmez | Napeo is a good budget option, but should be replaced once a better card is available.
Purple Pitaya is my recommendation for depths as it'll be your main damage type for damaging mobs. One Eye Dollocaris should only be used on a +12 garment, as it will provide curses instead of boons otherwise. | |
| Footgear | |||
| Accessory | The creamy card can teleport faster than flywings as the skill has no use delay when cast, but consumes an accessory slot which could be used to improve damage. As an alternative, teleport shadow gear can also provide the skill without taking up an accessory slot, however, you will likely ultimately prefer the extra shadow gear slot with endgame equipment. |
Dungeon/Instance Progression
Note: This list assumes you're using Guyak Pudding, Bubble Gum and the Teleport Spell for dungeon farming.
DPS references are done using the Main Office dummies, dps may be different in dungeon due to various factors but main office dummies will serve as a safe and consistent reference.
As you gain more powerful equipment you'll be able to take on more powerful dungeons and instances.
It can be confusing to know where to start however, but here's my general recommendation for when it's a good idea to start farming a certain dungeon.
The following list does not take elemental bonuses into account, so you'll need to think about that yourself before tackling a certain dungeon if you feel you're ready for it.
With that said, here's my general recommendation for progression:
| Location | Damage Output | Notable Drops | Zeny Gained & Notes |
|---|---|---|---|
| GM Events | 0 dps | Muh Coins | Varies depending on market price. As of writing, Muh Coins are valued at 80,000 zeny each. |
| Geffenia | 100k damage per Metallic Fury | Almost everything | Every item earned here is NPC vendable, it is recommended to have a fully leveled haggler pass or have a merchant character you can move your items to before selling for 24% extra zeny per item. With basic drop rate gear and bubble gum, it should be possible to achieve 50m per hour, however, your zeny/hr depends solely on how fast you can kill monsters. You may want to start with metallic fury until you feel confident you can One Hit kill mobs with Reverberation, at which point continue using reverberation from there. Here is a useful @nolootid list by Teragram, to be used with @autoloot 100 for Geffenia: Remember to have an empty inventory aside from the bare essentials before starting as you will frequently be moving items between inventories while depositing farming loot. |
| Dungeon of Oz Floor 2 | 5m damage per Metallic Fury | Varies depending on market price. As of writing, 1400 fragments can be consistently gained per hour with Bubble Gum & Guyak Pudding. | |
| Challenge Old Glast Heim | 100m dps | Varies depending on market price. As of writing, 21 fragments can be consistently gained per run at Challenge 10. | |
| Niflheim Dungeon Floor 2 | 100m dps | Varies depending on market price. As of writing, 20 branches can be gained on average per hour with Bubble Gum & Guyak Pudding using sub optimal gear. | |
| Varmundt Death Sphere | 100m dps | All Biosphere unique item drops For example: |
Varies depending on market price. Most of the items dropped here won't immediately be for zeny gain, but rather for materials to work towards crafting and enchanting a |
| Any Varmundt BioSphere | 150m dps | All Biosphere unique item drops For example: |
Varies depending on market price. As of writing, 23m raw zeny can be earnt per hour, combined with an average of 50 essences (at 300k ea), 200 runes (at 29k ea) and 10m from NPC vending Engraved Orlean/Varmundt Rune equipment drops, it shouldn't be unreasonable to make at least 53m per hour with an undergeared setup. Be sure to check which biosphere items sell best on the market before farming. |
| Thanatos Tower Floor 12 | 7m damage per Metallic Fury | 70m raw zeny per hour from NPC selling items 200 Zelunium per hour, assuming they're sold at 82,000 zeny each, gives 16.4m zeny It is recommended to have a fully leveled haggler pass or have a merchant character you can move your items to before selling for 24% extra zeny per item. To enter this area, you'll need to do a Short Quest. | |
| Depths Floor 1 (Party Dps) | 200m dps | All monster drops | It is difficult to calculate zeny per hour due to the various items drops from the dungeon, instead this section will focus on the reputation gained per hour instead. Depths 1 Reputation per hour varies depending on the party, however 200 per hour should be a reasonable estimate with a good party. Before stepping into the dungeon, make sure you have some Additionally bring about 100 This dungeon will test how effectively you can swap arrow types for damage, so be prepared if you plan to contribute to dps. When you're finished, you can turn in your Be sure to avoid selling any Temple, Purification or Soul related Depths items as we will be needing them for enchanting Robes once we have enough reputation. |
| Alice Twisted Madness Hard (Party Dps) | 200m dps | All monster drops | Alice Hard is an instance which requires a party to complete, you'll want a source of magic dps (yourself), a source of physical ranged dps, a source of physical melee dps, someone to tank (elemental master) and preferably an AB to help as well. If your party can complete the instance in under 20 minutes, you'll be rewarded with a Your job will be to kill the vine monsters called Spades as they will only be vulnerable to magical damage, while your physical damage dealer handles the Absolem. For this instance, you'll want to use fire damage to kill the Spades and holy damage for the bosses as it's their respective weaknesses. Additionally, when you find the portal at the end of the red maze, be careful not to enter as it will closely shortly after a party member steps inside of it. The items from this instance will be useful for upgrading your Mad Bunny shield into a Mad Bunny-LT, as well as crafting some other headgear accessories. |
| Depths Floor 1 (solo dps) | 800m dps | All monster drops | All the advice from the party dps section also applies here, by the point you have 800m dps you'll likely already have the Time Dimensions crown from depths 2 and won't need the reputation.
The main resource to farm here are Temple, Purification and Soul related items to craft Soul Purification Rune Robes. Remember to bring a |
Miscellaneous Advice
This section is dedicated to other pieces of useful information which doesn't quite fit anywhere else.
Let's get started
- Free Bubble Gum & Buff Potions
- You can earn free bubble gum, battle manuals and buff potions by completing eden board quests and trading your eden coins in at the Eden Vending Machine (moc_para01 51, 31).
- My preferred way to farm eden coins is in Abyss 4, by taking the Abyss 4 eden board quest (moc_para01 52, 37) and the main office Abyss Lakes 4 quests (main_office 123, 36) as you can farm
 Eden Coin (25223) and
  Forgotten Heirloom (50001) simultaneously.
 - However, the fastest place to farm solely eden coins is Varmundt Power Plant 2 due to the significantly higher monster density.
- Casual MVP farming
- Field MVPs can be fun to hunt, but remember use a bubblegum when you go to hunt them, BBG is nearly free thanks to Eden Board farming and a 0.08% MVP card drop rate is a lot better than 0.04%.
- Further on this note, if used with guyak pudding, a single bubble gum is enough to clear all of Endless Tower or Endless Cellar.
- MVPs also frequently drop
 Shadow Crate (50034) ,
  Shadowdecon (25729) and
  Zelunium (25731) which are useful materials.
 - Random MVP drops such as
 Heroic Emblem (968) and
  Knot Letter (25629) are also useful for shadow gears, so shouldn't be abandoned.
- Bloody Branch Popping
- Are you rich and want to gamble for an MVP card?
- If you have a large amount of bloody branches, you can pop a HE Bubble Gum and spam bloody branches for a chance at an MVP card.
- On average, you'll usually want about 1,000 branches for 1 MVP card using this method, since while you'll have a 0.12% chance to drop a card on each MVP, not all MVPs spawned from the branch drop an MVP card.
- Fly Wings or Teleport Skill?
- While fly wings don't require a dedicated gear slot, they come with a short delay before casting teleport.
- Because of this teleporting using the skill itself, such as with a creamy card, is much faster than using fly wings.
- Cheap Reform Refines
- When reforming items, such as a
 Mad Bunny [1] (28902) into a
  Mad Bunny-LT [1] (460020) , you'll usually be given an option between a cheap option for -5 refine levels and an expensive option for -1 refine level
 - While it is immediately cheaper to take the cheap option, if you're interested in getting an item to +12 without concern for grading it in the future, it will ultimately be cheaper overall to purchase a Safe to +x Certificate one above your desired refine level and reform it using the expensive option.
- This won't work for most equipment as the refine level will be reset upon grading regardless, but it might happen to come in useful one day under niche circumstances where grading equipment is not a concern.
- As a 2nd reminder, this won't be useful for most equipment as grading will reset the refine level regardless of how high it is, this should only be used on equipment you have no intent to grade.
- When reforming items, such as a
