Melee crit paradise dk edition
Introduction
This is a comprehensive one-stop bible written by CY for Melee CRIT players through the lens of a CRIT Dragon Knight. As such, it goes through every part that I think will be helpful to players at almost all stages. Please use the TOC to skip to whichever section is relevant to you.
Lore of Dragon Knight 
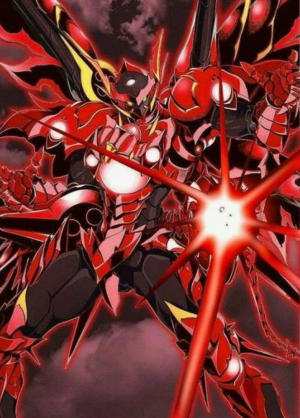
Dragon Knights (DK) are the 4th class of the knight branch who draws energy from the Red Dragon Leticia; a cosmic dragon who took notice of your character after mastering mana acquired through the power of Runes ( one that gains the respect of dragons but scares off Pecos). These runes were discovered in Ash Vacuum by the player as a Rune Knight; where Ash Vacuum is an alternate dimension that Satan Morroc hailed from.
The CRIT DK is one of 2 main playstyles for DK where we directly imbue the Strength of the Dragon into our Sword to dish out Outrageous DPS through skills like:
 STORM SLASH: One of the highest DPS single-target skill due to short cool down and 60% chance to deal double damage,
 Hack and Slasher: A 7x7 AOE skill to deal with mobs. The damage is okay but the AOE is small @ 7x7; the downside of CRIT DK.
 Charge Attack: At 14 cells- the furthest mobility target skill in game, allows CRIT DK to close in on any target easily.
 Vigor: Draws out the dragon's aura to deal 50% additional damage to Angel and Demi-human enemies. Also increases normal attack damage.
The other playstyle channels upon the Vitality of the dragon to spew flames via ![]() Dragonic Breath- a build with lesser Single target DPS but more HP and better AOE (9x9) at range.
Dragonic Breath- a build with lesser Single target DPS but more HP and better AOE (9x9) at range.
Highlight of the Melee CRIT DK build
Pro:
The high DPS of ![]() Storm Slash, coupled with all the other defensive tools available to you as through Runes makes you probably the best boss-killer in the current meta.
Storm Slash, coupled with all the other defensive tools available to you as through Runes makes you probably the best boss-killer in the current meta.
The best playstyle to compliment this is through instances (basically a short raid) with bosses that offers great pay-outs. There is a section on instances in this guide later.
Con:
The small 7x7 AOE of ![]() Hack and Slasher makes your field-farming capabilities much lower than the typical mage; besides selected dungeons where pathways are narrower. Fortunately, the current end game dungeon, Depth 2, is one of them, and still remains very profitable.
Hack and Slasher makes your field-farming capabilities much lower than the typical mage; besides selected dungeons where pathways are narrower. Fortunately, the current end game dungeon, Depth 2, is one of them, and still remains very profitable.
However field-farming is a big part of the game (at least until the late phases), and MUHRO even improves upon it by having cash shop items such as ![]() Blacksmith's Blessings and
Blacksmith's Blessings and ![]() Bloody Branches being acquirable through field farming. As such, you may find that the starting farm speed of the CRIT DK is slow but it is worth the wait as you will eventually get strong enough to beat powerful instances much faster than most classes.
Bloody Branches being acquirable through field farming. As such, you may find that the starting farm speed of the CRIT DK is slow but it is worth the wait as you will eventually get strong enough to beat powerful instances much faster than most classes.
Pre-game Setup
Turbo
In official servers, some players set up external macro programs to help them spam and click skills. MuhRO has it's own one built into the game to even the playing fields without cheating. This is a game-changer in your gaming experience, so make sure to set it up first!
Refer to: https://wiki.muhro.eu/Patcher#Turbo_Setup
TIP: Turbo is useful not only for skill spamming, as you can use the rapid click feature to :
- quickly sell all your junk to NPC, doing so safely by first putting all of your valuables into the fav tab in your inventory and then locking it.
- level up skill points quickly through the rapid click to save time as well.
Autoloot
MuhRO has a very comprehensive loot system that lets you save various versions of autolooting items dropped by monsters in game. However, new players usually find that they have to keep retyping their autoloot options on login. Reason is that you need to save your current loot setup as the main login option.
You may do so via the command @alc , which allows you to save several different loot lists.
You can load different ones that you saved via @als as well.
Generally for new players, we would typically just type @autoloot 100 to loot everything, and use @nolootid +id to not pick up items that weight too much.
Refer to : https://wiki.muhro.eu/index.php?title=Autoloot_setups for more information on loot setup options.
Eden Consumables
MUHRO has a good assortment of Cash shop consumables that are highly beneficial for farming available through the use of ![]() Eden Coins. You can get most of these consumables from the Eden machine
Eden Coins. You can get most of these consumables from the Eden machine
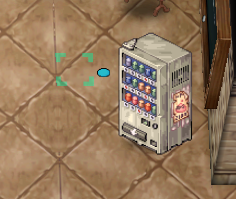
Some highlights that most of us use frequently include:
- Bubble Gum - 30 Eden Coins
- Battle Manual - 20 Eden coins
- Life Potions - 3/4 Eden Coins
- Brilliant Protection Scroll - 3 Eden Coins
- The One Potion (assortment of cash buffs together) - 25 Eden Coins
You can acquire Eden coins through doing eden quest boards. The best maps currently are ba_pw02, odin past and abyss 4.
Levelling
One of MUHRO's unique factor is that exp penalty from mob levels is non-existent, so some veteran RO players new to this server might find the recommended levelling path different than other servers.
While some classes may have issues levelling their first character, DK is not one of them. In fact, you'll be please to know that following my guide will let you hit lvl240~250 painlessly as a DK. The levelling process is not done as a CRIT build but uses whatever skill offers the best efficiency with almost no gears and just some consumables. We will re-spec to CRIT after acquiring a set of mid gears.
A full levelling video is provided for visual purpose:
Lvl1-99 (just dump all your stats into STR first and have ~30 int for enough SP)
- Follow through the tutorial to acquire the free HE Manual. Please hit LVL10 before exiting to save some time from visiting a separate dungeon, as it is required for paradise equipment. Equip your free costume.
- Head to Office (@go Office)and job-change to Swordsman. If not yet lvl10, type @go Lasagna and walk down to kill Eggrings to get lv10.
- Go to Eden (@go Eden), register with Eden Group and collect your paradise equipment+ sword.
- IMPORTANT: Use your free HE manual now as it will be disabled beyond lvl40. The duration does not tick down while in Town areas so you can relax in prontera even with it activated.
- Head to Orc Dungeon and beat orcs with Bash and
 Magnum Break until Job lv50.
 - Job change to Knight at job lv50 at @go Office and @go Eden to collect your second weapon, a twohanded sword.
- Head back to Orc Dungeon, and have fun with
 Charge Attack flying around until lvl75 by using the Turbo feature.
 - @go Eden and collect the lvl70-99 Board quests (Just click the "Take All" option). We are after only Petite, and sometimes Mantis.
- Warper--> Old Glast Heim --> Entrance and then walk right to land at the map for Petites.
- Kill petites and submit quests every 10 kills for the
 Eden coins. Be sure to drag the coins into your fav tab so you won't sell them accidentally.
 - MAKE SURE TO HAVE 1 COMPLETED PETITE request, and do not claim it!
- Rebirth at Base lvl99 and job lvl50 to High Novice.
- Head to Lasagna and beat a couple Eggrings to get joblvl10 to Job Change to High Swordsman at Office.
- @go Eden and submit your petite kill quest you saved earlier to directly hit Job lvl50 as High Swordsman.
- Go back to Office and turn into Lord Knight. Make use of
 Aura Blade and
  Concentration to increase your
  Charge Attack into a 1-shot. It's fun!
 - Repeat step 7 to 10, Basically High orc to 75, Petites to 99/70. Same thing, make sure to leave 1 kill quest completed but NOT submitted.
- Job change to Rune Knight and then submit the petite quest you saved to get yourself above lvl100. Get
 Wind Cutter as your 3rd Job levelling skill on Turbo.
Lvl100-200 (Get STR to 120, DEX to ~50, ~30 INT, and then split AGI/VIT equally)
- Talk to Daily Hunt NPC (it's in many towns, i use mine in Lutie, Roxanne) to get the Illusion Moonlight kill quest. Just take the first option, "Take All"
- Head back to Eden and acquire your lvl100 set.
- Paradise Rune Knight Two-handed Sword for 10
 Eden coins or 15
  Old Pick (type @ws 7318, buy if available, use eden coins other).
 - Advance Shadow Gear set for 20
 Eden Coins.
 - Advanced Paradise Physical Set for 15
 Elastic Bands and 3
  Blue Hair (type @ws 7200 and buy 15 bands, then get the last 3 blue hair at ra_fild05)
- IF no bands for sale, skip first and get after your manual ends. Do not waste manual time on hunting bands as DK is able to hit lvl200 just fine with the pre100 set.
- Paradise Rune Knight Two-handed Sword for 10
- Feel free to head back to petites for some more
 Eden Coins if you do not have 30+
 - Warper --> illusion--> illusion Moonlight. Finish 100 kill counts. Submit to Daily Hunt NPC. This should unlock the Illusion of Vampire kill quest and access.
- Drag
 Illusion Stones into your fav tab so you won't sell them accidentally. Illusion boxes found through the dungeons should be kept as well.
 - Beyond this step, we employ cash shop consumables acquired from the Eden Machine. Purchase and activate
 Brilliant Protection Scroll for 3
  Eden Coins and;
 Medium life Potion for 4
  Eden Coins.
- Complete and submit 100 kill counts on Illusion Vampire, unlocking Illusion of Twins kill quest and access. If your Battle manual ended for whatever reason, you may not have unlocked Twins yet, then simply progress with the latest unlocked illusion dungeon you got (Teddy or whatever).
- Complete and submit 100 kill counts on Illusion Twins or whatever is your highest until you hit lvl 180.
- Type @ws 7439 to search for players that vend
 Fragment of Despair, a commonly sold item that gives free quest rewards daily. Usually a vendor selling these will have all 4 types of fragments in vend when you search for one.
 - Try to buy all 4 types of fragments, they are Agony, Misery, Hatred and Despair. Submitting all of them while your battle manual is still active gets you to Lv200 immediately.
- If nobody is vending and you can't find a seller thru shouting via the Trade channel, you will then need to continue thru illusion quests or do Recon Robots kill quest. You may refer to this in Cheverlotte's DK guide levelling section (still great for Dragonic Breath players).
- Job change to
 Dragon Knight. Congratulations!
Lvl200-250 (250 is the lvl requirement for Dimensions weapons, cheap and powerful)
- As Dragon Knight, you can first repeat 1 illusion kill quest to get more skill points. Start by using
 Hack and Slasher which you can max by Job Lvl15 first, but you'd want to use
  Madness Crusher with
  Charging Pierce buff up when you get enough skill points to max it around job lvl 26. Be sure to add your POW trait whenever you level, they increase your damage a LOT!
 - From here, there are 3 options to level effectively while getting the most out of it. Every 240 kills in both areas provides you with 33
 Eden coins every turn in. My suggestion is Odin's Past or Ein_dun03 for entirely new players.
- Head to Odin's Past. Slower than Abyss 4 but provides some zeny farming potential due to the presence of https://muhro.eu/?module=item&action=view&id=23986Odin's Relics which vends for 90K while you get to 240 minimum.
- As Odin's Past is one of the Recommended farming maps later on (beginner stages), be sure to use a
 Bubble Gum whenever you can (purchase for 30 Eden Coins from Eden Machine)H
- As Odin's Past is one of the Recommended farming maps later on (beginner stages), be sure to use a
- Head to Einbech dungeon 3. This offers similar farm speed to Odin's Past and is very easy, but doesn't have much raw zeny. Instead, you try to farm Dynite here for your Flush Claw Sword later, or sell the Dynites for money.
- Head to Abyss 4. This offers a faster leveling progression to 250 but you do not earn much zenny along the way. Mobs are stronger than Odin's past so you should only access this with
 Madness Crusher maxed.
- Head to Odin's Past. Slower than Abyss 4 but provides some zeny farming potential due to the presence of https://muhro.eu/?module=item&action=view&id=23986Odin's Relics which vends for 90K while you get to 240 minimum.
- Your goal for either area is the same, which is to accept the Daily Hunt Quest for the area and the Eden Board 130-190 kill count (requiring 240 kills).
- Submit all of them together whenever you finish the 240 kill counts and repeat.
- If you are unsure, my recommendation is to go to Odin's Past first. It is less demanding and offers some zeny rewards. I was still able to almost hit 250 within the 1 hour Battle Manual.
- To access either area through warper, you simply need to reach there yourself once.
- For abyss 4, Use warper to Abyss---> climb up to abyss 4.
- For Odin's Past, Use warper to Odin's temple --> climb up to Odin's past.
- For ein_dun03, User warper to Einbech dungeon --> climb up to ein_dun03
- For both areas, there are ghost mobs that demand you to use consumables to turn your weapon into a non-neutral element in order to hurt them.
- For Abyss 4, use any of the 4 elemental converters, try @ws earth elemental converter
- For Odin's Past, use
 Cursed waters. You can farm a few in Geffenia or similarly try @ws cursed water
 - For ein_dun03, use any of the 4 elemental converters, try @ws earth elemental converter
- Be sure to use a new
 Battle Manual if it ended (20 eden coins), and use the opportunity to make your 4 main runes before starting a new EXP manual. Refer to the runes section if you need help. You may not need to use all 4 of them if you're comfortable with your current power levels for the map. Don't forget about the Eden consumables too!
 Lux Anima Rune
 Asir Rune
 Turisus Rune
 Hagalas Rune
- Bonus: If you chose to farm Odin's Past, you may try to make an Enchanted
 LUK Soutane as your mid-game gear if you do not wish to ask people to help you enchant your
  Glacier Armor later. Talked about in gear section later
 - You may stop levelling before lvl250 in either of these maps but you would then need to buy a transition weapon, a
 Glacier Two-handed Sword to farm in better area. I would recommend just staying until 250 to be able to purchase and equip a
  Dimensions Dragon Sword. Just move to Abyss 4 for the faster levelling and get to 250 whenever you want to speed to 250 instead of Odin's Past.
What's next after lvl250
Following my levelling guide so far have gotten you here as a gearless pleb, making full use of ![]() Madness Crusher's high skill % and spammability when you don't have gear. However, this skill falls off hard later on as it cannot be scaled vs other main DK skills. We will now want to transit into our
Madness Crusher's high skill % and spammability when you don't have gear. However, this skill falls off hard later on as it cannot be scaled vs other main DK skills. We will now want to transit into our ![]() Hack and Slasher build with a few good and cheap cards+ equipment and then we're off to what RO is all about:
Hack and Slasher build with a few good and cheap cards+ equipment and then we're off to what RO is all about:
- Farm fields
- Play Instances
- Do Quests (the main story quests)
- Make nice costumes
- Gear your character to it's max potential
There are of course many areas you can farm, I've compiled a list of ALL good field farms and instances in my guide so you don't ever have to look else where. As for lvling from 250 to 275, it will happen as you move to at mid-late game gears and farm in the stronger areas.
On Episode Quests
When you are feeling up to it, you should start doing main story quests for Renewal in order to unlock some of the profitable instances. In MuhRO, you must complete these quests at least once, starting from EP18 , before you can skip them through purchasing Skip tickets on your other characters. The Quest skip NPC is found in office, Temporal Tina. You can skip EP17.1 and EP17.2 on your first character for 6M zeny and should do that to save some time.
Gear and Stats based on progression
I categorise gears in following Phases based on their power levels, aiming to incrementally increase your DK's power without wasted money with obsolete gears.
Please jump to whichever section fits your need:
- Beginner (levelling stage)
- Easy difficult farm Gear(~80m per hour fields)
- Mid difficult Gears (~140m per hour fields)
- Full End-Game
- Budget End-game gears (optional detour to provide gear power faster for higher difficulty instances since full end-game is very expensive)
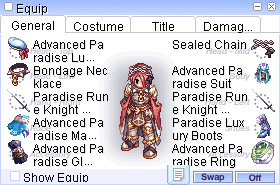
1. Beginner ( Madness Crusher with Advance Paradise Equipment)
For DK, As we've went thru lvling to 250 without any problems using ![]() Madness Crusher with Runes and Eden consumables activated.
Madness Crusher with Runes and Eden consumables activated.
1A. Lvl250 STATS for levelling
| STATS | VALUE | COMMENTS | TRAIT | VALUE | COMMENTS |
|---|---|---|---|---|---|
| STR | 130 | maximum dmg | POW | 110 | Max this |
| AGI | 110 | ASPD and FLEE | STA | 0 | |
| VIT | 110 | LIFE and Stun immunity | WIS | 0 | |
| INT | 50 | 50 int for QOL SP | SPL | 0 | |
| DEX | 50 | some hit rate | CON | 49 | dump remaining stats |
| LUK | left overs | madness crusher doesn't crit, but luk does have some atk | CRT | 0 |
1B. Gear Image
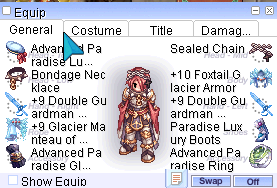
2. Switch into CRIT  Hack and Slasher Playstyle for EASY difficulty field farm
This is where we need to start building our first CRIT DK set. The purpose of this set is to set you up to be decent quickly and cheaply, so you can begin 1-shotting at Easy difficulty fields + easy difficulty instances. You will notice that I might not even tell you to max some of these gears, because from my testing they provide exactly enough power for you to one-shot the easy difficulty fields. You can then just save your earnings into building mid-gear set first, and then End-game OR Budget End-game gears straight.
Now the main Question is: What gear do you need before the switch?
- +9
 Dimensions Dragon Sword
 - 2
 Rekenber Guard card for your weapon. Back up choice:
 Polluted Wander Man Card
  Anger Nine tails card OR
  Yordos Executor Card slotted into a +9~11
  Glacier Armor/
  Dim Glacier Armor/
  Gaebolg Armor (get the cheapest of any of these in vend) Back up choice: +9
  Grace Knight Armor.
 Galensis Card slotted into cheapest
  Glacier/Dim Glacier/Gaebolg Garment off vend first. Back up choice: +9
  Grace Attack Garment
- A cheap
 Sealed Chain and
  Bondage Necklace for more CRIT Rate
* In MUHRO, instances sometimes drops episode gears that are upgraded, so popular instances like "The Immortal" means there are a lot of +9~11Glacier equipment available cheaply.
These gears will propel your CRIT rate above 130 and allow you to 1-shot EASY dungeons like nif_dun01 with runes up, even if the rest of your gears are still Eden Paradise. The overall costs does not exceed ~50M at time of writing. You can still farm at nif_dun01 before securing all the above parts with Eden gears + madness crusher btw, just at a lower zeny per hr until you get the above parts (prolly less than an hour later).
2A. STATS for New CRIT DK
| STATS | VALUE | COMMENTS | TRAIT | VALUE | COMMENTS |
|---|---|---|---|---|---|
| STR | 120 | maximum dmg before stats become too expensive | POW | 110 | Max this first. |
| AGI | 110 | ASPD and FLEE | STA | 0 | |
| VIT | 110 | LIFE and Stun immunity | WIS | 0 | |
| INT | 50 | 50 int for QOL SP | SPL | 0 | |
| DEX | 1 | not necessary for CRIT skills that have no CAST TIME | CON | 72 | Dump remaining stats here for P.atk and flee |
| LUK | 125 | 125 is necessary for your Garment's Galensis Card effect | CRT | 110 | Max this second. End in Multiples of 3 for C.rate |
2B. Easy Gear Image
3. Efficient Early/Mid-Gear Setup for Mid-difficulty Fields (~140m per hr in nif_dun02)
3A. Stats
Follow stats in 2, it's the same for now.
3B. Gear Image
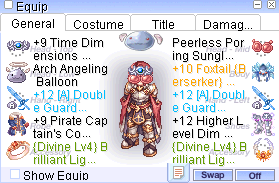
3C. Gear Details
As usual, you can still move to Mid-diff fields like nif_dun02 even if you haven't acquired all of the gears below. As long as you can 2-shot, Nif_dun02 should already make you more zeny per hour than nif_dun01. You can also explore all the other mid difficulty fields for some variety fun. Only Mjolnir underground caves may be a little too difficult if you can't one-shot.
| Main Gear | Name | Cards | Enchant | Acquisition | COMMENTS |
|---|---|---|---|---|---|
| Headgear | +9  Time Dimension Rune Crown (Dragon Knight) Time Dimension Rune Crown (Dragon Knight)
|
Shining Seaweed | none yet | Buy or ask someone on #Global to help you exchange for 75 |
Best bang for buck combo with your Dimensions Dragon Sword. As of writing, this costs ~60M for the crown. |
| Mid |  Poring Sunglasses Poring Sunglasses
|
- | - | Buy or acquire from Poring Village Instance | 5% Drop rate gear |
| Lower |  Any Poring Balloon Any Poring Balloon
|
- | - | Buy or acquire from Sky Mode Instance | Cheap 5% drop rate gear, 10%  Happy Balloon costs almost 1B atm Happy Balloon costs almost 1B atm
|
| Weapon | +12 GRADE A  Dimensions Dragon Sword Dimensions Dragon Sword
|
Rekenber Guard Card x2 | - | Buy and then refine yourself, or buy full +12A for ~260M. | this is really easy to refine and grade as it has a guaranteed upgrade box that adds +1 from +9 onwards (up to +12), called  Dimensions Weapon Refinement Device Dimensions Weapon Refinement Device
|
| Armor | +10  Glacier Armor (any grade) Glacier Armor (any grade)
|
Anger Nine Tail Cardor
Yordos Executor Card |
Berserker, Warrior,
Cooldown/POW |
Buy and then either complete quest until ep20 to self-enchant, or ask someone to do it for you with the mats. It's quite rare to see someone sell a fully enchanted glacier armor. | I chose enchanted glacier armor because this is the cheapest by material costs to get fully enchanted, which provides quite a significant boost for only 25~30M. If you can't find someone to help you enchant, your back up option would be a +9 Yordus Executor Card has 16 CRIT if your armor is +11, and 10CRIT if its not 11. It is a lot cheaper than anger nine tail card though, so you can consider this if you have a +11 armor or don't need that extra 5 CRIT. |
| Garment | +9  Pirate Captain's Coat (any grade) Pirate Captain's Coat (any grade)
|
Galensis Card | - | Acquire for 250 |
Grade C has best bang for buck dmg to money ratio if you want to pump it a little. I was one-shotting in nif_dun02 with a no-grade +9. |
| Shoes | +12  Dim Glacier Boots (no grade). Optional if you need extra +20 crit. Otherwise go straight to Dim Glacier Boots (no grade). Optional if you need extra +20 crit. Otherwise go straight to |
Piloted Midrange Rgan Card | - | Purchase +11 from vends and use Dim Glacier Armor Enhancer (buy from vend) to guarantee +1 to 12. | This is the cheapest boots that you can get +12 with a slot and some damage. If can't find one, stick with Advance Eden boots for that sweet +15 CRIT until you move to build your late game boots. |
| Accessory 1 |  Brilliant Light Ruby Ring Brilliant Light Ruby Ring
|
Void Mimic Card | Divine Lv3+ | Acquire for 50 Fragment of Good Will and then gamble 50 fragment of Good Will for specifically only demon damage enchant. Can stop at lv3 for fast and cheap result. Check memories of thanatos for more info | This combo provides 70%+ damage to demons, which all nif_dun02 mobs are. They thus give you a major dmg boost for only around 15m per ring as of writing. Feel free to use an fully enchanted Glacier Ring and Glacier Ring and  Glacier Pendant if you want a general mid gear accessory instead. Glacier Pendant if you want a general mid gear accessory instead.
|
| Accessory 2 |  Brilliant Light Ruby Necklace Brilliant Light Ruby Necklace
|
Void Mimic Card | Divine Lv3+ | check above | check above |
| Costume Stones | Rune Knight Stone (Top), (mid) and (low) with Dragon knight Stone (Garment) | - | - | Buy OR Gamble with fashion points at Office second floor. | Use any costumes for now, the stones can be removed at any time for 1M zeny. As of writing, RK and DK stones remain cheap as most players play mages (so knight stones are by-products of gambling for mage stones). |
| Shadow Gear | Still just Advanced Paradise, you can one-shot without making new shadows yet above set | - | - | Eden | You will be going all out to make shadow gears right after once you hit enough damage to 1-shot nif_dun02 mobs for with the mid-set. |
4. Full End-Game Gear (Nebula and Hall of Life Equipment)
I am showcasing the full end game setup first, so you can see how it's like. To be fair, most likely you will take a detour for some equipment into budget options to get more power in between.
For a smooth progression, you may follow my sequence of gear priority:
- 12A Dragon Sword+ DK Stones (should be done during your mid-game setup)
- Complete ALL of your shadow sets to +9~10 in this sequence. Sounds weird to do it before end gears, but they do make the most difference for cost.
- Full Penetration Set +9 (full defense pierce results in major damage boost most of the time)
- Maximum Mammoth Set +10 (RUSH this quickly. The removal of knockback is a game-changer for melee DK as you can finally charge attack to mobs without pushing them back).
- Mega Blitz Shadow Shield +9
- Infinity Shadow Weapon +10 (this has to be 10 for the nullify weapon size penalty) (possible to push back far back in priority if you are still killing mid/small size monsters 1-shot).
- Get all of them enchanted with 5 C.Rate. (If you're on budget, can just accept any 3+ and revisit later)
- From this point, you can then choose to tackle the full end game pieces one by one OR acquire certain budget options before that. *Highly Recommended* Check out the budget gear sections after this.
- If doing end game pieces straight, this is my preferred sequence:
- +12A Gaebolg boots (This has easy hammer to get you to 12A quickly once you complete Episode 21. You can then use Piloted Midrange Rgan for +20 CRIT).
- +12A Nebula Suit of Creative (pow3sharp3)
- 12A Headgear (either Yorscalp Crown or Time dimension. Depends on whether you are purely instancing or also field farming).
- Creative Signet of Star (full enchant)
- Signet of Circulation Winter (only Token)
- +12A Circulation of Winter garment (no enchant)
- Get to a good Headgear enchant level
- Finish Signet of Circulation Enchant
- Finish garment enchants
- If you picked any of the budget options later on, you can push those equipment slots further back. Example: You made a Acute5 Temporal circlet---> Do +12A Headgear later than other parts.
4A. STATS for END-GAME CRIT DK
| STATS | VALUE | COMMENTS | TRAIT | VALUE | COMMENTS |
|---|---|---|---|---|---|
| STR | 120 | maximum dmg before stats become too expensive | POW | 110 | Max this first. |
| AGI | 120 | ASPD and FLEE | STA | 0 | |
| VIT | 120 | LIFE and Stun immunity | WIS | 0 | |
| INT | 50 | dump remaining here | SPL | 0 | |
| DEX | 1 | not necessary for CRIT skills that have no CAST TIME | CON | 72 | Dump remaining stats here for P.atk and flee |
| LUK | 89 | 89 is the cut off before angel slug reduces your CRIT | CRT | 110 | Max this second. End in Multiples of 3 for C.rate |
For stats in end-game, as we get a lot of CRIT from our gear, we no longer run 125 LUK; instead opting for 89 LUK to maximise our damage with Angel Iceslug Card without its -15 CRIT downside.
STR, AGI and VIT are put at 120/120/120 as the default, but this is actually quite flexible. You can do 130STR, 100AGI, 130VIT, or 130STR, 120AGI, 110VIT etc...
4B. Gear Image (End-Game CRIT DK)
There are 2 two ways to setup an End-game CRIT DK. The difference is in the Headgear+ Weapon. Some of the more hardcore players may go for both options, but understandably due to budget constraints, most can only go for 1.
The options are:
i. Yorscalp Crown of Execution + Flush Claw Sword with a Tris Card.
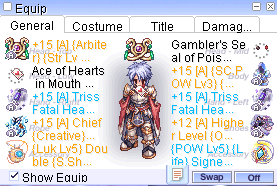
ii. Time Dimensions Rune Crown + Dimensions Dragon Sword
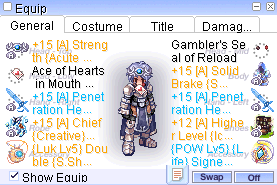
iii. How to Select which set to get:
If your Dragon Knight is purely for bossing and you can afford to eventually make a +15 Yorscalp Crown with Tris Card, go straight to ![]() Yorscalp Crown of Execution. This will deal a lot more damage on your
Yorscalp Crown of Execution. This will deal a lot more damage on your ![]() Storm Slash - a Single Target move. Your Focus is on difficult instances like Constellation Tower and Final Battle.
Storm Slash - a Single Target move. Your Focus is on difficult instances like Constellation Tower and Final Battle.
However, if you are pushing your CRIT DK for mobbing and general field farming, you might want to settle on the Time dimension set for the -0.2sec CD on ![]() Hack and Slasher to push AOE damage into the realms suitable for Biosphere Depths 1 and Depths 2.
Hack and Slasher to push AOE damage into the realms suitable for Biosphere Depths 1 and Depths 2.
On the choice of weapon, as long as you intend to use ![]() Hack and Slasher,
Hack and Slasher,  Dimensions Dragon Sword is a must keep for the bonus damage. Add
  Flush Claw Sword if you are going Yorscalp Crown of Execution for bossing. The decision is more on your headgear option rather than the weapon actually!
4C. Gear Details
| Main Gear | Name | Cards | MVP Option | Enchant | Acquisition | COMMENTS |
|---|---|---|---|---|---|---|
| Headgear | +12A  Time Dimension Rune Crown (Dragon Knight) Time Dimension Rune Crown (Dragon Knight)
+12A~15A |
Shining SeaweedJitterbug (for betelgeuse/Rigel)
Engkanto (for poison element bosses/mobs) |
[MVP] Violent Coelacanth Card | For Time Dimension Rune crown: Acute Jewel 5Lv + Acute Jewel 5Lv +  Time Dimensional Jewel (Luck) Lv3 Time Dimensional Jewel (Luck) Lv3
For Yorscalp Crown of Execution:
|
Depth 2 (for time dim) | For +15 Priority:
Fourth for TDRC. FIRST if you are going Yorscalp Crown + Tris Card. |
| Mid |  Gambler's Seal Gambler's Seal
|
Isaac Wigner | Sealed Kiel OR
[MVP] Kiel |
Non MVP: 5% ACD+ Melee
MVP: 10% Melee |
Alice Twisted Madness Instance | You need 30% ACD min. for Storm Slash total, HOL set gives 20%, so gambler seal with 5% acd + isaac gives the other 10%. This is only if you're going for Dragon Sword. If you are using Flush Claw sword, you do not need Kiel or Sealed Kiel since the sword has 15% ACD. |
| Lower |  Ace of Hearts in Mouth (Melee Physical) Ace of Hearts in Mouth (Melee Physical)
|
- | Melee 7%
STR5 |
Alice Twisted Madness Instance | LUK/AGI/VIT also acceptable | |
| Weapon | +12A  Flush Claw Sword Flush Claw Sword
+12A |
Tris Card (x1) ---> Only for Yorscalp Crown Combo
Scalleg + Yormi Card Combo (General use. 60% size damage to all sizes) Brutal Murderer x2 (for mid-size only) Gan Ceann x2 (for large-size only) Future Update: Guerrero Card (This is BIS no matter what when it's here) |
[MVP] Thanatos Card[MVP] Ghost Ship Captain | Enchant for your most important farming/instance spot. I have several blades with different enchants
Rigel: Formless + Poison Betelgeuse: Dragon + Poison D2: Formless + Glade/Flame (depends which enchant on is on ur shoes. You want 1 of each) |
Buy and then refine yourself, or buy straight | For +15 Priority:
Second |
| Armor | +12A  Nebula Suit of Creative Nebula Suit of Creative
|
A: Unfrost flower (combo with shining seaweed HG)
B: SET combo: Shelter+Happy C: Two Eyes Dollocaris (For Generic life/defenses) D: Yorscopus Guardian (Very strong option if you can afford the reduced CRIT) |
BEST:
[MVP] Encroached Tan (EP21) For now: Use armor property/racial cards:
|
 Star Cluster of Power Lv3 Star Cluster of Power Lv3
STR 5 |
Constellation Tower Instance | For +15 Priority:
First |
| Garment | +12A  Circulation of Life Winter Circulation of Life Winter
|
A: Yoster Fixer
B: SET combo: Shelter+Happy B: Catherine Gaebolg (IF you cant afford the negative crit from Yoster Fixer card) |
Best: [MVP] Rgan Chief Cleaner
OK: [MVP] Rune Knight Seyren |
 Life of Winter Creative Life of Winter Creative
|
Garden of Time | For +15 Priority:
Third Life of Winter Creative is most impactful while Physical Flower is least impactful. |
| Shoes | +12A  Glade Rune Boots (This is still stronger IF the elemental bonus is included. Otherwise, for Generic purposes, use Yorscalp boots) Glade Rune Boots (This is still stronger IF the elemental bonus is included. Otherwise, for Generic purposes, use Yorscalp boots)
+12A |
- Piloted Midrange Rgan (Generic use)
- Any of the + 20% racial damage cards for bosses if you need additional damage. (Example: Yoster Cleaner for Dragon) |
[MVP] Broken Memory of Thanatos Card for anti human/demon |  Varmundt's Crystal (Glade/Flame) Lv4+ Varmundt's Crystal (Glade/Flame) Lv4+
|
Varmundt's Biosphere GrassEp21 Age of Heroes | For +15 Priority:
Never >:D |
| Accessory 1 |  Creative Signet of Star Creative Signet of Star
|
Angel Iceslug | - |  Star Cluster of Luck Lv5 Star Cluster of Luck Lv5
|
Constellation Tower Instance | DO NOT SETTLE FOR METTLE! |
| Accessory 2 |  Signet of Circulation Winter Signet of Circulation Winter
|
Void Mimic | - |  Signet of Power Lv5 Signet of Power Lv5
|
Garden of Time | While building up, Just Token of Life first is good enough |
| Costume Stones | Rune Knight Stone (Top), (mid) and (low) with Dragon knight Stone (Garment) | - | - | Buy OR Gamble with fashion points at Office second floor. | ||
| Shadow Gear | Can be either armor/accessory for fullpene/max mammoth
|
- | 5 C.rate on all of them, bonus with melee/crit/atk | Office Basement | If using Thanatos card in weapon, do not use full penetration. Get 2 sets of maximum mammoth instead. | |
| PET | Abysmal Knight Egg | AK for boss dmg | ||||
| Rune Tablet | Demigod Set | Schulang Card, Twisted God Freya Card | Rune Tablet System#Tablets | Provides a +10% class damage boost to Boss which is pretty significant. The upgraded version is the highest chase cards in muhRO atm, providing 40% total boost. Fortunately the base version with 10% is cheap enough. |
5. Budget Gear Section:
These are additional gears you can consider to tide you through your farming to the end game equipment above. The goal is to not overspend on these while gaining additional power for farming End-game equipment.
5A. STATS
Follow End-game DK stats (same)
5B. Gear details of budget End-game (revert back to 125LUK stat if need more CRIT with galensis)
| Main Gear | Name | Cards | Enchant | Acquisition |
|---|---|---|---|---|
| Generic Replacements (budget replacements with no bonus with each other) | ||||
| Headgear | +10 Old Rune Circlet Acute5+
+10 Temporal Circlet (DK) Acute5+ +9~12A Boitata Hat Any of these 3 will work. They serve to give you more CRIT and CRIT% damage before your costly Time Dimension Rune crown/Yorscalp Crown is completed with enchants and 12A. Recommended if you need more power to do mid/hard instances early with a *Dragon Sword does not have any Storm Slash bonus without Time Dimension Rune Crown. So if you pick a headgear here, definitely get Flush Claw Sword for Bossing* |
|||
| Armor*RECOMMENDED* | +11 Highly cost-effective price-to-power option in MUHRO since we are able to select enchants in this server for a fixed amount of While it is severely outclassed by other end-game armors, the power upgrade you get for 2700 |
Wolf Orb (Warrior) Lv.2
Wolf Orb (Warrior) Lv.3 Wolf Orb (Melee Duple) |
Episode 18 Direction of Prayers | |
| Armor | +12A  Flame Earth Rune Armor Flame Earth Rune Armor
This is a great option if they are on sale for a good price for +12A. It grants you independent power when you still do not have set bonus with pairing equipment unlike Nebula Suit of Creative. You can resell it back into the market when you are done with this. |
A: SET combo: Shelter+Happy
B: Two Eyes Dollocaris C: Unfrost Flower |
Flame Earth Rune Lv10
Flame Lv10 Earth Lv10 |
Varmundt Depth 1 |
| Weapon*RECOMMENDED* | +12A  Flush Claw Sword Flush Claw Sword
Tthis is actually a main weapon for Storm Slash-prioritise this if you are intending to kill more bosses. |
Scalleg + Yormi Card Combo (General use)
Brutal Murderer x2 (for mid-size only), Gan Ceann x2 (for large-size only) |
Expert Fighter Lv5
Sharp5 |
Mjolnir Underground Cave |
| Garment | +12A  Pirate Captain's Coat Pirate Captain's Coat
|
A: SET combo: Shelter+Happy
B: Yoster Fixer or Galensis |
- | Self Upgrade or buy from vends. |
| Accessory 1 |  Venom Rune Ring Venom Rune Ring
|
Void Mimic | Any racial enchant with Tenacity and POW | Varmundt biosphere. Realistically, buy cheap or skip. |
| Accessory 2 |  Venom Magic Ring Venom Magic Ring
|
Void Mimic | Any racial enchant with Tenacity and POW | Varmundt biosphere. Realistically, buy cheap or skip. |
| Possible SET : GNE + Flush (Potential choice if u are looking for a budget boss killer) | ||||
| Headgear | +12A  Crown of Good and Evil (Dragon Knight) Crown of Good and Evil (Dragon Knight)
|
Shining Seaweed, Jitterbug (for betelgeuse/Rigel) |
|
Good and Evil Headgears |
| Shoes | +12A  Boots of Good and Evil (Dragon Knight) Boots of Good and Evil (Dragon Knight)
|
Piloted Midrange Rgan | Expert Fighter Lv5 |
Boots of Good and Evil |
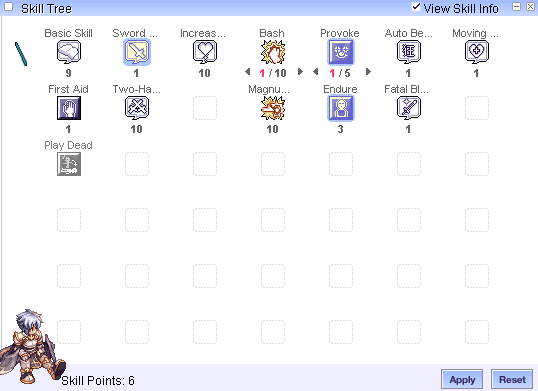
Skill Tree
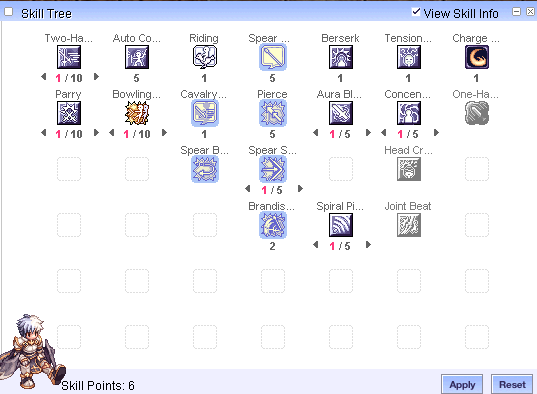
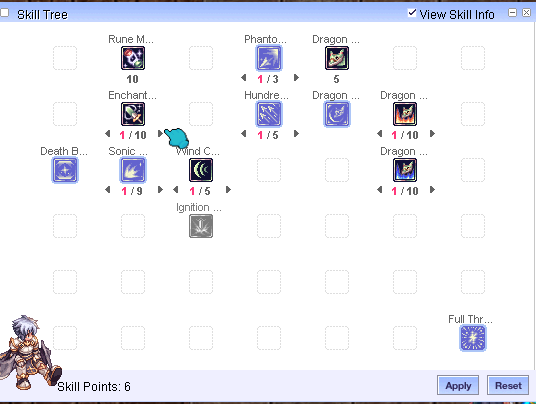
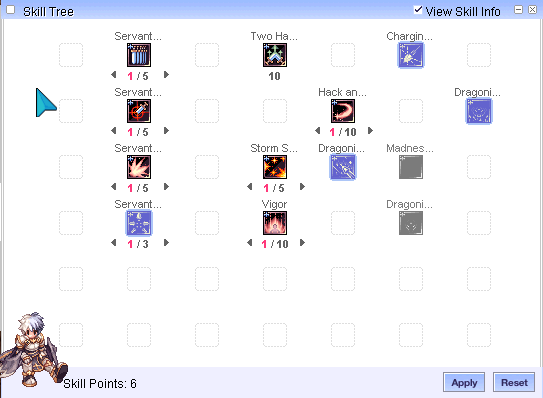
Field Farm Locations
This is my compiled list of what you can farm at every gear level; with which location is great for a DK to farm amongst each difficulty zone highlighted. More details about loots will be added when I have the time. Meanwhile feel free to ask on discord what to loot in any of these areas. I'm sure many players would entertain you :D
Super Easy (As long as 4th class can do)
- Istana Cave
- Geffenia
- Thanatos Tower F7-12
- Odin's Past
Easy ( Mobs <15M HP)
- Sp_rudus4
- Nif_dun1
- Amicitia1
Mid (Mobs 40-60M HP)
- Nif_dun02
- clock_01 (Clock tower unknown basement)
- Amicitia2
- Mjolnir Underground Cave
- Power Twisted Plains
Mid-Hard
- Varmundt's Biosphere A, all 4 maps (Glade is the recommended zone for A)
Hard
- Varmundt's Biosphere B, all 3 maps (Temple is recommended zone for B)
- Garden of Time
Current End Dungeon
- Varmundt's Biosphere Depth 2 (Depth 1 is no longer profitable, you only play it to get Reputation points to enter Depth 2)
Episode-based (Unlocks with episode quests). Some might be decent for zeny farming but are generally for farming Episode gears.
- jor_root1 (sacred cat whiskers + dim box, 22M HP) EP20
- jor_ab02 (flower petals + dim weapon box, 45M HP) EP19
- jor_ab01 (flower petals + dim weapon box, 25M HP) EP19
- oz_dun02 (amethyst fragment, 5M HP) EP18
- ba_pw02 (Varmeal Ticket, 3M HP) EP17.2 ----> This is one of the best maps to farm Eden Coins, very high density, allows you to kill 240 mobs for 33 coins in 2~3min
- sp_rudus2 (unknown parts, cor core, <1M HP) EP17.1
Instance Farm Locations
This is a list of instances, organized according to difficulty, that is still worth doing on a daily basis. You do not need to do every single one of them. In fact, the fun is in making your own variety of an instance run schedule.
As the life blood of a CRIT DK , experienced players often make multiple clones of their characters to allow them to repeat their most desired instances multiple times a day.
Gears can be easily swapped between these characters by having an empty storage where you use the command @storeall to put all your equipment instantly into storage and then use @getall to get them out on the next character.
There is a lot of profit that can be made through instances when you reach a stage that you do not urgently need upgrades that field-farming can provide quickly.
instances that are extremely quick will have their timing mentioned. Loots details in each instance will be added eventually.
Easy (MVP Card Gacha)
- Central Lab (<1min)
- Endless Tower (GTB and out)
- Endless Cellar (Tao/Kiel/Thanatos)
Easy (as long 4th job)
- Old Glast Heim, Normal/Hard mode
- Fall of Glast Heim, Normal/Hard mode
- Buwaya Cave (<1min)
- Hey Sweety! (<1min)
- Bioresearch Laboratory
- Poring Village
Mid
- Old Glast Heim, Challenge Mode
- Airship Destruction (EP19)
- The Immortal, Normal mode (EP20) (<1min)
- Sticky Sea (EP20) (<2min)
Mid-Hard
- Lake of Fire
- Simulation Battle (EP19) (<1min)
- Villa of Deception, Normal mode (EP18) ---> Requires an alt to access
- Final Battle, Normal/Easy mode (<1min)
- Mysterious Ghost Ship (<2min)
Hard
- Villa of Deception, Hard Mode (EP18)
- The Immortal, Hard mode (EP20) (<1min if u OP)
- Constellation Tower
- Final Battle, Hard Mode (EP 21) (also just a couple of secs if you OP)
Niche card hunting (difficulty not included, for those who are specifically after the boss card only)
- Geffen Magic Arena/Night Arena; for Fenrir Card
- Thanatos Tower Instance; for Broken Memory of Thanatos Card (rare collectible)
- Sarah and Fenrir; for Sarah card (most powerful defensive card in game)
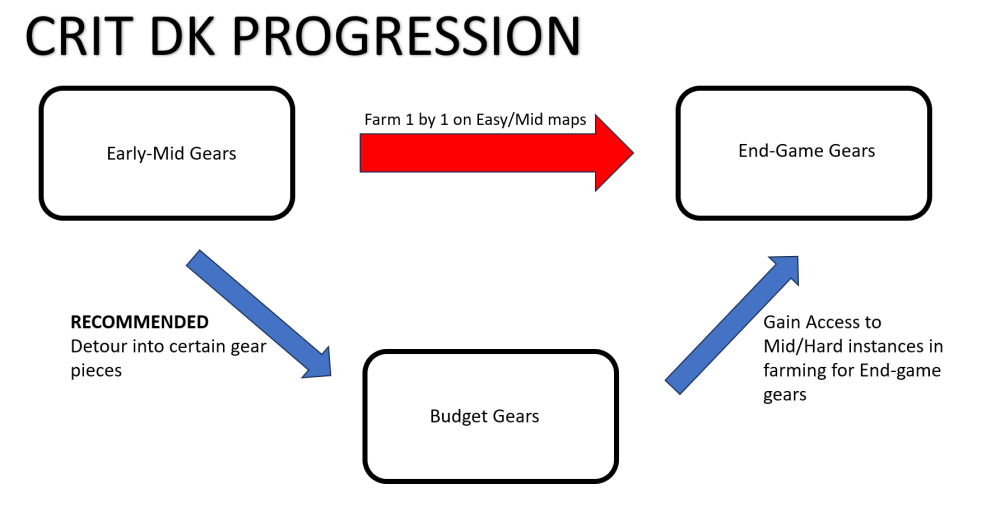
 Nebula of Sharp 3
 Physical Fruit Lv20
 Physical Flower Lv5
 Power of Varmundt Lv3
STR5
 Star of Sharp 5
 Token of Life