Rakugaki's Sky Emperor Guide

Revision as of 21:52, 19 October 2025 by G5457s (talk | contribs)
DISCLAIMER This guide is made by a Hyper Novice main who loves playing Sky Emperor.
The info found here may be erroneous and/or sub-optimal. If there are far better Sky Emperors out there, please feel free to make a better guide than this, or provide suggestions and corrections.
Taekwon Kid
Job base: Sky Emperor
Written By: Rakugaki


Overview

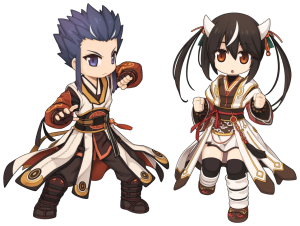
The Sky Emperor (SE for short) is a Melee DPS class that aligns to the Sun, Moon, and/or Stars, each dealing damage in unique ways. In addition to changing their attack element via 425.png Mild Wind, they have some rather unusual skills, like making use of the real world's date, marking maps, putting certain monsters on a wanted list, floating in mid-air, performing "miracles", going blind, gaining weight (limit), ganging up with other SEs and SAs (Soul Ascetic) and shaking their heads to recover HP and SP, doing sick moves with Inquisitors, and more!

Note that I AM NOT A SKY EMPEROR MAIN, and it's a sad to see no Sky Emperor guides around here. So I made one.

Builds

Currently, there are two viable builds - CRITical Sun Build, and VCT (Variable Cast Time) Moon Build.

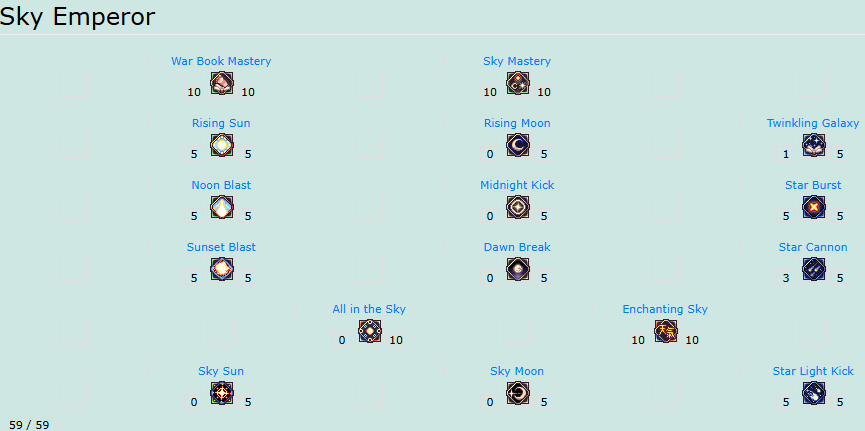
CRIT Sun

The CRIT Sun build quickly disposes of enemies by harnessing the power of the Sun (CRITs) to further augment one's power. Sun skills have no FCT and VCT, but they have a short ACD, are targeted skills, and require CRIT for full power. Set the Sun skills to smartcast turbo to make things a little easier. Turbo setup guide here.


Stats and Traits

Stat Amount Notes
STR 100+ Main stat. Increases damage.
AGI 80+ Mainly for ASPD, needed for spamming 5467.png Sunset Blast as quickly as possible. Aim for 175+ ASPD. 100 Total AGI also provides Sleep and Bleeding Immunity.
VIT 80+ 100 Total VIT is required for Poison and Stun Immunity.
INT 80+ 100 Total INT is required for Silence and Blind Immunity.
DEX 1+ Increase this for HIT Rate at earlier levels. If you have enough CRIT, then this is leftover.
LUK 100+ Increases CRIT Rate by 1 for every 3 point. 100 Total LUK is needed for Curse Immunity.
Trait Amount Notes
POW 110 Main Trait. Max it out.
STA 0+ Optional Trait. Invest some points here if more RES is needed.
WIS 0+ Optional Trait. Invest some points here if more MRES is needed.
SPL 0 Unnecessary. Sky Emperors don't read books. They use them to kick their enemies to death, not for academic study or reading various spells to conjure anything...
CON 72 Further increases damage while marginally increasing survivability via increased FLEE.
CRT 110 Second most important trait, mainly for raising C.RATE for increased CRIT damage.

Skills

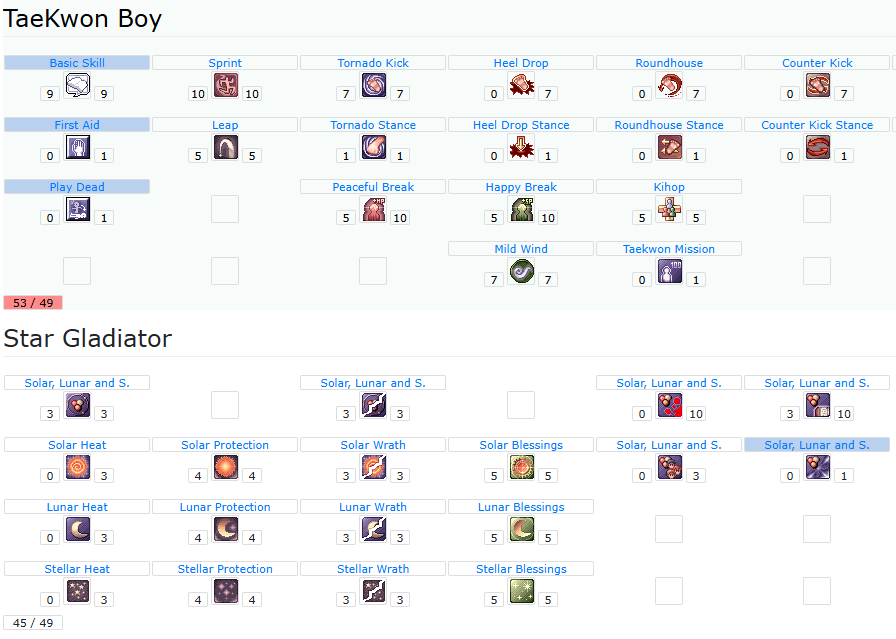
Skills: Taekwon Kid
 
Skill set overview for 1st class, focused on 413.png Tornado Kick
Skill Level Notes
Taekwon Kid
413.png Tornado Kick 7 Enable Tornado Stance before using. Deals damage in a 5x5 AoE. While autoattacking, there's a small chance to get into 412.png Tornado Stance. While in Tornado Stance, activate it quickly, or else you'll go back to autoattacking.
412.png Tornado Stance 1 Enables use of Tornado Kick. Requires level 1 Tornado Kick.
424.png Kihop 5 Increases Attack Power. Prerequisite for 425.png Mild Wind
421.png Flying Kick 7 Gap closer. Deals significantly increased damage when used while 411.png Sprinting.
411.png Sprint 10 Provides a number of nice early-game effects. Gotta go fast but in One Direction!

Hitting a wall or any entity causes you to get knocked back. Use 421.png Flying Kick while sprinting for significantly increased damage. This bonus works with or without a weapon equipped. When no weapon is equipped, get +10 Barehanded Mastery Attack. Use and immediately cancel for +10 STR (Spurt Status), but lose the bonus when equipping a weapon.

422.png Peaceful Break 5-10 Prerequisite for 425.png Mild Wind
423.png Happy Break 5 Prerequisite for 425.png Mild Wind
425.png Mild Wind 7 Changes your attacking element for 5 minutes. Levels 1-7 gives Earth, Wind, Water, Fire, Ghost, Shadow and Undead Element respectively.
426.png Leap 5 Jump around in most places, up to 10 cells at Level 5. Can go through walls and ledges and can be used to traverse straight corridors super fast.
420.png Tumbling 1 Adds a chance to block Ranged Attacks. When in Spurt Status (see 411.png Sprint above), it can block other kinds of attacks too.
Skills: Star Gladiator
 
A few excess skill points to the other 3 levels of Warm Wind and Tumble.
Skill Level Notes
Star Gladiator
427.png Feeling of Sun Moon Star 3 Align a map with the Sun, Moon, or Stars. Enables a variety of skills.
435.png Anger of The Sun
436.png Anger of The Moon
437.png Anger of The Star
3 Marks monsters with Solar Wrath, Lunar Wrath, and Stellar Wrath.
  • Solar Wrath works only on Small monsters.
  • Lunar Wrath works only on Medium monsters with 6,000+ HP.
  • Stellar Wrath works only on Large monsters with 20,000+ HP.
438.png Blessing of The Sun
439.png Blessing of The Moon
440.png Blessing of The Star
4 Increases EXP gained from monsters targeted by the Wrath skills above. Check the time, or type @time to see what day it is on your server.
  • Solar monsters give bonus EXP on even-numbered days.
  • Lunar monsters give bonus EXP on odd-numbered days.
  • Stellar monsters give bonus EXP on days divisible by 5 (e.g. 10, 15, 20).

They can be active at the same time. E.g. in April 10, 438.png Blessing of The Sun and 440.png Blessing of The Star are active at the same time.

431.png Comfort of The Sun
432.png Comfort of The Moon
433.png Comfort of The Star
4 *Solar Maps and even-numbered days - Reduces damage by a fixed amount.
  • Lunar Maps and only on odd-numbered days - Increases FLEE.
  • Stellar Maps and only on days divisible by 5 - Increases ASPD.
Miracle of the Sun, Moon, and Stars RNG When dealing damage, there is a 1% chance to activate this super-buff. Activates all Anger and Blessing skills, and enables the use of all Comfort skills for an hour, even with unmarked maps and monsters. It doesn't go away on death and when logging out (timer stops). However, changing maps will cancel it.
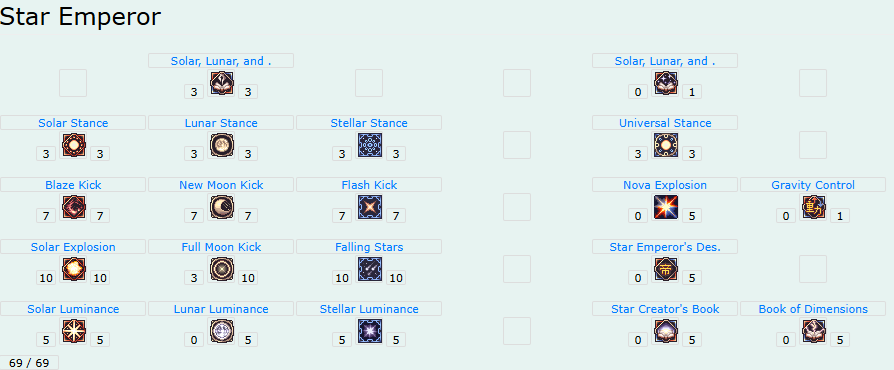
Skills: Star Emperor
There are three different skill branches - Sun, Moon, and Star. Feel free to max out 2 of the 3 branches of your choosing.


Skill Level Notes
Star Emperor
2588.png Document of Sun Moon Star 3 Level 1: resets 427.png Feeling of Sun Moon Star.
Level 2: resets 435.png Anger of The Sun, 436.png Anger of The Moon, 437.png Anger of The Star.
Level 3: resets everything.
2591.png Sun Stance 3 When activated, enables the use of Sun Skills and increases ATK.
2593.png Prominence Kick 7 Hits all enemies around the target in a 3x3 area.
2592.png Solar Burst 10 or Optional 2593.png Prominence Kick must be used before using this skill. Hits all enemies in a 7x7 area around you.
2590.png Light of Sun 5 or Optional Increases the damage of 2592.png Solar Burst.
2575.png Lunar Stance 3 When activated, enables the use of Moon Skills and increases HP.
2579.png New Moon Kick 7 Self-cast skill that hits all enemies in a 7x7 area around you, followed by a special form of cloaking that cannot be detected by Insect and Demon monsters.
2576.png Full Moon Kick 10 or Optional Requires 2579.png New Moon Kick to activate. Reveal yourself and hit all enemies in a 7x7 around you.
2574.png Light of Moon 5 or Optional Increases the damage of 2576.png Full Moon Kick.
2578.png Star Stance 3 When activated, enables the use of Star Skills, and increases ASPD (post-attack delay or after-attack delay).
2580.png Flash Kick 7 Marks enemies. Up to 5 marks can be activate at a time.
2584.png Falling Star 10 or Optional On activation, while autoattacking, add a chance to drop stars on marked enemies, dealing damage to surrounding enemies in a 5x5 area. Because up to 5 marks can be active at the same time, enemies can be hit up to 5 instances of this skill at a time. Very RNG dependent.
2577.png Light of Star 3 Increases the damage of 2584.png Falling Star.
2583.png Universe Stance 3 When activated, enables the use of Sun, Moon, and Star Skills, and increases All Stats by 5 at level 3.
Skills: Sky Emperor
Once you reach around Job Level 10 (Level 3 5463.png Sky Mastery, Level 1 5465.png Rising Sun, Level 5 5466.png Noon Blast), reskill and get level 10 422.png Peaceful Break for a cute +10 ATK from 25846.png Star Gladiator Stone (Top) (25846) , level 10 441.png Demon of Sun Moon Star for increased ASPD, and level 10 443.png Knowledge of Sun Moon Star for significantly increased Weight Limit in marked maps. Being a person AND a cart at the same time (in marked maps) is most effective with increased inventory space, so get some 25793.png Inventory Expansion Voucher (25793) if you can. The maximum number of unique items one can carry is 400. This map-marking can also be useful in things like turning 900 984.png Oridecon (984) to 900 1000332.png Etherdeocon (1000332) in one go, instead of repeatedly going to the inventory or cart in batches of 300.


20,200 weight! 12,100 weight + 8,100 extra weight from 443.png Knowledge of Sun Moon Star. It's like SEs are also carts, if in a marked map!


Skill Level Notes
Heaven Emperor
5464.png War Book Mastery 10 Increases PATK and Hit. Max it out.
5463.png Sky Mastery 10 Further increases the damage of all skills, except the "Sky" skills.
5465.png Rising Sun 5 Enables the use of Sun Skills for a certain duration. Can be used up to three times and affects what skills can be used and their effects.
One use (Sunrise) - Enables use of 5466.png Noon Blast only.
Two uses (Noon) - Enables the use of 5467.png Sunset Blast. 5466.png Noon Blast gains the ability to CRIT, and gains even more CRIT DMG based on half of the C.RATE (?).
Three uses (Sunset) - disables the use 5466.png Noon Blast, only 5467.png Sunset Blast can be used, but gains the ability to CRIT, and gains even more CRIT DMG based on half of the C.RATE (?).
5466.png Noon Blast 5 Hits all enemies in a 7x7 area around the target. Can CRIT when 5465.png Rising Sun is at Noon, or when 5475.png Enchanting Sky is activated.
5467.png Sunset Blast 5 Hits all enemies in a 7x7 area around the target. Can CRIT when 5465.png Rising Sun is at Sunset, or when 5475.png Enchanting Sky is activated. Despite its shorter CD, it's initially much weaker compared to 5466.png Noon Blast. However, when 400543.png Time Dimensions Rune Crown (Sky Emperor) [1] (400543) and 540083.png Dimensions Emperor Sun Book [2] (540083) are equipped and both are A-Grade, this becomes SIGNIFICANTLY STRONGER because using this skill will autocast 5466.png Noon Blast.
5475.png Enchanting Sky 10 Enables the use of all skills at their maximum potential.
5471.png Twinkling Galaxy 1 Calls forth some random meteors from the sky.
5472.png Star Burst 3-5 Requires 5471.png Twinkling Galaxy to activate. Redirects said random meteors to a single target, hitting it and all enemies in a 5x5 area. Mainly for survival purposes, increasing the chances of activating Lifesteal (e.g. from Succubus Pet), SP Drain (e.g. from Incubus Pet), or the SP Recovery from the Burning Fang Rune Set.
5473.png Star Cannon 3 Prerequisite for 5504.png Star Light Kick. Makes said random meteors a bit more powerful.
5504.png Star Light Kick 5 Gap closer, an improved version of 421.png Flying Kick, dealing 7x7 AoE damage but has shorter range.

Equipment

Equipment
10-100
Item Type Way to obtain Notes
Paradise Set Equipment Set Eden Academy, Base Level 10 HIGHLY RECOMMENDED! Upon reaching Base Level 10, get the full set by going to @go 16. Go one room up, find Paradise Equipment and talk to Lothaire to get the set FOR FREE. It will serve you well until around level 100, when you'll get better version. There are other options below, but this is one of, if not the best one to use from level 10-100.
100-170
Advanced Paradise Set Chest Eden Academy, Base Level 100 Upon reaching Base Level 100, go back to where you got the Paradise Set. Talk to Louis to get the Advanced Paradise Set in exchange for a couple of monster drops or by spending 10 25223.png Eden Coin (25223) per piece.
450122.png Noblesse Super Novice Robe [1] (450122)

470017.png Noblesse Magic Boots [1] (470017)

480014.png Noblesse Magic Manteau [1] (480014)

490015.png Noblesse Magic Ring [1] (490015)

Equipment Set 10 6919.png Token of Honor (6919) per piece. Obtained by completing 16.1 Banquet for Heroes Good until level 125. It is highly recommended to complete the 16.1 Banquet for Heroes quest chain to get this over the other armors. While it gives less MATK compared to the Flattery Robe and is designed more towards an autospell build, completing the full set gives quite a lot of bonuses, which include reduction in Variable Casting Time and Aftercast Delay, and can be further upgraded into the Imperial and Grace sets. Finally, to put the icing on the cake, they can be refined to +9 thanks to the 100128.png Noblesses Refine Ticket (100128) at a price of 10 6919.png Token of Honor (6919)
450124.png Imperial Super Novice Robe [1] (450124)

470019.png Imperial Magic Boots [1] (470019)

480017.png Imperial Magic Manteau [1] (480017)

490018.png Imperial Magic Ring [1] (490018)

Equipment Set 10 25155.png Schwarzwald Token of Honor (25155) per piece. Obtained by completing the 16.2 Terra Gloria Good until level 150. An upgraded version of the Noblesse set. Like the Noblesse set, they can be easily refined to +9 thanks to the 100129.png Imperial Refine Ticket (100129) , at the cost of...
450126.png Grace Super Novice Robe [1] (450126)

470021.png Grace Magic Boots [1] (470021)

480019.png Grace Magic Manteau [1] (480019)

490020.png Grace Magic Ring [1] (490020)

Equipment Set 20 25669.png Unknown Parts (25669) per piece. Obtained by completing the 17.1_Illusion Best by level 200, but these will still serve you well even at level 250 if you still don't have enough resources to get the best equipment. Each piece costs 20 25669.png Unknown Parts (25669) while the 100130.png Grace Refine Ticket (100130) costs 20 25723.png Cor Core (25723) .
540033.png Paradise Star Emperor Book of the Sun (540033)
540034.png Paradise Star Emperor Book of the Moon (540034)
Book Eden Academy, Base Level 100 and above Go back to where you got the Paradise Set and pay Labraham 10 25223.png Eden Coin (25223) . Choose the book of your preference.
5208.png Rideword Hat [1] (5208) Upper Headgear Increases survival thanks to HP and SP leech.
460018.png Illusion Silver Guard [1] (460018) Shield Illusion of Twins Reduces VCT and ACD. Try to refine this to +10 - +11. Enchant with HP/SP Absorb for increased survival or Rune of Strength for more... strength.
460017.png Illusion Guard [1] (460017) Shield Illusion of Twins Increases ASPD and adds Perfect Hit. Try to refine this to +10 - +11. Enchant with HP/SP Absorb for increased survival or Rune of Strength for more... strength.
2898.png Black Rosary [1] (2898) Accessory Nightmare Wraith Dead Gives a nice boost to MDEF (+15), reducing damage from magic attacks and the chances of being Stone Cursed and Frozen.
170-200
400021.png Red Clark Casquette [1] (400021) Upper Headgear OS / OS-LT Headgears Pair with Circuit Board-OS.
18874.png Monocle [1] (18874) Mid Headgear Owl Viscount, Owl Marquees The cheapest and "easiest" to get slotted mid headgear. Other mid headgears can be obtained via the Cash Shop, but only a few can be slotted by the 6396.png Spiritual Auger (6396) .
18754.png Blood Sucker (18754) Lower Headgear Equipment Crafting Adds a chance to leech HP, but disables HP and SP regeneration in exchange.
15376.png Illusion Armor Type A [1] (15376) Armor 17.1 Illusion An upgrade over the Grace set but only at high refines (+9) and with modification modules. Gives a large increase in AATK (+100), even more AATK at higher refines and can be enchanted.
450127.png Automatic Armor Type A [1] (450127) Armor 17.2 Sage Legacy An improved version of the Illusion Armor, it gives a sizeable increase in MATK (+125), even more MATK at higher refines and can be enchanted. While the modules have better stats, further boosting requires higher refines.
28629.png Circuit Board-OS [2] (28629) Book OS / OSAD Weapons Increases ATK, ASPD (after attack delay reduction), damage against Small and Medium monsters, and CRIT DMG at +11. Best to refine it to +9, then reform it to 540051.png Circuit Board-OSAD [2] (540051) , or get a 540043.png Relapse Book [2] (540043) instead.
540004.png Sloth Text [2] (540004) Book 17.2 Sage Legacy Boosts damage of Star Emperor's Moon skills.
460018.png Illusion Silver Guard [1] (460018) Shield Illusion of Twins Reduces VCT and ACD. Try to refine this to +10 - +11. Enchant with HP/SP Absorb for increased survival or Rune of Strength for more... strength.
460017.png Illusion Guard [1] (460017) Shield Illusion of Twins Increases ASPD and adds Perfect Hit. Try to refine this to +10 - +11. Enchant with HP/SP Absorb for increased survival or Rune of Strength for more... strength.
20933.png Illusion Engine Wing Type A [1] (20933) Garment 17.1 Illusion Max HP +1000. Adds 100 HP every 2 refine rate.
480020.png Automatic Engine Wing Type A [1] (480020) Garment 17.2 Sage Legacy Improved version of the Illusion Engine Wing.
22196.png Illusion Leg Type A [1] (22196) Footgear 17.1 Illusion Max SP +200. Adds 20 SP every 2 refine rate.
470022.png Automatic Leg Type A [1] (470022) Footgear 17.2 Sage Legacy Improved version of the Illusion Leg.
32207.png Illusion Booster R [1] (32207) Accessory Illusion Grants ATK +5%.
32208.png Illusion Booster L [1] (32208) Accessory Illusion Grants ATK +5%.
490025.png Automatic Booster L [1] (490025) Accessory 17.2 Sage Legacy An improved version of the Illusion Booster.
490024.png Automatic Booster R [1] (490024) Accessory 17.2 Sage Legacy An improved version of the Illusion Booster.
200-230
400267.png Red Clock Casquette-LT [1] (400267) Upper Headgear OS / OS-LT Headgears Upgraded versions of OS Headgear. Best paired with 540051.png Circuit Board-OSAD [2] (540051) .
410094.png Sealed Chain [1] (410094) Middle Headgear Niflheim, random item from 41080.png Niflheim Equipment Box (41080) Boosts all CRIT, Melee and Ranged Physical Damage. Comboes with 420076.png Bondage Necklace (420076)
420076.png Bondage Necklace (420076) Lower Headgear Niflheim, random item from 41080.png Niflheim Equipment Box (41080) Boosts CRIT and CRIT DMG.
450177.png Grey Wolf Suit [1] (450177) Armor Gray Wolf Equipment An improved version of the Automatic Armor, it gives a large increase in AATK (+130), even more MATK at higher refines and can be enchanted. While the modules have better stats, further boosting requires higher refines.
450206.png Snow Flower Armor [1] (450206) Armor Issgard Equipment A much better version of the Automatic Armor Type-B and Gray Wolf Robe, thanks to higher stats and the ability to choose which enchants you want. No RNG shenanigans.
540043.png Relapse Book [2] (540043) Book Niflheim A level 5 weapon that boosts 5466.png Noon Blast damage.
540042.png Wicked Book [2] (540042) Book Clock Tower Unknown Basement A level 5 weapon that boosts 5466.png Noon Blast and 5467.png Sunset Blast damage.
540049.png Glacier Book (540049) Book Issgard Equipment A non-slotted book that can be enchanted four times, making it a decently powerful weapon until the dimmer but more powerful 540056.png Dim Glacier Book [1] (540056) is obtained.
460018.png Illusion Silver Guard [1] (460018) Shield Illusion of Twins A good alternative to the Cursed Knight's Shield and Purified Knight's Shield, it reduces Variable Casting Time and Aftercast Delay and can be enchanted. Highly recommended to refine this to +11 and get 2 Spellbound Nives.
460006.png Complete Encyclopedia [1] (460006) Shield Geffen Night Arena Really THICC book that increases ATK and provides some MDEF. Can be enchanted. Try getting enchants that ignore the DEF of Normal or Boss monsters, preferably Boss monsters.
480091.png Grey Wolf Manteau [1] (480091) Garment Gray Wolf Equipment Improved version of the Illusion Engine Wing and Automatic Engine Wing.
480159.png Snow Flower Manteau [1] (480159) Garment Issgard Equipment Improved version of the Gray Wolf Muffler.
480124.png Convertible Physical Wing [1] (480124) Garment Convertible Wings A significantly upgraded version of the Excellion Wing, tuned to greatly boost physical power, especially when refined and paired with either Deep Blue Sunglasses and Victory Wing Ears.
470087.png Grey Wolf Boots [1] (470087) Footgear Gray Wolf Equipment Improved version of the Illusion Leg and Automatic Leg.
470115.png Snow Flower Boots [1] (470115) Footgear Issgard Equipment Improved version of the Gray Boots.
490044.png Sinful Ruby Ring [1] (490044)

490056.png Brilliant Light Ruby Ring [1] (490056)

Accessory (Right) Thanatos Tower These two are almost virtually identical to each other. Both give additional ATK and ASPD. Best paired with their necklace counterparts for the ACD and FCT reduction.
490045.png Sinful Ruby Necklace [1] (490045)

490057.png Brilliant Light Ruby Necklace [1] (490057)

Accessory (Left) Thanatos Tower These two are almost virtually identical to each other. Both give additional ATK and VCT reduction. Best paired with their ring counterparts for the ACD and FCT reduction.
230-275
400109.png Boitata Hat [1] (400109) Upper Headgear Equipment Crafting Headgear good for increasing CRIT in exchange for slightly reduced HIT.
410080.png Deep Blue Sunglasses [1] (410080) Middle Headgear Verus A cool-looking slotted Middle Headgear that can be enchanted. Reduces Variable Cast Time. Try to get ATK enchants.
400002.png Victory Wing Ears [1] (400002) Middle Headgear Amicitia (0.05%) A cool-looking slotted Middle Headgear that can be enchanted. Reduces After-Cast Delay. Try to get ATK enchants.
420066.png Orbs of Survival-LT (420066) Lower Headgear Rock Ridge Lower headgear that boosts magical damage while reducing variable casting time.
450270.png Dim Glacier Armor [1] (450270) Armor 20 The Immortal An armor that gives a lot of power, sufficient for the late-game, but lacking in the end-game. It can be easily graded, because it doesn't need an exorbitant amount of zeny and expensive 6635.png Blacksmith's Blessing (6635) to refine. Try obtaining a +12 Grade C. Currently can be purchased from player vendors at cheap prices.
540056.png Dim Glacier Book [1] (540056) Book Issgard Equipment 2nd best-in-slot weapon despite having just 1 slot. It can have three very powerful enchants of your choosing, which means no RNG nonsense. It can be easily graded as well, because it doesn't need an exorbitant amount of zeny and expensive 6635.png Blacksmith's Blessing (6635) to refine.
460040.png Glacier Guard [1] (460040) Shield Episode 20 Easy to get and fully enchant - the rewards from 20 The Immortal is enough to obtain one and fully enchant. Upgrade it to Grade C and refine it to +10. Focusing on the more defensive enchants provides A LOT of damage reduction plus a HUGE quality of life improvement - 10% reduced VCT and over 100 Hard MDEF. Having over 100 Hard MDEF means complete immunity to a myriad of bad status effects, like getting Stoned, Frozen, and more!
480283.png Dim Glacier Manteau [1] (480283) Garment 20 The Immortal Sufficient for the late-game but lacking in the end-game. It can be easily graded, because it doesn't need an exorbitant amount of zeny and expensive 6635.png Blacksmith's Blessing (6635) to refine. Try obtaining a +12 Grade C. Currently can be purchased from player vendors at cheap prices.
470197.png Dim Glacier Boots [1] (470197) Footgear 20 The Immortal Sufficient for the late-game but lacking in the end-game. It can be easily graded, because it doesn't need an exorbitant amount of zeny and expensive 6635.png Blacksmith's Blessing (6635) to refine. Try obtaining a +12 Grade C. Currently can be purchased from player vendors at cheap prices. Despite its many benefits like reduced FCT, it is but a stopgap to the wonderful, wonderful moaning that's to come.
490303.png Venom Rune Ring [1] (490303) Accessory (Right) Varmundt's Biosphere One of the best-in-slot accessories. EXPENSIVE to enchant!
490306.png Venom Magic Ring [1] (490306) Accessory (Left) Varmundt's Biosphere One of the best-in-slot accessories. EXPENSIVE to enchant!
275+
400543.png Time Dimensions Rune Crown (Sky Emperor) [1] (400543) Upper Headgear Depth 2 Best in slot headgear. Its full power is unleashed at Grade A and when paired with a Grade A 540083.png Dimensions Emperor Sun Book [2] (540083)
410233.png Gambler's Seal [1] (410233) Middle Headgear
420210.png Ace of Hearts in Mouth (Melee Physical) (420210) Lower Headgear
450285.png Engraved Corruption Poison Rune Cloth [1] (450285) Armor Varmundt's Biosphere Depth The 2nd best-in-slot armor will serve you well until all the stars align. Grants copious amounts of ATK, CRIT, and CRIT DMG, especially at higher grades and higher refines.
450172.png Nebula Suit of Creative [1] (450172) Armor Constellation Tower The best-in-slot armor, especially if all the stars align. The final (2nd slot) enchant is 310676.png Star Cluster of Power Lv.3 (310676) . But once you obtain a 480352.png Circulation of Life Winter [1] (480352) with the 313023.png Life of Winter (Creative) (313023) enchant, 490135.png Creative Signet of Star [1] (490135) with 313033.png Star Cluster of Luck Lv5 (313033) , and 490486.png Signet of Circulation Winter [1] (490486) with 312996.png Signet of Spell Lv5 (312996) , there will be a huge increase in power.
540083.png Dimensions Emperor Sun Book [2] (540083) Book Time Gap Weapons Most powerful and best-in-slot weapon. It can have two powerful enchants of your choosing, no RNG nonsense. When Grade A, it enables autocasting 5466.png Noon Blast while using 5467.png Sunset Blast when paired with a Grade A 400545.png Time Dimensions Rune Crown (Hyper Novice) [1] (400545) , significantly increasing damage.
460020.png Mad Bunny-LT [1] (460020) Shield Alice The more offensive-oriented shield. Upgrade it to at least Grade D for the damage reduction, but it is highly recommended to max it out at Grade A and refine it to +12 to take advantage of the 300379.png Renovated Upper Rgan (300379) .
460040.png Glacier Guard [1] (460040) Shield Episode 20 The more defensive-oriented shield. Upgrade it to Grade C and refine it to +12 to take advantage of 300379.png Renovated Upper Rgan (300379) 's damage reduction bonuses. Focusing on the more defensive enchants provides A LOT of damage reduction plus a HUGE quality of life improvement - 10% reduced VCT and over 100 Hard MDEF. The 10% reduced VCT will come in handy when using the 300522.png Yordos Judge Card (300522) /300529.png Yortus Conjurator Card (300529) combo, while having over 100 Hard MDEF means complete immunity to a myriad of bad status effects, like getting Stoned, Frozen, and more!
480351.png Circulation of Life Autumn [1] (480351) Garment Garden of Time - Divine Beast's Cloak: Winter Best-in-slot Garment, becoming even stronger when all the stars align. See the 450172.png Nebula Suit of Creative [1] (450172) above for more info.
470174.png Glade Rune Boots [1] (470174) Footgear Varmundt's Biosphere This and the Yorscalp Boots below are tied for best in slot.
470303.png Yorscalp Boots [1] (470303) Footgear 21 Age of Heroes This and the Glade Rune Boots below are tied for best in slot.
490135.png Creative Signet of Star [1] (490135) Accessory (Right) Constellation Tower The best-in-slot accessory, but it is very expensive to enchant due to extremely maddening RNG.
490486.png Signet of Circulation Winter [1] (490486) Accessory (Left) Garden of Time - Circulation of Life Accessories The other best-in-slot accessory, but it is very expensive to enchant due to extremely maddening levels of RNG. Best paired with 480352.png Circulation of Life Winter [1] (480352) .
285+ (Future, currently unobtainable here)
400989.png [1] (400989) Headgear ??? Headgear that further aligns the Sky Emperor to the Sun. Significantly boosts Sun-related Skills. It must be graded and refined to A and at least +12, and it must absolutely be paired with a Grade A +12 540111.png [2] (540111) . Pairing them will make 5466.png Noon Blast autocast 5467.png Sunset Blast and 5502.png Sky Sun for 150 seconds after activating 5475.png Enchanting Sky.
{{#item:540111} Weapon ??? Significantly boosts damage of Sun-related skills. It must be graded and refined to A and at least +12, and it must absolutely be paired with a Grade A +12 400989.png [3] (400989) . The downside to this combo is, 5475.png Enchanting Sky must be active all times and must be reactivated every 150 seconds for its effects to stay up and running.
470335.png Dimension World Battle Greaves [1] (470335) Headgear ??? Boosts melee physical power at the cost of reduced HP. Enchanting it makes it SIGNIFICANTLY more powerful. If you have more than enough CRIT and CRIT DMG, pick this one.
470339.png Dimension World Executioner Boots [1] (470339) Weapon ??? Boosts physical power and CRIT at the cost of reduced HP. Enchanting it makes it SIGNIFICANTLY more powerful. If you need more CRIT and CRIT DMG, pick this one.
Shadow Equipment
Beginner Shadow Gear Shadow Gear Set @go eden, Lucy Starter shadow set
Advanced Shadow Gear Shadow Gear Set @go eden, Lucy Provides 50% DEF and MDEF pierce. Advanced Shadow Gear that's good until the mid-late game. Requires Base Level 100. Can be rented for 20 25223.png Eden Coin (25223) per week or 30 25223.png Eden Coin (25223) per piece, 80 25223.png Eden Coin (25223) for the class-specific weapon.
24679.png Maximum Mammoth Shadow Armor (24679)
24680.png Maximum Mammoth Shadow Shoes (24680)
Shadow Armor, Shadow Shoes Shadow Gear Shadow armor and shoes that increase physical damage while preventing knockback.
24386.png Infinity Shadow Weapon (24386) Shadow Weapon Shadow Gear Nullifies weapon size penalty.
24685.png Absorb Shadow Shield (24685) Shadow Shield Shadow Gear At +10, adds the a small chance to absorb HP and SP. Increases survivability.
24767.png Mega Blitz Shadow Shield (24767) Shadow Shield Shadow Gear Increases CRIT, CRIT DMG, ASPD, and C.Rate.

24661.png Full Penetration Shadow Earring (24661)
24662.png Full Penetration Shadow Pendant (24662)
Shadow Ring, Shadow Earring Shadow Gear Provides full DEF penetration when both pieces are +9 and above.
24800.png Master Shadow Armor (24800)
24792.png Master Shadow Weapon (24792)
24793.png Master Shadow Shield (24793)
24801.png Master Shadow Shoes (24801)
24802.png Master Shadow Earring (24802)
24803.png Master Shadow Pendant (24803)
Shadow Gear Set Shadow Gear Deals slightly less damage compared to the three 2-sets above, but pierces through MRES. Enchant with the spell of your choosing and SPL.
24975.png Noon Sun Shadow Earring (24975)
24976.png Noon Sun Shadow Pendant (24976)
24793.png Master Shadow Shield (24793)
24801.png Master Shadow Shoes (24801)
24977.png Sunset Blast Shadow Armor (24977)
24978.png Sunset Blast Shadow Shoes (24978)
Shadow Gear Set Shadow Gear An improved version of the Master Shadow Set, tailored for Sun-Aligned Sky Emperors. Enchant with the spell of your choosing and POW .
Quality of Life Equipment
At level 100 and above, there are three pieces of equipment that'll make life easier. Switch to these equipment, activate the skill, then switch back to your default equipment. Example:
Life of Quality Equipment
Item Type Way to obtain Notes
28311.png Sarah's Right Earring (28311)
25228.png Teleport Stone (Low) (25228)
24138.png Teleport Shadow Armor (24138)
24139.png Teleport Shadow Shoes (24139)
24140.png Teleport Shadow Shield (24140)
24141.png Teleport Shadow Weapon (24141)
24142.png Teleport Shadow Earring (24142)
24143.png Teleport Shadow Pendant (24143)
Various Hugel Race, Base Level 100 Just one these will enable the use of 26.png Teleport.
28900.png Royal Guard Shield [1] (28900) Shield 16.1 Banquet for Heroes, 800 6919.png Token of Honor (6919) Enables use of level 1 2315.png Shield Spell, restoring 3% of Max HP every 3 seconds for 90 seconds, for a total of 90% Max HP in 90 seconds. Increases survivability and slightly reduces the use of 28.png Heal and potions.
2576.png Adventurer's Backpack [1] (2576) of 1013.png Greed Garment of 1013.png Greed Equipment Crafting of 1013.png Greed I'LL BEGIN BY ACTIVATING MY POT BACKPACK OF 1013.png Greed!!! THIS LETS ME DRAW AT LEAST 2 ITEMS LITTERED ON THE GROUND AND ADD THEM TO MY INVENTORY!!! BUT I'M NOT DONE YET!!! BY SENDING MY BACKPACK OF 1013.png Greed BACK TO MY INVENTORY, IT WILL ALLOW ME TO RE-USE THE GARMENT I HAVE PREVIOUSLY EQUIPPED, THUS ENDING MY TURN!!! 1013.png Greed!!11111!

Cards and Pets

Cards and Costume Stones
Card Slot Notes
300150.png Abysmal King Dramoh Card (300150)
4524.png King Dramoh Card (4524)
Headgear Early to mid game cards that boost ATK. Place 4524.png King Dramoh Card (4524) at slotted mid headgears.
300459.png Elite Rgan Healer Card (300459) Headgear Best paired with 300461.png Fake Iwin Soldier Card (300461) .
300360.png Shining Seaweed Card (300360) Headgear Best card for Physical Damage at the cost of increased SP cost. Best placed in +11 Headgears.
300456.png Icewind Egg Card (300456) Headgear Use if more ACD is needed. Can be placed in slotted mid headgears, but is best in upper headgears. Can be paired with 300455.png Copo Card (300455)
27396.png Isaac Wigner Card (27396) Headgear Use if more ACD is needed.
4241.png Archangeling Card (4241) Headgear Doubles HP and SP recovery is Base LUK is 77 and above. Helps mitigate SP consumption when farming at lower level areas if you're really kuripot stingy with zeny and refuse to buy SP-recovering stuff, like me.
4393.png Shelter Card (4393) Armor Best paired with 300271.png Happy Card (300271) 300271.png Happy Card (300271) 300271.png Happy Card (300271) :3 for significantly increased Melee damage.
300362.png Unfrost Flower Card (300362) Armor Increases Physical Damage. When paired with 300360.png Shining Seaweed Card (300360) , ATK +10%.
300376.png Two Eyes Dollocaris (300376) Armor Requires a +12 level 2 armor to bring out its full potential. Gives a lot of RES and MRES and is one of the best defensive armor cards. If you already deal a ton of damage but want some more survivability, get this card.
300524.png Yoscopus Guardian Card (300524) Armor Significantly increases Melee Damage when paired with 300515.png Yoster Fixer Card (300515) but OH MY GOODNESS the CRIT RATE reduction!
300523.png Yordos Executor Card (300523) Armor Increases CRIT and and CRIT DMG, especially at higher refines.
300533.png [MVP] Encroached Tan Card (300533) Armor A TANtalizing MVP card that greatly boosts physical damage against boss-type enemies at the cost of reduced HP. TANtalizingly TANtalizing against late-game enemies. Tan.
4608.png White Knight Card (4608) Weapon Boosts damage against Medium and Large monsters. Pair it with 4609.png Khalitzburg Knight Card (4609)
27361.png Polluted Wander Man Card (27361) Weapon Boosts damage against Medium and Large monsters. That's about it.
300455.png Copo Card (300455) Weapon Boosts damage against Small and Medium monsters. Can be paired with 300457.png Grey Icewind Card (300457) .
300461.png Fake Iwin Soldier Card (300461) Weapon Increases Melee Damage, even moreso when paired with 300459.png Elite Rgan Healer Card (300459)
300240.png Gan Ceann Card (300240) Weapon Increases damage against Large monsters. Books have a BIG 50% penalty against Large enemies. This can help fix some of that while waiting for something like a 24386.png Infinity Shadow Weapon (24386) .
27356.png Frozen Gargoyle Card (27356) Shield The cheap, inferior version of Khalitzburg Knight and Mutated Khalitzburg cards. Get it if you're on a tight budget. 25% damage reduction from Medium and Large monsters, but receive 5% more damage from small monsters.
4609.png Khalitzburg Knight Card (4609) Shield Best paired with 4608.png White Knight Card (4608) . Gives 25% damage reduction from Medium and Large Monsters (30% if paired with WK). Increases overall survivability as long as the monster isn't Small.
4413.png Hodremlin Card (4413) Shield Reduces damage from Small, Medium and Large mobs by 15%. It also has a chance to increase Perfect Dodge by 30 if you're attacked.
300379.png Renovated Upper Rgan (300379) Shield A Hodremlin Card, but better... if your shield is a level 2, like 460040.png Glacier Guard [1] (460040) , and is refined to +12.
300465.png Elite Rgan Guardian Card (300465) Shield Probably the best-in-slot shield card? Provides decent damage reduction while increasing offensive power at the same time. That LUK -25 though...
27176.png Swamp Cramp Card (27176) Garment A decent garment card, good for early-mid game. ATK +3 and ASPD +1% for every 10 base STR. If base STR is 120 and above, ATK +40.
300261.png Galensis Card (300261) Garment Provides CRIT every 10 Base LUK and an extra 30% CRIT DMG if Base LUK is 125. If CRIT is a problem, you can use this in the meantime.
300271.png Happy Card (300271)

300271.png Happy Card (300271)

Garment When paired with a 4393.png Shelter Card (4393) card at level 200+ and with at least 120 Base STR, Melee Physical Damage is increased.
300515.png Yoster Fixer Card (300515) Garment Significantly increases Melee Physical Damage, especially when paired with 300524.png Yoscopus Guardian Card (300524) but OH MY GOODNESS the CRIT RATE reduction!
300144.png Abysmal Merman Card (300144) Footgear Increases ATK. When paired with 300150.png Abysmal King Dramoh Card (300150) , increases CRIT DMG. Good early-mid game card.
300177.png Midnight Archi Card (300177) Footgear A better version of the original Arhi. Increases physical AND magic damage to all size enemies by 5%, HP +1000 and Flee +35. Obtained at the Geffen Night Arena.
300457.png Grey Icewind Card (300457) Footgear Complements the 300455.png Copo Card (300455) quite nicely.
300380.png Piloted Midrange Rgan Card (300380) Footgear Probably the best-in-slot footgear card, but requires a +12 Level 2 Footgear to bring out its full potential.
300526.png Yorker Worker Card (300526)

300527.png Yorker Religious Worker Card (300527)

Accessory These cards increase CRIT RATE while also reducing VCT.
300278.png Void Mimic Card (300278) Accessory CRIT DMG +15%
300223.png Phantom Wolf Card (300223) 300220.png Grey Wolf Card (300220) Accessory These two cards boost Melee damage.
300365.png Primitive Rgan Card (300365) 300367.png Lower Rgan Card (300367) Accessory These two cards boost Melee damage and reduces VCT.
300366.png Lowest Rgan Card (300366) 300367.png Lower Rgan Card (300367) Accessory These two cards boost CRIT RATE, CRIT DMG, and C.RATE.
1001044.png Star Emperor Stone (Top) (1001044)
1001045.png Star Emperor Stone (Mid) (1001045)
1001046.png Star Emperor Stone (Low) (1001046)
1001419.png Sky Emperor Stone (Garment) (1001419)
Sky Emperor Costume Stone Set The Sky Emperor Costume Stone Set is tailor-made for Sun builds. Collect them all and slot them in your favorite costumes.
1001055.png Power Stone (Dual) (1001055) Garment costume stone (dual) More POWer means more damage.
1000526.png HP Absorbtion Stone (Dual) (1000526) Garment costume stone (dual) If more survivability is needed, this HP leech stone can help.
1000525.png SP Absorbtion Stone (Dual) (1000525) Garment costume stone (dual) Having a bit of SP consumption issues? This SP leech stone can help.
Pets

The following pets below are most suited for this build, with their bonuses when Loyal. Check the Pet System on how to obtain and feed a pet.

  • 9052.png Incubus Egg (9052) : Small chance to SP leech.
  • 9055.png Succubus Egg (9055) : Small chance to HP leech.
  • 9090.png Little Isis Egg (9090) : Increases damage against Normal and Boss enemies.
  • 9126.png Kiel-D-01 Egg (9126) : Luxurious pet that increases ASPD, Hit, and Melee damage.
  • 9193.png Mistress Egg (9193) : Luxurious pet that nullifies weapon size penalty.
  • 9142.png Eddga Egg (9142) : One of, if not the best pets, because it increases CRIT.
  • 9132.png Abysmal Knight Egg (9132) : Increases ATK and damage against Boss enemies.

Tips and Tricks

Leveling (WIP)
WORK IN PROGRESS,
Strategy (WIP)
To be added soon.


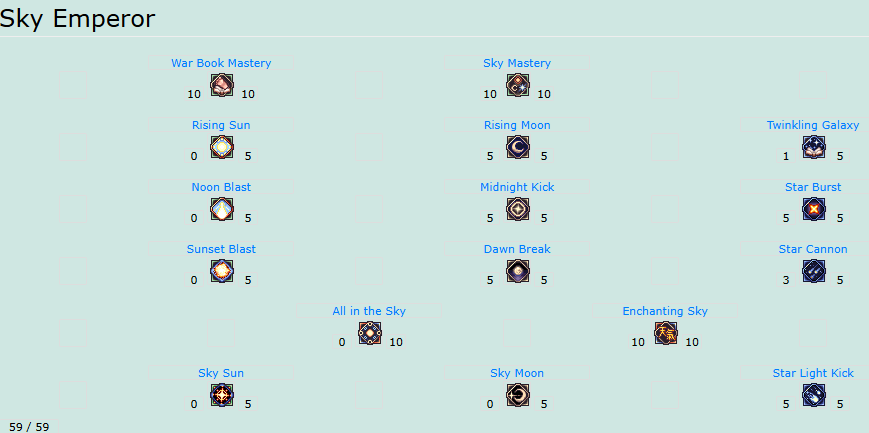
VCT Moon

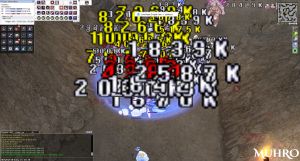
The moon build is about making quick and easy work on eliminating foes through the sheer power of spinning kicks. ALT+P, hold 3, spin2win something free (I cringe at this REEEEEEEE). While the skills have no ACD and are self-cast, it has FCT and VCT. Both have to be reduced to a minimum in order to spam kicks effectively.

 
SE kicking Forgotten Time enemies... to the moon! ALT+P, hold 3, spin2win something free.


Stats and Traits

Stat Amount Notes
STR 120+ Main stat. Increases damage.
AGI 80+ Mainly for ASPD, needed for spamming 5470.png Dawn Break as quickly as possible. Aim for 175+ ASPD. 100 Total AGI also provides Sleep and Bleeding Immunity.
VIT 80+ 100 Total VIT is required for Poison and Stun Immunity.
INT 80+ 100 Total INT is required for Silence and Blind Immunity.
DEX 1+ Increase this for HIT Rate at earlier levels. If you have close to or 100% VCT reduction, then put leftover points here, unless you needed more HIT.
LUK 80+ 100 Total LUK is needed for Curse Immunity.
Trait Amount Notes
POW 110 Main Trait. Max it out.
STA 0-72 Adjust STA or WIS depending on which form of damage needs more reduction.
WIS 0-72 Adjust STA or WIS depending on which form of damage needs more reduction.
SPL 0 Unnecessary. Sky Emperors don't read books. They use them to kick their enemies to death, not for academic study or reading various spells to conjure anything...
CON 110 Further increases damage while marginally increasing survivability via increased FLEE.
CRT 0 Not needed for this build, because the Moon doesn't CRIT.

Skills

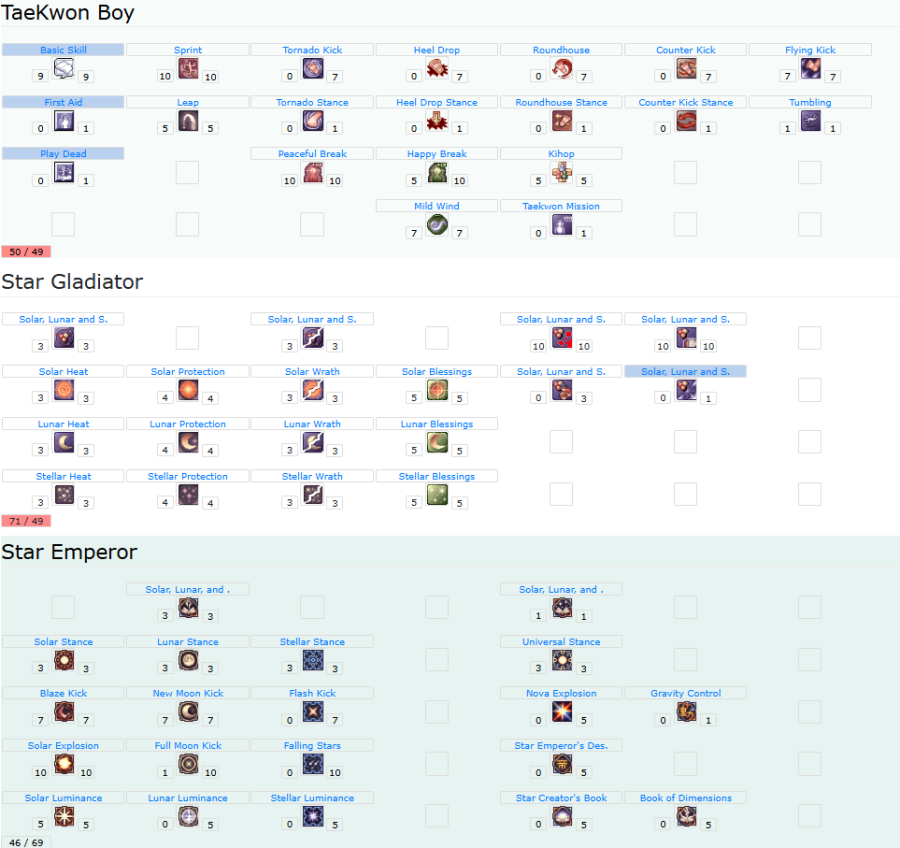
Skills: Taekwon Kid
 
Skill set overview for 1st class, focused on 413.png Tornado Kick
Skill Level Notes
Taekwon Kid
413.png Tornado Kick 7 Enable Tornado Stance before using. Deals damage in a 5x5 AoE. While autoattacking, there's a small chance to get into 412.png Tornado Stance. While in Tornado Stance, activate it quickly, or else you'll go back to autoattacking.
412.png Tornado Stance 1 Enables use of Tornado Kick. Requires level 1 Tornado Kick.
424.png Kihop 5 Increases Attack Power. Prerequisite for 425.png Mild Wind
421.png Flying Kick 7 Gap closer. Deals significantly increased damage when used while 411.png Sprinting.
411.png Sprint 10 Provides a number of nice early-game effects. Gotta go fast but in One Direction!

Hitting a wall or any entity causes you to get knocked back. Use 421.png Flying Kick while sprinting for significantly increased damage. This bonus works with or without a weapon equipped. When no weapon is equipped, get +10 Barehanded Mastery Attack. Use and immediately cancel for +10 STR (Spurt Status), but lose the bonus when equipping a weapon.

422.png Peaceful Break 5-10 Prerequisite for 425.png Mild Wind
423.png Happy Break 5 Prerequisite for 425.png Mild Wind
425.png Mild Wind 7 Changes your attacking element for 5 minutes. Levels 1-7 gives Earth, Wind, Water, Fire, Ghost, Shadow and Undead Element respectively.
426.png Leap 5 Jump around in most places, up to 10 cells at Level 5. Can go through walls and ledges and can be used to traverse straight corridors super fast.
420.png Tumbling 1 Adds a chance to block Ranged Attacks. When in Spurt Status (see 411.png Sprint above), it can block other kinds of attacks too.
Skills: Star Gladiator
 
A few excess skill points to the other 3 levels of Warm Wind and Tumble.
Skill Level Notes
Star Gladiator
427.png Feeling of Sun Moon Star 3 Align a map with the Sun, Moon, or Stars. Enables a variety of skills.
435.png Anger of The Sun
436.png Anger of The Moon
437.png Anger of The Star
3 Marks monsters with Solar Wrath, Lunar Wrath, and Stellar Wrath.
  • Solar Wrath works only on Small monsters.
  • Lunar Wrath works only on Medium monsters with 6,000+ HP.
  • Stellar Wrath works only on Large monsters with 20,000+ HP.
438.png Blessing of The Sun
439.png Blessing of The Moon
440.png Blessing of The Star
4 Increases EXP gained from monsters targeted by the Wrath skills above. Check the time, or type @time to see what day it is on your server.
  • Solar monsters give bonus EXP on even-numbered days.
  • Lunar monsters give bonus EXP on odd-numbered days.
  • Stellar monsters give bonus EXP on days divisible by 5 (e.g. 10, 15, 20).

They can be active at the same time. E.g. in October 5, 439.png Blessing of The Moon and 440.png Blessing of The Star are active at the same time.

431.png Comfort of The Sun
432.png Comfort of The Moon
433.png Comfort of The Star
4 *Solar Maps and even-numbered days - Reduces damage by a fixed amount.
  • Lunar Maps and only on odd-numbered days - Increases FLEE.
  • Stellar Maps and only on days divisible by 5 - Increases ASPD.
Miracle of the Sun, Moon, and Stars RNG When dealing damage, there is a 1% chance to activate this super-buff. Activates all Anger and Blessing skills, and enables the use of all Comfort skills for an hour, even with unmarked maps and monsters. It doesn't go away on death and when logging out (timer stops). However, changing maps will cancel it.
Skills: Star Emperor
There are three different skill branches - Sun, Moon, and Star. Feel free to max out 2 of the 3 branches of your choosing.


Skill Level Notes
Star Emperor
2588.png Document of Sun Moon Star 3 Level 1: resets 427.png Feeling of Sun Moon Star.
Level 2: resets 435.png Anger of The Sun, 436.png Anger of The Moon, 437.png Anger of The Star.
Level 3: resets everything.
2591.png Sun Stance 3 When activated, enables the use of Sun Skills and increases ATK.
2593.png Prominence Kick 7 Hits all enemies around the target in a 3x3 area.
2592.png Solar Burst 10 or Optional 2593.png Prominence Kick must be used before using this skill. Hits all enemies in a 7x7 area around you.
2590.png Light of Sun 5 or Optional Increases the damage of 2592.png Solar Burst.
2575.png Lunar Stance 3 When activated, enables the use of Moon Skills and increases HP.
2579.png New Moon Kick 7 Self-cast skill that hits all enemies in a 7x7 area around you, followed by a special form of cloaking that cannot be detected by Insect and Demon monsters.
2576.png Full Moon Kick 10 or Optional Requires 2579.png New Moon Kick to activate. Reveal yourself and hit all enemies in a 7x7 around you.
2574.png Light of Moon 5 or Optional Increases the damage of 2576.png Full Moon Kick.
2578.png Star Stance 3 When activated, enables the use of Star Skills, and increases ASPD (post-attack delay or after-attack delay).
2580.png Flash Kick 7 Marks enemies. Up to 5 marks can be activate at a time.
2584.png Falling Star 10 or Optional On activation, while autoattacking, add a chance to drop stars on marked enemies, dealing damage to surrounding enemies in a 5x5 area. Because up to 5 marks can be active at the same time, enemies can be hit up to 5 instances of this skill at a time. Very RNG dependent.
2577.png Light of Star 3 Increases the damage of 2584.png Falling Star.
2583.png Universe Stance 3 When activated, enables the use of Sun, Moon, and Star Skills, and increases All Stats by 5 at level 3.
Skills: Sky Emperor
Once you reach around Job Level 10 (Level 3 5463.png Sky Mastery, Level 1 5468.png Rising Moon, Level 5 5469.png Midnight Kick), reskill and get level 10 422.png Peaceful Break for a cute +10 ATK from 25846.png Star Gladiator Stone (Top) (25846) , level 10 441.png Demon of Sun Moon Star for increased ASPD, and level 10 443.png Knowledge of Sun Moon Star for significantly increased Weight Limit in marked maps. Being a person AND a cart at the same time (in marked maps) is most effective with increased inventory space, so get some 25793.png Inventory Expansion Voucher (25793) if you can. The maximum number of unique items one can carry is 400. This map-marking can also be useful in things like turning 900 984.png Oridecon (984) to 900 1000332.png Etherdeocon (1000332) in one go, instead of repeatedly going to the inventory or cart in batches of 300.
 
 
thumb
 
20,200 weight! 12,100 weight + 8,100 extra weight from 443.png Knowledge of Sun Moon Star. It's like SEs are also carts, if in a marked map!
Skill Level Notes
Heaven Emperor
5464.png War Book Mastery 10 Increases PATK and Hit. Max it out.
5463.png Sky Mastery 10 Further increases the damage of all skills, except the "Sky" skills.
5468.png Rising Moon 5 Enables the use of Moon Skills for a certain duration. Can be used up to three times and affects what skills can be used and their effects.
One use (Moonrise) - Enables use of 5469.png Midnight Kick only.
Two uses (Midnight) - Enables the use of 5470.png Dawn Break. 5469.png Midnight Kick deals increased damage.
Three uses (Moonset) - disables the use 5469.png Midnight Kick, only 5470.png Dawn Break can be used, but gains increased damage.
5469.png Midnight Kick 5 Hits all enemies in a 7x7 area around the target. Deals increased damage when 5468.png Rising Moon is at Midnight, or when 5475.png Enchanting Sky is activated.
5470.png Dawn Break 5 Hits all enemies in a 7x7 area around the target. Deals increased damage when 5468.png Rising Moon is at Moonset, or when 5475.png Enchanting Sky is activated. Despite its shorter CD, it's initially much weaker compared to 5468.png Rising Moon. However, when 400543.png Time Dimensions Rune Crown (Sky Emperor) [1] (400543) and 540082.png Dimensions Emperor Moon Book [2] (540082) are equipped and both are A-Grade, this becomes SIGNIFICANTLY STRONGER because using this skill will autocast 5469.png Midnight Kick.
5475.png Enchanting Sky 10 Enables the use of all skills at their maximum potential.
5471.png Twinkling Galaxy 1 Calls forth some random meteors from the sky.
5472.png Star Burst 3-5 Requires 5471.png Twinkling Galaxy to activate. Redirects said random meteors to a single target, hitting it and all enemies in a 5x5 area. Mainly for survival purposes, increasing the chances of activating Lifesteal (e.g. from Succubus Pet), SP Drain (e.g. from Incubus Pet), or the SP Recovery from the Burning Fang Rune Set.
5473.png Star Cannon 3 Prerequisite for 5504.png Star Light Kick. Makes said random meteors a bit more powerful.
5504.png Star Light Kick 5 Gap closer, an improved version of 421.png Flying Kick, dealing 7x7 AoE damage but has shorter range.

Equipment

Equipment
10-100
Item Type Way to obtain Notes
Paradise Set Equipment Set Eden Academy, Base Level 10 HIGHLY RECOMMENDED! Upon reaching Base Level 10, get the full set by going to @go 16. Go one room up, find Paradise Equipment and talk to Lothaire to get the set FOR FREE. It will serve you well until around level 100, when you'll get better version. There are other options below, but this is one of, if not the best one to use from level 10-100.
100-170
Advanced Paradise Set Chest Eden Academy, Base Level 100 Upon reaching Base Level 100, go back to where you got the Paradise Set. Talk to Louis to get the Advanced Paradise Set in exchange for a couple of monster drops or by spending 10 25223.png Eden Coin (25223) per piece.
450122.png Noblesse Super Novice Robe [1] (450122)

470017.png Noblesse Magic Boots [1] (470017)

480014.png Noblesse Magic Manteau [1] (480014)

490015.png Noblesse Magic Ring [1] (490015)

Equipment Set 10 6919.png Token of Honor (6919) per piece. Obtained by completing 16.1 Banquet for Heroes Good until level 125. It is highly recommended to complete the 16.1 Banquet for Heroes quest chain to get this over the other armors. While it gives less MATK compared to the Flattery Robe and is designed more towards an autospell build, completing the full set gives quite a lot of bonuses, which include reduction in Variable Casting Time and Aftercast Delay, and can be further upgraded into the Imperial and Grace sets. Finally, to put the icing on the cake, they can be refined to +9 thanks to the 100128.png Noblesses Refine Ticket (100128) at a price of 10 6919.png Token of Honor (6919)
450124.png Imperial Super Novice Robe [1] (450124)

470019.png Imperial Magic Boots [1] (470019)

480017.png Imperial Magic Manteau [1] (480017)

490018.png Imperial Magic Ring [1] (490018)

Equipment Set 10 25155.png Schwarzwald Token of Honor (25155) per piece. Obtained by completing the 16.2 Terra Gloria Good until level 150. An upgraded version of the Noblesse set. Like the Noblesse set, they can be easily refined to +9 thanks to the 100129.png Imperial Refine Ticket (100129) , at the cost of...
450126.png Grace Super Novice Robe [1] (450126)

470021.png Grace Magic Boots [1] (470021)

480019.png Grace Magic Manteau [1] (480019)

490020.png Grace Magic Ring [1] (490020)

Equipment Set 20 25669.png Unknown Parts (25669) per piece. Obtained by completing the 17.1_Illusion Best by level 200, but these will still serve you well even at level 250 if you still don't have enough resources to get the best equipment. Each piece costs 20 25669.png Unknown Parts (25669) while the 100130.png Grace Refine Ticket (100130) costs 20 25723.png Cor Core (25723) .
540033.png Paradise Star Emperor Book of the Sun (540033)
540034.png Paradise Star Emperor Book of the Moon (540034)
Book Eden Academy, Base Level 100 and above Go back to where you got the Paradise Set and pay Labraham 10 25223.png Eden Coin (25223) . Choose the book of your preference.
5208.png Rideword Hat [1] (5208) Upper Headgear Increases survival thanks to HP and SP leech.
460018.png Illusion Silver Guard [1] (460018) Shield Illusion of Twins Reduces VCT and ACD. Try to refine this to +10 - +11. Enchant with HP/SP Absorb for increased survival or Rune of Strength for more... strength.
460017.png Illusion Guard [1] (460017) Shield Illusion of Twins Increases ASPD and adds Perfect Hit. Try to refine this to +10 - +11. Enchant with HP/SP Absorb for increased survival or Rune of Strength for more... strength.
2898.png Black Rosary [1] (2898) Accessory Nightmare Wraith Dead Gives a nice boost to MDEF (+15), reducing damage from magic attacks and the chances of being Stone Cursed and Frozen.
170-200
400021.png Red Clark Casquette [1] (400021) Upper Headgear OS / OS-LT Headgears Pair with Circuit Board-OS.
18874.png Monocle [1] (18874) Mid Headgear Owl Viscount, Owl Marquees The cheapest and "easiest" to get slotted mid headgear. Other mid headgears can be obtained via the Cash Shop, but only a few can be slotted by the 6396.png Spiritual Auger (6396) .
18754.png Blood Sucker (18754) Lower Headgear Equipment Crafting Adds a chance to leech HP, but disables HP and SP regeneration in exchange.
15376.png Illusion Armor Type A [1] (15376) Armor 17.1 Illusion An upgrade over the Grace set but only at high refines (+9) and with modification modules. Gives a large increase in AATK (+100), even more AATK at higher refines and can be enchanted.
450127.png Automatic Armor Type A [1] (450127) Armor 17.2 Sage Legacy An improved version of the Illusion Armor, it gives a sizeable increase in MATK (+125), even more MATK at higher refines and can be enchanted. While the modules have better stats, further boosting requires higher refines.
28629.png Circuit Board-OS [2] (28629) Book OS / OSAD Weapons Increases ATK, ASPD (after attack delay reduction), damage against Small and Medium monsters, and CRIT DMG at +11. Best to refine it to +9, then reform it to 540051.png Circuit Board-OSAD [2] (540051) , or get a 540043.png Relapse Book [2] (540043) instead.
540004.png Sloth Text [2] (540004) Book 17.2 Sage Legacy Boosts damage of Star Emperor's Moon skills.
460018.png Illusion Silver Guard [1] (460018) Shield Illusion of Twins Reduces VCT and ACD. Try to refine this to +10 - +11. Enchant with HP/SP Absorb for increased survival or Rune of Strength for more... strength.
460017.png Illusion Guard [1] (460017) Shield Illusion of Twins Increases ASPD and adds Perfect Hit. Try to refine this to +10 - +11. Enchant with HP/SP Absorb for increased survival or Rune of Strength for more... strength.
20933.png Illusion Engine Wing Type A [1] (20933) Garment 17.1 Illusion Max HP +1000. Adds 100 HP every 2 refine rate.
480020.png Automatic Engine Wing Type A [1] (480020) Garment 17.2 Sage Legacy Improved version of the Illusion Engine Wing.
22196.png Illusion Leg Type A [1] (22196) Footgear 17.1 Illusion Max SP +200. Adds 20 SP every 2 refine rate.
470022.png Automatic Leg Type A [1] (470022) Footgear 17.2 Sage Legacy Improved version of the Illusion Leg.
32207.png Illusion Booster R [1] (32207) Accessory Illusion Grants ATK +5%.
32208.png Illusion Booster L [1] (32208) Accessory Illusion Grants ATK +5%.
490025.png Automatic Booster L [1] (490025) Accessory 17.2 Sage Legacy An improved version of the Illusion Booster.
490024.png Automatic Booster R [1] (490024) Accessory 17.2 Sage Legacy An improved version of the Illusion Booster.
200-230
400267.png Red Clock Casquette-LT [1] (400267) Upper Headgear OS / OS-LT Headgears Upgraded versions of OS Headgear. Best paired with 540051.png Circuit Board-OSAD [2] (540051) .
410094.png Sealed Chain [1] (410094) Middle Headgear Niflheim, random item from 41080.png Niflheim Equipment Box (41080) Boosts all CRIT, Melee and Ranged Physical Damage. Comboes with 420076.png Bondage Necklace (420076)
420031.png Ninja's Blue Mask (420031) Lower Headgear Niflheim, random item from 41080.png Niflheim Equipment Box (41080) Boosts Melee Physical Damage.
450177.png Grey Wolf Suit [1] (450177) Armor Gray Wolf Equipment An improved version of the Automatic Armor, it gives a large increase in AATK (+130), even more MATK at higher refines and can be enchanted. While the modules have better stats, further boosting requires higher refines.
450206.png Snow Flower Armor [1] (450206) Armor Issgard Equipment A much better version of the Automatic Armor Type-B and Gray Wolf Robe, thanks to higher stats and the ability to choose which enchants you want. No RNG shenanigans.
540043.png Relapse Book [2] (540043) Book Niflheim A level 5 weapon that boosts 5466.png Noon Blast damage. Not exactly for Moon builds, but it's a good start for a fresh, new Star Emperor. After all, a full moon is possible due to the sunlight reflecting its surface.
540049.png Glacier Book (540049) Book Issgard Equipment A non-slotted book that can be enchanted four times, making it a decently powerful weapon until the dimmer but more powerful 540056.png Dim Glacier Book [1] (540056) is obtained.
460018.png Illusion Silver Guard [1] (460018) Shield Illusion of Twins A good alternative to the Cursed Knight's Shield and Purified Knight's Shield, it reduces Variable Casting Time and Aftercast Delay and can be enchanted. Highly recommended to refine this to +11 and get 2 Spellbound Nives.
460006.png Complete Encyclopedia [1] (460006) Shield Geffen Night Arena Really THICC book that increases ATK and provides some MDEF. Can be enchanted. Try getting enchants that ignore the DEF of Normal or Boss monsters, preferably Boss monsters.
480091.png Grey Wolf Manteau [1] (480091) Garment Gray Wolf Equipment Improved version of the Illusion Engine Wing and Automatic Engine Wing.
480159.png Snow Flower Manteau [1] (480159) Garment Issgard Equipment Improved version of the Gray Wolf Muffler.
480124.png Convertible Physical Wing [1] (480124) Garment Convertible Wings A significantly upgraded version of the Excellion Wing, tuned to greatly boost physical power, especially when refined and paired with either Deep Blue Sunglasses and Victory Wing Ears.
470087.png Grey Wolf Boots [1] (470087) Footgear Gray Wolf Equipment Improved version of the Illusion Leg and Automatic Leg.
470115.png Snow Flower Boots [1] (470115) Footgear Issgard Equipment Improved version of the Gray Boots.
490044.png Sinful Ruby Ring [1] (490044)

490056.png Brilliant Light Ruby Ring [1] (490056)

Accessory (Right) Thanatos Tower These two are almost virtually identical to each other. Both give additional ATK and ASPD. Best paired with their necklace counterparts for the ACD and FCT reduction.
490045.png Sinful Ruby Necklace [1] (490045)

490057.png Brilliant Light Ruby Necklace [1] (490057)

Accessory (Left) Thanatos Tower These two are almost virtually identical to each other. Both give additional ATK and VCT reduction. Best paired with their ring counterparts for the ACD and FCT reduction.
230-275
400109.png Boitata Hat [1] (400109) Upper Headgear Equipment Crafting Headgear good for increasing CRIT in exchange for slightly reduced HIT.
410080.png Deep Blue Sunglasses [1] (410080) Middle Headgear Verus A cool-looking slotted Middle Headgear that can be enchanted. Reduces Variable Cast Time. Try to get ATK enchants.
400002.png Victory Wing Ears [1] (400002) Middle Headgear Amicitia (0.05%) A cool-looking slotted Middle Headgear that can be enchanted. Reduces After-Cast Delay. Try to get ATK enchants.
420066.png Orbs of Survival-LT (420066) Lower Headgear Rock Ridge Lower headgear that boosts magical damage while reducing variable casting time.
450270.png Dim Glacier Armor [1] (450270) Armor 20 The Immortal An armor that gives a lot of power, sufficient for the late-game, but lacking in the end-game. It can be easily graded, because it doesn't need an exorbitant amount of zeny and expensive 6635.png Blacksmith's Blessing (6635) to refine. Try obtaining a +12 Grade C. Currently can be purchased from player vendors at cheap prices.
540056.png Dim Glacier Book [1] (540056) Book Issgard Equipment 2nd best-in-slot weapon despite having just 1 slot. It can have three very powerful enchants of your choosing, which means no RNG nonsense. It can be easily graded as well, because it doesn't need an exorbitant amount of zeny and expensive 6635.png Blacksmith's Blessing (6635) to refine.
460040.png Glacier Guard [1] (460040) Shield Episode 20 Easy to get and fully enchant - the rewards from 20 The Immortal is enough to obtain one and fully enchant. Upgrade it to Grade C and refine it to +10 at most. Focusing on the more defensive enchants provides A LOT of damage reduction plus a HUGE quality of life improvement - 10% reduced VCT and over 100 Hard MDEF. Having over 100 Hard MDEF means complete immunity to a myriad of bad status effects, like getting Stoned, Frozen, and more!
480283.png Dim Glacier Manteau [1] (480283) Garment 20 The Immortal Sufficient for the late-game but lacking in the end-game. It can be easily graded, because it doesn't need an exorbitant amount of zeny and expensive 6635.png Blacksmith's Blessing (6635) to refine. Try obtaining a +12 Grade C. Currently can be purchased from player vendors at cheap prices.
470197.png Dim Glacier Boots [1] (470197) Footgear 20 The Immortal Sufficient for the late-game but lacking in the end-game. It can be easily graded, because it doesn't need an exorbitant amount of zeny and expensive 6635.png Blacksmith's Blessing (6635) to refine. Try obtaining a +12 Grade C. Currently can be purchased from player vendors at cheap prices. Despite its many benefits like reduced FCT, it is but a stopgap to the wonderful, wonderful moaning that's to come.
490303.png Venom Rune Ring [1] (490303) Accessory (Right) Varmundt's Biosphere One of the best-in-slot accessories. EXPENSIVE to enchant!
490306.png Venom Magic Ring [1] (490306) Accessory (Left) Varmundt's Biosphere One of the best-in-slot accessories. EXPENSIVE to enchant!
275+
400543.png Time Dimensions Rune Crown (Sky Emperor) [1] (400543) Upper Headgear Depth 2 Best in slot headgear. Its full power is unleashed at Grade A and when paired with a Grade A 540082.png Dimensions Emperor Moon Book [2] (540082)
410233.png Gambler's Seal [1] (410233) Middle Headgear
420210.png Ace of Hearts in Mouth (Melee Physical) (420210) Lower Headgear
450282.png Engraved Flame Earth Rune Armor [1] (450282) Armor Varmundt's Biosphere Depth The 2nd best-in-slot armor will serve you well until all the stars align. Grants copious amounts of ATK and Melee Physical DMG, especially at higher grades and higher refines.
450169.png Nebula Armor of Power [1] (450169) Armor Constellation Tower The best-in-slot armor, especially if all the stars align. But once you obtain a 480349.png Circulation of Life Spring [1] (480349) with the 313012.png Life of Spring (Strength) (313012) enchant, 490132.png Power Signet of Star [1] (490132) with 313028.png Star Cluster of Strength Lv5 (313028) , and 490483.png Signet of Circulation Spring [1] (490483) with 312986.png Signet of Power Lv5 (312986) , there will be a huge increase in power.
540082.png Dimensions Emperor Moon Book [2] (540082) Book Time Gap Weapons Most powerful and best-in-slot weapon. It can have two powerful enchants of your choosing, no RNG nonsense. When Grade A, it enables autocasting 5469.png Midnight Kick while using 5470.png Dawn Break when paired with a Grade A 400545.png Time Dimensions Rune Crown (Hyper Novice) [1] (400545) , significantly increasing damage.
460020.png Mad Bunny-LT [1] (460020) Shield Alice The more offensive-oriented shield. Upgrade it to at least Grade D for the damage reduction, but it is highly recommended to max it out at Grade A and refine it to +12.
460040.png Glacier Guard [1] (460040) Shield Episode 20 Easy to get and fully enchant - the rewards from 20 The Immortal is enough to obtain one and fully enchant. Upgrade it to Grade C and refine it to +10 at most. Focusing on the more defensive enchants provides A LOT of damage reduction plus a HUGE quality of life improvement - 10% reduced VCT and over 100 Hard MDEF. Having over 100 Hard MDEF means complete immunity to a myriad of bad status effects, like getting Stoned, Frozen, and more!
480349.png Circulation of Life Spring [1] (480349) Garment Garden of Time - Divine Beast's Cloak: Summer Best-in-slot Garment, becoming even stronger when all the stars align. See the 450169.png Nebula Armor of Power [1] (450169) above for more info.
470174.png Glade Rune Boots [1] (470174) Footgear Varmundt's Biosphere This and the Yorscalp Boots below are tied for best in slot.
470303.png Yorscalp Boots [1] (470303) Footgear 21 Age of Heroes This and the Glade Rune Boots below are tied for best in slot.
490132.png Power Signet of Star [1] (490132) Accessory (Right) Constellation Tower The best-in-slot accessory, but it is very expensive to enchant due to extremely maddening RNG.
490483.png Signet of Circulation Spring [1] (490483) Accessory (Left) Garden of Time - Circulation of Life Accessories The other best-in-slot accessory, but it is very expensive to enchant due to extremely maddening levels of RNG. Best paired with 480349.png Circulation of Life Spring [1] (480349) .
285+ (Future, currently unobtainable here)
540115.png [4] (540115) Weapon ??? The moon counterpart of 540111.png [5] (540111) , it significantly boosts damage of Moon-related skills. When 5475.png Enchanting Sky is active, using 5503.png Sky Moon will autocast 5470.png Dawn Break, and using 5470.png Dawn Break will autocast 5469.png Midnight Kick for 150 seconds. However, it is unknown if using 5503.png Sky Moon will autocast 5470.png Dawn Break, which will autocast 5469.png Midnight Kick in a domino effect, similar to its Sun Counterpart (see 400989.png [6] (400989) in the Sun Build), or if they're separate. It must be graded and refined to A and at least +12, but it can stand alone by itself, which means you have more options for Upper Headgear and aren't constrained to a combo pair. The downside to this is, 5475.png Enchanting Sky must be active at all times and must be reactivated every 150 seconds for its effects to stay up and running.
470335.png Dimension World Battle Greaves [1] (470335) Headgear ??? Boosts melee physical power at the cost of reduced HP. Enchanting it makes it SIGNIFICANTLY more powerful.
Shadow Equipment
Beginner Shadow Gear Shadow Gear Set @go eden, Lucy Starter shadow set
Advanced Shadow Gear Shadow Gear Set @go eden, Lucy Provides 50% DEF and MDEF pierce. Advanced Shadow Gear that's good until the mid-late game. Requires Base Level 100. Can be rented for 20 25223.png Eden Coin (25223) per week or 30 25223.png Eden Coin (25223) per piece, 80 25223.png Eden Coin (25223) for the class-specific weapon.
24679.png Maximum Mammoth Shadow Armor (24679)
24680.png Maximum Mammoth Shadow Shoes (24680)
Shadow Armor, Shadow Shoes Shadow Gear Shadow armor and shoes that increase physical damage while preventing knockback.
24386.png Infinity Shadow Weapon (24386) Shadow Weapon Shadow Gear Nullifies weapon size penalty.
24685.png Absorb Shadow Shield (24685) Shadow Shield Shadow Gear At +10, adds the a small chance to absorb HP and SP. Increases survivability.
24661.png Full Penetration Shadow Earring (24661)
24662.png Full Penetration Shadow Pendant (24662)
Shadow Ring, Shadow Earring Shadow Gear Provides full DEF penetration when both pieces are +9 and above.
24800.png Master Shadow Armor (24800)
24792.png Master Shadow Weapon (24792)
24793.png Master Shadow Shield (24793)
24801.png Master Shadow Shoes (24801)
24802.png Master Shadow Earring (24802)
24803.png Master Shadow Pendant (24803)
Shadow Gear Set Shadow Gear Deals slightly less damage compared to the three 2-sets above, but pierces through MRES. Enchant with the spell of your choosing and SPL.
1270099.png Midnight Sky Shadow Earring (1270099)
1270100.png Midnight Sky Shadow Pendant (1270100)
24793.png Master Shadow Shield (24793)
24801.png Master Shadow Shoes (24801)
1270101.png Dawn Break Shadow Armor (1270101)
1270102.png Dawn Break Shadow Shoes (1270102)
Shadow Gear Set Shadow Gear An improved version of the Master Shadow Set, tailored for Moon-Aligned Sky Emperors. Enchant with the spell of your choosing and POW .
Quality of Life Equipment
At level 100 and above, there are three pieces of equipment that'll make life easier. Switch to these equipment, activate the skill, then switch back to your default equipment. Example:
Life of Quality Equipment
Item Type Way to obtain Notes
28311.png Sarah's Right Earring (28311)
25228.png Teleport Stone (Low) (25228)
24138.png Teleport Shadow Armor (24138)
24139.png Teleport Shadow Shoes (24139)
24140.png Teleport Shadow Shield (24140)
24141.png Teleport Shadow Weapon (24141)
24142.png Teleport Shadow Earring (24142)
24143.png Teleport Shadow Pendant (24143)
Various Hugel Race, Base Level 100 Just one of these will enable the use of 26.png Teleport.
28900.png Royal Guard Shield [1] (28900) Shield 16.1 Banquet for Heroes, 800 6919.png Token of Honor (6919) Enables use of level 1 2315.png Shield Spell, restoring 3% of Max HP every 3 seconds for 90 seconds, for a total of 90% Max HP in 90 seconds. Increases survivability and slightly reduces the use of 28.png Heal and potions.
2576.png Adventurer's Backpack [1] (2576) of 1013.png Greed Garment of 1013.png Greed Equipment Crafting of 1013.png Greed I'LL BEGIN BY ACTIVATING MY POT BACKPACK OF 1013.png Greed!!! THIS LETS ME DRAW AT LEAST 2 ITEMS LITTERED ON THE GROUND AND ADD THEM TO MY INVENTORY!!! BUT I'M NOT DONE YET!!! BY SENDING MY BACKPACK OF 1013.png Greed BACK TO MY INVENTORY, IT WILL ALLOW ME TO RE-USE THE GARMENT I HAVE PREVIOUSLY EQUIPPED, THUS ENDING MY TURN!!! 1013.png Greed!!11111!

Cards and Pets

Cards and Costume Stones
Card Slot Notes
300150.png Abysmal King Dramoh Card (300150)
4524.png King Dramoh Card (4524)
Headgear Early to mid game cards that boost ATK. Place 4524.png King Dramoh Card (4524) at slotted mid headgears.
300459.png Elite Rgan Healer Card (300459) Headgear Best paired with 300461.png Fake Iwin Soldier Card (300461) .
300360.png Shining Seaweed Card (300360) Headgear Best card for Physical Damage at the cost of increased SP cost. Best placed in +11 Headgears.
300456.png Icewind Egg Card (300456) Headgear Use if more ACD is needed. Can be placed in slotted mid headgears, but is best in upper headgears. Can be paired with 300455.png Copo Card (300455)
27396.png Isaac Wigner Card (27396) Headgear Use if more ACD is needed.
4241.png Archangeling Card (4241) Headgear Doubles HP and SP recovery is Base LUK is 77 and above. Helps mitigate SP consumption when farming at lower level areas if you're really kuripot stingy with zeny and refuse to buy SP-recovering stuff, like me.
4393.png Shelter Card (4393) Armor Best paired with 300271.png Happy Card (300271) 300271.png Happy Card (300271) 300271.png Happy Card (300271) :3 for significantly increased Melee damage.
300362.png Unfrost Flower Card (300362) Armor Increases Physical Damage. When paired with 300360.png Shining Seaweed Card (300360) , ATK +10%.
300376.png Two Eyes Dollocaris (300376) Armor Requires a +12 level 2 armor to bring out its full potential. Gives a lot of RES and MRES and is one of the best defensive armor cards. If you already deal a ton of damage but want some more survivability, get this card.
300524.png Yoscopus Guardian Card (300524) Armor Significantly increases Melee Damage when paired with 300515.png Yoster Fixer Card (300515) . No CRIT, no problem. Moon doesn't CRIT.
300533.png [MVP] Encroached Tan Card (300533) Armor A TANtalizing MVP card that greatly boosts physical damage against boss-type enemies at the cost of reduced HP. TANtalizingly TANtalizing against late-game enemies. Tan.
4608.png White Knight Card (4608) Weapon Boosts damage against Medium and Large monsters. Pair it with 4609.png Khalitzburg Knight Card (4609)
27361.png Polluted Wander Man Card (27361) Weapon Boosts damage against Medium and Large monsters. That's about it.
300455.png Copo Card (300455) Weapon Boosts damage against Small and Medium monsters. Can be paired with 300457.png Grey Icewind Card (300457) .
300461.png Fake Iwin Soldier Card (300461) Weapon Increases Melee Damage, even moreso when paired with 300459.png Elite Rgan Healer Card (300459)
300240.png Gan Ceann Card (300240) Weapon Increases damage against Large monsters. Books have a BIG 50% penalty against Large enemies. This can help fix some of that while waiting for something like a 24386.png Infinity Shadow Weapon (24386) .
27356.png Frozen Gargoyle Card (27356) Shield The cheap, inferior version of Khalitzburg Knight and Mutated Khalitzburg cards. Get it if you're on a tight budget. 25% damage reduction from Medium and Large monsters, but receive 5% more damage from small monsters.
4609.png Khalitzburg Knight Card (4609) Shield Best paired with 4608.png White Knight Card (4608) . Gives 25% damage reduction from Medium and Large Monsters (30% if paired with WK). Increases overall survivability as long as the monster isn't Small.
4413.png Hodremlin Card (4413) Shield Reduces damage from Small, Medium and Large mobs by 15%. It also has a chance to increase Perfect Dodge by 30 if you're attacked.
300379.png Renovated Upper Rgan (300379) Shield A Hodremlin Card, but better... if your shield is a level 2, like 460040.png Glacier Guard [1] (460040) , and is refined to +12.
300465.png Elite Rgan Guardian Card (300465) Shield Probably the best-in-slot shield card? Provides decent damage reduction while increasing offensive power at the same time.
27176.png Swamp Cramp Card (27176) Garment A decent garment card, good for early-mid game. ATK +3 and ASPD +1% for every 10 base STR. If base STR is 120 and above, ATK +40.
300271.png Happy Card (300271)

300271.png Happy Card (300271)

Garment When paired with a 4393.png Shelter Card (4393) card at level 200+ and with at least 120 Base STR, Melee Physical Damage is increased.
300515.png Yoster Fixer Card (300515) Garment Significantly increases Melee Physical Damage, especially when paired with 300524.png Yoscopus Guardian Card (300524) . No CRIT? No problem. Moon doesn't CRIT.
300144.png Abysmal Merman Card (300144) Footgear Increases ATK. When paired with 300150.png Abysmal King Dramoh Card (300150) , increases CRIT DMG. Good early-mid game card.
300177.png Midnight Archi Card (300177) Footgear A better version of the original Arhi. Increases physical AND magic damage to all size enemies by 5%, HP +1000 and Flee +35. Obtained at the Geffen Night Arena.
300457.png Grey Icewind Card (300457) Footgear Complements the 300455.png Copo Card (300455) quite nicely.
300526.png Yorker Worker Card (300526)

300527.png Yorker Religious Worker Card (300527)

Accessory CRIT doesn't do anything in this build, but they both reduce VCT by 7% each. If more VCT reduction is needed, use one or both of these cards.
300223.png Phantom Wolf Card (300223) 300220.png Grey Wolf Card (300220) Accessory These two cards boost Melee damage.
300365.png Primitive Rgan Card (300365) 300367.png Lower Rgan Card (300367) Accessory These two cards boost Melee damage and reduces VCT.
6999.png HP Absorp Stone (Top) (6999) Upper HG costume stone Increases survivability by HP leech.
1001045.png Star Emperor Stone (Mid) (1001045) Middle HG costume stone Increases Melee Physical Damage.
25174.png Variable Cast Stone (Low) (25174) Lower HG costume stone If more VCT is needed, use this stone.
25306.png Variable Casting Stone (Garment) (25306) Garment costume stone If more VCT is needed, use this stone.
6963.png HP Absorbtion Stone (Garment) (6963) Garment costume stone Increases survivability by HP leech.
1001419.png Sky Emperor Stone (Garment) (1001419) Garment costume stone The Sky Emperor Costume Stone Set isn't really for Moon builds, but increased damage against monsters is slightly useful.
1001055.png Power Stone (Dual) (1001055) Garment costume stone (dual) More POWer means more damage.
1000522.png Variable Casting Time Stone (Dual) (1000522) Garment costume stone (dual) Use if more VCT reduction is needed.
1000526.png HP Absorbtion Stone (Dual) (1000526) Garment costume stone (dual) If more survivability is needed, this HP leech stone can help.
1000525.png SP Absorbtion Stone (Dual) (1000525) Garment costume stone (dual) Having a bit of SP consumption issues? This SP leech stone can help.
Pets

The following pets below are most suited for this build, with their bonuses when Loyal. Check the Pet System on how to obtain and feed a pet.

Tips and Tricks

Leveling (WIP)
WORK IN PROGRESS,
Strategy (WIP)
To be added soon.