Rakugaki's Sky Emperor Guide: Difference between revisions
(→CRIT Sun: Added LoF screenshot) |
(→CRIT Sun: New stuff, fixed some slop that I missed) |
||
| Line 33: | Line 33: | ||
[[File:Sun SE Solo Forgotten Time 300 pots downed.jpg|thumb|A sun-aligned SE survives and triumphs [[Lake of Fire]], defeating a horrifying monstrosity... '''alone'''. <!--He downed over 300 {{#item:1100005}} bottles during the luring phase though. The side effects of consuming an extreme amount in such short time are yet to be seen...-->]] <!-- | [[File:Sun SE Solo Forgotten Time 300 pots downed.jpg|thumb|A sun-aligned SE survives and triumphs [[Lake of Fire]], defeating a horrifying monstrosity... '''alone'''. <!--He downed over 300 {{#item:1100005}} bottles during the luring phase though. The side effects of consuming an extreme amount in such short time are yet to be seen...-->]] <!-- | ||
[[File:Courageous SE braving Depth1.jpg|thumb|This SE's head is hotter than the sun, trying his luck in Depth1. Everything is going well... then Strip Shield and Spider Web came to say hi!]] --> | [[File:Courageous SE braving Depth1.jpg|thumb|This SE's head is hotter than the sun, trying his luck in Depth1. Everything is going well... then Strip Shield and Spider Web came to say hi!]] --> | ||
The CRIT Sun build quickly disposes of enemies by harnessing the power of the Sun (CRITs) to further augment one's power. Sun skills have no FCT and VCT, but they have a short ACD, are targeted skills, and require CRIT for full power. Set the Sun skills to smartcast turbo to make things a little easier. [[Patcher#Turbo_Setup|Turbo setup guide here.]] Try getting at least 30% ACD and 173 ASPD. | The CRIT Sun build quickly disposes of enemies by harnessing the power of the Sun (CRITs) to further augment one's power. Sun skills have no FCT and VCT, but they have a short ACD, are targeted skills, and require CRIT for full power. Set the Sun skills to smartcast turbo to make things a little easier. [[Patcher#Turbo_Setup|Turbo setup guide here.]] Try getting at least 30% ACD and 173 ASPD. But for maximum spamming, aim for 40% or more ACD reduction and 180+ ASPD. | ||
| Line 48: | Line 48: | ||
|AGI | |AGI | ||
|80+ | |80+ | ||
|Mainly for ASPD, needed for spamming {{#skill:5467}} as quickly as possible. Aim for | |Mainly for ASPD, needed for spamming {{#skill:5467}} as quickly as possible. Aim for 180+ ASPD. 100 Total AGI also provides Sleep and Bleeding Immunity. | ||
|- | |- | ||
|VIT | |VIT | ||
| Line 90: | Line 90: | ||
|- | |- | ||
|CON | |CON | ||
|72 | |72-110 | ||
|Further increases damage while marginally increasing survivability via increased FLEE. | |Further increases damage while marginally increasing survivability via increased FLEE. | ||
|- | |- | ||
|CRT | |CRT | ||
|110 | |72-110 | ||
|Second most important trait, mainly for raising C.RATE for increased CRIT damage. | |Second most important trait, mainly for raising C.RATE for increased CRIT damage. | ||
|- | |- | ||
| Line 119: | Line 119: | ||
|{{#Skill:412}} | |{{#Skill:412}} | ||
|1 | |1 | ||
|Enables use of Tornado Kick. Requires level 1 Tornado Kick. | |Enables use of Tornado Kick. Requires level 1 Tornado Kick. Can also be used for "dancing" when used alongside {{#Skill:420}}, {{#Skill:414}}, {{#Skill:416}}, and {{#Skill:418}}. | ||
|- | |- | ||
|{{#Skill:424}} | |{{#Skill:424}} | ||
| Line 127: | Line 127: | ||
|{{#Skill:421}} | |{{#Skill:421}} | ||
|7 | |7 | ||
|Gap closer. Deals significantly increased damage when used while {{#Skill:411}}ing. | |Gap closer. Has no cooldown and a range of 10 cells. Can be spammed at 193 ASPD for fun. Deals significantly increased damage when used while {{#Skill:411}}ing. | ||
|- | |- | ||
|{{#Skill:411}} | |{{#Skill:411}} | ||
|10 | |10 | ||
|Provides a number of nice early-game effects. Gotta go fast but in One Direction! | |Provides a number of nice early-game effects. Gotta go fast but in One Direction! | ||
Hitting a wall or any entity causes you to get knocked back. Use {{#Skill:421}} while sprinting for significantly increased damage. This bonus works with or without a weapon equipped. When | Hitting a wall or any entity causes you to get knocked back. Use {{#Skill:421}} while sprinting for significantly increased damage. This bonus works with or without a weapon equipped. When weaponless, get +10 Barehanded Mastery Attack. Use and immediately cancel for +10 STR (Spurt Status), but lose the bonus when equipping a weapon. | ||
|- | |- | ||
|{{#Skill:422}} | |{{#Skill:422}} | ||
| Line 144: | Line 144: | ||
|{{#Skill:425}} | |{{#Skill:425}} | ||
|7 | |7 | ||
|Changes your attacking element for 5 minutes. Levels 1-7 gives Earth, Wind, Water, Fire, Ghost, Shadow and | |Changes your attacking element for 5 minutes. Levels 1-7 gives Earth, Wind, Water, Fire, Ghost, Shadow and Holy Element respectively. | ||
|- | |- | ||
|{{#Skill:426}} | |{{#Skill:426}} | ||
| Line 183: | Line 183: | ||
|3 | |3 | ||
|Marks monsters with Solar Wrath, Lunar Wrath, and Stellar Wrath. Monsters on the hitlist will receive up to 75% more damage. | |Marks monsters with Solar Wrath, Lunar Wrath, and Stellar Wrath. Monsters on the hitlist will receive up to 75% more damage. | ||
*Solar Wrath works only on Small monsters. | *Solar Wrath works only on Small monsters. | ||
*Lunar Wrath works only on Medium monsters with 6,000+ HP. | *Lunar Wrath works only on Medium monsters with 6,000+ HP. | ||
*Stellar Wrath works only on Large monsters with 20,000+ HP. | *Stellar Wrath works only on Large monsters with 20,000+ HP. | ||
| Line 200: | Line 200: | ||
*Lunar Maps and only on odd-numbered days - Increases FLEE. | *Lunar Maps and only on odd-numbered days - Increases FLEE. | ||
*Stellar Maps and only on days divisible by 5 - Increases ASPD. | *Stellar Maps and only on days divisible by 5 - Increases ASPD. | ||
|- | |||
|{{#Skill:442}} | |||
|Optional | |||
|Increases the Monk's chances of triggering {{#skill:263}} when using {{#Skill:418}}, and get an increased chance of triggering {{#Skill:418}} when a Monk triggers {{#skill:263}}. Very, very niche and gimmicky Passive. | |||
|- | |||
|{{#Skill:444}} | |||
|Soul Link | |||
|Requires Level 9 {{#skill:443}} and {{#skill:448}} buff from a Soul Linker to activate. A very powerful, very flashy, but very high-risk skill that lasts for 10 minutes. | |||
Gain increased movement speed. All your attacks will never miss and will completely ignore DEF. All at the cost of sacrificing 2% of your Max HP for each hit. Be sure you have a good amount of HP leech to compensate for this, because once you're at 20% HP and you damage something, you die! Even the skill's ID is ominous - 444. | |||
This skill is also a very good party trick. When it is active and you sit down, you'll slowly float upwards. Stand up and you'll gently descend. If you die with this skill active, your corpse will "jump" up and down. Spoopy. You can also cycle between {{#Skill:420}}, {{#Skill:412}}, {{#Skill:414}}, {{#Skill:416}}, and {{#Skill:418}} to make your character "dance". The poses already look flashy, but doing it in mid-air makes it even better! Find other classes that can pose for even more fun! | |||
|- | |- | ||
|Miracle of the Sun, Moon, and Stars | |Miracle of the Sun, Moon, and Stars | ||
| Line 267: | Line 279: | ||
|{{#Skill:2580}} | |{{#Skill:2580}} | ||
|7 | |7 | ||
|Marks enemies. Up to 5 marks can be activate at a time. | |Marks enemies. An enemy gets just 1 mark. Up to 5 marks can be activate at a time, 1 per enemy. | ||
|- | |- | ||
|{{#Skill:2584}} | |{{#Skill:2584}} | ||
| Line 319: | Line 331: | ||
|{{#Skill:5467}} | |{{#Skill:5467}} | ||
|5 | |5 | ||
|Hits all enemies in a 7x7 area around the target. Can CRIT when {{#Skill:5465}} is at Sunset, or when {{#Skill:5475}} is activated. Despite its shorter CD, it's initially | |Hits all enemies in a 7x7 area around the target. Can CRIT when {{#Skill:5465}} is at Sunset, or when {{#Skill:5475}} is activated. Despite its shorter CD, it's initially weaker compared to {{#Skill:5466}}. However, when {{#item:400543}} and {{#item:540083}} are equipped and both are A-Grade, it becomes SIGNIFICANTLY STRONGER because it will autocast {{#Skill:5466}}. | ||
|- | |- | ||
|{{#Skill:5475}} | |{{#Skill:5475}} | ||
|10 | |7-10 | ||
|Enables the use of all skills at their maximum potential. | |Enables the use of all skills at their maximum potential. | ||
|- | |- | ||
|{{#Skill:5471}} | |{{#Skill:5471}} | ||
|1 | |1 | ||
|Calls forth | |Calls forth random meteors from the sky. | ||
|- | |- | ||
|{{#Skill:5472}} | |{{#Skill:5472}} | ||
|3-5 | |3-5 | ||
|Requires {{#Skill:5471}} to activate. Redirects said random meteors to a single target, hitting it and all enemies in a 5x5 area. Mainly for survival purposes, increasing the chances of | |Requires {{#Skill:5471}} to activate. Redirects said random meteors to a single target, hitting it and all enemies in a 5x5 area. Mainly for survival purposes and triggering effects, like increasing the chances of Lifesteal (e.g. from Succubus Pet), SP Drain (e.g. from Incubus Pet), {{#item:313426}}, or SP Recovery from the Burning Fang Rune Set. | ||
|- | |- | ||
|{{#Skill:5473}} | |{{#Skill:5473}} | ||
|3 | |3 | ||
|Prerequisite for {{#Skill:5504}}. Makes said random meteors a bit more powerful. | |Prerequisite for {{#Skill:5504}}. Makes said random meteors a bit more powerful. | ||
|- | |- | ||
|{{#Skill:5504}} | |{{#Skill:5504}} | ||
|5 | |5 | ||
|Gap closer, an improved version of {{#Skill:421}}, dealing 7x7 AoE damage but has shorter range. | |Gap closer, an improved version of {{#Skill:421}}, dealing 7x7 AoE damage but has shorter range (8 cells vs 10) and a 1-second cooldown. | ||
|- | |- | ||
|- | |- | ||
| Line 645: | Line 657: | ||
|Shield | |Shield | ||
|Episode 20 | |Episode 20 | ||
|Easy to get and fully enchant - the rewards from [[20 The Immortal]] | |Easy to get and fully enchant - the rewards from [[20 The Immortal]] are enough to obtain one and fully enchant it. Upgrade to Grade C and refine it to +10. Recommended enchants are {{#item:312095}}, {{#item:312093}}, and {{#item:312090}}. Focusing on the more defensive enchants provides A LOT of damage reduction plus a HUGE quality of life improvement - over 100 Hard MDEF. Having over 100 Hard MDEF means complete immunity to a myriad of bad status effects, like getting Stoned, Frozen, and more! | ||
|- | |- | ||
|{{#item:480283}} | |{{#item:480283}} | ||
| Line 676: | Line 688: | ||
|{{#item:410233}} | |{{#item:410233}} | ||
|Middle Headgear | |Middle Headgear | ||
| | |[[Alice Twisted Madness]] | ||
| | |Best in slot headgear and can be enchanted. If you have less than 40% ACD, get ACD enchants. If you already have 40% or more ACD, get either Melee Physical Damage or CRIT DMG. | ||
|- | |- | ||
|{{#item:420210}} | |{{#item:420210}} | ||
|Lower Headgear | |Lower Headgear | ||
| | |[[Alice Twisted Madness]] | ||
| | |Best in slot headgear for damage. Try getting STR, AGI or LUK, then Critical Damage or Melee Physical Damage. | ||
|- | |- | ||
|{{#item:450285}} | |{{#item:450285}} | ||
| Line 692: | Line 704: | ||
|Armor | |Armor | ||
|[[Constellation Tower]] | |[[Constellation Tower]] | ||
|The best-in-slot armor, especially if all the stars align. The final (2nd slot) enchant is {{#item:310676}}. But once you obtain | |The best-in-slot armor, especially if all the stars align. The final (2nd slot) enchant is {{#item:310676}}. | ||
But once you obtain the following: | |||
*{{#item:480352}} with the {{#item:313023}} enchant, | |||
*{{#item:490135}} with {{#item:313033}}, | |||
*{{#item:490486}} with {{#item:312996}}, | |||
There will be a huge increase in power. | |||
|- | |- | ||
|{{#item:540083}} | |{{#item:540083}} | ||
|Book | |Book | ||
|[[ | |[[Varmundt's Biosphere Depth 2|Depth 2]] | ||
|Most powerful and best-in-slot weapon. It can have two powerful enchants of your choosing, no RNG nonsense. When Grade A, it enables autocasting {{#Skill:5466}} while using {{#Skill:5467}} when paired with a Grade A {{#item: | |Most powerful and best-in-slot weapon. It can have two powerful enchants of your choosing, no RNG nonsense. When Grade A, it enables autocasting {{#Skill:5466}} while using {{#Skill:5467}} when paired with a Grade A {{#item:400543}}, significantly increasing damage. | ||
|- | |- | ||
|{{#item:460020}} | |{{#item:460020}} | ||
|Shield | |Shield | ||
|Alice | |[[Alice Twisted Madness]] | ||
|The more offensive-oriented shield. Upgrade it to at least Grade D for the damage reduction, but it is highly recommended to max it out at Grade A and refine it to +12 | |The more offensive-oriented shield. Upgrade it to at least Grade D for the damage reduction, but it is highly recommended to max it out at Grade A and refine it to +12 for the big CRIT bonus. | ||
|- | |- | ||
|{{#item:460040}} | |{{#item:460040}} | ||
|Shield | |Shield | ||
|Episode 20 | |Episode 20 | ||
|The more defensive-oriented shield. Upgrade it to Grade C and refine it to + | |The more defensive-oriented shield. Upgrade it to Grade C and refine it to +11 to take advantage of {{#item:300465}}'s bonuses. Recommended enchants are {{#item:312095}}, {{#item:312093}}, and {{#item:312090}}. Focusing on the more defensive enchants provides A LOT of damage reduction plus a HUGE quality of life improvement - over 100 Hard MDEF. Having over 100 Hard MDEF means complete immunity to a myriad of bad status effects, like getting Stoned, Frozen, and more! | ||
|- | |- | ||
|{{#item:480351}} | |{{#item:480351}} | ||
| Line 776: | Line 793: | ||
|Shadow Weapon | |Shadow Weapon | ||
|[[Shadow Gear]] | |[[Shadow Gear]] | ||
|Nullifies weapon size penalty. | |Nullifies weapon size penalty. If you have a {{#item:9193}}, you can switch this for something else. | ||
|- | |||
|{{#item:24686}} | |||
|Shadow Weapon | |||
|[[Shadow Gear]] | |||
|At +10, adds the a small chance to absorb HP and SP. Increases survivability. | |||
|- | |- | ||
|{{#item:24685}} | |{{#item:24685}} | ||
| Line 786: | Line 808: | ||
|Shadow Shield | |Shadow Shield | ||
|[[Shadow Gear]] | |[[Shadow Gear]] | ||
|Increases CRIT, CRIT DMG, ASPD, and C.Rate. | |Increases CRIT, CRIT DMG, ASPD, and C.Rate. | ||
|- | |- | ||
|<br>{{#item:24661}}<br>{{#item:24662}} | |<br>{{#item:24661}}<br>{{#item:24662}} | ||
| Line 796: | Line 818: | ||
|Shadow Gear Set | |Shadow Gear Set | ||
|[[Shadow Gear]] | |[[Shadow Gear]] | ||
|Deals slightly less damage compared to the three 2-sets above, but pierces through MRES. Enchant with the spell of your choosing and | |Deals slightly less damage compared to the three 2-sets above, but pierces through MRES. Enchant with the spell of your choosing and POW. | ||
|- | |- | ||
|{{#item:24975}}<br>{{#item:24976}}<br>{{#item:24793}}<br>{{#item:24801}}<br>{{#item:24977}}<br>{{#item:24978}}<br> | |{{#item:24975}}<br>{{#item:24976}}<br>{{#item:24793}}<br>{{#item:24801}}<br>{{#item:24977}}<br>{{#item:24978}}<br> | ||
| Line 980: | Line 1,002: | ||
|{{#item:300380}} | |{{#item:300380}} | ||
|Footgear | |Footgear | ||
| | |A two-way tie for the best-in-slot footgear card, but requires a +12 Level 2 Footgear to bring out its full potential. | ||
|- | |||
|{{#item:300557}} | |||
|Footgear | |||
|A two-way tie for the best-in-slot footgear card, providing almost identical damage to {{#item:300380}}, dealing either 0.5% more or less damage at +12. | |||
While {{#item:300380}} is on your main footgear, this card can be in your drop rate footgear, like {{#item:22055}}, preferably +12. | |||
|- | |- | ||
|{{#item:300526}} | |{{#item:300526}} | ||
| Line 1,010: | Line 1,037: | ||
|Garment costume stone (dual) | |Garment costume stone (dual) | ||
|More POWer means more damage. | |More POWer means more damage. | ||
|- | |||
|{{#item:1000855}} | |||
|Garment costume stone (dual) | |||
|More CRIT for more damage. | |||
|- | |- | ||
|{{#item:1000526}} | |{{#item:1000526}} | ||
| Line 1,032: | Line 1,063: | ||
*{{#item:9052}}: Small chance to SP leech. | *{{#item:9052}}: Small chance to SP leech. | ||
*{{#item:9055}}: Small chance to HP leech. | *{{#item:9055}}: Small chance to HP leech. | ||
*{{#item: | *{{#item:9049}}: Easy Critical Damage +8%. Comes as is when Loyal. No evolution required. | ||
*{{#item:9105}}: DEX+2, Hit+2, Increases Critical Damage by 9%. | |||
*{{#item:9117}}: AGI+4, CRIT+3, Critical Damage +7%. | |||
*{{#item:9112}}: Luxurious pet that increases CRIT and Hit, and adds a chance to recover a bit of HP and SP per second. | |||
*{{#item:9126}}: Luxurious pet that increases ASPD, Hit, and Melee damage. | *{{#item:9126}}: Luxurious pet that increases ASPD, Hit, and Melee damage. | ||
*{{#item:9193}}: Luxurious pet that nullifies weapon size penalty. | *{{#item:9193}}: Luxurious pet that nullifies weapon size penalty. | ||
*{{#item:9142}}: | *{{#item:9142}}: Luxurious pet that increases CRIT and C.Rate. | ||
*{{#item:9132}}: Increases ATK and damage against Boss enemies. | *{{#item:9132}}: Increases ATK and damage against Boss enemies. | ||
|- | |- | ||
Revision as of 20:41, 23 December 2025
| DISCLAIMER | This guide is made by a Hyper Novice main who loves playing Sky Emperor. |
|---|---|
| The info found here may be erroneous and/or sub-optimal. If there are far better Sky Emperors out there, please feel free to make a better guide than this, or provide suggestions and corrections. |
| Sky Emperor | |
|---|---|
| |
| Job base: | Taekwon Kid |
| Written By: | Rakugaki |
Overview
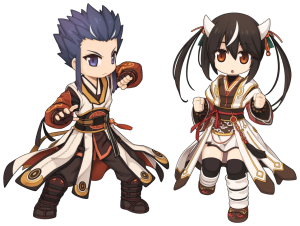
The Sky Emperor (SE for short) is a Melee DPS class that aligns to the Sun, Moon, and/or Stars, each dealing damage in unique ways. In addition to changing their attack element via ![]() Mild Wind, they have some rather unusual skills, like making use of the real world's date, marking maps, putting certain monsters on a wanted list, floating in mid-air, performing "miracles", going blind, gaining weight (limit), ganging up with other SEs and SAs (Soul Ascetic) and shaking their heads to recover HP and SP, doing sick moves with Inquisitors, and more!
Mild Wind, they have some rather unusual skills, like making use of the real world's date, marking maps, putting certain monsters on a wanted list, floating in mid-air, performing "miracles", going blind, gaining weight (limit), ganging up with other SEs and SAs (Soul Ascetic) and shaking their heads to recover HP and SP, doing sick moves with Inquisitors, and more!
Note that I AM NOT A SKY EMPEROR MAIN, and it's a sad to see no Sky Emperor guides around here. So I made one.
Builds
Currently, there are two viable builds - CRITical Sun Build, and VCT (Variable Cast Time) Moon Build.
CRIT Sun

The CRIT Sun build quickly disposes of enemies by harnessing the power of the Sun (CRITs) to further augment one's power. Sun skills have no FCT and VCT, but they have a short ACD, are targeted skills, and require CRIT for full power. Set the Sun skills to smartcast turbo to make things a little easier. Turbo setup guide here. Try getting at least 30% ACD and 173 ASPD. But for maximum spamming, aim for 40% or more ACD reduction and 180+ ASPD.
Stats and Traits
| Stat | Amount | Notes |
|---|---|---|
| STR | 100+ | Main stat. Increases damage. |
| AGI | 80+ | Mainly for ASPD, needed for spamming |
| VIT | 80+ | 100 Total VIT is required for Poison and Stun Immunity. |
| INT | 80+ | 100 Total INT is required for Silence and Blind Immunity. |
| DEX | 1+ | Increase this for HIT Rate at earlier levels. If you have enough CRIT, then this is leftover. |
| LUK | 100+ | Increases CRIT Rate by 1 for every 3 point. 100 Total LUK is needed for Curse Immunity. |
| Trait | Amount | Notes |
|---|---|---|
| POW | 110 | Main trait. Max it out. |
| STA | 0+ | Optional Trait. Invest some points here if more RES is needed. |
| WIS | 0+ | Optional Trait. Invest some points here if more MRES is needed. |
| SPL | 0 | Unnecessary. Sky Emperors don't read books. They use them to kick their enemies to death, not for academic study or reading various spells to conjure anything... |
| CON | 72-110 | Further increases damage while marginally increasing survivability via increased FLEE. |
| CRT | 72-110 | Second most important trait, mainly for raising C.RATE for increased CRIT damage. |
Skills
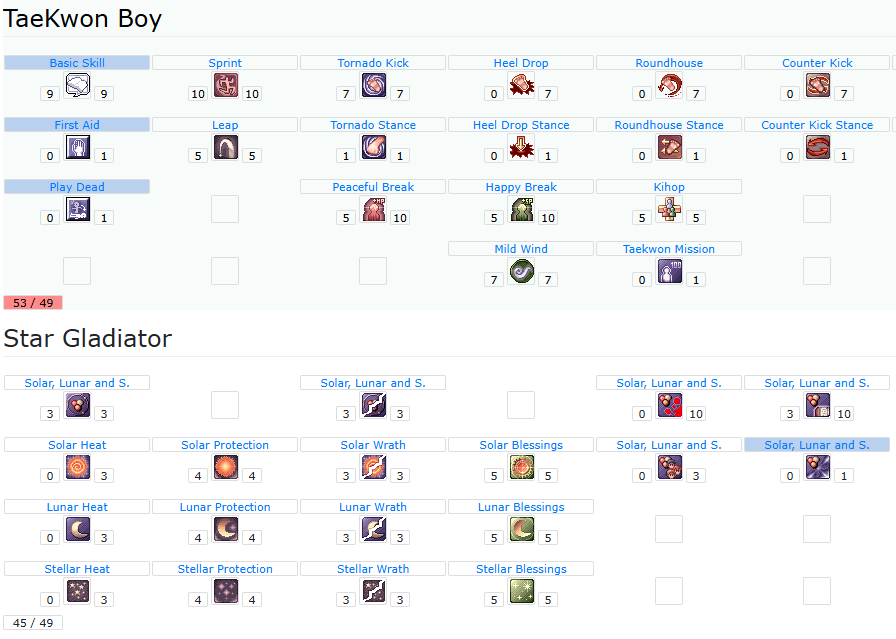
| Skills: Star Gladiator | |||||||||||||||||||||||||||||||
|---|---|---|---|---|---|---|---|---|---|---|---|---|---|---|---|---|---|---|---|---|---|---|---|---|---|---|---|---|---|---|---|
| |||||||||||||||||||||||||||||||
| Skills: Star Emperor | |||||||||||||||||||||||||||||||||||||||||||||||||
|---|---|---|---|---|---|---|---|---|---|---|---|---|---|---|---|---|---|---|---|---|---|---|---|---|---|---|---|---|---|---|---|---|---|---|---|---|---|---|---|---|---|---|---|---|---|---|---|---|---|
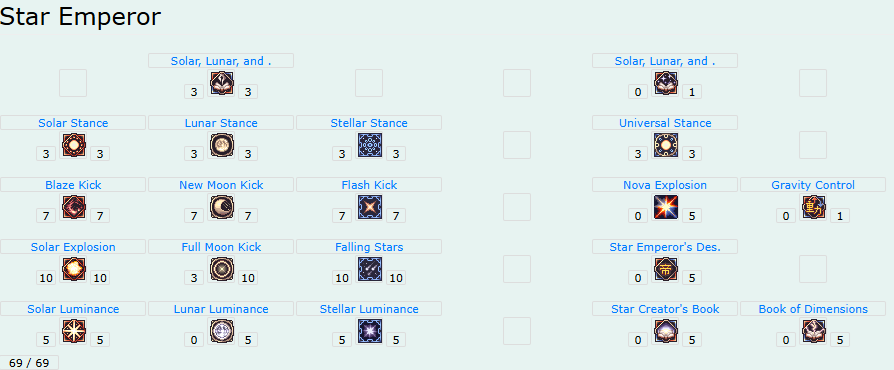
| There are three different skill branches - Sun, Moon, and Star. Feel free to max out 2 of the 3 branches of your choosing.
| |||||||||||||||||||||||||||||||||||||||||||||||||
| Skills: Sky Emperor | |||||||||||||||||||||||||||||||||||||
|---|---|---|---|---|---|---|---|---|---|---|---|---|---|---|---|---|---|---|---|---|---|---|---|---|---|---|---|---|---|---|---|---|---|---|---|---|---|
Once you reach around Job Level 10 (Level 3 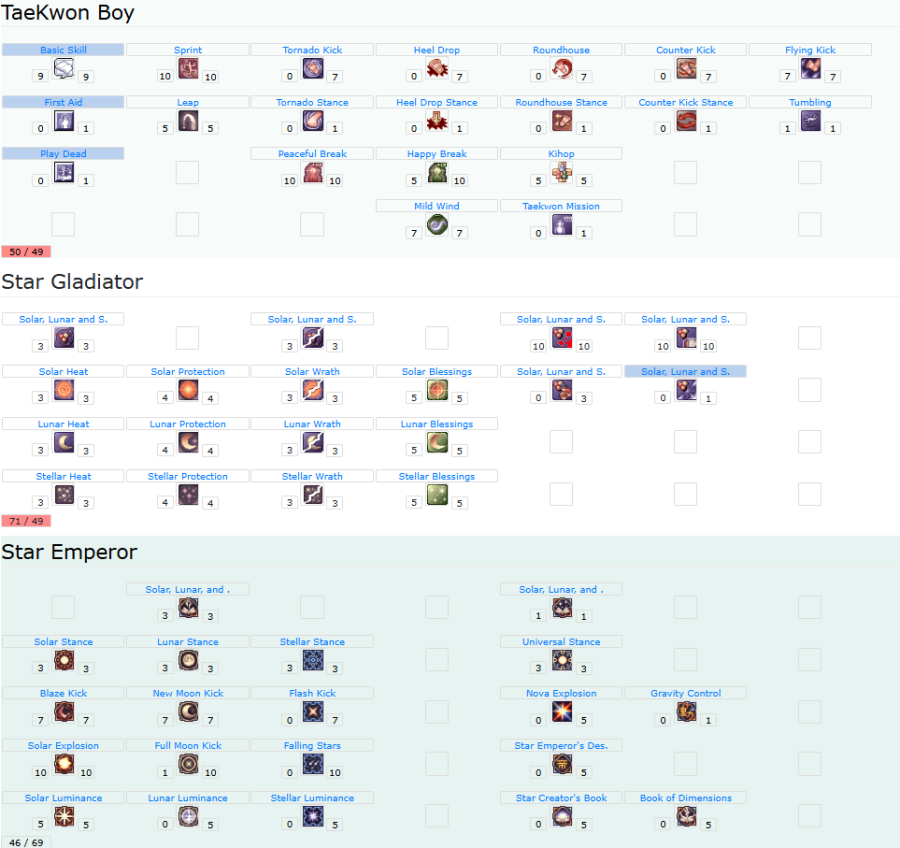 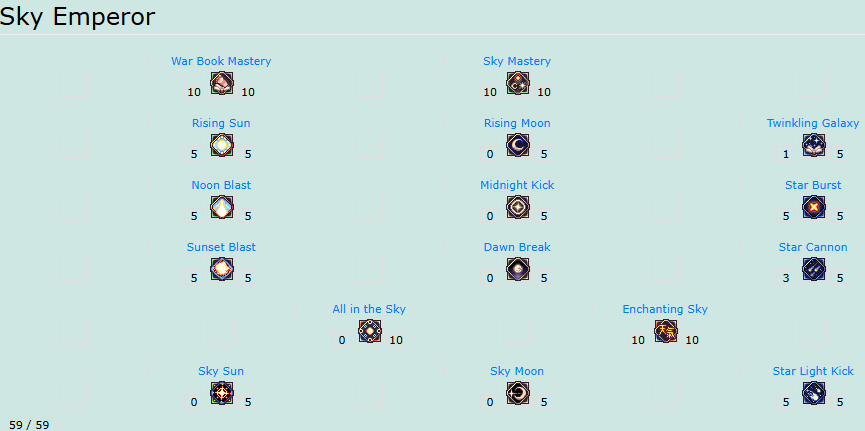
| |||||||||||||||||||||||||||||||||||||
Equipment
| Equipment | |||||||||||||||||||||||||||||||||||||||||||||||||||||||||||||||||||||||||||||||||||||||||||||||||||||||||||||||||||||||||||||||||||||||||||||||||||||||||||||||||||||||||||||||||||||||||||||||||||||||||||||||||||||||||||||||||||||||||||||||||||||||||||||||||||||||||||||||||||||||||||||||||||||||||||||||||||||||||||||||||||||||||||||||||||||||||||||||||||||||||||
|---|---|---|---|---|---|---|---|---|---|---|---|---|---|---|---|---|---|---|---|---|---|---|---|---|---|---|---|---|---|---|---|---|---|---|---|---|---|---|---|---|---|---|---|---|---|---|---|---|---|---|---|---|---|---|---|---|---|---|---|---|---|---|---|---|---|---|---|---|---|---|---|---|---|---|---|---|---|---|---|---|---|---|---|---|---|---|---|---|---|---|---|---|---|---|---|---|---|---|---|---|---|---|---|---|---|---|---|---|---|---|---|---|---|---|---|---|---|---|---|---|---|---|---|---|---|---|---|---|---|---|---|---|---|---|---|---|---|---|---|---|---|---|---|---|---|---|---|---|---|---|---|---|---|---|---|---|---|---|---|---|---|---|---|---|---|---|---|---|---|---|---|---|---|---|---|---|---|---|---|---|---|---|---|---|---|---|---|---|---|---|---|---|---|---|---|---|---|---|---|---|---|---|---|---|---|---|---|---|---|---|---|---|---|---|---|---|---|---|---|---|---|---|---|---|---|---|---|---|---|---|---|---|---|---|---|---|---|---|---|---|---|---|---|---|---|---|---|---|---|---|---|---|---|---|---|---|---|---|---|---|---|---|---|---|---|---|---|---|---|---|---|---|---|---|---|---|---|---|---|---|---|---|---|---|---|---|---|---|---|---|---|---|---|---|---|---|---|---|---|---|---|---|---|---|---|---|---|---|---|---|---|---|---|---|---|---|---|---|---|---|---|---|---|---|---|---|---|---|---|---|---|---|---|---|---|---|---|---|---|---|---|---|---|---|---|---|---|---|---|---|---|---|---|---|---|---|---|---|---|---|---|---|---|
10-100
| |||||||||||||||||||||||||||||||||||||||||||||||||||||||||||||||||||||||||||||||||||||||||||||||||||||||||||||||||||||||||||||||||||||||||||||||||||||||||||||||||||||||||||||||||||||||||||||||||||||||||||||||||||||||||||||||||||||||||||||||||||||||||||||||||||||||||||||||||||||||||||||||||||||||||||||||||||||||||||||||||||||||||||||||||||||||||||||||||||||||||||
| Quality of Life Equipment | |||||||||||||||||||||||
|---|---|---|---|---|---|---|---|---|---|---|---|---|---|---|---|---|---|---|---|---|---|---|---|
At level 100 and above, there are three pieces of equipment that'll make life easier. Switch to these equipment, activate the skill, then switch back to your default equipment. Example:
| |||||||||||||||||||||||
Life of Quality Equipment
| |||||||||||||||||||||||
Cards and Pets
| Cards and Costume Stones | ||||||||||||||||||||||||||||||||||||||||||||||||||||||||||||||||||||||||||||||||||||||||||||||||||||||||||||||||||||||||||||||
|---|---|---|---|---|---|---|---|---|---|---|---|---|---|---|---|---|---|---|---|---|---|---|---|---|---|---|---|---|---|---|---|---|---|---|---|---|---|---|---|---|---|---|---|---|---|---|---|---|---|---|---|---|---|---|---|---|---|---|---|---|---|---|---|---|---|---|---|---|---|---|---|---|---|---|---|---|---|---|---|---|---|---|---|---|---|---|---|---|---|---|---|---|---|---|---|---|---|---|---|---|---|---|---|---|---|---|---|---|---|---|---|---|---|---|---|---|---|---|---|---|---|---|---|---|---|---|
|
| Pets |
|---|
|
The following pets below are most suited for this build, with their bonuses when Loyal. Check the Pet System on how to obtain and feed a pet.
|
Tips and Tricks
| Leveling (WIP) |
|---|
| WORK IN PROGRESS, |
| Strategy (WIP) |
|---|
| To be added soon. |
VCT Moon
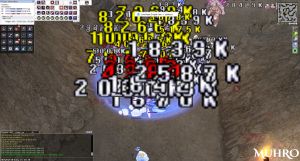
The moon build is about making quick and easy work on eliminating foes through the sheer power of spinning kicks. ALT+P, hold 3, spin2win something free (I cringe at this REEEEEEEE). While the skills have no ACD and are self-cast, it has FCT and VCT. Both have to be reduced to a minimum in order to spam kicks effectively.
Stats and Traits
| Stat | Amount | Notes |
|---|---|---|
| STR | 120+ | Main stat. Increases damage. |
| AGI | 80+ | Mainly for ASPD, needed for spamming |
| VIT | 80+ | 100 Total VIT is required for Poison and Stun Immunity. |
| INT | 80+ | 100 Total INT is required for Silence and Blind Immunity. |
| DEX | 1+ | Increase this for HIT Rate at earlier levels. If you have close to or 100% VCT reduction, then put leftover points here, unless you needed more HIT. |
| LUK | 80+ | 100 Total LUK is needed for Curse Immunity. |
| Trait | Amount | Notes |
|---|---|---|
| POW | 110 | Main Trait. Max it out. |
| STA | 0-72 | Adjust STA or WIS depending on which form of damage needs more reduction. |
| WIS | 0-72 | Adjust STA or WIS depending on which form of damage needs more reduction. |
| SPL | 0 | Reading books in the dark is said to be bad for the eyes, but they can be used to roundhouse kick enemies to death. SPeLls not required. Spin2win in darkness. |
| CON | 110 | Further increases damage while marginally increasing survivability via increased FLEE. |
| CRT | 0 | Not needed for this build, because the Moon doesn't CRIT. |
Skills
| Skills: Taekwon Kid | |||||||||||||||||||||||||||||||||||||
|---|---|---|---|---|---|---|---|---|---|---|---|---|---|---|---|---|---|---|---|---|---|---|---|---|---|---|---|---|---|---|---|---|---|---|---|---|---|

| |||||||||||||||||||||||||||||||||||||
| Skills: Star Gladiator | |||||||||||||||||||||||||
|---|---|---|---|---|---|---|---|---|---|---|---|---|---|---|---|---|---|---|---|---|---|---|---|---|---|

| |||||||||||||||||||||||||
| Skills: Star Emperor | |||||||||||||||||||||||||||||||||||||||||||||||||
|---|---|---|---|---|---|---|---|---|---|---|---|---|---|---|---|---|---|---|---|---|---|---|---|---|---|---|---|---|---|---|---|---|---|---|---|---|---|---|---|---|---|---|---|---|---|---|---|---|---|
| There are three different skill branches - Sun, Moon, and Star. Feel free to max out 2 of the 3 branches of your choosing.

| |||||||||||||||||||||||||||||||||||||||||||||||||
| Skills: Sky Emperor | |||||||||||||||||||||||||||||||||||||
|---|---|---|---|---|---|---|---|---|---|---|---|---|---|---|---|---|---|---|---|---|---|---|---|---|---|---|---|---|---|---|---|---|---|---|---|---|---|
Once you reach around Job Level 10 (Level 3  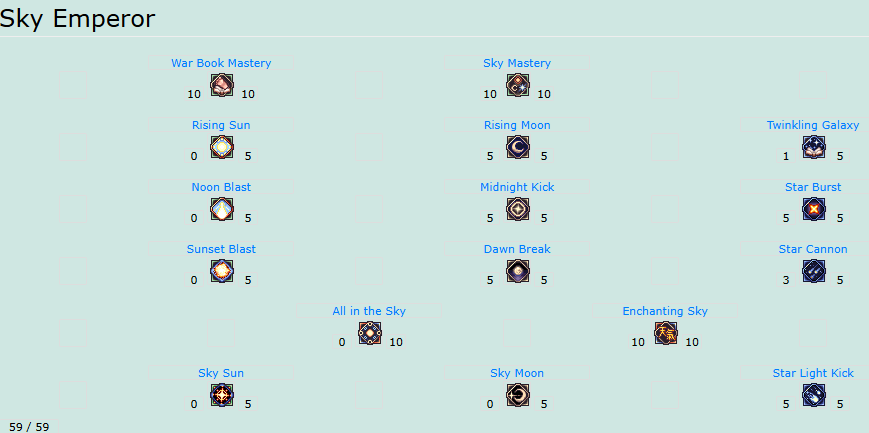
| |||||||||||||||||||||||||||||||||||||
Equipment
| Equipment | |||||||||||||||||||||||||||||||||||||||||||||||||||||||||||||||||||||||||||||||||||||||||||||||||||||||||||||||||||||||||||||||||||||||||||||||||||||||||||||||||||||||||||||||||||||||||||||||||||||||||||||||||||||||||||||||||||||||||||||||||||||||||||||||||||||||||||||||||||||||||||||||||||||||||||||||||||||||||||||||||||||||||||||||||||||||
|---|---|---|---|---|---|---|---|---|---|---|---|---|---|---|---|---|---|---|---|---|---|---|---|---|---|---|---|---|---|---|---|---|---|---|---|---|---|---|---|---|---|---|---|---|---|---|---|---|---|---|---|---|---|---|---|---|---|---|---|---|---|---|---|---|---|---|---|---|---|---|---|---|---|---|---|---|---|---|---|---|---|---|---|---|---|---|---|---|---|---|---|---|---|---|---|---|---|---|---|---|---|---|---|---|---|---|---|---|---|---|---|---|---|---|---|---|---|---|---|---|---|---|---|---|---|---|---|---|---|---|---|---|---|---|---|---|---|---|---|---|---|---|---|---|---|---|---|---|---|---|---|---|---|---|---|---|---|---|---|---|---|---|---|---|---|---|---|---|---|---|---|---|---|---|---|---|---|---|---|---|---|---|---|---|---|---|---|---|---|---|---|---|---|---|---|---|---|---|---|---|---|---|---|---|---|---|---|---|---|---|---|---|---|---|---|---|---|---|---|---|---|---|---|---|---|---|---|---|---|---|---|---|---|---|---|---|---|---|---|---|---|---|---|---|---|---|---|---|---|---|---|---|---|---|---|---|---|---|---|---|---|---|---|---|---|---|---|---|---|---|---|---|---|---|---|---|---|---|---|---|---|---|---|---|---|---|---|---|---|---|---|---|---|---|---|---|---|---|---|---|---|---|---|---|---|---|---|---|---|---|---|---|---|---|---|---|---|---|---|---|---|---|---|---|---|---|---|---|---|---|---|---|---|---|---|---|---|---|---|---|---|---|---|
10-100
| |||||||||||||||||||||||||||||||||||||||||||||||||||||||||||||||||||||||||||||||||||||||||||||||||||||||||||||||||||||||||||||||||||||||||||||||||||||||||||||||||||||||||||||||||||||||||||||||||||||||||||||||||||||||||||||||||||||||||||||||||||||||||||||||||||||||||||||||||||||||||||||||||||||||||||||||||||||||||||||||||||||||||||||||||||||||
| Quality of Life Equipment | |||||||||||||||||||||||
|---|---|---|---|---|---|---|---|---|---|---|---|---|---|---|---|---|---|---|---|---|---|---|---|
At level 100 and above, there are three pieces of equipment that'll make life easier. Switch to these equipment, activate the skill, then switch back to your default equipment. Example:
| |||||||||||||||||||||||
Life of Quality Equipment
| |||||||||||||||||||||||
Cards and Pets
| Cards and Costume Stones | |||||||||||||||||||||||||||||||||||||||||||||||||||||||||||||||||||||||||||||||||||||||||||||||||||||||||||||||||||||||||||
|---|---|---|---|---|---|---|---|---|---|---|---|---|---|---|---|---|---|---|---|---|---|---|---|---|---|---|---|---|---|---|---|---|---|---|---|---|---|---|---|---|---|---|---|---|---|---|---|---|---|---|---|---|---|---|---|---|---|---|---|---|---|---|---|---|---|---|---|---|---|---|---|---|---|---|---|---|---|---|---|---|---|---|---|---|---|---|---|---|---|---|---|---|---|---|---|---|---|---|---|---|---|---|---|---|---|---|---|---|---|---|---|---|---|---|---|---|---|---|---|---|---|---|---|
|
| Pets |
|---|
|
The following pets below are most suited for this build, with their bonuses when Loyal. Check the Pet System on how to obtain and feed a pet.
|
Tips and Tricks
| Leveling (WIP) |
|---|
| WORK IN PROGRESS, |
| Strategy (WIP) |
|---|
| To be added soon. |
 Tornado Kick
 Knowledge of Sun Moon Star. It's like SEs are also carts, if in a marked map!