Rakugaki's Sky Emperor Guide: Difference between revisions
No edit summary |
(Added warmth skills. Added more details and clarifications to the miracle buff. The miracle buff stays as long as you stay in the map, even when logging out and in, and the timer stops. BUT IF YOU LEAVE, THE BUFF IS GONE!) |
||
| Line 160: | Line 160: | ||
|- | |- | ||
| | | | ||
[[File:SE 2nd Job.png|900x900px|left|thumb|A few excess skill points to the other 3 levels of Warm Wind and Tumble.]] | [[File:SE 2nd Job.png|900x900px|left|thumb|A few excess skill points to the other 3 levels of Warm Wind and Tumble. The warmth/heat skills at the left side of the Star Gladiator Tree aren't used for now, but they'll come in really handy at the late-game, when there are way more boss-type monsters.]] | ||
{| class="wikitable" width="100%" | {| class="wikitable" width="100%" | ||
! style=" width: 15% " | Skill | ! style=" width: 15% " | Skill | ||
| Line 166: | Line 166: | ||
! style=" width: 90% " | Notes | ! style=" width: 90% " | Notes | ||
|- | |- | ||
| style="background-color: # | | style="background-color: #B5B7BB; text-align: center;" colspan="4" | '''Star Gladiator''' | ||
|- | |- | ||
|{{#Skill:427}} | |{{#Skill:427}} | ||
|3 | |3 | ||
|Align a map with the Sun, Moon, or Stars. Enables a variety of skills. | |Align a map with the Sun, Moon, or Stars. Enables a variety of skills. | ||
|- | |||
|{{#Skill:428}}<br>{{#Skill:429}}<br>{{#Skill:430}} | |||
|3 | |||
|Get warmth/heat from sun, moon, or stars on sun, moon, or star-aligned maps to damage enemies and push them back. Boss-types can't be pushed around. Each hit drains 2 SP. It can be used only on aligned maps. Warmth of the Sun can be used only on sun maps, and so on. | |||
It's better to get these skills at the later parts of the game when you're a Sky Emperor. At the early game, they're useful for pushing back non-boss enemies, not for damage, mainly to escape an overcrowded horde. However, at the later parts of the game when there are a lot more boss-type monsters, it can be VERY USEFUL in triggering HP and SP leech and other effects like {{#item:313426}}. The rapid-fire hits can also increase the odds of triggering the hidden "Miracle" super-buff (see below). | |||
|- | |- | ||
|{{#Skill:435}}<br>{{#Skill:436}}<br>{{#Skill:437}} | |{{#Skill:435}}<br>{{#Skill:436}}<br>{{#Skill:437}} | ||
|3 | |3 | ||
|Marks monsters with Solar Wrath, Lunar Wrath, and Stellar Wrath. | |Marks monsters with Solar Wrath, Lunar Wrath, and Stellar Wrath. Monsters on the hitlist will receive up to 75% more damage. | ||
*Solar Wrath works only on Small monsters. | *Solar Wrath works only on Small monsters. | ||
*Lunar Wrath works only on Medium monsters with 6,000+ HP. | *Lunar Wrath works only on Medium monsters with 6,000+ HP. | ||
| Line 185: | Line 191: | ||
*Lunar monsters give bonus EXP on odd-numbered days. | *Lunar monsters give bonus EXP on odd-numbered days. | ||
*Stellar monsters give bonus EXP on days divisible by 5 (e.g. 10, 15, 20). | *Stellar monsters give bonus EXP on days divisible by 5 (e.g. 10, 15, 20). | ||
They can be active at the same time. E.g. in | They can be active at the same time. E.g. in October 5, {{#Skill:439}} and {{#Skill:440}} are active at the same time. | ||
|- | |- | ||
|{{#Skill:431}}<br>{{#Skill:432}}<br>{{#Skill:433}} | |{{#Skill:431}}<br>{{#Skill:432}}<br>{{#Skill:433}} | ||
| Line 195: | Line 201: | ||
|Miracle of the Sun, Moon, and Stars | |Miracle of the Sun, Moon, and Stars | ||
|RNG | |RNG | ||
|When dealing damage, there is a 1% chance to activate this super-buff. Activates all Anger and Blessing skills, and enables the use of all Comfort skills for an hour, even with unmarked maps and monsters. It doesn't go away on death and when logging out (timer stops). | |When dealing damage, there is a 1% chance to activate this super-buff, indicated by a blue icon and the screen having a slight blue tinge. Activates all Anger and Blessing skills, and enables the use of all Comfort and Warmth skills for an hour, even with unmarked maps and monsters. It doesn't go away on death and when logging out (timer stops). <u>'''HOWEVER, YOU WILL LOSE THE BUFF WHEN CHANGING MAPS.'''</u> Basically, when this happens, you deal 75% more damage to ALL mobs while receiving 100% more EXP <u>'''within the map'''</u> for an hour. | ||
|- | |- | ||
|} | |} | ||
| Line 1,236: | Line 1,242: | ||
|- | |- | ||
| | | | ||
[[File:SE 2nd Job.png|900x900px|left|thumb|A few excess skill points to the other 3 levels of Warm Wind and Tumble.]] | [[File:SE 2nd Job.png|900x900px|left|thumb|A few excess skill points to the other 3 levels of Warm Wind and Tumble. The warmth/heat skills at the left side of the Star Gladiator Tree aren't used for now, but they'll come in really handy at the late-game, when there are way more boss-type monsters.]] | ||
{| class="wikitable" width="100%" | {| class="wikitable" width="100%" | ||
! style=" width: 15% " | Skill | ! style=" width: 15% " | Skill | ||
| Line 1,247: | Line 1,253: | ||
|3 | |3 | ||
|Align a map with the Sun, Moon, or Stars. Enables a variety of skills. | |Align a map with the Sun, Moon, or Stars. Enables a variety of skills. | ||
|- | |||
|{{#Skill:428}}<br>{{#Skill:429}}<br>{{#Skill:430}} | |||
|3 | |||
|Get warmth/heat from sun, moon, or stars on sun, moon, or star-aligned maps to damage enemies and push them back. Boss-types can't be pushed around. Each hit drains 2 SP. It can be used only on aligned maps. Warmth of the Sun can be used only on sun maps, and so on. | |||
It's better to get these skills at the later parts of the game when you're a Sky Emperor. At the early game, they're useful for pushing back non-boss enemies, not for damage, mainly to escape an overcrowded horde. However, at the later parts of the game when there are a lot more boss-type monsters, it can be VERY USEFUL in triggering HP and SP leech and other effects like {{#item:313426}}. The rapid-fire hits can also increase the odds of triggering the hidden "Miracle" super-buff (see below). | |||
|- | |- | ||
|{{#Skill:435}}<br>{{#Skill:436}}<br>{{#Skill:437}} | |{{#Skill:435}}<br>{{#Skill:436}}<br>{{#Skill:437}} | ||
|3 | |3 | ||
|Marks monsters with Solar Wrath, Lunar Wrath, and Stellar Wrath. | |Marks monsters with Solar Wrath, Lunar Wrath, and Stellar Wrath. Monsters on the hitlist will receive up to 75% more damage. | ||
*Solar Wrath works only on Small monsters. | *Solar Wrath works only on Small monsters. | ||
*Lunar Wrath works only on Medium monsters with 6,000+ HP. | *Lunar Wrath works only on Medium monsters with 6,000+ HP. | ||
| Line 1,271: | Line 1,283: | ||
|Miracle of the Sun, Moon, and Stars | |Miracle of the Sun, Moon, and Stars | ||
|RNG | |RNG | ||
|When dealing damage, there is a 1% chance to activate this super-buff. Activates all Anger and Blessing skills, and enables the use of all Comfort skills for an hour, even with unmarked maps and monsters. It doesn't go away on death and when logging out (timer stops). | |When dealing damage, there is a 1% chance to activate this super-buff, indicated by a blue icon and the screen having a slight blue tinge. Activates all Anger and Blessing skills, and enables the use of all Comfort and Warmth skills for an hour, even with unmarked maps and monsters. It doesn't go away on death and when logging out (timer stops). <u>'''HOWEVER, YOU WILL LOSE THE BUFF WHEN CHANGING MAPS.'''</u> Basically, when this happens, you deal 75% more damage to ALL mobs while receiving 100% more EXP <u>'''within the map'''</u> for an hour. | ||
|- | |- | ||
|} | |} | ||
Revision as of 19:17, 29 October 2025
| DISCLAIMER | This guide is made by a Hyper Novice main who loves playing Sky Emperor. |
|---|---|
| The info found here may be erroneous and/or sub-optimal. If there are far better Sky Emperors out there, please feel free to make a better guide than this, or provide suggestions and corrections. |
| Sky Emperor | |
|---|---|
| |
| Job base: | Taekwon Kid |
| Written By: | Rakugaki |
Overview
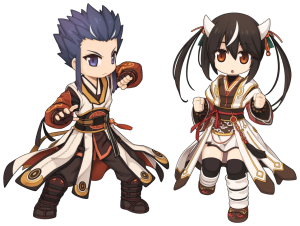
The Sky Emperor (SE for short) is a Melee DPS class that aligns to the Sun, Moon, and/or Stars, each dealing damage in unique ways. In addition to changing their attack element via ![]() Mild Wind, they have some rather unusual skills, like making use of the real world's date, marking maps, putting certain monsters on a wanted list, floating in mid-air, performing "miracles", going blind, gaining weight (limit), ganging up with other SEs and SAs (Soul Ascetic) and shaking their heads to recover HP and SP, doing sick moves with Inquisitors, and more!
Mild Wind, they have some rather unusual skills, like making use of the real world's date, marking maps, putting certain monsters on a wanted list, floating in mid-air, performing "miracles", going blind, gaining weight (limit), ganging up with other SEs and SAs (Soul Ascetic) and shaking their heads to recover HP and SP, doing sick moves with Inquisitors, and more!
Note that I AM NOT A SKY EMPEROR MAIN, and it's a sad to see no Sky Emperor guides around here. So I made one.
Builds
Currently, there are two viable builds - CRITical Sun Build, and VCT (Variable Cast Time) Moon Build.
CRIT Sun
The CRIT Sun build quickly disposes of enemies by harnessing the power of the Sun (CRITs) to further augment one's power. Sun skills have no FCT and VCT, but they have a short ACD, are targeted skills, and require CRIT for full power. Set the Sun skills to smartcast turbo to make things a little easier. Turbo setup guide here.
Stats and Traits
| Stat | Amount | Notes |
|---|---|---|
| STR | 100+ | Main stat. Increases damage. |
| AGI | 80+ | Mainly for ASPD, needed for spamming |
| VIT | 80+ | 100 Total VIT is required for Poison and Stun Immunity. |
| INT | 80+ | 100 Total INT is required for Silence and Blind Immunity. |
| DEX | 1+ | Increase this for HIT Rate at earlier levels. If you have enough CRIT, then this is leftover. |
| LUK | 100+ | Increases CRIT Rate by 1 for every 3 point. 100 Total LUK is needed for Curse Immunity. |
| Trait | Amount | Notes |
|---|---|---|
| POW | 110 | Main Trait. Max it out. |
| STA | 0+ | Optional Trait. Invest some points here if more RES is needed. |
| WIS | 0+ | Optional Trait. Invest some points here if more MRES is needed. |
| SPL | 0 | Unnecessary. Sky Emperors don't read books. They use them to kick their enemies to death, not for academic study or reading various spells to conjure anything... |
| CON | 72 | Further increases damage while marginally increasing survivability via increased FLEE. |
| CRT | 110 | Second most important trait, mainly for raising C.RATE for increased CRIT damage. |
Skills
| Skills: Star Gladiator | |||||||||||||||||||||||||
|---|---|---|---|---|---|---|---|---|---|---|---|---|---|---|---|---|---|---|---|---|---|---|---|---|---|
| |||||||||||||||||||||||||
| Skills: Star Emperor | |||||||||||||||||||||||||||||||||||||||||||||||||
|---|---|---|---|---|---|---|---|---|---|---|---|---|---|---|---|---|---|---|---|---|---|---|---|---|---|---|---|---|---|---|---|---|---|---|---|---|---|---|---|---|---|---|---|---|---|---|---|---|---|
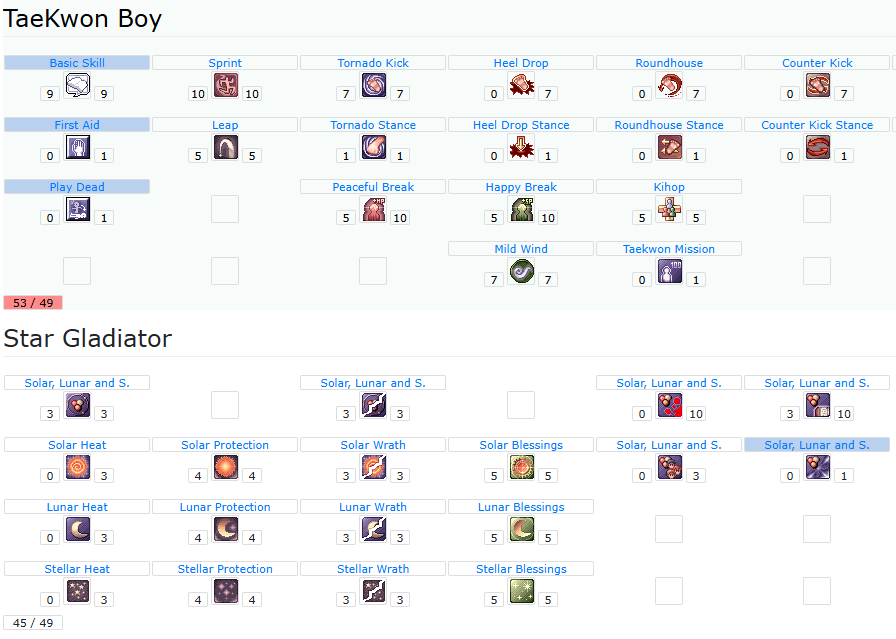
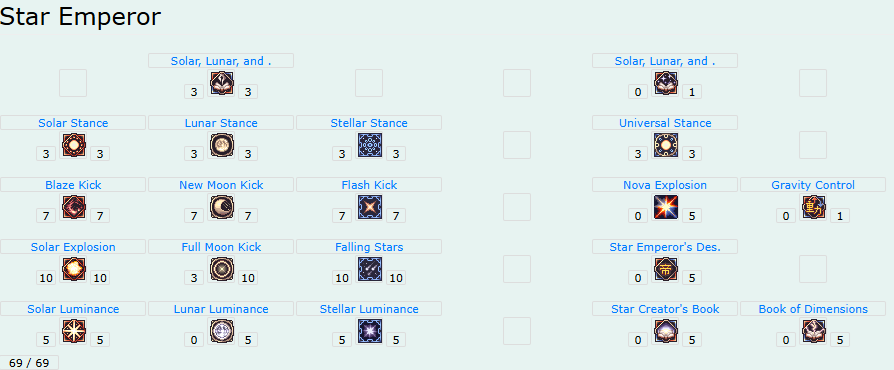
| There are three different skill branches - Sun, Moon, and Star. Feel free to max out 2 of the 3 branches of your choosing.
| |||||||||||||||||||||||||||||||||||||||||||||||||
| Skills: Sky Emperor | |||||||||||||||||||||||||||||||||||||
|---|---|---|---|---|---|---|---|---|---|---|---|---|---|---|---|---|---|---|---|---|---|---|---|---|---|---|---|---|---|---|---|---|---|---|---|---|---|
Once you reach around Job Level 10 (Level 3 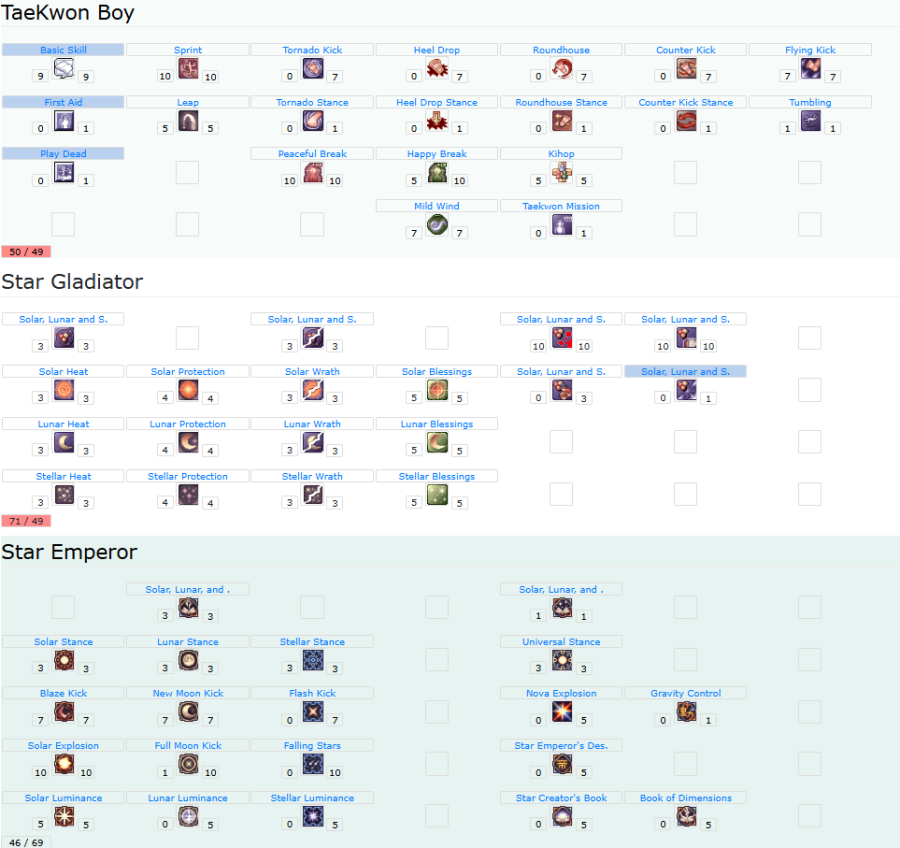 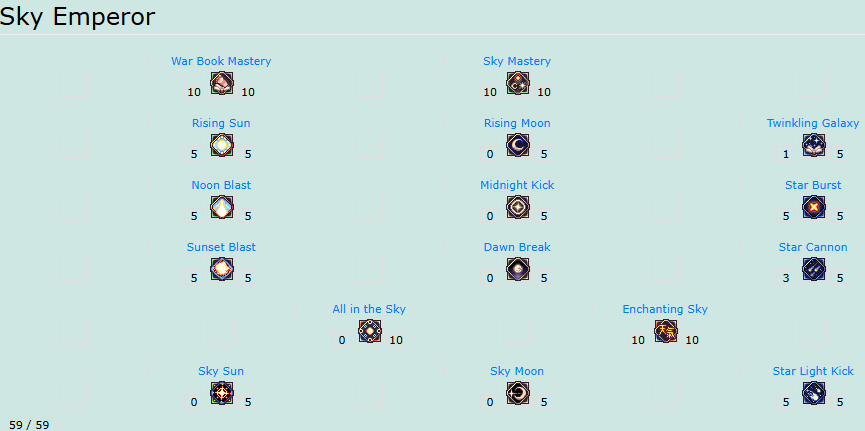
| |||||||||||||||||||||||||||||||||||||
Equipment
| Equipment | |||||||||||||||||||||||||||||||||||||||||||||||||||||||||||||||||||||||||||||||||||||||||||||||||||||||||||||||||||||||||||||||||||||||||||||||||||||||||||||||||||||||||||||||||||||||||||||||||||||||||||||||||||||||||||||||||||||||||||||||||||||||||||||||||||||||||||||||||||||||||||||||||||||||||||||||||||||||||||||||||||||||||||||||||||||||||||||||||||||||
|---|---|---|---|---|---|---|---|---|---|---|---|---|---|---|---|---|---|---|---|---|---|---|---|---|---|---|---|---|---|---|---|---|---|---|---|---|---|---|---|---|---|---|---|---|---|---|---|---|---|---|---|---|---|---|---|---|---|---|---|---|---|---|---|---|---|---|---|---|---|---|---|---|---|---|---|---|---|---|---|---|---|---|---|---|---|---|---|---|---|---|---|---|---|---|---|---|---|---|---|---|---|---|---|---|---|---|---|---|---|---|---|---|---|---|---|---|---|---|---|---|---|---|---|---|---|---|---|---|---|---|---|---|---|---|---|---|---|---|---|---|---|---|---|---|---|---|---|---|---|---|---|---|---|---|---|---|---|---|---|---|---|---|---|---|---|---|---|---|---|---|---|---|---|---|---|---|---|---|---|---|---|---|---|---|---|---|---|---|---|---|---|---|---|---|---|---|---|---|---|---|---|---|---|---|---|---|---|---|---|---|---|---|---|---|---|---|---|---|---|---|---|---|---|---|---|---|---|---|---|---|---|---|---|---|---|---|---|---|---|---|---|---|---|---|---|---|---|---|---|---|---|---|---|---|---|---|---|---|---|---|---|---|---|---|---|---|---|---|---|---|---|---|---|---|---|---|---|---|---|---|---|---|---|---|---|---|---|---|---|---|---|---|---|---|---|---|---|---|---|---|---|---|---|---|---|---|---|---|---|---|---|---|---|---|---|---|---|---|---|---|---|---|---|---|---|---|---|---|---|---|---|---|---|---|---|---|---|---|---|---|---|---|---|---|---|---|---|---|---|---|---|---|---|---|---|---|---|---|---|
10-100
| |||||||||||||||||||||||||||||||||||||||||||||||||||||||||||||||||||||||||||||||||||||||||||||||||||||||||||||||||||||||||||||||||||||||||||||||||||||||||||||||||||||||||||||||||||||||||||||||||||||||||||||||||||||||||||||||||||||||||||||||||||||||||||||||||||||||||||||||||||||||||||||||||||||||||||||||||||||||||||||||||||||||||||||||||||||||||||||||||||||||
| Quality of Life Equipment | |||||||||||||||||||
|---|---|---|---|---|---|---|---|---|---|---|---|---|---|---|---|---|---|---|---|
At level 100 and above, there are three pieces of equipment that'll make life easier. Switch to these equipment, activate the skill, then switch back to your default equipment. Example:
| |||||||||||||||||||
Life of Quality Equipment
| |||||||||||||||||||
Cards and Pets
| Cards and Costume Stones | ||||||||||||||||||||||||||||||||||||||||||||||||||||||||||||||||||||||||||||||||||||||||||||||||||||||||||||||||||||||||
|---|---|---|---|---|---|---|---|---|---|---|---|---|---|---|---|---|---|---|---|---|---|---|---|---|---|---|---|---|---|---|---|---|---|---|---|---|---|---|---|---|---|---|---|---|---|---|---|---|---|---|---|---|---|---|---|---|---|---|---|---|---|---|---|---|---|---|---|---|---|---|---|---|---|---|---|---|---|---|---|---|---|---|---|---|---|---|---|---|---|---|---|---|---|---|---|---|---|---|---|---|---|---|---|---|---|---|---|---|---|---|---|---|---|---|---|---|---|---|---|---|
|
| Pets |
|---|
|
The following pets below are most suited for this build, with their bonuses when Loyal. Check the Pet System on how to obtain and feed a pet.
|
Tips and Tricks
| Leveling (WIP) |
|---|
| WORK IN PROGRESS, |
| Strategy (WIP) |
|---|
| To be added soon. |
VCT Moon
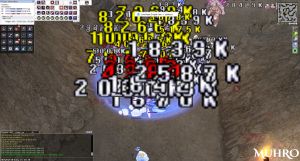
The moon build is about making quick and easy work on eliminating foes through the sheer power of spinning kicks. ALT+P, hold 3, spin2win something free (I cringe at this REEEEEEEE). While the skills have no ACD and are self-cast, it has FCT and VCT. Both have to be reduced to a minimum in order to spam kicks effectively.
Stats and Traits
| Stat | Amount | Notes |
|---|---|---|
| STR | 120+ | Main stat. Increases damage. |
| AGI | 80+ | Mainly for ASPD, needed for spamming |
| VIT | 80+ | 100 Total VIT is required for Poison and Stun Immunity. |
| INT | 80+ | 100 Total INT is required for Silence and Blind Immunity. |
| DEX | 1+ | Increase this for HIT Rate at earlier levels. If you have close to or 100% VCT reduction, then put leftover points here, unless you needed more HIT. |
| LUK | 80+ | 100 Total LUK is needed for Curse Immunity. |
| Trait | Amount | Notes |
|---|---|---|
| POW | 110 | Main Trait. Max it out. |
| STA | 0-72 | Adjust STA or WIS depending on which form of damage needs more reduction. |
| WIS | 0-72 | Adjust STA or WIS depending on which form of damage needs more reduction. |
| SPL | 0 | Unnecessary. Sky Emperors don't read books. They use them to kick their enemies to death, not for academic study or reading various spells to conjure anything... |
| CON | 110 | Further increases damage while marginally increasing survivability via increased FLEE. |
| CRT | 0 | Not needed for this build, because the Moon doesn't CRIT. |
Skills
| Skills: Taekwon Kid | |||||||||||||||||||||||||||||||||||||
|---|---|---|---|---|---|---|---|---|---|---|---|---|---|---|---|---|---|---|---|---|---|---|---|---|---|---|---|---|---|---|---|---|---|---|---|---|---|

| |||||||||||||||||||||||||||||||||||||
| Skills: Star Gladiator | |||||||||||||||||||||||||
|---|---|---|---|---|---|---|---|---|---|---|---|---|---|---|---|---|---|---|---|---|---|---|---|---|---|

| |||||||||||||||||||||||||
| Skills: Star Emperor | |||||||||||||||||||||||||||||||||||||||||||||||||
|---|---|---|---|---|---|---|---|---|---|---|---|---|---|---|---|---|---|---|---|---|---|---|---|---|---|---|---|---|---|---|---|---|---|---|---|---|---|---|---|---|---|---|---|---|---|---|---|---|---|
| There are three different skill branches - Sun, Moon, and Star. Feel free to max out 2 of the 3 branches of your choosing.

| |||||||||||||||||||||||||||||||||||||||||||||||||
| Skills: Sky Emperor | |||||||||||||||||||||||||||||||||||||
|---|---|---|---|---|---|---|---|---|---|---|---|---|---|---|---|---|---|---|---|---|---|---|---|---|---|---|---|---|---|---|---|---|---|---|---|---|---|
Once you reach around Job Level 10 (Level 3  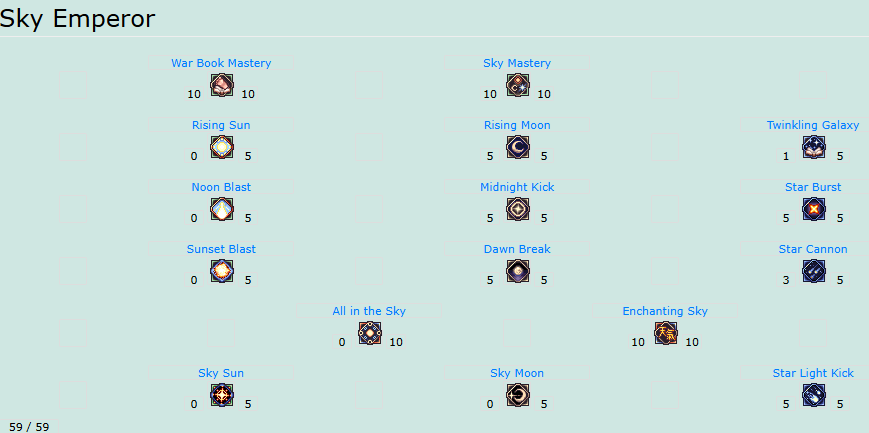
| |||||||||||||||||||||||||||||||||||||
Equipment
| Equipment | |||||||||||||||||||||||||||||||||||||||||||||||||||||||||||||||||||||||||||||||||||||||||||||||||||||||||||||||||||||||||||||||||||||||||||||||||||||||||||||||||||||||||||||||||||||||||||||||||||||||||||||||||||||||||||||||||||||||||||||||||||||||||||||||||||||||||||||||||||||||||||||||||||||||||||||||||||||||||||||||||||||||||||||||||||||||
|---|---|---|---|---|---|---|---|---|---|---|---|---|---|---|---|---|---|---|---|---|---|---|---|---|---|---|---|---|---|---|---|---|---|---|---|---|---|---|---|---|---|---|---|---|---|---|---|---|---|---|---|---|---|---|---|---|---|---|---|---|---|---|---|---|---|---|---|---|---|---|---|---|---|---|---|---|---|---|---|---|---|---|---|---|---|---|---|---|---|---|---|---|---|---|---|---|---|---|---|---|---|---|---|---|---|---|---|---|---|---|---|---|---|---|---|---|---|---|---|---|---|---|---|---|---|---|---|---|---|---|---|---|---|---|---|---|---|---|---|---|---|---|---|---|---|---|---|---|---|---|---|---|---|---|---|---|---|---|---|---|---|---|---|---|---|---|---|---|---|---|---|---|---|---|---|---|---|---|---|---|---|---|---|---|---|---|---|---|---|---|---|---|---|---|---|---|---|---|---|---|---|---|---|---|---|---|---|---|---|---|---|---|---|---|---|---|---|---|---|---|---|---|---|---|---|---|---|---|---|---|---|---|---|---|---|---|---|---|---|---|---|---|---|---|---|---|---|---|---|---|---|---|---|---|---|---|---|---|---|---|---|---|---|---|---|---|---|---|---|---|---|---|---|---|---|---|---|---|---|---|---|---|---|---|---|---|---|---|---|---|---|---|---|---|---|---|---|---|---|---|---|---|---|---|---|---|---|---|---|---|---|---|---|---|---|---|---|---|---|---|---|---|---|---|---|---|---|---|---|---|---|---|---|---|---|---|---|---|---|---|---|---|---|
10-100
| |||||||||||||||||||||||||||||||||||||||||||||||||||||||||||||||||||||||||||||||||||||||||||||||||||||||||||||||||||||||||||||||||||||||||||||||||||||||||||||||||||||||||||||||||||||||||||||||||||||||||||||||||||||||||||||||||||||||||||||||||||||||||||||||||||||||||||||||||||||||||||||||||||||||||||||||||||||||||||||||||||||||||||||||||||||||
| Quality of Life Equipment | |||||||||||||||||||
|---|---|---|---|---|---|---|---|---|---|---|---|---|---|---|---|---|---|---|---|
At level 100 and above, there are three pieces of equipment that'll make life easier. Switch to these equipment, activate the skill, then switch back to your default equipment. Example:
| |||||||||||||||||||
Life of Quality Equipment
| |||||||||||||||||||
Cards and Pets
| Cards and Costume Stones | |||||||||||||||||||||||||||||||||||||||||||||||||||||||||||||||||||||||||||||||||||||||||||||||||||||||||||||||||||||||||||
|---|---|---|---|---|---|---|---|---|---|---|---|---|---|---|---|---|---|---|---|---|---|---|---|---|---|---|---|---|---|---|---|---|---|---|---|---|---|---|---|---|---|---|---|---|---|---|---|---|---|---|---|---|---|---|---|---|---|---|---|---|---|---|---|---|---|---|---|---|---|---|---|---|---|---|---|---|---|---|---|---|---|---|---|---|---|---|---|---|---|---|---|---|---|---|---|---|---|---|---|---|---|---|---|---|---|---|---|---|---|---|---|---|---|---|---|---|---|---|---|---|---|---|---|
|
| Pets |
|---|
|
The following pets below are most suited for this build, with their bonuses when Loyal. Check the Pet System on how to obtain and feed a pet.
|
Tips and Tricks
| Leveling (WIP) |
|---|
| WORK IN PROGRESS, |
| Strategy (WIP) |
|---|
| To be added soon. |
 Tornado Kick
 Knowledge of Sun Moon Star. It's like SEs are also carts, if in a marked map!