|
|
| (21 intermediate revisions by the same user not shown) |
| Line 257: |
Line 257: |
| | {{#skill:327}} || {{#skill:319}} || {{#skill:309}} || {{#skill:2350}} || {{#skill:2423}} || {{#skill:5007}} | | | {{#skill:327}} || {{#skill:319}} || {{#skill:309}} || {{#skill:2350}} || {{#skill:2423}} || {{#skill:5007}} |
| |- | | |- |
| | {{#skill:329}} Fortune's Kiss || {{#skill:320}} || {{#skill:307}} || {{#skill:2351}} || {{#skill:2420}} || ♡♡♡ | | | {{#skill:329}}|| {{#skill:320}} || {{#skill:307}} || {{#skill:2351}} || {{#skill:2420}} || ♡♡♡ |
| |- | | |- |
| | {{#skill:330}} || {{#skill:321}} || {{#skill:313}} || {{#skill:2352}} || {{#skill:2427}} || ♡♡♡ | | | {{#skill:330}} || {{#skill:321}} || {{#skill:313}} || {{#skill:2352}} || {{#skill:2427}} || ♡♡♡ |
| |- | | |- |
| | ♡♡♡ || {{#skill:320}} || {{#skill:310}} || {{#skill:2381}} || {{#skill:2431}} || ♡♡♡ | | | ♡♡♡ || {{#skill:322}} || {{#skill:310}} || {{#skill:2381}} || {{#skill:2431}} || ♡♡♡ |
| |- | | |- |
| | ♡♡♡ || ♡♡♡ || {{#skill:312}} || {{#skill:2382}} || {{#skill:2434}} || ♡♡♡ | | | ♡♡♡ || ♡♡♡ || {{#skill:312}} || {{#skill:2382}} || {{#skill:2434}} || ♡♡♡ |
| Line 286: |
Line 286: |
| === Early Stage 1-99 === | | === Early Stage 1-99 === |
| This is just gonna be a short guide for leveling. Your first priority is joining the Eden Group and then doing the [[https://wiki.muhro.eu/Kill_Quests_and_Item_Collection_Boards| Board Quests]]. To prepare for this, just collect the Bows for levels 10 and 45 from the [[https://wiki.muhro.eu/Beginners_Guide#Eden_Gear| Eden Gears]] and then get the {{#item:580022}} at level 100. From Archer to Gypsy, you only need to use the skill {{#skill:46}} to level. Prioritize getting your DEX and AGI to 99 and you should be all set. Just do random Eden Quests until you're level 70 and can collect the level 70-99 quest for hunting '''15x Wraith 15x Evil Druid''' in '''Glast Heim (Monastery)'''. From warper, just choose Dungeons > Glast Heim > Monastery. Repeat this a few times to get to level 99 but don't rebirth yet, make sure you keep 1 completed quest of this so you can turn it in later for quick leveling. After that, rebirth to High Novice > job change to High Archer > do some Eden Boards quests again til you're job 50 and can job change to Gypsy. After changing your job to Gypsy, turn in the the level 70-99 quest that you saved earlier, and you should be around high level 80 to 90's. Repeat and do some quests again to go level 99 and job 70 to become a Wanderer | | This is just gonna be a short guide for leveling. Your first priority is joining the Eden Group and then doing the [[https://wiki.muhro.eu/Kill_Quests_and_Item_Collection_Boards| Board Quests]]. To prepare for this, just collect the Bows for levels 10 and 45 from the [[https://wiki.muhro.eu/Beginners_Guide#Eden_Gear| Eden Gears]] and then get the {{#item:580022}} at level 100. From Archer to Gypsy, you only need to use the skill {{#skill:46}} to level. Prioritize getting your DEX and AGI to 99 and you should be all set. Just do random Eden Quests until you're level 70 and can collect the level 70-99 quest for hunting '''15x Wraith 15x Evil Druid''' in '''Glast Heim (Monastery)'''. From warper, just choose Dungeons > Glast Heim > Monastery. Repeat this a few times to get to level 99 but don't rebirth yet, make sure you keep 1 completed quest of this so you can turn it in later for quick leveling. After that, rebirth to High Novice > job change to High Archer > do some Eden Boards quests again til you're job 50 and can job change to Gypsy. After changing your job to Gypsy, turn in the the level 70-99 quest that you saved earlier, and you should be around high level 80 to 90's. Repeat and do some quests again to go level 99 and job 70 to become a Wanderer |
| | | <br> |
| === Mid Stage 100-199=== | | === Mid Stage 100-199=== |
| From here, just level up a little more until you get level 5 {{#skill:2418}}. You can then proceed with doing the illusion dungeons quests from the [[https://wiki.muhro.eu/Board_Quests| Main Board Quests]]. You can also do some Eden Board quests again if you find the illusion dungeons a bit too difficult. In fact, once you reach around '''level 190''' i'd recommend doing the episode 17.1 and 17.2 quests or buying the skip tickets for them {{#item:1000285}} and {{#item:1000287}} so you can access the map with the Eden Boards quest '''240x of any type in ba_pw03'''. Get it and go to the Warper > Dungeons > Varmundt Dungeons > Second Power Plant. Just do this quest a lot and you should level up fast. It would also help you collect {{#item:25223}} which you can use to buy {{#item:12263}}, {{#item:12264}}, {{#item:22758}}, and most importantly, {{#item:50035}}. If you are struggling on some maps, i'd recommend using {{#item:22758}} for 30% ranged damage buff (you will be transformed into a gazeti and kobold archer) and {{#item:50035}} for damage and survivability. Using these two would help make your journey a lot easier | | From here, just level up a little more until you get level 5 {{#skill:2418}}. You can then proceed with doing the illusion dungeons quests from the [[https://wiki.muhro.eu/Board_Quests| Main Board Quests]]. You can also do some Eden Board quests again if you find the illusion dungeons a bit too difficult. In fact, once you reach around '''level 190''' i'd recommend doing the episode 17.1 and 17.2 quests or buying the skip tickets for them {{#item:1000285}} and {{#item:1000287}} so you can access the map with the Eden Boards quest '''240x of any type in ba_pw03'''. Get it and go to the Warper > Dungeons > Varmundt Dungeons > Second Power Plant. Just do this quest a lot and you should level up fast. It would also help you collect {{#item:25223}} which you can use to buy {{#item:12263}}, {{#item:12264}}, {{#item:22758}}, and most importantly, {{#item:50035}}. If you are struggling on some maps, i'd recommend using {{#item:22758}} for 30% ranged damage buff (you will be transformed into a gazeti and kobold archer) and {{#item:50035}} for damage and survivability. Using these two would help make your journey a lot easier |
| | | <br> |
| === Late Stage 200-275 === | | === Late Stage 200-275 === |
| When you reach level 200, change your job to Trouvere and prioritize getting {{#skill:5353}}, {{#skill:5355}}, {{#skill:5351}}, and {{#skill:5352}}. And then max out the other buffs. You should also now be able to access [[Varmundt's Biosphere]] at 240. Understandably, you would struggle quite a bit here if your gears aren't ready for this stage yet. I'd recommend farming first and then coming back here when you think you can handle the monsters. Leveling via the Eden Boards level 190 quests are also still viable. It would take some time, but you can get eden coins for it. | | When you reach level 200, change your job to Trouvere and prioritize getting {{#skill:5353}}, {{#skill:5355}}, {{#skill:5351}}, and {{#skill:5352}}. And then max out the other buffs. You should also now be able to access [[Varmundt's Biosphere]] at 240. Understandably, you would struggle quite a bit here if your gears aren't ready for this stage yet. I'd recommend farming first and then coming back here when you think you can handle the monsters. Leveling via the Eden Boards level 190 quests are also still viable. It would take some time, but you can get eden coins for it. |
| | <br> |
| <br> | | <br> |
| Late stage options for leveling at level 240+ are: | | Late stage options for leveling at level 240+ are: |
| <br> | | <br> |
| # [[Varmundt's Biosphere]] - solo. Quest turn in experience is decent | | #[[Clock Tower Unknown Basement]] - solo. Lots of good loots to get you started in refining and grading |
| | #[[Varmundt's Biosphere]] - solo. Quest turn in experience is decent |
| #[[Varmundt's Biosphere Depth]] - party preferred (very rare now) | | #[[Varmundt's Biosphere Depth]] - party preferred (very rare now) |
| #[[Unknown Blue Hole]] - solo/party (you need to be level 250, no reputation needed, can wear EXP gears) | | #[[Unknown Blue Hole]] - solo/party (you need to be level 250, no reputation needed, can wear EXP gears) |
| Line 381: |
Line 383: |
| * [[Grace Set]] | | * [[Grace Set]] |
| *[[18 Direction of Prayer|Direction of Prayer]] | | *[[18 Direction of Prayer|Direction of Prayer]] |
| | *[[Illusion Enchantment]] |
| |} | | |} |
| <br> | | <br> |
| Line 418: |
Line 421: |
| <br> | | <br> |
| * [https://wiki.muhro.eu/Equipment_Crafting#Pirate_Mayne_-_Pirate_Captain's_Coat,_Moan_of_Corruption,_Crown_of_Beelzebub,_Fish_Head_Hat| Crown of Beelzebub] | | * [https://wiki.muhro.eu/Equipment_Crafting#Pirate_Mayne_-_Pirate_Captain's_Coat,_Moan_of_Corruption,_Crown_of_Beelzebub,_Fish_Head_Hat| Crown of Beelzebub] |
| | *[[18 Direction of Prayer|Direction of Prayer]] |
| | *[[Issgard Equipment]] |
| | *[[Snow Flower Enchantment]] |
| | *[[Illusion Enchantment]] |
| | |} |
| | <br> |
| | {| style="background: #FAFAFA; text-align: center; width: 100%; border-style: dashed;" |
| | | |
| | ||'''⚠️ ⚠️ ⚠️ WARNING⚠️ ⚠️ ⚠️''' |
| | <br> |
| | Around Late Game onwards, you should have ''discernment'' and be very careful in buying/making gears as they can be very costly at this part of the game. |
| | <br>To save zeny, I recommend doing your best to skip as many gears as you can that is considered as "Late Game" in this guide. |
| | <br>Prioritize making the ones in End Game '''if possible'''. However, going through this recommended gear progression is also nice especially if you are also preparing to gear up a 1x character |
| | |- |
| |} | | |} |
| <br> | | <br> |
| Line 600: |
Line 617: |
| | Mid Head Gear || | N/A || Most MVP headgear cards that give damage require some kind of refining. Since the middle slot can't be refined. I can't think of any other MVP card that's good for this slot (note: it might be good to use {{#item:300174}} since lots of MVP cards reduce HP by a certain %) | | | Mid Head Gear || | N/A || Most MVP headgear cards that give damage require some kind of refining. Since the middle slot can't be refined. I can't think of any other MVP card that's good for this slot (note: it might be good to use {{#item:300174}} since lots of MVP cards reduce HP by a certain %) |
| |- | | |- |
| | Armor || | Priority: {{#item:300533}} <br> Situational, but nice to have: {{#item:300007}} {{#item:4408}} {{#item:300021}} {{#item:27126}}|| {{#item:300533}} is really just so nice to have cause it's useful for all purpose. Both MVP-ing and farming. The other element/race cards could be better in specific instances | | | Armor || | Priority: {{#item:300533}} and {{#item:4560}} <br> Situational, but nice to have: {{#item:300007}} {{#item:4408}} {{#item:300021}} {{#item:27126}}|| {{#item:300533}} is really just so nice to have cause it's useful for all purpose. Both MVP-ing and farming. <br> {{#item:4560}} very useful to make gameplay smoother and also very helpful in parties! The additional +40 FLEE is really nice for certain niche uses. <br> The other element/race cards could be better in specific instances |
| |- | | |- |
| | Weapon || | {{#item:4399}} || Definitely the best in slot MVP card right now for us. Lets us change our shadow gears for a huge boost of damage and better utility. Just a reminder, if you have Blossom and Musical Shooting Shadow gears, '''make sure to keep the total refine level of each combo to +17 to avoid the Defense Ignore bonus'''. If you don't do this, Thanatos Card will actually nerf your damage. <br>With this card, your shadow gears are very flexible. Personally, I use {{#item:1270136}}, {{#item:1270137}}, {{#item:24793}}, {{#item:24686}}, {{#item:24681}}, and {{#item:24682}} in Zero Cell. Can also use this combo in other dungeons but you have to make sure that you are also using a Mistress pet. You can definitely play around with more shadow gears | | | Weapon || | {{#item:4399}} || Definitely the best in slot MVP card right now for us. Lets us change our shadow gears for a huge boost of damage and better utility. Just a reminder, if you have Blossom and Musical Shooting Shadow gears, '''make sure to keep the total refine level of each combo to +17 to avoid the Defense Ignore bonus'''. If you don't do this, Thanatos Card will actually nerf your damage. <br>With this card, your shadow gears are very flexible. Personally, I use {{#item:1270136}}, {{#item:1270137}}, {{#item:24793}}, {{#item:24686}}, {{#item:24681}}, and {{#item:24682}} in Zero Cell. Can also use this combo in other dungeons but you have to make sure that you are also using a Mistress pet. You can definitely play around with more shadow gears |
| Line 700: |
Line 717: |
| |- | | |- |
| | ♡♡♡ || ♡♡♡ || ♡♡♡ || ♡♡♡ || ♡♡♡ || ♡♡♡ | | | ♡♡♡ || ♡♡♡ || ♡♡♡ || ♡♡♡ || ♡♡♡ || ♡♡♡ |
| | |} |
| | |} |
| | <br> |
| | {| style="background: #FAFAFA; width: 100%; border-style: double;" |
| | | |
| | || |
| | === Damage Test 💪🏻 === |
| | DPS Check on Dummies. Showing battle stats and gears for transparency and <s>(in)</s>accuracy. Feel free to call out and suggest some things for testing if i made an inaccurate test here |
| | {| class="mw-collapsible mw-collapsed wikitable" |
| | |+ style="white-space:nowrap; border:1px solid; padding:3px; | Battle Stats |
| | ! battle stats |
| | [[File:Battle Stats (1).jpg]] |
| | <br> |
| | Please add 30% ACD cause i forgot to cast Bragi's Poem before taking a screenshot 😭 ACD should show up as (Items: 20%, Buffs 30%) for a total of 50% |
| | |- |
| | |} |
| | {| class="mw-collapsible mw-collapsed wikitable" |
| | |+ style="white-space:nowrap; border:1px solid; padding:3px; | Gears |
| | ! Gears |
| | [[File:Equips 1.png|800px]] |
| | [[File:Equips 2.png|800px]] |
| | <br> |
| | Don't know why it's not shown there, but both Master Shadow Weapon and Shield have CON+3 and DEX+5 for a total of 6 CON and 10 DEX |
| | |} |
| | {| class="mw-collapsible mw-collapsed wikitable" |
| | |+ style="white-space:nowrap; border:1px solid; padding:3px; | DPS Check |
| | ! <br>Basement Dummy |
| | <br> |
| | Damage inflated a little bit by {{#item:313948}} and {{#item:313943}} |
| | <br> |
| | [[File:Basement Dummy.png|500px]] |
| | <br> |
| | Single Target: 43.6 B |
| | <br> |
| | AoE: N/A |
| | ! Training Room Dummy using Thanatos Card |
| | <br> |
| | 0 DEF - Water - Small - Brute |
| | [[File:Thanatos 0 DEF.png|550px]] |
| | <br> |
| | Single Target: 27.6 B |
| | <br> |
| | AoE: 8.8 B |
| | ! Training Room Dummy using Thanatos Card |
| | <br> |
| | 500 DEF - Water - Small - Brute |
| | [[File:Thanatos 500 DEF.png|550px]] |
| | <br> |
| | Single Target: 33.2 B |
| | <br> |
| | AoE: 10.4 B |
| |} | | |} |
| |} | | |} |
| Line 738: |
Line 806: |
| <br> | | <br> |
| Formatting inspired by: | | Formatting inspired by: |
| * [[Sakura's Rawr (Dragonic Breath) guide towards the Journey's End|Sakura]] {{#mob:1002}} | | * [[Sakura's Rawr (Dragonic Breath) guide towards the Journey's End|Sakura 🌸]] {{#mob:1002}} |
| * [[The Imperial Guard Immortal Warrior Guide|Titano]] {{#mob:1282}} | | * [[The Imperial Guard Immortal Warrior Guide|Titano]] {{#mob:1282}} |
| <br> | | <br> |
Introduction
|
|
Hiiii, i'm Sofiya 🩷 I've been playing the dancer class since pre-renewal on PH RO ever since I was a kid. Played on and off, but was always spamming Scream/Tarot Card of Fate and dancing Please Don't Forget Me/Loki's Wail in WoE. I'm also really used to soloing and playing alone (bards were preferred in leveling parties before as Bragi was almost always needed, and Dancers were mostly in demand only in PvP/WoE 💔.. I still have the tendency to be a bit of a soloist/loner (even irl lol), but i'm really happy to be doing difficult instances with the friends i've made here in MuhRO ❤️ and to help in case you have any questions.
While the (physical) performer classes don't have the highest DPS, they have decent damage (specially with the new non-crit multiplier), good range, and great survivability. This guide is more focused on the Dancer route since it's the class that i always played as, but it should also be applicable to the Bard route (as well as other non-crit, non-HP, ranged physical class builds - albeit with some tweaks). The Dancer class is always gonna hold a special place in my 🩷
|
|
|
Notes
As a Physical Performer, our main skill for AOE farming is  Rose Blossom. Rose Blossom has 2 parts. The first part is the single target portion of the skill, while the second part is the AOE one. The AOE part has a stronger damage and can usually one-hit most mobs on it's own when farming, but some monsters with high HP still survive 1 cast of the skill if only the AOE part damages them (even if you could 1 hit them directly using endgame gears). This isn't a problem since clear times are still decent and this usually only happens on endgame-ish dungeons from Biosphere A onwards. I also feel like (not proven) having multiple parts for the skill also helps in triggering things like HP/SP absorption etc. Rose Blossom. Rose Blossom has 2 parts. The first part is the single target portion of the skill, while the second part is the AOE one. The AOE part has a stronger damage and can usually one-hit most mobs on it's own when farming, but some monsters with high HP still survive 1 cast of the skill if only the AOE part damages them (even if you could 1 hit them directly using endgame gears). This isn't a problem since clear times are still decent and this usually only happens on endgame-ish dungeons from Biosphere A onwards. I also feel like (not proven) having multiple parts for the skill also helps in triggering things like HP/SP absorption etc.

As you can see, I can 1 shot the Verdant Cornus, but only if it's the main target. You can make some adjustments to your build/switch arrows to make sure you 1 shot/deal better damage to everything in a specific map though.
I started with this disclaimer because some people prefer classes/builds that really one shot everything with just 1 click using 1 general build like Dragon Knights/Wind Hawks and etc.

1 shotting mobs using the right element/modifiers
❤️ Pros and Cons 💔
| ❤️ Pros ❤️ |
💔 Cons 💔
|
| Can use HP and SP Absorb gears for easier farming and better survivability |
Lower DPS compared to Metallic Fury/Rhythmic Wave build. The gap has improved (a lot) with the release of the Non-Critical Damage multiplier, but i think magic still has higher DPS*
|
| Some physical gears have HP boosts built in so it can be a bit tankier |
Long skill cooldown for Rose Blossom at 0.7
|
| Quick cooldown for single target skill Rhythm Shooting at 0.35 |
2-4 button turbo for max DPS. Main Combo: Rose Blossom + Rhythm Shooting but you can also do Sound Blend + Rose Blossom + Rhythm Shooting + Severe Rainstorm
|
| Rose Blossom damage decent enough to 1 hit Temple/Venom dungeons (with drop rate gears) and Forgotten Time dungeon |
Needs HIT. Can struggle against certain MVPs with Agi Up
|
| Can do Zerocell Lux and Nox solo (with defensive gears + HP absorb gears) |
|
Sexy |
Skill is blocked by Pneuma and other similar skills
|
Cute |
Needs to worry about Variable Cast Time (as compared to the 0 cast time of Metallic Fury)
|
Popular to boot |
Magic build can share gears with lots of other classes
|
Love dancing |
Need to apply debuff (Sound Blend) and have ultimate skill active (Mystic Symphony) just to achieve max DPS. For magic, only debuff is needed for Metallic Fury (unless fighting Fish/Demi Human monsters) and only ultimate skill is needed for Rhythmic Wave
|
Great hair |
|
The boys all love to stare |
Rose Blossom damage has 2 parts. 1 single target and 1 aoe. You can sometimes 1 shot the main target, but need 2 casts to clear mobs. I think this also means only one of the damage parts gets Lex Aeterna debuff if you ever help in parties :(
|
Additional Notes:
- ♡♡♡ Thanks to Magic Trouvere AinTz for testing and showing DPS ♡♡♡
|
Stats and Traits
Trouvere Stat and Trait Bonuses
| Stats
|
| STR + 6 |
AGI + 9 |
VIT + 6 |
INT + 10 |
DEX + 8 |
LUK + 3
|
| Traits
|
| POW + 5 |
STA + 6 |
WIS + 4 |
SPL + 5 |
CON + 9 |
CRT + 4
|
My Build
|
|
Traits
- POW - 110 - For ATK and P. Atk
- STA - 21 - Keep it divisible by 3 (including trait bonuses from gears/consumables) for maximum RES bonus. I have 36 STA total when I use
 Force Booster (102803) Force Booster (102803)
- WIS - 51 - same as above except it's for MRES. I find it more important to keep WIS/MRES higher cause FLEE almost always takes care of physical attacks
- SPL - 0
- CON - 110 - HIT, FLEE, P. Atk, and Skill Modifier for Rose Blossom and
 Rhythm Shooting Rhythm Shooting
- CRT - 0
|
|
|

No buffs
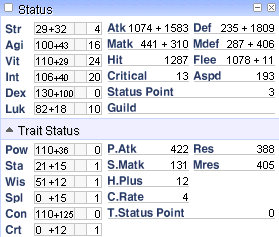
With buffs
Relevant Consumables: Force Booster (102803),  Speed Booster (102985), Speed Booster (102985),  The One Potion (50035), The One Potion (50035),  Big Siroma Icetea (50117) Big Siroma Icetea (50117)
Relevant Buffs:  Blessing, Blessing,  Increase Agility, Increase Agility,  Improve Concentration, Improve Concentration,  Symphony of Lover, Symphony of Lover,  March of Prontera, March of Prontera,  Serenade of Jawaii, Serenade of Jawaii,  Musical Interlude Musical Interlude
Note: Even without Blessing and Big Siroma Icetea (50117), I can still hit the required DEX and INT to reach 100% VCT
|
Important Skills
|
|
We have lots of skills points that we can play around with. I won't be giving an exact skill build since we have different needs (for supporting and etc.), but I'll be giving out pointers on what to max out and why.
˚₊ · ͟͟͞͞➳❥ Archer ˚₊ · ͟͟͞͞➳❥
| Skill |
Level |
Explanation
|
 Owl's Eye Owl's Eye Owl's Eye Owl's Eye |
10 |
For the passive bonus +10 DEX
|
 Vulture's Eye Vulture's Eye Vulture's Eye Vulture's Eye |
10 |
Additional HIT rate. It's more for when still using Bow class weapons when leveling early, we don't really have anywhere to put our skill points
|
| Improve Concentration |
10 |
12% DEX and AGI boost! You can include this when calculating VCT and ASPD when adjusting stat build. Usually only need to recast every few mins or when dispelled, but you automatically auto cast the highest level learned when using The One Potion (50035)
|
 Double Strafe Double Strafe |
10 |
Useful for leveling until becoming a Wanderer/Minstrel
|
ﮩ٨ـﮩﮩ٨ـ❤︎ﮩ٨ـﮩﮩ٨ـ Dancer/Gypsy ﮩ٨ـﮩﮩ٨ـ❤︎ﮩ٨ـﮩﮩ٨ـ
| Skill |
Level |
Explanation
|
 Dancing Lesson Dancing Lesson |
10 |
Bonus ATK and SP
|
 Throw Arrow Throw Arrow |
0/5 |
As pre-requisite for  Severe Rainstorm. You would probably just use Double Strafe til you become a Wanderer/Minstrel. You can remove it if you don't use it anymore after becoming Trouvere/Troubadour Severe Rainstorm. You would probably just use Double Strafe til you become a Wanderer/Minstrel. You can remove it if you don't use it anymore after becoming Trouvere/Troubadour
|
 Ugly Dance Ugly Dance |
5 |
Max out for Reverberation (pre-requisite)
|
 Fortune's Kiss Fortune's Kiss Fortune's Kiss Fortune's Kiss |
10 |
For supporting parties focusing on CRIT based classes. Critical +10 and Critical Damage +20% - Type: Dance Skill
|
 Service For You Service For You |
10 |
Very useful when soloing and when supporting other SP based classes in parties. Max SP + 20% and SP Consumption - 15% - Type: Dance Skill
|
 Drum of Battlefield Drum of Battlefield |
5 |
ATK +40 and DEF +75. Useful when farming - Type: Ensemble Skill
|
 Mr. Kim A Rich Man Mr. Kim A Rich Man |
0/5 |
Adds an EXP boost when killing monsters. Useful when leveling. You can skill reset and remove this when you max out your level - Type: Ensemble Skill
|
 Invulnerable Siegfried Invulnerable Siegfried |
5 |
The best Ensemble skill to use in endgame dungeons whether supporting or soloing in my opinion. +15% elemental resistance to Fire, Water, Earth and Wind and +25% tolerance to Blind, Frozen, Petrified, Stun, Curse, Sleep and Silence status for 180 seconds. Never get Cursed when active with 75 LUK and higher - Type: Ensemble Skill
|
Notes:
- Dance skills don't stack like Fortune's Kiss Kiss of Fortune and Service For You. You can only use one. However, you can have one Song and Dance active at the same time e.g. Service For You and
 Poem of Bragi Poem of Bragi
- You can only have 1 active Ensemble skill at a time. Prioritize Mr. Kim A Rich Man when leveling specially with a 1x character
。 ₊°༺❤︎༻°₊ 。♡𔒝 Wanderer 𔒝♡。 ₊°༺❤︎༻°₊ 。
| Skill |
Level |
Explanation
|
 Swing Dance Swing Dance |
5 |
Huge increase in ASPD. Also helps with 30% FCT reduction if your party doesn't have a Cardinal who can use Sacrament on those who need it. Very versatile. Almost everyone appreciates the additional ASPD - Type: Group A Song
|
| Symphony of Lover |
5 |
Gives a decent boost to MDEF BUT only if you already have a decent amount of it. This is the buff that I use for myself when soloing Depth 2.
Formula: MDEF Boost = [Base_MDEF_Boost + Voice_Lessons_Lv + JobLv ÷ 4]% (33.75% MDEF boost at Voice Lessons level 10, Job level 55, and Skill level 5 - Type: Group A Song
|
 Moonlight Serenade Moonlight Serenade |
5 |
Offers a good boost of MATK. Useful for Magic Performers and for supporting Magic classes in party play - Type: Group A Song
|
 Lesson Lesson |
10 |
Max it out for a huge buff on all your Wanderer buffs
|
 Reverberation Reverberation |
5 |
Just as a pre-requisite for Metallic Sound
|
 Metallic Sound Metallic Sound |
5 |
Just as a pre-requisite for Trouvere/Troubadour skill  Sound Blend Sound Blend
|
| Severe Rainstorm |
0/5 |
Useful for leveling until you get Rose Blossom and Rhythm Shooting. Can also be used for farming in Thanatos Tower alongside 4th class skills. You can remove it if you don't use it anymore
|
 Circle of Nature Circle of Nature |
0/5 |
Situational. Used to love this skill, but now that we can use Group B songs alone, it kinda falls flat since it overwrites other Group B songs - Type: Group B Song
|
 Death Valley Death Valley |
0/5 |
Optional. You can just use  Yggdrasil Leaf (610). Advantage of this skill is the item required is lighter Yggdrasil Leaf (610). Advantage of this skill is the item required is lighter  Regrettable Tears (6144) and you bring a lot of it anyway. Uses up resurrected person's SP so they wake up with no SP (easily solvable if they use seeds and berries). The skill visual effect is nice tho :) Regrettable Tears (6144) and you bring a lot of it anyway. Uses up resurrected person's SP so they wake up with no SP (easily solvable if they use seeds and berries). The skill visual effect is nice tho :)
|
 Siren's Voice Siren's Voice |
5 |
My favorite skill! Use for a chance to make enemies fall in love with you. They won't attack you or cast any skills while they're in love. Receiving damage cancels the effect immediately. Very useful when getting mobbed while playing solo. Monsters would follow you around but won't cast skills (ex. Depth 2 Salamander would still follow you but won't use Earthquake if you're alone). Just be careful using this skill in party plays. If a party member falls in love with you, any Group B song buffs that they have would be overwritten - Type: Group B Song
|
 Song of Mana Song of Mana |
3-5 |
Restores SP based on skill level and gives good SP regen. Super useful when farming. You won't have any SP issues when combined with Service For You and while using an SP Absorption equipment like a +10  Absorb Shadow Shield (24685). Just a tip, since most Group B songs have a long cooldown and don't stack, you can cast this first before using any other Group B Song buff, that way, you can restore your and your whole party's SP and then choose whatever other buff you want - Type: Group B Song Absorb Shadow Shield (24685). Just a tip, since most Group B songs have a long cooldown and don't stack, you can cast this first before using any other Group B Song buff, that way, you can restore your and your whole party's SP and then choose whatever other buff you want - Type: Group B Song
|
 Dance with Warg Dance with Warg |
5 |
Gives a huge ASPD buff, - 70% FCT reduction, and 5% Ranged Damage. Buff of choice when soloing - Type: Group B Song
|
 Lerad's Dew Lerad's Dew Lerad's Dew Lerad's Dew |
5 |
Gives a huge HP buff to the whole party. Can be used as an alternative to the other buffs if you need more survivability. Very useful in parties with Inquisitors and Dragon Knights - Type: Group B Song
|
 Unlimited Humming Voice Unlimited Humming Voice |
5 |
Gives a huge all element magic damage buff to the whole party. Great for Magic Performers and when in a party with Magic damage dealers - Type: Group B Song
|
 Frigg's Song Frigg's Song |
5 |
Gives a huge HP buff to the whole party. This is not included in Group A or B songs which means it can stack with them! Always keep this buff up
|
Notes:
- Group A Songs skills don't stack like Swing Dance and Moonlight Serenade. ALSO Minstrel's other skills like
 Windmill Rush is considered a Group A song. So... you can only have one of those buffs active at any given time. If you have a Troubadour party member, be sure to communicate which buff the party needs so you don't overwrite each other's buffs Windmill Rush is considered a Group A song. So... you can only have one of those buffs active at any given time. If you have a Troubadour party member, be sure to communicate which buff the party needs so you don't overwrite each other's buffs
- Group B Songs skills don't stack either. Just be careful with Siren's Voice and Circle of Nature overwriting your main Group B Song buffs if you use them
- This is just a guide and you don't have to get all these skills as there are other prerequisites for these skills that might take up all of your skill points. Just know what you want to focus on
ㅤꨄ︎𐫱 ✿ ❀ ❁ ✽ ❤︎ Trouvere ❤︎ ✽ ❁ ❀ ✿ 𐫱 ꨄ︎
| Skill |
Level |
Explanation
|
 Stage Manner Stage Manner |
5 |
Passive + 15 P.Atk
|
 Mystic Symphony Mystic Symphony |
1 |
Increases Rose Blossom and Rhythm Shooting damage by 100% (Ultimate Skill)
|
 Sonata of Kvasir Sonata of Kvasir |
1 |
Allows you to use Ensemble Skills and Chorus Group B Songs skills alone (Ultimate Skill)
|
| March of Prontera |
5 |
P. Atk Buff
|
| Serenade of Jawaii |
5 |
S. Matk Buff
|
| Musical Interlude |
5 |
Res Buff
|
| Sound Blend |
5 |
Adds a debuff on a single target monster that boosts your Rhythm Shooting and Rose Blossom damage to them. This is the auto cast skill of the Physical Performer Dimensions combo. Allows you to inflict the debuff on multiple enemies easily and with a high damage (using Rhythm Shooting)
|
 Rhapsody of Mineworker Rhapsody of Mineworker |
1/5 |
Useful for inflicting a -RES debuff on monsters near you. Useful for mid-late game content, but is useless by endgame content with Boss Protocol monsters. Can just be used to recover AP
|
| Rhythm Shooting |
5 |
Decent single target damage and useful for inflicting the Sound Blend debuff on enemies when using  Time Dimensions Rune Crown (Troubadour & Trouvere) [1] (400540). Can also be used to finish off monsters not killed by one cast of Rose Blossom. Can be used alternatively with Rose Blossom for helping with strong MVPs Time Dimensions Rune Crown (Troubadour & Trouvere) [1] (400540). Can also be used to finish off monsters not killed by one cast of Rose Blossom. Can be used alternatively with Rose Blossom for helping with strong MVPs
|
| Rose Blossom |
5 |
Our main skill! Quite strong, but has a long cooldown. Very cute with the pink flower effect
|
Notes:
- A good skill rotation to be able to use both Mystic Symphony and Sonata of Kvasir in a quick interval (starting at max AP), is to use Mystic Symphony first, cast March of Prontera, Serenade of Jawaii, Musical Interlude, and then cast Sonata of Kvasir
- I didn't max out some skills in Trouvere skill tree and just used the extra points on the Wanderer skill tree to get more useful Chorus buffs. You can do what you want with the remaining skill points, but since some Trouvere skills are only useable in PVP and/or useless by endgame (Gefenia Nocturne and Raphsody of Mine Worker), it's up to you if you wanna level them up or not
|
Leveling
|
|
Reminder: Always use  [Bound] Battle Manual (12263) or any other type of Battle Manual that you have. [Bound] Battle Manual (12263) or any other type of Battle Manual that you have.
This is just a rough leveling guide. It would still be good to check out other player guides and ask people in game on the best place to go to if you find yourself struggling on the recommended dungeons here.
Also refer to Gear Recommendation 👙 section as you progress. Specially if you are struggling with the suggested dungeons.
|
|
|
Early Stage 1-99
This is just gonna be a short guide for leveling. Your first priority is joining the Eden Group and then doing the [Board Quests]. To prepare for this, just collect the Bows for levels 10 and 45 from the [Eden Gears] and then get the  Paradise Wanderer Whip (580022) at level 100. From Archer to Gypsy, you only need to use the skill Double Strafe to level. Prioritize getting your DEX and AGI to 99 and you should be all set. Just do random Eden Quests until you're level 70 and can collect the level 70-99 quest for hunting 15x Wraith 15x Evil Druid in Glast Heim (Monastery). From warper, just choose Dungeons > Glast Heim > Monastery. Repeat this a few times to get to level 99 but don't rebirth yet, make sure you keep 1 completed quest of this so you can turn it in later for quick leveling. After that, rebirth to High Novice > job change to High Archer > do some Eden Boards quests again til you're job 50 and can job change to Gypsy. After changing your job to Gypsy, turn in the the level 70-99 quest that you saved earlier, and you should be around high level 80 to 90's. Repeat and do some quests again to go level 99 and job 70 to become a Wanderer Paradise Wanderer Whip (580022) at level 100. From Archer to Gypsy, you only need to use the skill Double Strafe to level. Prioritize getting your DEX and AGI to 99 and you should be all set. Just do random Eden Quests until you're level 70 and can collect the level 70-99 quest for hunting 15x Wraith 15x Evil Druid in Glast Heim (Monastery). From warper, just choose Dungeons > Glast Heim > Monastery. Repeat this a few times to get to level 99 but don't rebirth yet, make sure you keep 1 completed quest of this so you can turn it in later for quick leveling. After that, rebirth to High Novice > job change to High Archer > do some Eden Boards quests again til you're job 50 and can job change to Gypsy. After changing your job to Gypsy, turn in the the level 70-99 quest that you saved earlier, and you should be around high level 80 to 90's. Repeat and do some quests again to go level 99 and job 70 to become a Wanderer
Mid Stage 100-199
From here, just level up a little more until you get level 5 Severe Rainstorm. You can then proceed with doing the illusion dungeons quests from the [Main Board Quests]. You can also do some Eden Board quests again if you find the illusion dungeons a bit too difficult. In fact, once you reach around level 190 i'd recommend doing the episode 17.1 and 17.2 quests or buying the skip tickets for them  Episode 17.1 Clear Ticket (1000285) and Episode 17.1 Clear Ticket (1000285) and  Episode 17.2 Clear Ticket (1000287) so you can access the map with the Eden Boards quest 240x of any type in ba_pw03. Get it and go to the Warper > Dungeons > Varmundt Dungeons > Second Power Plant. Just do this quest a lot and you should level up fast. It would also help you collect Episode 17.2 Clear Ticket (1000287) so you can access the map with the Eden Boards quest 240x of any type in ba_pw03. Get it and go to the Warper > Dungeons > Varmundt Dungeons > Second Power Plant. Just do this quest a lot and you should level up fast. It would also help you collect  Eden Coin (25223) which you can use to buy [Bound] Battle Manual (12263), Eden Coin (25223) which you can use to buy [Bound] Battle Manual (12263),  [Bound] Bubble Gum (12264), [Bound] Bubble Gum (12264),  Collection Of Scrolls Shooting Transformation (22758), and most importantly, The One Potion (50035). If you are struggling on some maps, i'd recommend using Collection Of Scrolls Shooting Transformation (22758) for 30% ranged damage buff (you will be transformed into a gazeti and kobold archer) and The One Potion (50035) for damage and survivability. Using these two would help make your journey a lot easier Collection Of Scrolls Shooting Transformation (22758), and most importantly, The One Potion (50035). If you are struggling on some maps, i'd recommend using Collection Of Scrolls Shooting Transformation (22758) for 30% ranged damage buff (you will be transformed into a gazeti and kobold archer) and The One Potion (50035) for damage and survivability. Using these two would help make your journey a lot easier
Late Stage 200-275
When you reach level 200, change your job to Trouvere and prioritize getting Rose Blossom, Rhythm Shooting, Mystic Symphony, and Sonata of Kvasir. And then max out the other buffs. You should also now be able to access Varmundt's Biosphere at 240. Understandably, you would struggle quite a bit here if your gears aren't ready for this stage yet. I'd recommend farming first and then coming back here when you think you can handle the monsters. Leveling via the Eden Boards level 190 quests are also still viable. It would take some time, but you can get eden coins for it.
Late stage options for leveling at level 240+ are:
- Clock Tower Unknown Basement - solo. Lots of good loots to get you started in refining and grading
- Varmundt's Biosphere - solo. Quest turn in experience is decent
- Varmundt's Biosphere Depth - party preferred (very rare now)
- Unknown Blue Hole - solo/party (you need to be level 250, no reputation needed, can wear EXP gears)
- Varmundt's Biosphere Depth 2 - solo/party (you need to be level 250, have 2000 Biosphere Depth 1 Reputation, and good gears)
|
Gear Recommendation 👙
|
|
⚠️ NOTE: We've been getting more and more "catch up" gears that I haven't really tested or used on my journey. The stage-by-stage gear recommendations are just rough guides. Always use your discernment and decide if you'll still make them. Especially if you feel like the gears are too expensive to make (and are super outdated). The only "solid" recommendation on gears that this guide would have is on the End Game section (since I would do my best to keep it updated as new end game gears get released)
|
|
|
• Eden Gears •
These are decent starting gears. You need to use them while working towards getting the next set that you'll use. You should definitely get the Eden Shadow Gears. The 50% Ignore Monster Def it provides is definitely super needed! We won't be replacing them until around End Game since it is quite costly to make Shadow Gears. It would probably cost around 200m-400m just to get the BIS Full Penetration Shadow Gears. The headgear slots and garment slot don't really have a shadow gear. We could use costumes in those spots to get cute cosmetics and some additional stats using costume enchants
Useful links:
|
|
|
❣ Early Game ❣
These are the recommended early games gears, but do not get stuck trying to perfect them. The only important ones to collect here are the cards and you don't even have to have them all immediately. Focus on getting one combo card set at a time and then try farming the next suggested items. As long as you can decently farm  Amethyst Fragment (1000405) by killing Gray Wolves (@mi 21304), you can skip upgrading some stuff and focus on hunting Gray Wolves. Of course, it depends on your comfort level in hunting them, but don't dwell on these gears since we will drop these fast. Just a reminder, you should be able to get some refine tickets Amethyst Fragment (1000405) by killing Gray Wolves (@mi 21304), you can skip upgrading some stuff and focus on hunting Gray Wolves. Of course, it depends on your comfort level in hunting them, but don't dwell on these gears since we will drop these fast. Just a reminder, you should be able to get some refine tickets  Imperial Refine Ticket (100129) for the Grace set. Would be better to use those to save some zeny and materials Imperial Refine Ticket (100129) for the Grace set. Would be better to use those to save some zeny and materials
Useful links:
|
|
|
• ❤︎ Mid Game ❤︎ •
Recommended gears for Mid Game. Feel free to skip some of them if you can and just work towards getting Late Game / End Game gears if you can.
Mid Game Equipment
| ♡♡♡ |
Item |
Notes
|
| Upper Head Gear |
+12 A  Crown of Beelzebub [1] (400110) Crown of Beelzebub [1] (400110) |
You don't really have to make this a +12 A anymore if you can get Time Dimensions Rune Crown (Troubadour & Trouvere) [1] (400540). However, this can be used by other classes if you wanna try them. Prioritize getting the gears on the End Game Gears table
|
| Mid Head Gear |
 Gambler's Seal [1] (410233) Gambler's Seal [1] (410233) |
Priority enchant is Long Range Physical Damage, but you can also get Atk + (not Atk% +) or HP% +
|
| Low Head Gear |
 Young Leaf of World Tree (Dexteriy) (420018) / Young Leaf of World Tree (Dexteriy) (420018) /  Blood Sucker (18754) Blood Sucker (18754) |
P.Atk, Atk, and Dex are good enchants for Young Leaf of World Tree (Dexteriy) (420018). You can actually use any kind of Young Leaf of World Tree (Dexteriy) (420018) you can get not just the Dexterity one. It really doesn't matter
|
| Armor |
+9 / +11  Snow Flower Armor [1] (450206) / +9 / +11 Snow Flower Armor [1] (450206) / +9 / +11  Grey Wolf Suit [1] (450177) Grey Wolf Suit [1] (450177) |
I've been told that since the recent updates, it would be easier to farm for Snow Flower Armor [1] (450206) and its enchants or buy it from other players. There is more info about it [here]. The enchants you'd need for it are  Ice Magic Stone (Rainstorm) (1000791) and Ice Magic Stone (Rainstorm) (1000791) and  Ice Flower Spell (Sniper) (311100). The last enchant, you can decide what you need. You'd save more money and time making that so you can skip the Gray Wolf gears. Ice Flower Spell (Sniper) (311100). The last enchant, you can decide what you need. You'd save more money and time making that so you can skip the Gray Wolf gears.
|
| Weapon |
 Glacier Whip (580030) / Glacier Whip (580030) /  Dim Glacier Whip [1] (580033) / Dim Glacier Whip [1] (580033) /  Dimensions Musical Rope [2] (580062) Dimensions Musical Rope [2] (580062) |
The cheapest one you can get would be good.
|
| Shield |
+7 / +11  Illusion Silver Guard [1] (460018) Illusion Silver Guard [1] (460018) |
-
|
| Garment |
+9 / +11  Grey Wolf Muffler [1] (480090) Grey Wolf Muffler [1] (480090) |
 Wolf Orb (Powerful) Lv.3 (310584), Wolf Orb (Powerful) Lv.3 (310584),  Wolf Orb (Fast) Lv.3 (310575), and Wolf Orb (Fast) Lv.3 (310575), and  Wolf Orb (DEX) Lv.3 (310491) You don't really need perfect enchant for these. More info in explanation Wolf Orb (DEX) Lv.3 (310491) You don't really need perfect enchant for these. More info in explanation
|
| Shoes |
+9 / +11  Grey Wolf Boots [1] (470087) Grey Wolf Boots [1] (470087) |
 Wolf Orb (Firing Shot) (310611), Wolf Orb (Firing Shot) (310611),  Wolf Orb (Fixed Casting) Lv.3 (310602), and Wolf Orb (Fixed Casting) Lv.3 (310602), and  Wolf Orb (Robust) Lv.3 (310599) You don't really need perfect enchant for these. More info in explanation Wolf Orb (Robust) Lv.3 (310599) You don't really need perfect enchant for these. More info in explanation
|
| Accessory 1 |
 Grey Wolf Pendant [1] (490106) Grey Wolf Pendant [1] (490106) |
 Wolf Orb (Archer) Lv.4 (310631), Wolf Orb (Archer) Lv.4 (310631), and Wolf Orb (DEX) Lv.3 (310491) Wolf Orb (Archer) Lv.4 (310631), Wolf Orb (Archer) Lv.4 (310631), and Wolf Orb (DEX) Lv.3 (310491)
|
| Accessory 2 |
 Grey Wolf Ring [1] (490107) Grey Wolf Ring [1] (490107) |
Wolf Orb (Archer) Lv.4 (310631), Wolf Orb (Archer) Lv.4 (310631), and Wolf Orb (DEX) Lv.3 (310491) OPTIONAL:  Wolf Orb (Drain Life) (310643), Wolf Orb (Drain Life) (310643),  Wolf Orb (Drain Soul) (310644) CAUTION: Only choose the optional enchants if you have no plan of reselling these accessories. I was able to sell one of them easily since i chose the perfect enchants, but for the other one, i took drain life, and when i no longer needed it, it was hard to sell Wolf Orb (Drain Soul) (310644) CAUTION: Only choose the optional enchants if you have no plan of reselling these accessories. I was able to sell one of them easily since i chose the perfect enchants, but for the other one, i took drain life, and when i no longer needed it, it was hard to sell
|
Useful Links:
|
|
|
⚠️ ⚠️ ⚠️ WARNING⚠️ ⚠️ ⚠️
Around Late Game onwards, you should have discernment and be very careful in buying/making gears as they can be very costly at this part of the game.
To save zeny, I recommend doing your best to skip as many gears as you can that is considered as "Late Game" in this guide.
Prioritize making the ones in End Game if possible. However, going through this recommended gear progression is also nice especially if you are also preparing to gear up a 1x character
|
|
|
⭐ 💖 End Game 💖 ⭐
Current end game gears according to the latest updates. Will be updated from time to time.
|
Costume Stones/Shadows/MVP Cards/Pets
|
|
🎭 Costume Enchants 🎭
With the release of new gears having more non-crit physical damage bonuses, the  Troubadour & Trouvere Stone (Garment) (1001488) combo is the best again. Just change the mid head gear costume stone to Troubadour & Trouvere Stone (Garment) (1001488) combo is the best again. Just change the mid head gear costume stone to  Wanderer Minstrel Stone II (Mid) (1001943) since the 15% size damage is better than the 10% Rose Blossom skill modifier bonus Wanderer Minstrel Stone II (Mid) (1001943) since the 15% size damage is better than the 10% Rose Blossom skill modifier bonus
|
|
|
Shadow Gears
|
|
For the best in slot shadow gears, we should get our skill shadow gears: Blossom Shadow Armor and Shoes + Musical Shooting Earring and Pendant. Just a heads-up, these skill shadow gears are expensive and you might need at least 500m to craft a single piece if you decide to buy them in zenys. You also won't be able to use them on other classes. If you want a more general and cheaper set of shadow gears, you can proceed to the next part.
|
|
|
For the general (and cheaper) shadow gears, you can take a look here. It's the usual shadow equipment of most physical classes.
|
|
|
While the Skills Shadow Gears are really good and the best for DPS, it's still really nice to have the utility from the general shadow gears specially the Maximum Mammoth shadows. Keep this in mind when deciding what would work best for you.
For enchants, I recommend prioritizing CON + 5 (damage + utility) > +5% ranged physical damage (highest damage) > POW + 5, but you can definitely get more defensive enchants like HP%, FLEE, RES, and MRES if that's what you prefer.
- Ranged Physical damage (in the first enchant line) gives the highest damage even if we already have lots of it vs the +5 CON/POW (in the second enchant line).
- CON always gives higher damage for Rhythm Shooting (compared to POW) since it has a really high CON scaling. For Rose Blossom, sometimes POW gives more damage (even if it scales with CON) if it gives you higher p.atk, but CON beats POW if it doesn't.
Overall, I prioritize CON as the secondary benefit of having it like higher HIT and FLEE is really nice specially in end game dungeons like Encroached Geffenia. Hello  Meteor Assault from Depth Flame Ghost and Meteor Assault from Depth Flame Ghost and  Spiral Pierce from Chief Knight of Abyss 😊 Spiral Pierce from Chief Knight of Abyss 😊
|
|
|
|
MVP Cards
MVP Cards
| ♡♡♡ |
Item |
Notes
|
| Upper Head Gear |
 [MVP] Violent Coelacanth Card (4529) [MVP] Violent Coelacanth Card (4529) |
It's probably one of the best cards we can get for upper headgear (for an overall damage increase). It's not a priority since other MVP cards give more boost. But it's definitely one of the best (if not the best) in slot specially for an over-refined upper headgear. We don't really need the 0.5 FCT from  [MVP] Ultra Limacina Card (300377) even with full drop rate gears and ATK % is really bad. [MVP] Ultra Limacina Card (300377) even with full drop rate gears and ATK % is really bad.
Note: We have a lot of new head gear cards that boost damage to certain element by up to 20% ex:  High Incubus Card (300664). I can't compare it right now since I sold my [MVP] Violent Coelacanth Card (4529), but if you have a Demigod Tablet Set, it's possibly better to have the element headgear cards compared to this one (when targeting a specific mob) High Incubus Card (300664). I can't compare it right now since I sold my [MVP] Violent Coelacanth Card (4529), but if you have a Demigod Tablet Set, it's possibly better to have the element headgear cards compared to this one (when targeting a specific mob)
|
| Mid Head Gear |
N/A |
Most MVP headgear cards that give damage require some kind of refining. Since the middle slot can't be refined. I can't think of any other MVP card that's good for this slot (note: it might be good to use  Melted Poring Card (300174) since lots of MVP cards reduce HP by a certain %) Melted Poring Card (300174) since lots of MVP cards reduce HP by a certain %)
|
| Armor |
Priority:  [MVP] Encroached Tan Card (300533) and [MVP] Encroached Tan Card (300533) and  [MVP] Clown Alphoccio Card (4560) [MVP] Clown Alphoccio Card (4560)
Situational, but nice to have:  [MVP] Jewgoliant Card (300007) [MVP] Jewgoliant Card (300007)  [MVP] Gloom Under Night Card (4408) [MVP] Gloom Under Night Card (4408)  [MVP] Bone Detardeurus Card (300021) [MVP] Bone Detardeurus Card (300021)  [MVP] Boitata Card (27126) [MVP] Boitata Card (27126) |
[MVP] Encroached Tan Card (300533) is really just so nice to have cause it's useful for all purpose. Both MVP-ing and farming.
[MVP] Clown Alphoccio Card (4560) very useful to make gameplay smoother and also very helpful in parties! The additional +40 FLEE is really nice for certain niche uses.
The other element/race cards could be better in specific instances
|
| Weapon |
 [MVP] Thanatos Card (4399) [MVP] Thanatos Card (4399) |
Definitely the best in slot MVP card right now for us. Lets us change our shadow gears for a huge boost of damage and better utility. Just a reminder, if you have Blossom and Musical Shooting Shadow gears, make sure to keep the total refine level of each combo to +17 to avoid the Defense Ignore bonus. If you don't do this, Thanatos Card will actually nerf your damage.
With this card, your shadow gears are very flexible. Personally, I use  Blossom Shadow Armor (1270136), Blossom Shadow Armor (1270136),  Blossom Shadow Shoes (1270137), Blossom Shadow Shoes (1270137),  Master Shadow Shield (24793), Master Shadow Shield (24793),  Absorb Shadow Weapon (24686), Absorb Shadow Weapon (24686),  Maximum Mammoth Shadow Earring (24681), and Maximum Mammoth Shadow Earring (24681), and  Maximum Mammoth Shadow Pendant (24682) in Zero Cell. Can also use this combo in other dungeons but you have to make sure that you are also using a Mistress pet. You can definitely play around with more shadow gears Maximum Mammoth Shadow Pendant (24682) in Zero Cell. Can also use this combo in other dungeons but you have to make sure that you are also using a Mistress pet. You can definitely play around with more shadow gears
|
| Shield |
Best for DPS:  [MVP] Bijou Card (4636) [MVP] Bijou Card (4636)
Situational MVP card:  [MVP] Golden Thief Bug Card (4128) [MVP] Golden Thief Bug Card (4128) |
I haven't tried [MVP] Golden Thief Bug Card (4128), but it should be useful for Depth 2. [MVP] Bijou Card (4636) gives a nice boost of damage specially when you need that boost to 1 shot monsters when farming (easier) dungeons like the Biospheres and wearing full drop rate gear. Just keep in mind that the non MVP options  Elite Rgan Guardian Card (300465) and Elite Rgan Guardian Card (300465) and  Alice Card (4253) are usually good enough (and can be better in some cases) Alice Card (4253) are usually good enough (and can be better in some cases)
|
| Garment |
Best for DPS:  [MVP] Snow Angel Card (300473) [MVP] Snow Angel Card (300473)
Most Versatile:  [MVP] Wanderer Trentini Card (4683) [MVP] Wanderer Trentini Card (4683) |
It is so easy to get instant cast with [MVP] Wanderer Trentini Card (4683) and it helps so, so much with survivability. For the best DPS however, [MVP] Snow Angel Card (300473) is the one that you need. You'd have to adjust some gears and stats to get instant cast since it's hard to get stats to 530 without [MVP] Wanderer Trentini Card (4683) and/or almighty shadow gears and without relying on Blessing buff + The One
|
| Shoes |
N/A |
-
|
| Accessories |
 [MVP] Fallen Angel Iceslug Card (300471) [MVP] Fallen Angel Iceslug Card (300471) |
This is the only MVP card we have that gives damage in this slot and it really does help a lot with the mobs included in it even if it only falls under 1 race or element. It lowers HP by 20% tho, so beware of that for harder dungeons
|
|
|
MVP cards are really amazing to have! But always remember that using some of them have (sometimes severe) drawbacks, not just from the card itself, but also from giving up the defensive options that normal cards provide. For example, giving up Alice Card (4253) in order to use [MVP] Bijou Card (4636), might look good on paper as you have increased boss damage, but in End Game dungeons, you might drop dead (gorgeous) on the floor more if you don't think about your defensive stats.
As Performers, we don't really have the highest DPS in the game even if we force ourselves to wear all the MVP cards and +15 A gears. We shine when we play smartly to our advantages. We really kinda have it all. Decent damage, decent survivability (high FLEE, high HP, and can wear shields), decent range and AoE, and amazing buffs that we should use to our full advantage. Remember, not every step has to be a grand one. A little dainty dance step sometimes works a lot better 💋
|
|
|
|
🐾 Pets 🐾
Pets
| ♡♡♡ |
Item |
Notes
|
| Best Overall Pet |
 Mistress Egg (9193) Mistress Egg (9193) |
Nullifies monster size penalty for physical attacks which removes the need for +10  Perfect Size Shadow Weapon (24425). Increases physical damage against Normal classes by 7%. This is quite expensive to make. Doesn't help in Zero Cell as all mobs there are Medium. Can definitely swap it for the other pets listed here if farming there Perfect Size Shadow Weapon (24425). Increases physical damage against Normal classes by 7%. This is quite expensive to make. Doesn't help in Zero Cell as all mobs there are Medium. Can definitely swap it for the other pets listed here if farming there
|
| Versatile Physical Damage Pet |
 Little Isis Egg (9090) Little Isis Egg (9090) |
Increases physical damage against all classes (both Normal and Boss) by 4% when loyal
|
| Boss Damage Physical Damage Pet |
 Abysmal Knight Egg (9132) Abysmal Knight Egg (9132) |
When loyal, Atk + 5%, P.Atk + 2, Increases physical damage against boss monsters by 5%. You can also just get this if you prefer the Atk% and P.Atk over the Little Isis bonus
|
| HP Absorb Pet |
 Succubus Egg (9055) Succubus Egg (9055) |
When loyal, low chance of gaining 5% of the damage inflicted to an enemy as HP. Max HP +1%. My preferred pet in Zero Cell
|
| SP Absorb Pet |
 Incubus Egg (9052) Incubus Egg (9052) |
When loyal, max SP +5%. Low chance of gaining 1% of the damage inflicted to an enemy as SP. Probably the most used pet for farming. Almost no more SP problems when combined with other SP absorb items like  Rideword Hat [1] (5208) and Absorb Shadow Shield (24685) Rideword Hat [1] (5208) and Absorb Shadow Shield (24685)
|
|
Miscellaneous Stuff
|
|
Hall of Life
Performers are a good addition to the parties in the end game instance, Hall of Life
- As stated in Conga's guide, try to get at least 300k HP. It's possible to get higher HP and can give up devo on lower levels if needed. At higher levels though, you'd still want devo even with high HP.
- As a reminder, Group A Songs skills don't stack like Swing Dance and Windmill Rush. Usually, parties prefer Swing Dance so if there's a Troubadour with you, communicate.
- Another reminder is choosing Group B Chorus skills. They also don't stack so only choose one. The most commonly used Chorus buffs are Unlimited Humming Voice if your DPS are magic types and Dance with Warg if ranged types. For lower level parties where not everyone has high HP, or if your main DPS are melee types, Lerad's Dew is also a decent option.
- For Ensemble, you can't go wrong with Invulnerable Siegfried. It is confirmed in Discord that Rigel casts wind magic, fire magic, neutral magic, water magic, neutral misc, and ranged physical (thanks GM Muh). It is preferred that people avoid getting hit by any skill and dodge everything, but for those instances where someone messes up, having a little bit of these added resistances should help mitigate damage received (specially by the devo IG).
- Always cast Frigg's Song and if soul linked,
 Apple of Idun. Actually, ask to be soul linked if there's an SA cause higher HP is always needed in higher levels. And a reminder, it doesn't stack with Poem of Bragi. Prioritize Apple of Idun over Poem of Bragi. Apple of Idun. Actually, ask to be soul linked if there's an SA cause higher HP is always needed in higher levels. And a reminder, it doesn't stack with Poem of Bragi. Prioritize Apple of Idun over Poem of Bragi.
- If there are crit-focused members like Wind Hawks, DKs, and Dorams, use Fortune's Kiss Fortune's Kiss.
- It is not always a perfect run so if someone dies, make sure to recast all buffs that you can use specially if it's the main DPS of the party.
- Sometimes, when the runs are perfect, it goes so fast that Unlimited Humming Voice is still on CD. Just communicate with party members if you need to wait for CD of some skills before starting the fight again.
|
|
|
Damage Test 💪🏻
DPS Check on Dummies. Showing battle stats and gears for transparency and (in)accuracy. Feel free to call out and suggest some things for testing if i made an inaccurate test here
Battle Stats
| battle stats
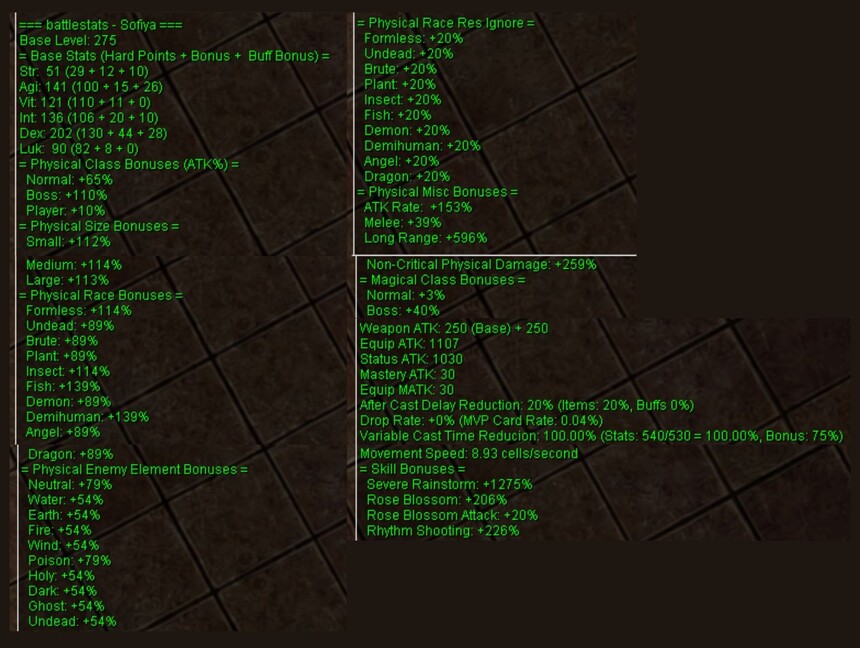
Please add 30% ACD cause i forgot to cast Bragi's Poem before taking a screenshot 😭 ACD should show up as (Items: 20%, Buffs 30%) for a total of 50%
|
Gears
| Gears

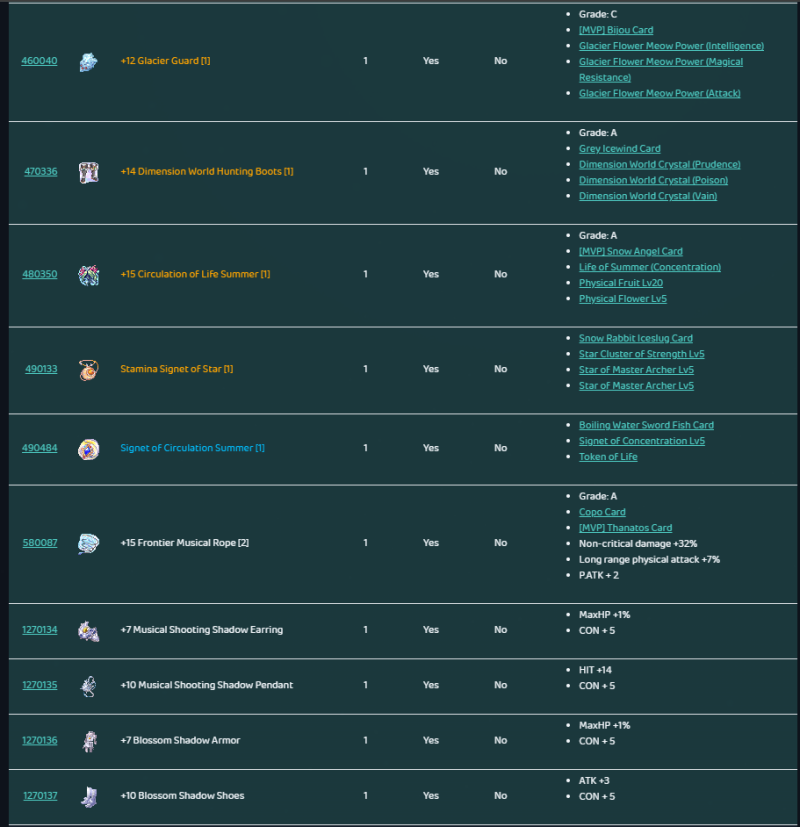
Don't know why it's not shown there, but both Master Shadow Weapon and Shield have CON+3 and DEX+5 for a total of 6 CON and 10 DEX
|
|
Encore 🎤
Credits
Gear Section inspired by:
Formatting inspired by:
|
|
Thank you GM Icey and GM Muh for the amazing server management ❤️ and sorry for not handling events yet 😭
|
Change Logs
Latest edit:
June 13, 2026 [Improved more formatting. Added stat build, misc cards, updated Zero Cell Lux video]
June 11, 2026 [Improved formatting (still a WIP). Updated recommended gears. Added Chapter 1 equipment. Updated costume stones]
March 25, 2026 [Added Zero Cell videos. Updated some pros and cons. Removed "Damage Tests" section. CH 1 gears and Zero Cell guide to be added soon]
January 09, 2026 [Minor edit with Skill Shadows]
January 01, 2026 [Hit Physical Enchant + Skill Shadow Gears Update]


 Humming
 Whistle
 Assassin Cross of Sunset
 The Ring of Nibelungen
 Into the Abyss
 Echo Song


.jpg)


