Achievements and Sakura's Rawr (Dragonic Breath) guide towards the Journey's End: Difference between pages
No edit summary |
|||
| Line 1: | Line 1: | ||
= | [[Category:Dragon Knight]] | ||
== '''Introduction''' == | |||
Hello everybody, Sakura[[File:Sakura petals.png|frameless|25x25px]] here, i've been playing MuhRO for over a year at the time of writing this guide. I love the class a lot, being able to carry lots of stuff, hit hard and not afraid of being hit :< and you get to have a mount. The purpose of this guide is to show the Best in slot (BiS) equipment and some tips and tricks for playing Dragon Knight mainly Dragonic Breath. As this is my first guide please be lenient >//< and enjoy reading! [[File:Poring 1.gif|frameless]] | |||
== '''Videos''' == | |||
[[File: | *'''[https://www.youtube.com/watch?v=oqEIKN2VONY A short video show casing the end game of Dragon Knight - Dragonic Breath Build] Featuring Biosphere Depth 2, CT 25* (Betelgeuse) and HoL Lv20 (Rigel).''' | ||
*'''[https://youtu.be/RILFTlJYgXA DcB DK Solo Tan Hard]''' | |||
== '''Notable Stats+Traits, Skills and Consumables''' [[File:Gold Poring.gif|frameless]] == | |||
[[File: | [[File:Down arrow.png|frameless|35x35px]] A short explanation on Stats and Traits, more in-depth info can be found [[Stats|here.]] | ||
{| class="wikitable" | |||
|+ style="white-space:nowrap; border:1px solid; padding:3px; | | |||
=== Stats === | |||
|- | |||
! Stats !! Effects !! Notes | |||
|- | |||
|| Str || Increase Weight Attack & Weight Limit || Suggested Value at 100-120, it improve some of your Damage and easier loot management. [[#Stats_Test_for_Damage|Click here to see how much it affect your Damage.]] | |||
|- | |||
|| Agi || Increase Attack Speed (Aspd) & Flee || Suggested Value at 1, its possible to get 193 (Max Aspd) with equipment and consumables alone. | |||
|- | |||
|| Vit || Increase Max HP & HP Healing Effectiveness || Suggested Value at 130, the most important stats for DcB DK. [[#Stats_Test_for_Damage|Click here to see how much it affect your Damage.]] | |||
|- | |||
|| Int || Increase Max SP & Reduce Cast Speed || Suggested Value at 60-100+, increasing Max SP improve some of our damage but not a lot, the main reason to up this stat is for the cast point. Stop adding Int until you get 530 cast point.(1 Int = 1 cast point) | |||
|- | |||
|| Dex || Reduce Cast Speed, Increase Hit & Slight Increase Attack Speed || Suggested Value at 120, the 2nd most important stats for DcB DK is to get 530 cast point((Dex*2) + int). Not worth to add beyond 120 Dex as it cost a lot just for +1 Dex (2 cast points), instead, relocate the remaining to Int until you reach instant cast. <br/> [[#Instant_Cast_by_Stats_VS_Instant_Cast_by_VCT_100%|Using Stats to gain Instant Cast is Better than getting Instant Cast by VCT 100%.]] | |||
|- | |||
|| Luk || Increase some Hit & Attack || Suggested Value at 1-100, the main reason for this stats is just to get curse immunity (total Luk at 0 or 100). | |||
|} | |||
*Tips for Runestone Crafting, up 130 stats on Dex & Luk, remaining stats point go towards Str for holding more materials while crafting, [[#Runestone_Crafting_Chance|click here to see the crafting success chance.]] You can Reset / Save Stats build with NPC Lotus located at {{#navi:main_office|124|167}}. | |||
*Don't forget to visit Clan Room for '''permanent''' additional Stats gain, can switch between Clan anytime. [Sword Clan give +1 Str & Vit], [Arc Wand Clan give +1 int & Dex], [Golden Mace Clan give +1 Luk & Int], and [Crossbow Clan give +1 Dex & Agi] located at {{#navi:main_office|113|310}}. | |||
== | {| class="wikitable" | ||
|+ style="white-space:nowrap; border:1px solid; padding:3px; | Traits | |||
|- | |- | ||
! | ! Traits !! Effects !! Notes | ||
! | |||
! | |||
|- | |- | ||
| | || POW || Increases Attack & some P.Attack|| Suggested Value at 110, max this asap as this is our main trait for damage as it scale with DcB Skill. | ||
| | |||
| | |||
|- | |- | ||
| | || STA || Increases RES || Suggested Value at 0-72, this trait reduce '''Physical''' damage receive. Choose either STA or WIS at 72, not enough trait points for both. | ||
| | |||
| | |||
|- | |- | ||
| | || WIS || Increases Mres || Suggested Value at 0-72, this trait reduce '''Magical''' damage receive. Choose either STA or WIS at 72, not enough trait points for both. | ||
| | |||
| | |||
|- | |- | ||
| | || SPL || Increases Magic Attack || Suggested Value at 0. | ||
| | |||
| | |||
|- | |- | ||
| | || CON || Increases Hit & some P.Attack || Suggested Value at 110, our secondary traits to increase damage. | ||
| | |||
| | |||
|- | |- | ||
| | || CRT || Increases Critical Damage || Suggested Value at 0. | ||
| | |} | ||
| | |||
[[File:Down arrow.png|frameless|35x35px]] Notable Skills from Swordman to Dragon Knight. Further info can can visit [[Dragon Knight|here.]] | |||
{| class="wikitable" | |||
|+ style="white-space:nowrap; border:1px solid; padding:3px; | | |||
=== Skills === | |||
|- | |- | ||
! !! Skills !! Effects !! Notes | |||
|- | |- | ||
| | || '''Swordman'''|| {{#skill:7}} || When casted, the buff last for 10 seconds that increase +20% fire physical property to your Damage || This skill is super good to improve damage during MVP fight, not so much for farming as you need to refresh every 10 seconds. | ||
| | |||
| | |||
|- | |- | ||
| | |↑ || {{#skill:8}} || When casted, the buff last for 37 seconds or after taking 7 hits from monster (whichever come first) will make you immune to stagger effect from physical hit || This skill has niche usage when you are not wearing Lord Bearer's Shadow Gear. | ||
| | |||
| | |||
|- | |- | ||
| | | '''Knight'''|| {{#skill:55}} || A Passive skill that +40 Mastery Attack || More Attack is always welcome. | ||
| | |||
| | |||
|- | |- | ||
| | |↑ || {{#skill:63}} || A Passive skill that enable us to get a mount which Improve movement speed, increase weight limit, Ignore Size Penalty with Spears Weapon, + Mastery Attack || Never say no to a Cute Mount and all the benefits it bring :3 [[File:Peco Peco.gif|frameless]] | ||
| | |||
| | |||
|- | |- | ||
| | |↑ || {{#skill:64}} || A Passive skill that regain our Attack Speed back to normal || Riding a mount reduces our Attack Speed so this skill balance back the Attack Speed. | ||
| | |||
| | |||
|- | |- | ||
| | |↑ || {{#skill:1001}} || An Active Skill that you cast on a target and "Jump" towards it from 14 Cells away || This skill is one of the best movement skill in game as it bring you closer to the monster, faster movement = faster kill = faster farming. | ||
| | |||
| | |||
|- | |- | ||
| | |↑ || {{#skill:357}} || When Casted, the buff last for 1 minute that increase +15% Attack, +50 Hit at a cost of -15% Def || This skill improve Damage by a bit, good for MVP and its duration is manageable in farming. | ||
| | |||
| | |||
|- | |- | ||
| | |'''Rune Knight''' || {{#skill:2007}} || A Passive skill that works like {{#skill:63}} but slightly better || This skill alone restore our Attack speed back to normal. | ||
| | |||
| | |||
|- | |- | ||
| | |↑ || {{#skill:2008}} || An Active skill that deal AoE Fire Ranged Physical attack to a target || This skill is pre-requisite for Dragon Knight Skill. | ||
| | |||
| | |||
|- | |- | ||
| | |↑ || {{#skill:5004}} || An Active skill that deal AoE Water Ranged Physical attack to a target || This skill is pre-requisite for Dragon Knight Skill. | ||
| | |||
| | |||
|- | |- | ||
| | |↑ || {{#skill:2010}} || A Passive skill that allow us to consume Runestones for self Buff & crafting Runestones || This skill is the most important skill that allow us to use Runestones. Check on [[#Consumables|Consumables Section.]] Also for [[#Runestone_Crafting_Chance|Runestone Crafting Chances.]] | ||
| | |||
| | |||
|- | |- | ||
| | | '''Dragon Knight''' || {{#skill:5207}} || A Passive skill that give reduce damage taken from 10% Small, 15% Medium and 18% Large sized monster || This skill is super good that increase our survivability. | ||
| | |||
| | |||
|- | |- | ||
| | |↑ || {{#skill:5210}} || When casted on a monster, a buff will be applied on you and last for 5 minutes, it increases our main skill Dragonic Breath (DcB) by A LOT || This skill is the most important buff for Dragon Knight. | ||
| | |||
| | |||
|- | |- | ||
| | |↑ || {{#skill:6001}} || An Active skill that deal 9x9 AoE Ranged Physical attack to a target || This skill is our Main Skill, it IGNORE Def of monsters and its Damage scale with our POW, Max HP & Max SP. We need to achieve instant cast by getting 530 cast point, the formula is ((dex*2)+int) and 185+ Attack speed for max spam. Try to get 193 (max Attack speed) for seamless {{#skill:1001}} + {{#skill:6001}} spam. | ||
| | |} | ||
| | <div style="float: right;"> [[#top|<big>'''[Top]'''</big>]]</div> | ||
[[File:Down arrow.png|frameless|35x35px]]'''Be aware''' that consumables that get marked by '''<big>"X"</big>''' next to their name will be '''Dispelled upon death'''. [[File:Deviling.gif|frameless]] | |||
*Only Hagalas Runestone get Dispelled when you Logout. | |||
{| class="wikitable" | |||
|+ style="white-space:nowrap; border:1px solid; padding:3px; | | |||
=== Consumables === | |||
|- | |- | ||
! Item !! Effects !! Notes !! Where to get | |||
|- | |- | ||
| | ||{{#item:12264}} || +100% Drop rate for 30 minutes || A must have consumables for field, dungeon & instances farming. || can get from [[Eden Machine|Eden Machine.]] | ||
| | |||
| | |||
|- | |- | ||
| | ||{{#item:12883}} || +10 All Stats for 30 minutes || One of the essential Food Buff for DcB DK to reach Instant Cast. || can get from [[Eden Machine|Eden Machine.]] | ||
| | |||
| | |||
|- | |- | ||
| | ||{{#item:23204}} || +500 Def and +200 Mdef for 30 minutes|| Optional Scroll since we have High Max HP, use only when you die a lot. || can get from [[Eden Machine|Eden Machine.]] | ||
| | |||
| | |||
|- | |- | ||
| | ||X {{#item:22758}} || +30% Range Physical Attack for 10 minutes || This Scroll increase Damage more than {{#item:11592}},|| can get from [[Eden Machine|Eden Machine.]] | ||
| | |||
| | |||
|- | |- | ||
| | ||X {{#item:12216}} || Self Buff a Lv10 {{#skill:29}} for 4 minutes || A super useful scroll if you don't want to keep going back to town for rebuff. || can get from {{#item:12914}} at [[Eden Machine|Eden Machine.]] | ||
| | |||
| | |||
|- | |- | ||
| | ||X {{#item:12215}} || Self Buff a Lv10 {{#skill:34}} for 4 minutes || A super useful scroll if you don't want to keep going back to town for rebuff. || can get from {{#item:12913}} at [[Eden Machine|Eden Machine.]] | ||
| | |||
| | |||
|- | |- | ||
| | ||X {{#item:657}} || Increases Attack Speed for 30 minutes || The Attack speed from this potion stack with {{#item:12437}}, || can get from any Tool Dealer. | ||
| | |||
| | |||
|- | |- | ||
| | ||{{#item:1100005}} || Heal 2750 HP || This is the Best HP Potion we have, spam-able and Heal increases with Healing effectiveness and Vit. || can buy from players or created by Genetic, more info [[Creations from special jobclasses#Special_Pharmacy_(Genetic)|here.]] | ||
| | |||
| | |||
|- | |- | ||
| | ||{{#item:1100004}} || Heal 360 SP || This is the Best SP Potion we have, spam-able and Heal increases with Healing effectiveness and Int. || can buy from players or created by Genetic, more info [[Creations from special jobclasses#Special_Pharmacy_(Genetic)|here.]] | ||
| | |||
| | |||
|- | |- | ||
| | ||{{#item:607}} || 100% Full Heal HP & SP || This is the only Item that Full Heal your HP & SP, but it has 4 seconds cooldown and is quite heavy to carry. || can buy from players or farm from dungeons and instances. | ||
| | |||
| | |||
|- | |- | ||
| | ||{{#item:12437}} || +10% Attack speed for about 8 minutes+ (500 seconds) || This Potion increases your Attack speed. You can get the 30 Minutes Version by Combining them from Mandy. <span style="color:#ffa200" id="n2ebb054d" class="copy-link" data-clipboard-text="@navi main_office 68/59">(main_office 68, 59)</span>. || can buy from players or created by Genetic, more info [[Creations from special jobclasses#Special_Pharmacy_(Genetic)|here.]] | ||
| | |||
| | |||
|- | |- | ||
| | ||{{#item:100232}} || +15% Melee & Range Physical Damage for about 8 minutes+ (500 Seconds) || This Potion increase our Damage by quite a bit, may help to 1 hit Kill the monster you're farming. You can get the 30 Minutes Version by Combining them from Mandy. <span style="color:#ffa200" id="n2ebb054d" class="copy-link" data-clipboard-text="@navi main_office 68/59">(main_office 68, 59)</span>. || can buy from players or created by Genetic, more info [[Creations from special jobclasses#Special_Pharmacy_(Genetic)|here.]] | ||
| | |||
| | |||
|- | |- | ||
| | ||{{#item:12424}} || Heal 5% HP, and Max HP increased by 2500 + (10/3)*[Base Level] for 8 minutes+ (500 seconds).|| This Potion increases our Max HP by Flat Value and Damage by a bit, You can get the 30 Minutes Version by Combining them from Mandy. <span style="color:#ffa200" id="n2ebb054d" class="copy-link" data-clipboard-text="@navi main_office 68/59">(main_office 68, 59)</span>. || can buy from players or created by Genetic, more info [[Creations from special jobclasses#Special_Pharmacy_(Genetic)|here.]] | ||
| | |||
| | |||
|- | |- | ||
|This | ||{{#item:12431}} || +20 Vit for 5 minutes || This Food increases our Max HP and Damage by quite a bit, You can get the 30 Minutes Version by Combining them from Mandy. <span style="color:#ffa200" id="n2ebb054d" class="copy-link" data-clipboard-text="@navi main_office 68/59">(main_office 68, 59)</span>. || can buy from players or created by Genetic, more info [[Creations from special jobclasses#Special_Pharmacy_(Genetic)|here.]] | ||
| | |||
| | |||
|- | |- | ||
| | ||X {{#item:12725}} || Recover 25% Max HP upon usage but the important one is it removes Stun, Sleep, <br/>Curse, Stone Curse, Poison Blind, Silence, Bleeding, Confusion, Frozen,Deep Sleep, <br/>Burning, Freezing, Guillotine Cross Poisons Marsh of Abyss and Mandragora Howling Debuff. <br/>Then Immune to those Debuff for 60 seconds || A super useful Runestones in Tower of Trials as monster there cast all sorts of Debuff.|| have to be crafted by yourself since the Runestones are untradable, more info [[Creations from special jobclasses#Rune_Mastery_(Rune_Knight)|here.]] | ||
| | |||
| | |||
|- | |- | ||
| | ||X {{#item:12728}} || +50% Incoming Healing Effectiveness. Last 15 Minutes.|| This Runestone improve Healing from Potion by A Lot, worth to use if you use Potions a lot.|| have to be crafted by yourself since the Runestones are untradable, more info [[Creations from special jobclasses#Rune_Mastery_(Rune_Knight)|here.]] | ||
| | |||
| | |||
|- | |- | ||
| | ||X {{#item:12729}} || Increases Weapon ATK by 70+(7 x RuneMasteryLv) Increases Scaling ASPD by (0.4 x RuneMasteryLv). Last 15 Minutes.|| This Runestone increases your Damage and Attack Speed.|| have to be crafted by yourself since the Runestones are untradable, more info [[Creations from special jobclasses#Rune_Mastery_(Rune_Knight)|here.]] | ||
| | |||
| | |||
|- | |- | ||
| | || {{#item:12733}} || Increases Def and Mdef based on this formula: (JobLevel x RuneMasteryLv / 4). Last 15 Minutes.|| A Defensive Runestone that help with survivability.|| have to be crafted by yourself since the Runestones are untradable, more info [[Creations from special jobclasses#Rune_Mastery_(Rune_Knight)|here.]] | ||
| | |||
| | |||
|- | |- | ||
| | ||X {{#item:12731}} || +30 Str. Last 15 Minutes. || A Runestone that improve your Damage. || have to be crafted by yourself since the Runestones are untradable, more info [[Creations from special jobclasses#Rune_Mastery_(Rune_Knight)|here.]] | ||
| | |||
| | |||
|- | |- | ||
| | ||X {{#item:22540}} || Increase +30% Physical Damage to All Size, +30% Range & Melee Physical Attack, +30% Critical Damage, +30% Max HP & Max SP. Last 15 Minutes.|| This is the Best Runestone, it increase your Damage significantly.|| have to be crafted by yourself since the Runestones are untradable, more info [[Creations from special jobclasses#Rune_Mastery_(Rune_Knight)|here.]] | ||
| | |||
| | |||
|- | |- | ||
| | |||
| | |} | ||
| | <div style="float: right;"> [[#top|<big>'''[Top]'''</big>]]</div> | ||
<br><br> | |||
== '''MVP and Farming Gear''' [[File:King Poring (s).gif]] == | |||
[[File:Down arrow.png|frameless|35x35px]] Farm gear are basically gears that provide increase drop rate %, the higher it is the more item drops you'll get. Be wary equipping farm gear may reduce your Damage, and always try to aim for 1 Hit / 2 Hit kill the monster you're farming for maximum efficiency. [[File:Angeling.gif|frameless]] | |||
{| class="wikitable" | |||
|+ style="white-space:nowrap; border:1px solid; padding:3px; | End Game Equipment for MVP & Farming | |||
|- | |- | ||
! !! Equipment !! Notes | |||
|- | |- | ||
| | | Upper Head Gear || +12 A {{#item:400529}} || Best enchant on 2nd slot is {{#item:312783}} 3rd slot is {{#item:312706}} 4th slot can go for any stats. Further info can visit [[Dimensions_Rune_Crowns|here.]] | ||
| | |||
| | |||
|- | |- | ||
| | | Mid Head Gear || | {{#item:410233}} || BiS is 10% Long range, but if you get 10% Max HP it works too, use {{#item:102343}} to enchant. Further info can visit [[Alice_Twisted_Madness#Enchants_2|here.]] | ||
| | |||
| | |||
|- | |- | ||
| | | Mid Head Gear (Farm) || | {{#item:19117}} or {{#item:19118}} || Depends whether you need the card slot for slight damage increase for last hitting monster. Further info can visit [[Increase_item_drop_gears#Equipment_that_increases_drop_rate|here.]] | ||
| | |||
| | |||
|- | |- | ||
| | | Low Head Gear || | {{#item:420220}} || BiS is 5 Vit and 7% Long range but Prioritize on 7% Long range then follow by stats, use {{#item:102342}} to enchant. Further info can visit [[Alice_Twisted_Madness#Enchants_3|here.]] | ||
| | |||
| | |||
|- | |- | ||
| | | Low Head Gear (Farm) || | {{#item:19095}} or {{#item:19143}} || BiS is Happy Balloon for the 10% drop rate but if it's too pricey, 2nd best would be {{#item:19147}} because of the +2 Dex but can get any balloon from [[Poring_Family_Balloons#Poring_Family_Balloons|Poring Family]] for 5% drop rate if you don't need the stats. Balloons from Poring Family can be Enchanted, BiS for the enchant is {{#item:310991}} more info [[Poring_Family_Balloons#Enchantment|here]]. Further info for drop rate can visit [[Increase_item_drop_gears#Equipment_that_increases_drop_rate|here.]] | ||
| | |||
| | |||
|- | |- | ||
| | | Armor || | +12 A {{#item:450171}} || Best enchant on 2nd slot is {{#item:310682}} 3rd slot is {{#item:310732}} 4th slot can go for Vit or Dex. Further info can visit [[Constellation_Tower#Nebula_Armor_Enchantment|here.]] <br/> [[#Nebula_of_Expert_ArcherLv3_vs_Nebula_of_HealthLv3|Click here for Expert Archer<sup>Lv3</sup> VS Health<sup>Lv3</sup> on 3rd Enchant.]] | ||
| | |||
| | |||
|- | |- | ||
| | | Armor (Farm) || | +12 {{#item:15186}} || Best enchant to get from 1st line is Indestructible, 2nd line would be either Vit or Dex. You can use {{#item:23175}} for the enchant. By replacing Nebula Armor, you'll lose a lot of Attack Speed and may slow down your farm. Further info can visit [[Increase_item_drop_gears#Equipment_that_increases_drop_rate|here.]] | ||
| | |||
| | |||
|- | |- | ||
| | |- | ||
| | | Weapon || | +12 A {{#item:630041}} || For the enchant you can choose which monster / MVP you want to focus. Further info can visit [[Dimension_Weapons#Dimensions_Weapons_Enchants|here.]] | ||
| | * For {{#linkmob:22174}} (Formless | <span style="background-color:none; color:#DEA193;">Neutral</span>) hence, {{#item:311934}} & {{#item:312800}} | ||
* For {{#linkmob:20994}} (Dragon | <span style="background-color:none; color:#DEA193;">Neutral</span>) hence, {{#item:311928}} & {{#item:312800}} | |||
* For {{#linkmob:22373}} (Demi-Human | <span style="background-color:none; color:purple;">Poison</span>) hence, {{#item:311937}} & {{#item:312800}} | |||
* For [[Varmundt%27s_Biosphere_Depth_2#Monsters_Info|Biosphere Depth 2]] my build rely on these 2 enchant {{#item:311934}} & {{#item:311874}} | |||
Tips:- Notice how the 3 MVP listed shared the same {{#item:312800}}, you can save some zeny to use 1 lance against 3 of them. | |||
|- | |||
| Garment || | +12 A {{#item:480350}} || This Garment should be the most expensive gear to make but it has the highest damage boost and should last a very long time. Prioritize to max the enchant on 2nd slot and aim for {{#item:313015}} (RNG involved to get Concentration). After 2nd enchant then only start focusing on 3rd enchant {{#item:312538}}. The last enchant to focus is the 4th enchant {{#item:312513}}. Further info can visit [[Divine Beast's Cloak: Summer|here.]] | |||
|- | |||
| Shoes || | +11 C {{#item:470073}} || This is like the cheat code damage boost for DcB DK, once the bonus vit is proc from the boots, your damage will be boosted by a large amount. BiS is 10% Max HP, the 2nd line enchant preferably MHP (flat 50~1000) too but can be any as long as you get 10% max HP on the first line enchant. Tips to use [[Board_Quests#Instance_Coin_Shop|Doil the Instance Coin Shop]] if you don't want to run the instance. Further info can visit [[Airship_Crash#Item_Exchange|here.]] | |||
[[#Boots_of_Unknown_Life_VS_Yorscalp_Boots|Click here for Boots of Unknown Life VS Yorscalp Boots test.]] | |||
|-/ | |||
| Shoes (Farm) || | | |||
* +12 A {{#item:470303}} | |||
* +12 A {{#item:470174}} | |||
*+12 {{#item:22048}} | |||
|| | |||
* BiS Boots for general farming and higher HP for higher survivability, best enchant on 2nd slot is {{#item:313097}} 3rd slot is {{#item:313094}} 4th slot is {{#item:313090}} Further info can visit [[21_Age_of_Heroes#Footgear_Enchants|here.]] | |||
* Glade Rune Boots have higher damage IF hitting the monster that match the element of the 2nd enchant of the boots at Lv5 (Example:- {{#item:311876}} against Wind and Earth element, other elements Glade Rune Boots fall behind in Damage compared to Yorscalp. Further info can visit [[Varmundt%27s_Biosphere#Rune_Armors_Enchant|here.]] <br/>'''[[#Glade_Rune_Boots_VS_Gaebolg_Boots_VS_Yorscalp_Boots|Click here for Glade Rune Boots VS Yorscalp Boots test.]]''' | |||
* Sombre Shoe provide 10% drop rate or any other drop rate shoe. If you have trouble 1 shot killing the monster, considering not using drop rate shoe and go for Yorscalp or Glade Rune Boots. Further info can visit [[Increase_item_drop_gears#Equipment_that_increases_drop_rate|here.]] | |||
|- | |||
| Accessory 1 || | {{#item:490133}} || Best enchant on 2nd slot is {{#item:313028}} 3rd and 4th slot is {{#item:310701}} (RNG involved to get double Master Archer). Further info can visit [[Constellation_Tower#Stellar_Seal_Accessories_Enchantment|here.]] | |||
|- | |||
| Accessory 2 || | {{#item:490484}} || Best enchant on 2nd slot is {{#item:312991}} (There's a perfect enchant concentration Lv1 but cost x20 times the materials) 3rd slot is {{#item:312981}}. Further info can visit [[Circulation_of_Life_Accessories#Circulation_of_Life_Accessory_Enchantment|here.]] | |||
|} | |} | ||
<div style="float: right;"> [[#top|<big>'''[Top]'''</big>]]</div> | |||
<br><br> | |||
{| class="wikitable | == '''Cards recommendation for MVP / Farming''' [[File:Drops.gif|frameless]] == | ||
{| class="wikitable" | |||
|+ style="white-space:nowrap; border:1px solid; padding:3px; | Cards | |||
|- | |- | ||
! | ! [[File:Down arrow.png|frameless|23x23px]]!! Cards !! Notes | ||
! | |||
! | |||
|- | |- | ||
| | | Upper Head Gear || | ||
| | *{{#item:300528}} | ||
*{{#item:4583}} | |||
|| | |||
*This Card give +7% Max HP, if refine +10 additional +3% Max HP and if refine +14 additional +2% Max HP. With a Total +12% Max HP. | |||
*Use this Card if you lack Damage against {{#linkmob:22373}} since his Element is Poison. It 30% increased damage against poison monster. | |||
|- | |- | ||
| | | Mid Head Gear || | ||
| | *{{#item:300174}} | ||
*{{#item:4583}} | |||
*{{#item:27109}} | |||
|| | |||
*This Card can be used for general farming give +10% Max HP and a total of 4% decreased damage from Earth and Poison elemental @ base vit 130. | |||
*Use this Card if you lack Damage against {{#linkmob:22373}} since his Element is Poison. It 30% increased damage against poison monster. | |||
*Use this card only when fighting Neutral type MVP (Rigel and Betelgeuse) when proc it will double your damage against neutral monster and must use with the Singing Pere Card (Accessory slot) and Playing Pere Card (Accessory slot), not recommended to use for farming since the proc is unreliable and it hinders movement. | |||
|- | |- | ||
| | | Low Head Gear || | - || - | ||
| | |||
| | |||
|- | |- | ||
| | | Armor || {{#item:4302}} || This MVP Card is BiS for armor, it gives +100% Max HP and is the highest impact card to improve Damage. The downside of this card is -50% of Def & Mdef. <br/> Encroached Tan Card is not really good for DcB Build. <br/>'''[[#MVP_Tao_Gunka_Card_VS_MVP_Encroached_Tan_Card|Click here for MVP Tao Gunka Card VS MVP Encroached Tan Card.]]''' | ||
| | |||
| | |||
|- | |- | ||
| | | Weapon || | | ||
| | * {{#item:300532}} | ||
| | * {{#item:4140}} | ||
* {{#item:27361}} | |||
* {{#item:300519}} | |||
* {{#item:300506}} | |||
* {{#item:300240}} | |||
* {{#item:300241}} | |||
|| | |||
* x2 MVP Ghost Ship Captain Card is BiS for farming Boss Protocol Monster [[File:Mvp icon.png|frameless]] [[File:Boss icon.png|frameless]] where their sizes are mix (Example:- Biosphere D1, D2 and Tower of Trials) | |||
* Abysmal Knight Card + Polluted Wander Man Card are 2nd Best for Fighting Boss Protocol Monster [[File:Mvp icon.png|frameless]] [[File:Boss icon.png|frameless]] if there's only Large and Medium sized monster. (Example:- Biosphere D2) | |||
* Yormi Card + Scalleg Card is a good combo if fighting non-boss protocol and good for Small, Medium and Large sized monster. | |||
* x2 Gan Ceann Card is good for ONLY fighting Large sized Monster. (Example:- Rigel and Betelgeuse) | |||
* x2 Brutal Murderer Card is good for ONLY fighting Medium sized Monster. (Example:- Biosphere D1) | |||
* The Highest Damage output for weapon card combo from this list is to have Boss + Size (MVP Ghost Ship Captain Card + Gan Ceann Card for Large sized monster or MVP Ghost Ship Captain Card + Brutal Murderer Card for Medium sized monster) | |||
'''[[#Weapon_Card_Test|Click here for Weapon Card Test Result]]''' | |||
|- | |||
| Garment || | | |||
* {{#item:4679}} | |||
* {{#item:300473}} | |||
|| | |||
* This card is Bis and provide the best utility for DcB DK, +2 Aspd, +15% physical damage to all races and most importantly +20 to all stats which help reaching instant cast tremendously. | |||
* This card give a huge boost to Long Range damage, @ +15 refine it gives 55% LR%, but the important one is +10% boss damage as this modifier is quite rare. | |||
'''[[#MVP_Rune_Knight_Seyren_Card_vs_MVP_Snow_Angel_Card|Click here for MVP Rune Knight Seyren Card VS MVP Snow Angel Card]]''' | |||
|- | |- | ||
| | | Shoes || | | ||
| | * {{#item:27150}} | ||
| | * {{#item:300509}} | ||
* {{#item:300510}} | |||
* {{#item:300511}} | |||
* {{#item:300514}} | |||
* {{#item:300516}} | |||
|| | |||
*BiS card for ALL purpose farm as it provide 15% Max HP & Max SP which scale with DcB damage, the flat Max HP boost is a bonus since with the rest of the card and gear, we will reach a very high % Max HP and flat Max HP will provide a slight boost. | |||
*BiS card for farming a specific monster race (Insect). | |||
*BiS card for farming a specific monster race (Demon). | |||
*BiS card for farming a specific monster race (Undead). Can be use on MVP Ghost Ship Captain or MVP Lasgand. | |||
*BiS card for farming a specific monster race (Dragon). Can be use on MVP Betelgeuse. | |||
*BiS card for farming a specific monster race (Formless). Can be use on MVP Rigel, or field farming [[Forgotten_Time#Monster|Forgotten Time Zone 1 or Zone 2.]] | |||
'''[[#MVP_Venom_Chimera_Card_VS_Specific_Monster_Race_Card|Click here for MVP Venom Chimera Card VS Specific Monster Race Card]]''' | |||
|- | |- | ||
| | | Accessory 1 || | | ||
| | *{{#item:300076}} | ||
*{{#item:27107}} | |||
|| | |||
*BiS card for all purpose farm, any Vit stats + % Max HP are welcome. | |||
*Only use this card in combo with Jitterbug card (Headgear slot). | |||
|- | |- | ||
| | | Accessory 2 || | | ||
| | *{{#item:300076}} | ||
| | *{{#item:27108}} | ||
|| | |||
*BiS card for all purpose farm, any Vit stats + % Max HP are welcome. | |||
*Only use this card in combo with Jitterbug card (Headgear slot). | |||
|} | |||
<div style="float: right;"> [[#top|<big>'''[Top]'''</big>]]</div> | |||
<br><br> | |||
== '''Shadow Gears & Costume Stones''' [[File:Ghostring.gif|frameless]] == | |||
{| class="wikitable" | |||
|+ style="white-space:nowrap; border:1px solid; padding:3px; | Shadow Gears | |||
|- | |- | ||
| | ! [[File:Down arrow.png|frameless|23x23px]]!! Item!! Notes | ||
| | |||
|- | |- | ||
| | These New Advance Shadow Gear from Tower of Trials triumph when facing High RES monster because of the -20% ignore RES from both sets and it surpasses the Blue Shadow Gear even at '''RES 0'''. '''[[#Blue_Shadow_Gear_vs_New_Advance_Shadow_Gear|Click here for the Test Result.]]''' Be aware that using this new set may improve Damage but you'll lose Max HP and have to relocate your stats again for Instant Cast. | ||
| | | Armor || | +10 {{#item:1270025}} || Best enchant is Long Range Damage % on 1st line and Pow or P.atk on 2nd line. Prioritize on LR % > Pow / P.atk. Can use {{#item:101262}} for the enchant. Further info can visit [[Shadow_Enchanting#New_Sets|here for enchant,]] and [[Shadow_Gear#Advanced|here for the Shadow Gear.]] | ||
| | |||
|- | |- | ||
| | | Shoes || | +10 {{#item:1270026}} | ||
| | || Best enchant is Long Range Damage % on 1st line and Pow or P.atk on 2nd line. Prioritize on LR % > Pow / P.atk. Can use {{#item:101262}} for the enchant. Further info can visit [[Shadow_Enchanting#New_Sets|here for enchant,]] and [[Shadow_Gear#Advanced|here for the Shadow Gear.]] | ||
| | |||
|- | |- | ||
| | | Weapon || | +10 {{#item:24792}} || Best enchant on slot 1 is +3 Pow and for slot 2 is +5 Vit or +5 Dex, pick Vit for Damage or Dex for instant cast. Further info can visit [[Shadow_Enchanting#Weapon_&_Shield|here for enchant,]] and [[Shadow_Gear#Master_Shadow_Gear|here for the Shadow Gear.]] | ||
| | |||
| | |||
|- | |- | ||
| | |Shield || | +10 {{#item:24793}} | ||
| | || Best enchant on slot 1 is +3 Pow and for slot 2 is +5 Vit or +5 Dex, pick Vit for Damage or Dex for instant cast. Further info can visit [[Shadow_Enchanting#Weapon_&_Shield|here for enchant,]] and [[Shadow_Gear#Master_Shadow_Gear|here for the Shadow Gear.]] | ||
| | |||
|- | |- | ||
| | | Accessory 1 || | +10 {{#item:1270011}} || Best enchant is Long Range Damage % on 1st line and Pow or P.atk on 2nd line. Prioritize on LR % > Pow / P.atk. Can use {{#item:101262}} for the enchant. Further info can visit [[Shadow_Enchanting#New_Sets|here for enchant,]] and [[Shadow_Gear#Bow_Master|here for the Shadow Gear.]] | ||
| | |||
| | |||
|- | |- | ||
| | | Accessory 2 || | +10 {{#item:1270012}} || Best enchant is Long Range Damage % on 1st line and Pow or P.atk on 2nd line. Prioritize on LR % > Pow / P.atk. Can use {{#item:101262}} for the enchant. Further info can visit [[Shadow_Enchanting#New_Sets|here for enchant,]] and [[Shadow_Gear#Bow_Master|here for the Shadow Gear.]] | ||
| | |} | ||
| | {| class="wikitable" | ||
|+ style="white-space:nowrap; border:1px solid; padding:3px; | Costume Stones | |||
|- | |- | ||
| | ! [[File:Down arrow.png|frameless|23x23px]]!! Item!! Notes | ||
| | |||
|- | |- | ||
| | | Top || | {{#item:1001939}} || This stone provide a total of 10% Long Range Damage when Lv10 {{#skill:2007}} is learned. Further info can visit [[Costume_Enchants_(Fashion_Points)#Top_Box_3|here.]] | ||
| | |||
|- | |- | ||
| | | Mid || | {{#item:1001940}} || This stone doesn't provide anything on it's own but it combo with Dragon Knight Stone II (Garment). Further info can visit [[Costume_Enchants_(Fashion_Points)#Mid_Box_3|here.]] | ||
| | |||
|- | |- | ||
| | | Low || | {{#item:1000376}} || This stone provide 3% Long Range Damage on it's own and combo with Ranged Stone (Dual). We have a few option for Costume Stone (Low), you can even use {{#item:25228}} for Field Farming, {{#item:25228}} for Tower of Trials, even {{#item:25062}} for Treasure Chest reward type like CT and OGHC, '''[[#Costume_Stone_(Garment_Dual_&_Low)_Comparison|but Ranged Stone (Low) has the highest Damage.]]''' Further info can visit [[Costume_Enchants_(Fashion_Points)#Low_Box_1|here.]] | ||
| | |||
| | |||
|- | |- | ||
| | | Garment || | {{#item:1001948}} & {{#item:1000523}} || DK Stone II (Garment) Combo with RK Stone II (Top & Mid) which provide +15% physical damage against all size, +5% Max HP and +10% DcB Skill Modifier. Ranged Stone (Dual) provide +4% Long Range Damage on it's own and another +2% Long Range Damage with the combo with Ranged Stone (Low). Further info can visit [[Costume_Enchants_(Fashion_Points)#Garment_Box_3|here for Dragon Knight Stone II (Garment),]] and [[Costume_Enchants_(Fashion_Points)#Garment_2nd_slot_Box_1|here for Ranged Stone (Dual).]] | ||
| | |||
|} | |} | ||
<div style="float: right;"> [[#top|<big>'''[Top]'''</big>]]</div> | |||
<br><br> | |||
{| class="wikitable | == '''Pets & Runes Tablet System ''' [[File:Poporing.gif|frameless]] == | ||
! | |||
{| class="wikitable" | |||
|+ style="white-space:nowrap; border:1px solid; padding:3px; | Pets | |||
|- | |||
! Pet Name !! Notes | |||
|- | |||
|[[File:MG KNIGHT OF ABYSS.gif|frameless]] <br/> {{#linkmob:1219}} || The best pet for fighting any Boss Protocol monster, the easiest way to tell is by these symbol on the monster name [[File:Mvp icon.png|frameless]] and [[File:Boss icon.png|frameless]]. It provide Atk + 5%, P.Atk + 2 Increases physical damage against boss monsters by 5% when intimacy level is at Loyal. Further info can visit [[Pet_System#Pets_that_begin_with_"A"|here]]. | |||
|- | |||
| [[File:Blue Moon Loli.gif|frameless]] <br/> {{#linkmob:20940}} || One of the best pet for fighting any monster that is NOT Boss Protocol monster. It provide +4 Vit, +5% Max HP and chance to auto cast Lv2 {{#skill:73}} on yourself when receiving physical damage (not very important) when intimacy is at Loyal. Further info can visit [[Pet_System#Pets_that_begin_with_"B"|here]]. | |||
|- | |||
| [[File:Incubus.gif|frameless]]<br/> {{#linkmob:1374}} || Good for farming any map that you've already able to 1 hit kill the monster. It provide Max SP +5% with low chance of healing your SP with your 1% damage dealt when intimacy is at Loyal. Further info can visit [[Pet_System#Pets_that_begin_with_"I"|here]]. | |||
|- | |||
| [[File:Succubus.gif]] <br/> {{#linkmob:1370}} || Good for farming any map that you've already able to 1 hit kill the monster. It provide Max HP +1% with low chance of healing your HP with your 5% damage dealt when intimacy is at Loyal. Further info can visit [[Pet_System#Pets_that_begin_with_"S"|here]]. | |||
|- | |||
|} | |||
{| class="wikitable" | |||
|+ style="white-space:nowrap; border:1px solid; padding:3px; | Runes Tablet | |||
|- | |||
! Tablet !! Notes | |||
|- | |||
| '''Demigod Set''' || This is the best rune tablet in the game right now if you're fighting Boss Protocol monster [[File:Mvp icon.png|frameless]] [[File:Boss icon.png|frameless]]. It may look intimidating to fully activate it (3 pieces) but you can just activate the 2 pieces to get +10% increase damage against Boss Protocol [[File:Mvp icon.png|frameless]] [[File:Boss icon.png|frameless]]. When its fully activated (3 pieces) you can go ahead and upgraded to +15, you'll get +40% Damage increase damage against Boss Protocol [[File:Mvp icon.png|frameless]] [[File:Boss icon.png|frameless]]. Further info can visit [[Rune_Tablet_System#Informations|here]]. | |||
*After activate the Demigod Set, don't forget to Equip it on your character. It is shared across your Master Account, all your alts benefit from it but you have to equip them 1 by 1. | |||
|- | |||
|<div class="center">[[File:Down arrow.png|frameless|23x23px]]</div> | |||
| To Activate the Demigod 2 pieces, first you'll need to activate the Phantom Kite Rune and Grey Wolf Rune, after that you can activate the Demigod Set, collect the item listed Below. [[File:Down arrow.png|frameless|23x23px]] | |||
|- | |||
| Phantom Kite Rune || x450 {{#item:1000405}} <br/> x3 {{#item:300222}} <br/> x3 {{#item:300223}} <br/> x150 {{#item:1059}} <br/> x50 {{#item:6691}} | |||
|- | |||
| Grey Wolf Rune || x550 {{#item:1000405}} <br/> x1 {{#item:300220}} <br/> x75 {{#item:920}} | |||
|- | |||
| Demigod Set || x1250 {{#item:1000405}} <br/> x150 {{#item:1001282}} <br/> x2 {{#item:1001283}} | |||
*To get Imperfect Rune and Perfect Rune you'll need to recycle {{#item:300482}} or a certain number of monster cards. Further info for [[Rune_Tablet_System#Cards|Imperfect and Perfect run click here,]] and [[Main_Office#Card_Exchanger_Sakura|click here for Lesser Rune Card.]] | |||
|- | |||
| '''Demigod Rune<sup>3 pieces</sup>''' || [[File:Twisted God Freyja (s).gif]][[File:Schulang (s).gif]]<br/>x750 {{#item:1000405}} <br /> x1 {{#item:300228}} <br /> x1 {{#item:300227}} <br /> x100 {{#item:1000501}} <br /> x100 {{#item:1000502}} | |||
*All of these item and cards can be farmed at [[Villa of Deception]], both Normal and Hard mode drop the card, and both purification potions only drop from Hard mode. | |||
|- | |||
|} | |||
<div style="float: right;"> [[#top|<big>'''[Top]'''</big>]]</div> | |||
<br> | |||
== '''Tips and Tricks''' [[File:Pouring.gif|frameless]] == | |||
{| class="wikitable" | |||
|+ style="white-space:nowrap; border:1px solid; padding:3px; | | |||
=== MVP Fighting Tips === | |||
|- | |- | ||
! | ! MVP !! Cards !!Consumables Used !! Notes | ||
! | |||
! | |||
|- | |- | ||
| | ||{{#mob:22174|center}} <br/>(Formless | <span style="background-color:none; color:#DEA193;">Neutral<sup>Lv2</sup></span> | Large) <br/> (RES:1833 | MRES:850) <br/> [[Hall of Life|From Hall of Life]] | ||
| | || | ||
| | x2 {{#item:300240}} <br/> {{#item:27109}} <br/> {{#item:27107}} <br/> {{#item:27108}} <br/> {{#item:300516}} <br/> | ||
|| | |||
*[[#Consumables|Use most consumables from here.]] | |||
*{{#item:102433}} | |||
*{{#item:102434}} [[Garden_of_Time#Various_Goods_Vending_Machine|Can get from here]] | |||
|| | |||
*If you have unlocked the Family Reputation you can apply [[21_Age_of_Heroes#Family_Reputation|Family Blessings to further improve your Damage.]] | |||
*Unsealing scrolls and Warm Shield Scroll is a must to fight this MVP. [[Hall_of_Life#Mechanics_&_Skills| Click here to learn about the MVP mechanics.]] | |||
*For Traits, get 72 STA and try to avoid scattered orange squares because Aimed Shower Hurts (Physical Damage). <br/> [[#Videos | Click here to watch the fight.]] | |||
|- | |- | ||
| | ||{{#mob:20994|center}} <br/>(Dragon | <span style="color:#DEA193;">Neutral<sup>Lv2</sup></span> | Large) <br/> (RES:500 | MRES:500) <br/> [[Constellation Tower|From Constellation Tower]] | ||
| | || | ||
| | x2 {{#item:300240}} <br/> {{#item:27109}} <br/> {{#item:27107}} <br/> {{#item:27108}} <br/> {{#item:300514}} <br/> | ||
|| | |||
*[[#Consumables|Use most consumables from here.]] | |||
*{{#item:506}} (Tool Dealer) | |||
*{{#item:12118}} [[Eden_Market#Elemental_Potions/Converter|Can get from here]] | |||
|| | |||
*If you have unlocked the Family Reputation you can apply [[21_Age_of_Heroes#Family_Reputation|Family Blessings to further improve your Damage.]] | |||
*Green Potion is important to cure Hallucination Debuff. | |||
*Fireproof Potion is to tank {{#skill:83}} (Fire). | |||
*For Traits, if you don't play on {{#skill:288}} get 72 WIS to tank {{#skill:2213}} (Neutral) and {{#skill:83}} (Fire) and must avoid moving Traps. | |||
*Be wary when Betelgeuse casting Max Pain, may cause Party Wipe. <br/>[[#Videos | Click here to watch the fight.]] | |||
|- | |||
||{{#mob:22373|center}} <br/>(Demi-Human | <span style="color:purple;">Poison<sup>Lv3</sup></span> | Large) <br/> (RES:868 | MRES:744) <br/> [[Final_Battle | From Final Battle]] | |||
|| | |||
x2 {{#item:300240}} <br/> x2 {{#item:4583}} | |||
|| | |||
*[[#Consumables|Use most consumables from here.]] | |||
*{{#item:12119}} [[Eden_Market#Elemental_Potions/Converter|Can get from here]] | |||
*{{#item:12733}} | |||
*{{#item:12114}} [[Eden_Market#Elemental_Potions/Converter|Can get from here]] | |||
*{{#item:12115}} | |||
*{{#item:12116}} | |||
*{{#item:12117}} | |||
|| | |||
*If you have unlocked the Family Reputation you can apply [[21_Age_of_Heroes#Family_Reputation|Family Blessings to further improve your Damage.]] | |||
*Coldproof Potion is important against Encroached Tan {{#skill:2204}}, if still get one shot by it, get 72 WIS. | |||
*Hagalas Runestone is crucial to gain Freeze immunity (100 Mdef from equipment) from {{#skill:2204}}, Encroaced Tan is level 268 <br/> if your Level is lower than him, you may need more Mdef. | |||
*Can use any Elemental Converter to imbue your weapon and deal extra 25% Damage against Poison. | |||
*Encroached Tan Hard Mode just need to out Damage his Regen, where as in Normal mode if you kill all his "Shadows" <br/> it stuns him and you'll deal significantly more damage to him. Shadows are Ghost property. <br/>[[#Videos | Click here to watch the fight.]] | |||
|- | |- | ||
|} | |} | ||
<div style="float: right;"> [[#top|<big>'''[Top]'''</big>]]</div> | |||
{| style="background: #ffffff; width: 100%; border-style: frame;" | |||
|+ style="white-space:nowrap; border:1px solid; padding:3px; | | |||
=== Biosphere Depth 2 Monsters === | |||
| | |||
*There are a total of 10 types of monster in D2, consist of '''6 Large sized and 4 Medium sized'''. All are unique Race, but some having the same Element. Please use this to plan which Element / Race you want to target and enchant your Time Dimensional Weapon accordingly. [[Varmundt's Biosphere Depth 2|Click here for more info.]] | |||
|} | |||
{| style="background: #ffffff; width: 100%; border-style: none none none none;" | |||
||{{#mob:22260|center}} <br/>(Formless | <span style="color:red;">Fire<sup>Lv2</sup></span> | Large) <br/> (RES:1987 | MRES:2311) | |||
*Earthquake | |||
*Fireball | |||
*Sonic Blow | |||
*Critical Attack | |||
|| | |||
{{#mob:22252|center}} <br/>(Demi-Human | <span style="color:red;">Fire<sup>Lv3</sup></span> | Large) <br/> (RES:1725 | MRES:2009) | |||
*Fiber Lock | |||
|| | |||
{{#mob:22257|center}} <br/>(Undead | <span style="color:red;">Fire<sup>Lv2</sup></span> | Medium) <br/> (RES:1067 | MRES:2177) | |||
*Meteor Assault | |||
*Deadly Curse | |||
*Lightning Bolt | |||
*Cloaking | |||
*Snap | |||
|| | |||
{{#mob:22254|center}} <br/>(Plant | <span style="color:brown;">Earth<sup>Lv2</sup></span> | Large) <br/> (RES:2066 | MRES:2401) | |||
*Pneuma | |||
*Grasp of Death | |||
*Fiber Lock | |||
*AoE Lex Aeterna | |||
|| | |||
{{#mob:22253|center}} <br/>(Brute | <span style="color:brown;">Earth<sup>Lv2</sup></span> | Large) <br/> (RES:1651 | MRES:1923) | |||
*Waterball | |||
*Brandish Spear | |||
|- | |||
{| style="background: #ffffff; width: 100%; border-style: frame;" | |||
|- | |||
|| | |||
{{#mob:22255|center}} <br/>(Fish | <span style="color:brown;">Earth<sup>Lv3</sup></span> | Medium) <br/> (RES:1734| MRES:2019) | |||
*Hiding | |||
*Grimtooth | |||
*Lightning Bolt | |||
*Heaven's Drive | |||
|| | |||
{{#mob:22258|center}} <br/>(Dragon | <span style="color:green;">Wind<sup>Lv2</sup></span> | Large) <br/> (RES:2412| MRES:1768) | |||
*Jupitel Thunder | |||
*Lightning Bolt | |||
*Thunderstorm | |||
|| | |||
{{#mob:22261|center}} <br/>(Insect | <span style="color:green;">Wind<sup>Lv3</sup></span> | Medium) <br/> (RES:2257| MRES:2623) | |||
*Lightning Bolt | |||
|| | |||
{{#mob:22256|center}} <br/>(Demon | <span style="color:blue;">Water<sup>Lv3</sup></span> | Medium) <br/> (RES:851| MRES:1915) | |||
*Grasp of Death | |||
*Arrow Repel | |||
|| | |||
{{#mob:22259|center}} <br/>(Angel | Dark<sup>Lv1</sup> | Large) <br/> (RES:1734| MRES:2019) | |||
*Pneuma | |||
*Wide Curse | |||
*Dispel | |||
*Pulse Strike | |||
|} | |||
{| style="background: #ffffff; width: 100%; border-style: ;" | |||
||Deadly Skills that may 1 shot you:- | |||
*Earthquake from Salamander, spam potions through it or kill it before it cast. WIS trait will help to reduce the damage. | |||
*Sonic Blow from Salamander, it will cast this when in melee range. Kill it before it reaches you. | |||
*Meteor Assault from Flame Ghost, it always cast this when near with Cloaking (Invisible) or Snap, if its uncloak kill him before he gets near. Use detection ({{#item:4103}}) when its in Cloaking. <br/> Having High MaxHP and STA trait will help you survive or High Flee at 970 (95% dodge). | |||
||Skills that are very annoying:- | |||
*Pneuma from Ancient Tree & Morroc Incarnation, they will cast it when you deal Physical Range damage when near them. Have to kill them further away. Example:- Using Charge attack (Range Physical Damage) on them will make them cast Pneuma instantly. | |||
*Wide Curse from Morroc Incarnation, having total of 0 or 100 Luck stats will prevent curse. | |||
*Deadly Curse from Flame Ghost, this only affects people who use Golden Thief Bug Card. This skill remove Magic Immune Effect from GTB. | |||
*Fiber Lock from Duneyrr & Bio Ancient Tree, if you get Fiber Lock and Pneuma on you. Try to use charge attack on another monster to temporarily escape. | |||
*Dispel from Morroc Incarnation, although it doesn't cast very frequently but still good to keep an eye on it. | |||
*Death grasp (Pull towards monster) and Arrow Repel (Push away from monster) , these skill cause displacement. Usually only affects Melee Class. | |||
|- | |||
|} | |||
<div style="float: right;"> [[#top|<big>'''[Top]'''</big>]]</div> | |||
<br/> | |||
{| class="wikitable" | |||
|+style="white-space:nowrap; border:1px solid; padding:3px; | | |||
=== Leveling Tips & EXP Gears === | |||
|- | |||
|| | |||
'''Notes:-''' | |||
*There are many other Leveling route out there, but this is the one that i always use as it is quite straight forward and try to wear some EXP Gear to speed up the Leveling process, but don't over wear them to the point that it affects your Damage. | |||
*It is '''super important''' to finish the starting tutorial for {{#item:7803}} as it boost EXP gain from monster defeated and quest submission by 200% for 30 minutes. This Costume {{#item:20307}} is super useful for starting out your journey. | |||
*Einbech 3 EXP gain from Eden Board yield higher EXP and Faster submission (160 kill count) compared to Abyss Lake 4 (240 kill count). In my opinion, if you are leeching Alts '''without''' Even Share EXP Party Setup, do Einbech 3. IF you are SOLO or Leveling Alts '''with''' Even Share EXP Party Setup, do Abyss Lake 4 (Monster at Abyss Lake 4 is about 43% more exp than monster in Einbech 3). | |||
'''Step-by-Step Guide:-''' | |||
#After Tutorial, you should be able to change job [Swordman]. | |||
#Go Eden and talk to Secretary Lime and Register yourself as a Member of Eden, you'll get {{#item:22508}}. | |||
#Go Payon Cave kill anything to get some skills '''Be aware not to level pass Lv40.''' | |||
#Use {{#item:7803}} and go Orc dungeon and hit anything to at least Lv70 or able to change job [Knight]. | |||
#Go Eden and talk to Eden board [[File:Eden Board.png|frameless|42x42px]] [[Kill_Quests_and_Item_Collection_Boards#Level_70_~_99|(Lv70-Lv99 Mission Board)]] and choose pick all. | |||
#Then go Dungeon > Glast Heim(GH) > Monastery and kill x15 {{#linkmob:1192}} & x 15 {{#linkmob:1435}} keep doing the board quest until 99/50 then do once more but this time keep and don't submit the quest. | |||
#After Rebirth you'll be at Lv1. Go Payon Cave kill anything then change job [High Swordman]. | |||
#Submit Board quest (GH Monastery) to job 50 change job [Lord Knight]. | |||
#Repeat Eden board quest (GH Monastery) until job 70 and change job [Rune Knight]. | |||
#Do Eden board quest (GH Monastery) once to Lv100+ and talk to Daily Hunts NPC Roxanne. | |||
#Complete Illusion of Moonlight daily once (Kill count 100). | |||
#Complete Illusion of Vampire daily once (Kill count 100). | |||
#Complete Illusion of Twins daily once (Kill count 100), this should bring you past Lv180+. | |||
#Go Eden and talk to Eden board [[File:Eden Board.png|frameless|42x42px]] [[Kill_Quests_and_Item_Collection_Boards#Level_130_~_190|(Lv130-Lv190 Mission Board)]] and choose pick all. Then go Einbech 3 dungeon (use a cardi warp to Einbech 3 if you have the memo, otherwise just walk from Einbech dungeon 1) finish board quest once (160 kill count) and change job [Dragon Knight]. <br/> Then rinse repeat at Einbech 3 to Lv250 (Just focus on the 160 kill count and submit, the different kill count quest from Daily Hunts NPC (Example:- kill x10 {{#linkmob:20603}}) is just bonus.) <br/> Or you can go over to Abyss Lake 4 depending on your Party EXP Setup. | |||
#Lv250-275 go Depth 1 or Depth 2 depending on your gears. | |||
|- | |- | ||
! | |} | ||
[[File:Down arrow.png|frameless|35x35px]] All the EXP Bonus from EXP Gear are from '''Defeating''' monster, it doesn't boost EXP gain from Board Quest / Daily Quest submission. However, it does provide Bonus EXP from an Even Shared EXP Party Setup even though you are not the one who defeat the monster. Super awesome for Leeching :3 | |||
*EXP Gears are great investment if you are planning to create more Alts. | |||
*By wearing ALL the EXP Gears, potentially you'll get '''99% EXP Bonus''' for any defeated monster. | |||
{| class="wikitable" | |||
|+ style="white-space:nowrap; border:1px solid; padding:3px; | | |||
'''EXP Gear''' | |||
|- | |||
! Equipment !! Notes !! Where to get | |||
|- | |||
|| | |||
{{#item:24683}} | |||
|| | |||
*If Base level <175, gives 20% EXP | |||
*If Base level = or >175, gives 10% EXP | |||
*Each +2 refine +1% EXP | |||
*At +10, gives additional 5% EXP (Totaling 20% EXP at lvl 175 above) | |||
|| [[Shadow_Gear#Eno_(A-H)| Under EXP Equipment.]] | |||
|- | |||
|| | |||
{{#item:24770}} | |||
|| | |||
*If Base level <175, gives 20% EXP | |||
*If Base level = or >175, gives 10% EXP | |||
*Each +2 refine +1% EXP | |||
*At +10, gives additional 5% EXP (Totaling 20% EXP at lvl 175 above) | |||
|| [[Shadow_Gear#Eno_(A-H)| Under EXP Equipment.]] | |||
|- | |||
||{{#item:25171}} | |||
|| | |||
*The stone alone give 2% EXP | |||
*If combo with {{#item:25141}} & {{#item:25015}}, it give additional 3% | |||
|| [[Costume_Enchants_(Fashion_Points)#Top_Box_1| From Costume Enchants Top Box 1.]] | |||
|- | |||
|| | |||
{{#item:25141}} | |||
|| The stone alone give 2% EXP | |||
|| [[Costume_Enchants_(Fashion_Points)#Mid_Box_1| From Costume Enchants Mid Box 1.]] | |||
|- | |||
|| | |||
{{#item:25015}} | |||
|| The stone alone give 2% EXP | |||
|| [[Costume_Enchants_(Fashion_Points)#Low_Box_1| From Costume Enchants Low Box 1.]] | |||
|- | |||
|| | |||
*{{#item:19157}} or | |||
*{{#item:19136}} | |||
|| | |||
*All stats +1, -10% SP Consumption for skills, +5% EXP and Drop rate, Refine at +9 give Aspd, at +12 give Movement speed. It is Enchantable with {{#item:23100}}. | |||
*Each +2 refine give +1% EXP and Drop rate, Each +4 refine give +4% Max HP & SP, Refine at +9 give +40% HP & SP Recovery Rate, at +12 give +3% Max HP & SP. | |||
|| Click here for [[Equipment_Crafting#Jewy_-_Orbs_of_Survival,_Survival_Circlet,_Heart_Wings_Hairband,_Rosary's_Necklace,_Drooping_Gunslinger|crafting Drooping Gunslinger & Spirit Of Chung E]] & {{#item:23100}} can get from [[Market_Place#Muzaszir| Muzaszir NPC]]. The possible Enchants for Drooping Gunslingers are [https://wiki.muhro.eu/index.php?title=Overview_of_our_enchant-tables.&mobileaction=toggle_view_desktop here.]] | |||
|- | |||
|| | |||
*{{#item:19117}} or | |||
*{{#item:18839}} | |||
|| | |||
+5% / +4% EXP & Drop rate. It depends on whether you need the Slot for extra DPS. | |||
|| You can get them from [[Poring_Village#Enchanting_Angel_Poring_Boots| Poring Village.]] | |||
|- | |||
|| | |||
{{#item:22101}} | |||
|| All stats +1, combo with Poring Sunglasses to get additional +5 / +4 % EXP. It can be Enchanted. | |||
|| You can get them from [[Poring_Village#Enchanting_Angel_Poring_Boots| Poring Village.]] | |||
|- | |||
|| | |||
{{#item:15186}} | |||
|| Give +5% EXP and Drop rate. Each refine +100 Max HP & +20 Max SP, Refine at +7 give +3% Max HP & SP, at +9 give +5% Max HP & SP, +12 give +100% HP & SP Recovery Rate | |||
|| Further info can get from [[Increase_item_drop_gears#Equipment_that_increases_drop_rate| here.]] | |||
|- | |||
|| | |||
{{#item:28439}} | |||
|| All stats +1, give extra 5% EXP. It is Enchantable with {{#item:23170}}. | |||
||Click here [[Equipment_Crafting#Captain_-_Sea_Otter_and_Fur_Seal_Mini_Fan,_Turtle_Hat|for crafting Sea Otter Mini Fan.]] | |||
|- | |||
|| | |||
{{#item:28440}} | |||
|| All stats +1, give extra 5% EXP. It is Enchantable with {{#item:23170}}. | |||
||Click here [[Equipment_Crafting#Captain_-_Sea_Otter_and_Fur_Seal_Mini_Fan,_Turtle_Hat|for crafting Seal Mini Fan.]] | |||
|- | |||
||{{#item:2195}} | |||
|| The main reason for this Shield is the +10% EXP, or use any other shield from Royal Hunt. | |||
||Click here [[Royal_Hunting#Royal_Secret_Box|for Royal Hunt Shield.]] | |||
|- | |||
|| | |||
{{#item:19152}} | |||
|| Increase +5% EXP and Drop rate, or use any other Balloon from Poring Family. It can be Enchanted, and most preferably try to get {{#item:311004}} for extra 5% EXP from '''Any''' monster defeated, this enchant is optional as it is quite rate. | |||
||Click here [[Poring_Family_Balloons|for Porings Balloon,]] and here [[Poring_Family_Balloons#Normal_Enchants|for the Enchants.]] | |||
|- | |- | ||
|} | |} | ||
<div style="float: right;"> [[#top|<big>'''[Top]'''</big>]]</div> | |||
[[File:Down arrow.png|frameless|35x35px]] All of these Cards are to be slotted into Shoes Slot. Super useful if you know which monster you are going to kill the most. (Example:- [[Abyss_Lake#Monsters|Abyss Lake 4]] consist Half of Dragon Race & Other Half is Undead Race or [[Einbech#Monsters|Einbech 3]] most of them are Formless Race.) | |||
{| class="wikitable" | |||
! Cards !! Notes | |||
|- | |||
|| | |||
{{#item:4245}} | |||
|| Increase +10% EXP from defeating Demi-Human race monster. | |||
|- | |||
|| | |||
{{#item:4204}} | |||
|| Increase +10% EXP from defeating Brute race monster. | |||
|- | |||
|| | |||
{{#item:4221}} | |||
|| Increase +10% EXP from defeating Insect race monster. | |||
|- | |||
|| | |||
{{#item:4239}} | |||
|| Increase +10% EXP from defeating Formless race monster. | |||
|- | |||
|| | |||
{{#item:4249}} | |||
|| Increase +10% EXP from defeating Demon race monster. | |||
|- | |||
|| | |||
{{#item:4275}} | |||
|| Increase +10% EXP from defeating Undead race monster. | |||
|- | |||
|| | |||
{{#item:4164}} | |||
|| Increase +10% EXP from defeating Fish race monster. | |||
|- | |||
|| | |||
{{#item:4151}} | |||
|| Increase +10% EXP from defeating Plant race monster. | |||
|- | |||
|| | |||
{{#item:4267}} | |||
|| Increase +10% EXP from defeating Dragon race monster. | |||
|- | |||
|| | |||
{{#item:4235}} | |||
|| Increase +10% EXP from defeating Angel race monster. | |||
|- | |||
|} | |||
{| class="wikitable" | |||
|+ style="white-space:nowrap; border:1px solid; padding:3px; | | |||
=== Advance Leveling Guide === | |||
|- | |||
|Best time to level a character is during EXP Event, with proper preparation it is possible to get from Lv1 to Lv275 in under 1 Hour. | |||
*The main EXP gain is from EXP Event (Bonus 50% EXP on defeating monster, Quest & Daily submission) and with Dancer Skill {{#skill:307}} (60% Bonus EXP from defeating monster). Further info on EXP Event can visit [[Global Exp Event|here.]] | |||
*If you don't mind using Alts for Buffing, Cardinal and Trouvere are both super good. In order to use {{#skill:307}}, you'll need a partner Bard/Dancer but you can bypass this condition and perform solo with Trouvere skill {{#skill:5352}}. Further info can visit [[Trouvere|here.]] | |||
|- | |||
|} | |||
|- | |||
Consumables and Equipment that i used are listed below. Equipment are entirely Optional and dependent on your budget. | |||
|- | |||
{| class="wikitable" | |||
|+ style="white-space:nowrap; border:1px solid; padding:3px; | Consumables and Equipment used in the Video | |||
|| | |||
*{{#skill:307}} | |||
*{{#item:7803}}<big><big>●</big></big>{{#item:12411}} | |||
*{{#item:24683}}<big><big>●</big></big>{{#item:24770}} | |||
*{{#item:19117}}<big><big>●</big></big>{{#item:22101}} | |||
*{{#item:15186}}<big><big>●</big></big>{{#item:19152}} | |||
*{{#item:12729}}<big><big>●</big></big>{{#item:24683}} | |||
*{{#item:28439}}<big><big>●</big></big>{{#item:28440}} | |||
*{{#item:2195}} | |||
|} | |||
{| class="wikitable" | |||
|+ style="white-space:nowrap; border:1px solid; padding:3px; | Equipment for Leveling | |||
|- | |||
! !! Equipment !! Notes | |||
|- | |||
| Upper Head Gear || {{#item:5899}} || It boost your {{#skill:2005}} by 50%. Can be crafted [[Equipment_Crafting#Trainer_Adric_-_Black_Ribbon,_Divine_Guard_Hat,_Palace_Guard|here.]] | |||
|- | |||
| Mid Head Gear || | {{#item:19117}} || This is for the 5%/4% Bonus EXP, also combo with Angel Poring Boots. It also depends whether you need the slot for extra Damage or Utility. | |||
|- | |||
| Low Head Gear || | {{#item:19152}} || This is for the 5% Bonus EXP from defeated monster and possible additional 5% Bonus EXP depending on the enchant. Further info can visit [[Poring_Family_Balloons#Enchantment|here.]] | |||
|- | |||
| Armor i || | +12 {{#item:15186}} ||This is for the 5% Bonus EXP from defeated monster. Later on we will change into a stronger Armor. Further info can visit [[Increase_item_drop_gears#Equipment_that_increases_drop_rate|here.]] | |||
|- | |||
| Armor ii || | +11 {{#item:450177}} || Best enchant on 2nd slot is {{#item:310517}} 3rd slot is {{#item:310515}} 4th slot is {{#item:310506}}. Further info can visit [[Gray_Wolf_Enchantments#Gray_Wolf_Armor_Enchantments|here.]] | |||
|- | |||
| Weapon i || | +9 {{#item:21050}} || A super good starter weapon for Wind Cutter Build for the 20% ACD, the enchant could be any but preferably Physical Attack to Normal monster on the 4th Line Enchant. You can use {{#item:100423}} on a +4 {{#item:21050}} to try to get to +9. Further info for getting the weapon can visit [[Illusion_of_Labyrinth#Illusion_Gear|here,]] for the enchant click [[Illusion Enchantment|here.]] | |||
|- | |||
| Weapon ii || | | |||
* +11 {{#item:600008}} or | |||
* +12 {{#item:600017}} | |||
|| | |||
*Hypocrisy Edge is slightly weaker than Adulter Fides Two-Handed Sword but its much more easier to get and doesn't need +12 for full potential. For Enchant, preferably try to get increase Melee Physical Damage on 2nd Line and increase Damage to Normal monster on 3rd Line. Further info for getting the weapon and Enchantment can visit [[Sin Weapons and Enchants (17.2)|here.]] | |||
*Adulter Fides Two-Handed Sword is strong but have to +12 for full potential and it's quite troublesome to get, either opening {{#item:102562}} for a chance to get one, or MVP drop from [[Villa of Deception|Villa of Deception Instance.]] For Enchant, try to get on 2 enchant line increase Melee Physical Damage. | |||
|- | |- | ||
! | | Garment || | +11 {{#item:480090}} || This Garment . Further info can visit [[Divine Beast's Cloak: Summer|here.]] | ||
|- | |||
| Shoes || | {{#item:22101}} || This is like the cheat code damage boost for DcB DK, once the bonus vit is proc from the boots, your damage will be boosted by a large amount. BiS is 10% Max HP, the 2nd line enchant preferably MHP (flat 50~1000) too but can be any as long as you get 10% max HP on the first line enchant. Tips to use [[Board_Quests#Instance_Coin_Shop|Doil the Instance Coin Shop]] if you don't want to run the instance. Further info can visit [[Airship_Crash#Item_Exchange|here.]] | |||
[[#Boots_of_Unknown_Life_VS_Yorscalp_Boots|Click here for Boots of Unknown Life VS Yorscalp Boots test.]] | |||
|-/ | |||
| Shoes (Farm) || | | |||
* +12 A {{#item:470303}} | |||
* +12 A {{#item:470174}} | |||
*+12 {{#item:22048}} | |||
|| | |||
* BiS Boots for general farming and higher HP for higher survivability, best enchant on 2nd slot is {{#item:313097}} 3rd slot is {{#item:313094}} 4th slot is {{#item:313090}} Further info can visit [[21_Age_of_Heroes#Footgear_Enchants|here.]] | |||
* Glade Rune Boots have higher damage IF hitting the monster that match the element of the 2nd enchant of the boots at Lv5 (Example:- {{#item:311876}} against Wind and Earth element, other elements Glade Rune Boots fall behind in Damage compared to Yorscalp. Further info can visit [[Varmundt%27s_Biosphere#Rune_Armors_Enchant|here.]] <br/>'''[[#Glade_Rune_Boots_VS_Gaebolg_Boots_VS_Yorscalp_Boots|Click here for Glade Rune Boots VS Yorscalp Boots test.]]''' | |||
* Sombre Shoe provide 10% drop rate or any other drop rate shoe. If you have trouble 1 shot killing the monster, considering not using drop rate shoe and go for Yorscalp or Glade Rune Boots. Further info can visit [[Increase_item_drop_gears#Equipment_that_increases_drop_rate|here.]] | |||
|- | |||
| Accessory 1 || | {{#item:490133}} || Best enchant on 2nd slot is {{#item:313028}} 3rd and 4th slot is {{#item:310701}} (RNG involved to get double Master Archer). Further info can visit [[Constellation_Tower#Stellar_Seal_Accessories_Enchantment|here.]] | |||
|- | |||
| Accessory 2 || | {{#item:490484}} || Best enchant on 2nd slot is {{#item:312991}} (There's a perfect enchant concentration Lv1 but cost x20 times the materials) 3rd slot is {{#item:312981}}. Further info can visit [[Circulation_of_Life_Accessories#Circulation_of_Life_Accessory_Enchantment|here.]] | |||
|} | |||
{| class="wikitable" | |||
|+ style="white-space:nowrap; border:1px solid; padding:3px; | Shadow Gears | |||
|- | |||
! [[File:Down arrow.png|frameless|23x23px]]!! Item!! Notes | |||
|- | |||
All these Blue Shadow Gear listed are previously BiS before the release of Advance Shadow Gear from ToT. | |||
| Armor || | +10 {{#item:24764}} || Max HP % increases survivability and Damage improvement when we transition into DcB Build. Having permanent {{#skill:8}} is good too. | |||
|- | |||
| Shoes || | +10 {{#item:24763}} | |||
|| Max HP % increases survivability and Damage improvement when we transition into DcB Build. Having permanent {{#skill:8}} is good too. | |||
|- | |||
| Weapon || | +10 {{#item:24770}} | |||
|| Use it for the Bonus +20% EXP Bonus from defeating monster. | |||
|- | |||
|Shield || | +10 {{#item:24683}} | |||
|| Use it for the Bonus +20% EXP Bonus from defeating monster. | |||
|- | |||
| Accessory 1 || | +10 {{#item:24339}} || One of the most versatile Shadow Gear in the game, +10 to All stats for survivability, Damage improvement and getting instant cast when we transition into DcB Build. | |||
|- | |- | ||
| Accessory 2 || | +10 {{#item:24340}} || One of the most versatile Shadow Gear in the game, +10 to All stats for survivability, Damage improvement and getting instant cast when we transition into DcB Build. | |||
|} | |||
== '''Test with Screenshots''' [[File:Santa poring.gif|frameless]] == | |||
This section of the guide provide test for various combination of Cards, Costume Stones and Gears. All the test have been done as fair as possible. Buff used are all self-casted. Test Setup for Dummy are '''Damage Taken 10% Average Variance | Large | Formless''' unless stated otherwise under notes. | |||
{| class="wikitable" | |||
|+ style="white-space:nowrap; border:1px solid; padding:3px; | Buffs and Consumables for all the Test | |||
|| | |||
* {{#skill:29}} and {{#skill:34}} from Healer | |||
*{{#skill:5210}} | |||
*{{#item:12883}} get from [[Eden Machine|here.]] | |||
*{{#item:657}} get from Tool Dealer. | |||
*{{#item:100232}} get from [[Creations from special jobclasses#Special_Pharmacy_(Genetic)|here.]] | |||
*{{#item:12437}} get from [[Creations from special jobclasses#Special_Pharmacy_(Genetic)|here.]] | |||
*{{#item:12424}} get from [[Creations from special jobclasses#Special_Pharmacy_(Genetic)|here.]] | |||
*{{#item:12431}} get from [[Creations from special jobclasses#Mixed_Cooking_(Genetic)|here.]] | |||
*{{#item:12729}} get from [[Creations from special jobclasses#Rune_Mastery_(Rune_Knight)|here.]] | |||
*{{#item:12731}} get from [[Creations from special jobclasses#Rune_Mastery_(Rune_Knight)|here.]] | |||
*{{#item:22540}} get from [[Creations from special jobclasses#Rune_Mastery_(Rune_Knight)|here.]] | |||
|} | |||
{| class="wikitable" | |||
|- | |- | ||
| | ! [[File:Down arrow.png|frameless|29x29px]]!! Screen Shot with Notes at the bottom | ||
| | |||
|- | |- | ||
| | || | ||
| | ===== Weapon Card Test ===== | ||
| | || [[File:Weapon Cards Test.png|Weapon Cards Test.png]] <br/> '''Note:-''' DK can easily reach high value of Long Range % and Size % Modifier due to Lux Anima Runestone, once reaching around 100% Size Modifier we can start building Boss % Modifier. Hence the result showing Boss + Size yield the highest Damage among all the other combination. | ||
<div style="float: right;"> [[#top|<big>'''[Top]'''</big>]]</div> | |||
|- | |- | ||
| | || | ||
| | |||
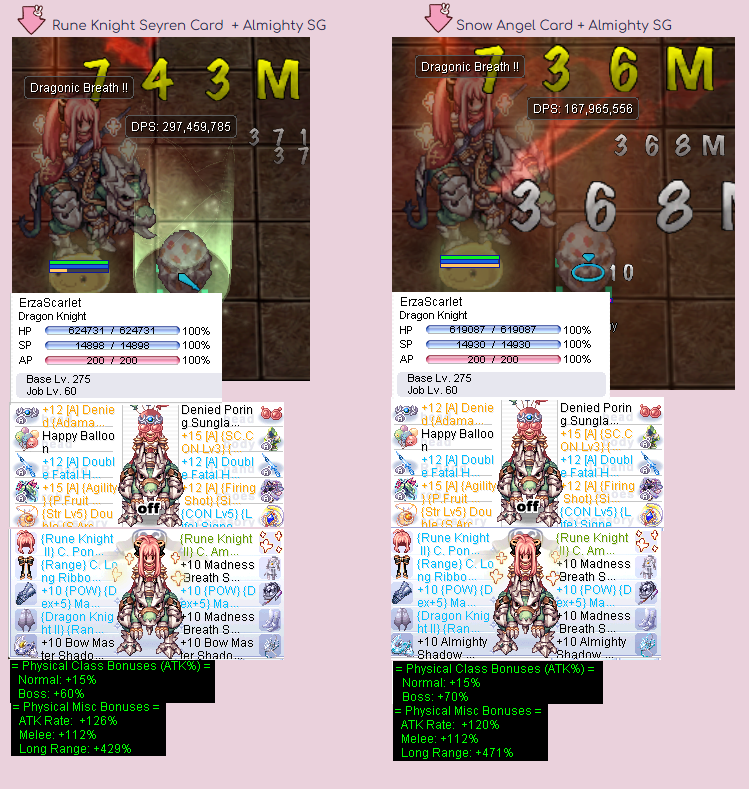
| | ===== MVP Rune Knight Seyren Card vs MVP Snow Angel Card ===== | ||
|| | |||
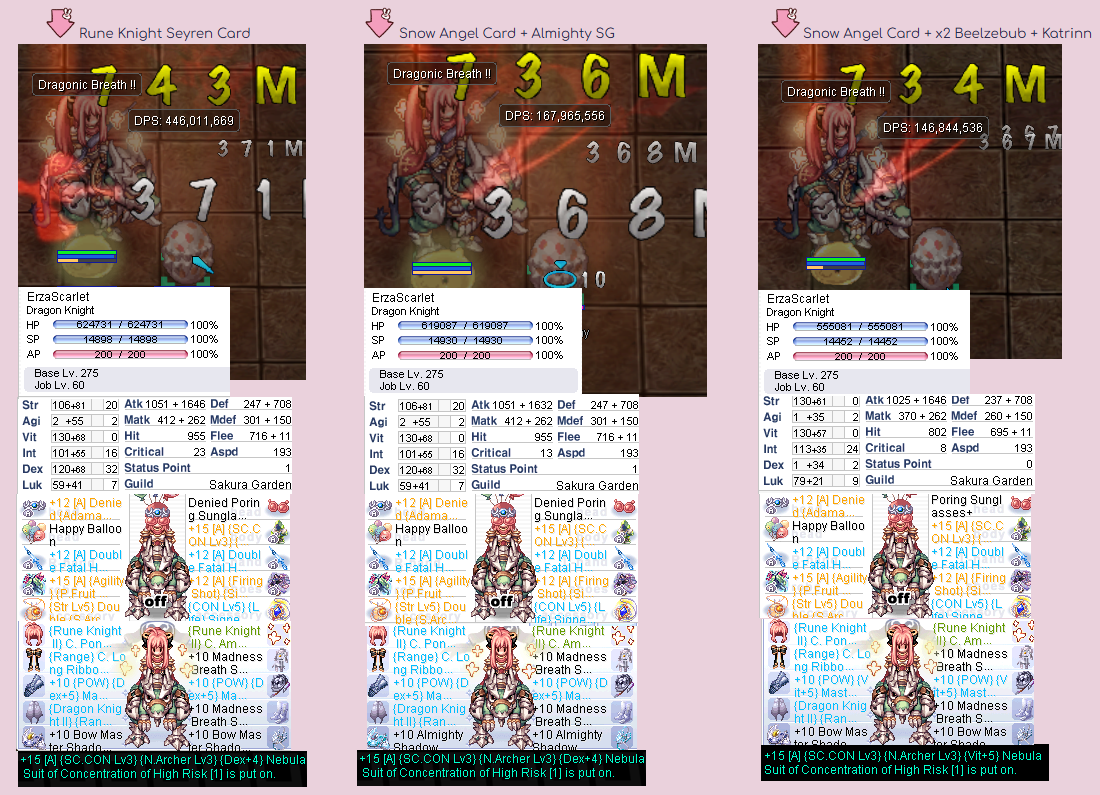
[[File:Rune Knight Seyren Card VS Snow Angel Card.png]] <br/> '''Note:-''' | |||
*Left Image is MVP Rune Knight Seyren Card | |||
*Right Image is MVP Snow Angel Card | |||
This test is with RES 0 to make it fair for Almighty Shadow Gear. <br/>'''MVP Snow Angel Card will be BiS''' by wearing with Bow Master Shadow set , BUT have to consume +20 Int {{#item:12430}} & +20 Dex {{#item:12432}} to replace the stats lose from Almighty Shadow Gear for Instant Cast. | |||
<div style="float: right;"> [[#top|<big>'''[Top]'''</big>]]</div> | |||
|- | |- | ||
| | | | ||
| | |||
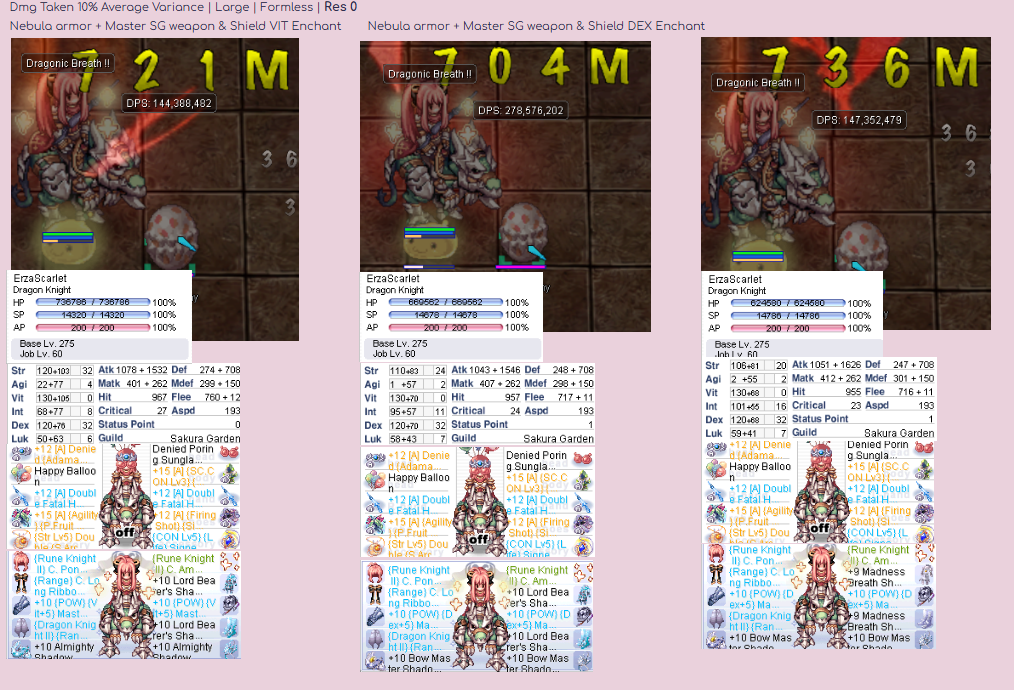
| | ===== Blue Shadow Gear vs New Advance Shadow Gear ===== | ||
|| | |||
[[File:Blue SG VS New Advance SG.png|Blue SG VS New Advance SG.png]] <br> '''Note:-''' | |||
*The Left image is with '''Vit''' Enchant on Nebula armor and both Master Shadow Weapon+Shield. | |||
*The Middle image is with '''Dex''' Enchant on Nebula armor and both Master Shadow Weapon+Shield, the reason behind is because dropping Almighty Shadow Gear loses stats for instant cast and have to get back the stats from equipment enchant. | |||
*The Right image is with Madness Breath Shadow set. | |||
<div style="float: right;"> [[#top|<big>'''[Top]'''</big>]]</div> | |||
|- | |- | ||
| | | | ||
| | |||
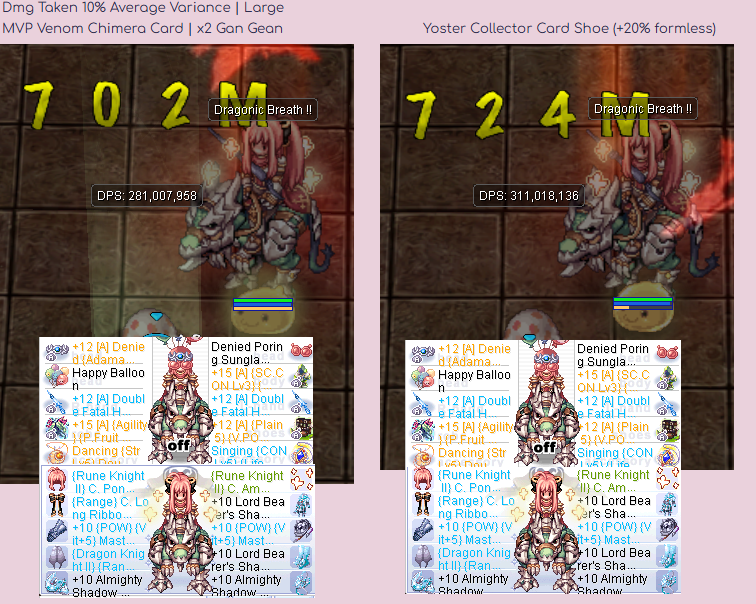
| | ===== MVP Venom Chimera Card VS Specific Monster Race Card ===== | ||
|| | |||
[[File:Venom chimera vs specific monster race card.png|Venom chimera vs specific monster race card.png]] <br> '''Note:-''' The Left image is with MVP Venom Chimera Card. The Right image is with Specific Monster Race in this test we target Formless. | |||
<div style="float: right;"> [[#top|<big>'''[Top]'''</big>]]</div> | |||
|- | |- | ||
| | | | ||
| | |||
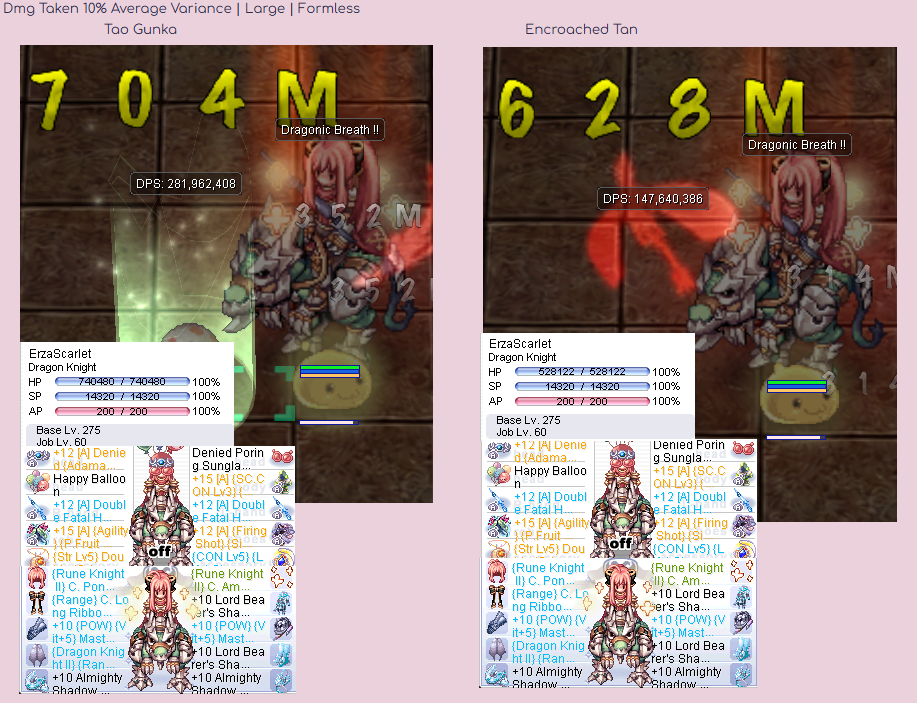
| | ===== MVP Tao Gunka Card VS MVP Encroached Tan Card ===== | ||
|| | |||
[[File:TGK VS TAN.png|TGK VS TAN.png]] <br> '''Note:-''' | |||
*The Left image is with MVP Tao Gunka Card. | |||
*The Right image is with MVP Encroached Tan card. <br/> We lose a lot of Max HP and Damage for using Encroached Tan. | |||
<div style="float: right;"> [[#top|<big>'''[Top]'''</big>]]</div> | |||
|- | |- | ||
| | | | ||
| | |||
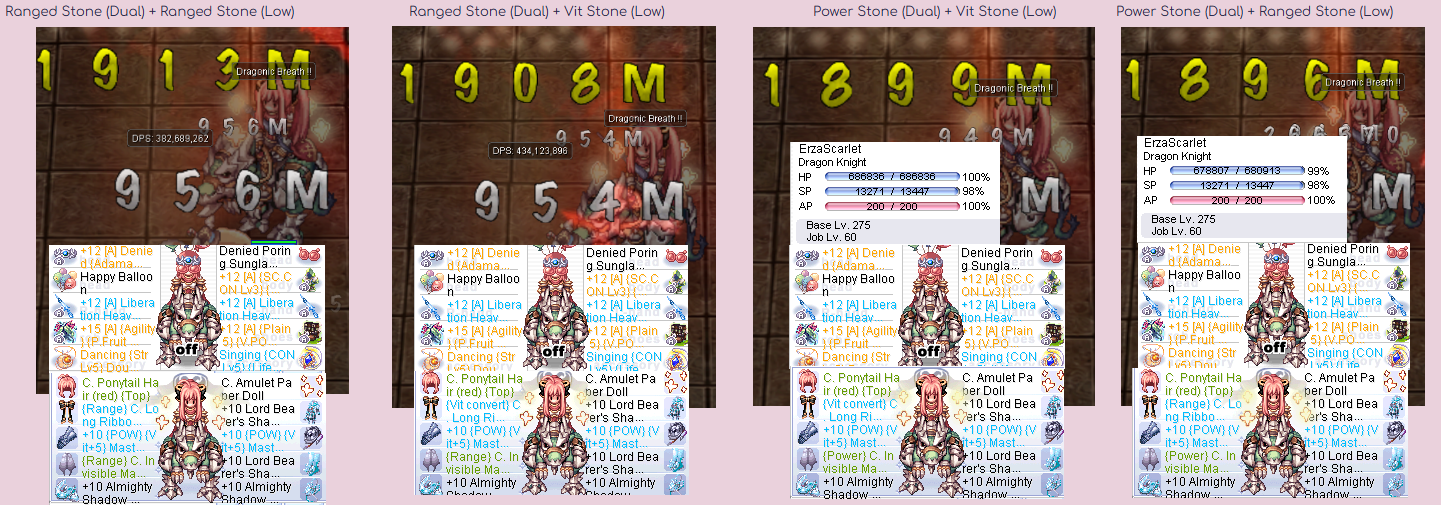
| | ===== Costume Stone (Garment Dual & Low) Comparison ===== | ||
|| | |||
[[File:Costume Stone (low) comparison.png|Costume Stone (low) comparison.png]] <br> '''Note:-''' In this test we compared a few Costume Stone in different combination, Ranged Stone (Garment), Ranged Stone (Low), Vit Convert (Low) and Power Stone (Dual). '''This test was tested with Damage Taken 30% Average Variance | Medium | Formless''' | |||
<div style="float: right;"> [[#top|<big>'''[Top]'''</big>]]</div> | |||
|- | |- | ||
| | | | ||
| | |||
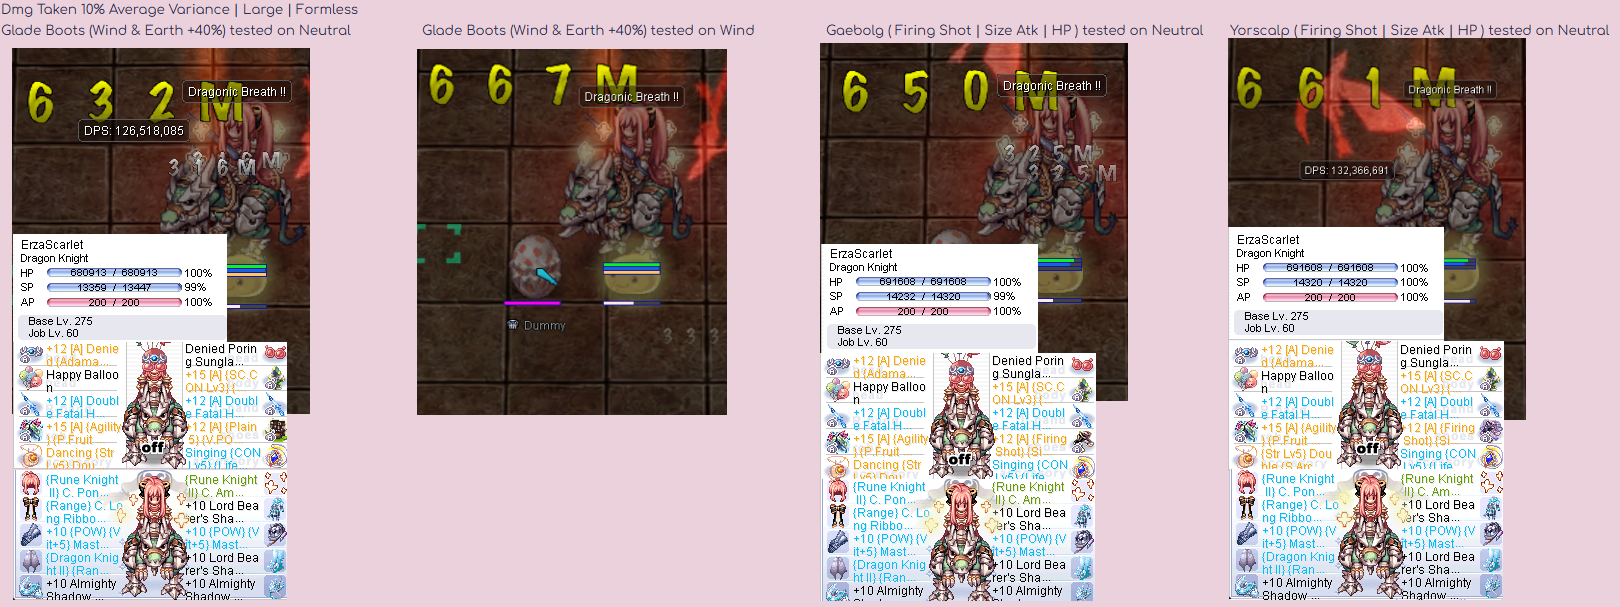
| | ===== Glade Rune Boots VS Gaebolg Boots VS Yorscalp Boots ===== | ||
|| | |||
[[File:Glade rune boots VS Gaebolg VS Yorscalp.png|Glade rune boots VS Gaebolg VS Yorscalp.png]] <br> '''Note:-''' | |||
In this test, the Glade Rune Boots 2nd Enchant is {{#item:311876}} '''(40% extra Damage against Wind & Earth Element)''' <br/> | |||
*On 1st image, Glade Rune Boots was tested on '''Neutral Element dummy''' and it loses out to Gaebolg Boots & Yorscalp Boots in Damage. | |||
*On 2nd image, Glade Rune Boots was tested on '''Wind Element dummy''' and it win Gaebolg Boots & Yorscalp Boots in Damage. | |||
*On the last image, Yorscalp Boots damage is getting close to Glade Rune Boots '''2nd image''', and are not locked to 2 type of monster Elemental like Glade Rune Boots. | |||
<div style="float: right;"> [[#top|<big>'''[Top]'''</big>]]</div> | |||
|- | |- | ||
| | | | ||
| | |||
| | ===== Stats Test for Damage ===== | ||
|| | |||
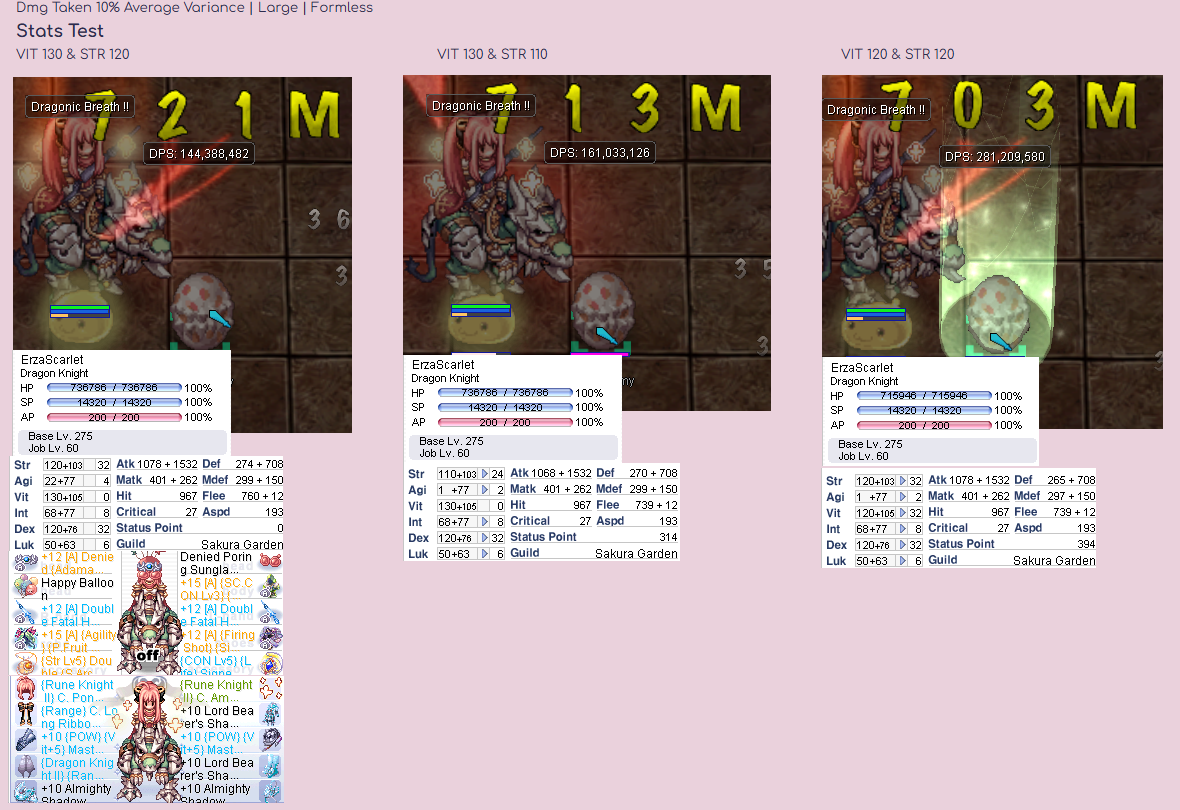
[[File:Stats Test.png]] | |||
<br>'''Note:-''' | |||
In this test, we are testing to see how much Str and Vit affect our Damage. Although it may not look like there's huge difference, keep in mind the dummy is set with 10% Damage Taken. Some of this mini boost may be the differences to be able to 1 shot the monster you're farming. | |||
* Left Image is with 130 Vit & Str | |||
* Middle Image is with 130 Vit & 110 Str | |||
* Right Image is with 120 Vit & Str | |||
<div style="float: right;"> [[#top|<big>'''[Top]'''</big>]]</div> | |||
|- | |- | ||
| | | | ||
| | |||
| | ===== Nebula of Expert Archer<sup>Lv3</sup> vs Nebula of Health<sup>Lv3</sup>===== | ||
|| | |||
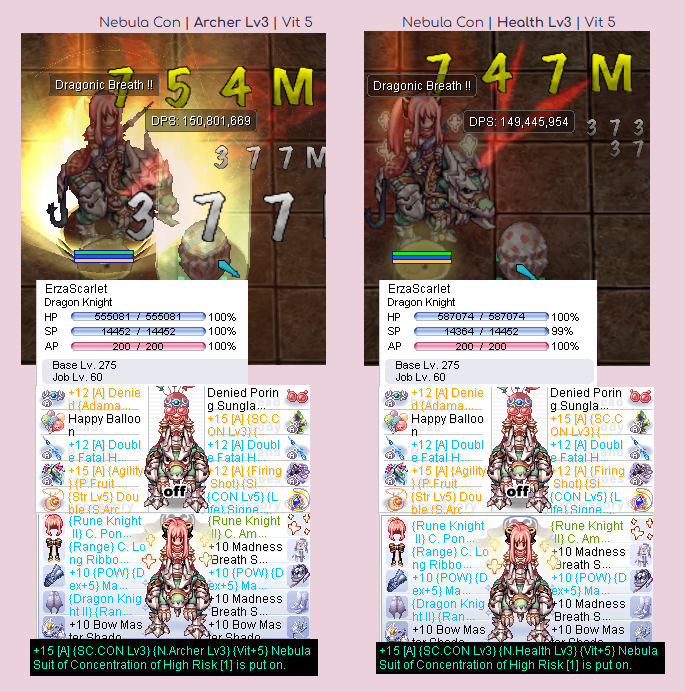
[[File:Nebula 3rd enchant EA VS Health.png]] | |||
<br>'''Note:-''' | |||
*Left Image is Nebula Suit of Concentration with {{#item:310732}}. | |||
*Right Image is Nebula Suit of Concentration with {{#item:310744}}. | |||
We get more Damage with Expert Archer Lv3 but loses some Max HP. | |||
<div style="float: right;"> [[#top|<big>'''[Top]'''</big>]]</div> | |||
|- | |- | ||
| | | | ||
| | ===== Instant Cast by Stats VS Instant Cast by VCT 100% ===== | ||
|| | |||
[[File:Instant Cast by Stats VS Instant Cast by % VCT.png]] | |||
<br>'''Note:-''' | |||
*Left Image and Middle Image get Instant Cast by using Stats (Dex + Int) to gain 530 cast point. | |||
*Right Image get Instant Cast by using VCT 100% (x2 {{#item:4145}}(60%) + {{#item:4366}}(10%) + {{#item:630041}}(10%) + {{#item:480346}}(10%) + {{#item:490484}}(10%)) | |||
By using VCT 100%, we can drop Almighty Shadow Gear and go for full Damage Bow Master Shadow Gear. But in the process we lose -20% Max HP and -6 Vit from x2 {{#item:300076}}, another -10% Max HP from {{#item:300174}} and -153 Hit from having only 1 Dex. | |||
|- | |- | ||
| | | | ||
| | ===== Runestone Crafting Chance ===== | ||
| | || | ||
[[File:Runestone Success Rate.png]] | |||
<br>'''Note:-''' The Table above is base on this formula:- [Base Success Rate + ((DEX ÷ 30) + LUK ÷ 10) + (JobLv ÷ 10)) + Crafting Stone Bonus - Rune Difficulty]%. <br/> | |||
It was computed by using the lowest quality crafting stone {{#item:12737}} (+4% success chance) and crafting the hardest Runestone (-20% success chance) with just base stats 130 Dex & Luk without Stats from Equipment, Buff or Food and at Lv60 Job Level and Lv10 {{#skill:2010}}, you'll get a '''97% success chance'''. <br/>So it's safe to use any other crafting stone that is better than {{#item:12737}} to get pass 100% success chance, or you could also wear some Luk Equipment to make a total of 157 Luk to get 100% success chance. | |||
*Please use {{#item:12736}} to craft {{#item:22540}} to get the minimum '''2~6''' quantity per craft, because {{#item:969}} is expensive, and the other crafting stones will have chance to get minimum '''1~6''' quantity per craft. The rest of the runestone can use any crafting stone depending your budget. | |||
<div style="float: right;"> [[#top|<big>'''[Top]'''</big>]]</div> | |||
|- | |- | ||
| | | | ||
| | |||
===== Boots of Unknown Life VS Yorscalp Boots ===== | |||
|| | |||
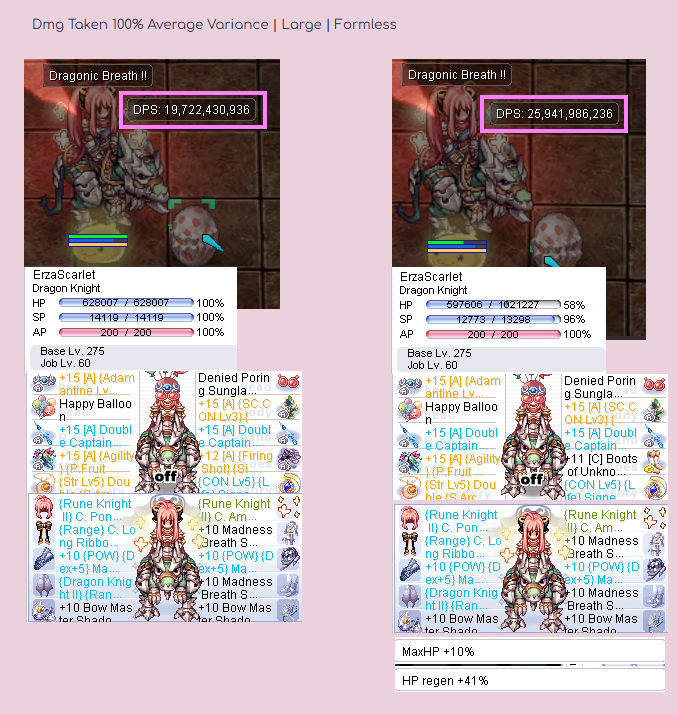
[[File:Boots of Unknown VS Yorscalp Boots.png]] | |||
<br>'''Note:-'''This test was tested with '''Damage Taken 100%''' Average Variance | Large| Formless. Tested multiple times for consistent result. | |||
*Left Image is Yorscalp Boots | |||
*Right Image is Boots of Unknown Life<br/> | |||
Notice when Boots of Unknown proc on Right Image, Max HP increases significantly passing '''1 Mil Max HP'''. This improve Damage tremendously, hence the nick name "Cheat code boots" for DcB DK. | |||
|- | |- | ||
|} | |} | ||
<div style="float: right;"> [[#top|<big>'''[Top]'''</big>]]</div> | |||
== Update Log == | |||
05/10/25 -Officially posted the Guide <br/> | |||
06/10/25 -Added D2 under Tips and Tricks section <br/> | |||
07/10/25 -Added Stats+Traits, Nebula Con EA vs Health & Stats VS VCT Instant Cast <br/> | |||
11/10/25 -Added Leveling Tips & EXP Gears under Tips and Tricks section & Runestone Crafting Chances under Screenshot. | |||
Revision as of 09:27, 13 October 2025
Introduction
Hello everybody, Sakura![]() here, i've been playing MuhRO for over a year at the time of writing this guide. I love the class a lot, being able to carry lots of stuff, hit hard and not afraid of being hit :< and you get to have a mount. The purpose of this guide is to show the Best in slot (BiS) equipment and some tips and tricks for playing Dragon Knight mainly Dragonic Breath. As this is my first guide please be lenient >//< and enjoy reading!
here, i've been playing MuhRO for over a year at the time of writing this guide. I love the class a lot, being able to carry lots of stuff, hit hard and not afraid of being hit :< and you get to have a mount. The purpose of this guide is to show the Best in slot (BiS) equipment and some tips and tricks for playing Dragon Knight mainly Dragonic Breath. As this is my first guide please be lenient >//< and enjoy reading! ![]()
Videos
- A short video show casing the end game of Dragon Knight - Dragonic Breath Build Featuring Biosphere Depth 2, CT 25* (Betelgeuse) and HoL Lv20 (Rigel).
- DcB DK Solo Tan Hard
Notable Stats+Traits, Skills and Consumables 
![]() A short explanation on Stats and Traits, more in-depth info can be found here.
A short explanation on Stats and Traits, more in-depth info can be found here.
| Stats | Effects | Notes |
|---|---|---|
| Str | Increase Weight Attack & Weight Limit | Suggested Value at 100-120, it improve some of your Damage and easier loot management. Click here to see how much it affect your Damage. |
| Agi | Increase Attack Speed (Aspd) & Flee | Suggested Value at 1, its possible to get 193 (Max Aspd) with equipment and consumables alone. |
| Vit | Increase Max HP & HP Healing Effectiveness | Suggested Value at 130, the most important stats for DcB DK. Click here to see how much it affect your Damage. |
| Int | Increase Max SP & Reduce Cast Speed | Suggested Value at 60-100+, increasing Max SP improve some of our damage but not a lot, the main reason to up this stat is for the cast point. Stop adding Int until you get 530 cast point.(1 Int = 1 cast point) |
| Dex | Reduce Cast Speed, Increase Hit & Slight Increase Attack Speed | Suggested Value at 120, the 2nd most important stats for DcB DK is to get 530 cast point((Dex*2) + int). Not worth to add beyond 120 Dex as it cost a lot just for +1 Dex (2 cast points), instead, relocate the remaining to Int until you reach instant cast. Using Stats to gain Instant Cast is Better than getting Instant Cast by VCT 100%. |
| Luk | Increase some Hit & Attack | Suggested Value at 1-100, the main reason for this stats is just to get curse immunity (total Luk at 0 or 100). |
- Tips for Runestone Crafting, up 130 stats on Dex & Luk, remaining stats point go towards Str for holding more materials while crafting, click here to see the crafting success chance. You can Reset / Save Stats build with NPC Lotus located at (main_office 124, 167).
- Don't forget to visit Clan Room for permanent additional Stats gain, can switch between Clan anytime. [Sword Clan give +1 Str & Vit], [Arc Wand Clan give +1 int & Dex], [Golden Mace Clan give +1 Luk & Int], and [Crossbow Clan give +1 Dex & Agi] located at (main_office 113, 310).
| Traits | Effects | Notes |
|---|---|---|
| POW | Increases Attack & some P.Attack | Suggested Value at 110, max this asap as this is our main trait for damage as it scale with DcB Skill. |
| STA | Increases RES | Suggested Value at 0-72, this trait reduce Physical damage receive. Choose either STA or WIS at 72, not enough trait points for both. |
| WIS | Increases Mres | Suggested Value at 0-72, this trait reduce Magical damage receive. Choose either STA or WIS at 72, not enough trait points for both. |
| SPL | Increases Magic Attack | Suggested Value at 0. |
| CON | Increases Hit & some P.Attack | Suggested Value at 110, our secondary traits to increase damage. |
| CRT | Increases Critical Damage | Suggested Value at 0. |
![]() Notable Skills from Swordman to Dragon Knight. Further info can can visit here.
Notable Skills from Swordman to Dragon Knight. Further info can can visit here.
| Skills | Effects | Notes | |
|---|---|---|---|
| Swordman | When casted, the buff last for 10 seconds that increase +20% fire physical property to your Damage | This skill is super good to improve damage during MVP fight, not so much for farming as you need to refresh every 10 seconds. | |
| ↑ | When casted, the buff last for 37 seconds or after taking 7 hits from monster (whichever come first) will make you immune to stagger effect from physical hit | This skill has niche usage when you are not wearing Lord Bearer's Shadow Gear. | |
| Knight | A Passive skill that +40 Mastery Attack | More Attack is always welcome. | |
| ↑ | A Passive skill that enable us to get a mount which Improve movement speed, increase weight limit, Ignore Size Penalty with Spears Weapon, + Mastery Attack | Never say no to a Cute Mount and all the benefits it bring :3 
| |
| ↑ | A Passive skill that regain our Attack Speed back to normal | Riding a mount reduces our Attack Speed so this skill balance back the Attack Speed. | |
| ↑ | An Active Skill that you cast on a target and "Jump" towards it from 14 Cells away | This skill is one of the best movement skill in game as it bring you closer to the monster, faster movement = faster kill = faster farming. | |
| ↑ | When Casted, the buff last for 1 minute that increase +15% Attack, +50 Hit at a cost of -15% Def | This skill improve Damage by a bit, good for MVP and its duration is manageable in farming. | |
| Rune Knight | A Passive skill that works like |
This skill alone restore our Attack speed back to normal. | |
| ↑ | An Active skill that deal AoE Fire Ranged Physical attack to a target | This skill is pre-requisite for Dragon Knight Skill. | |
| ↑ | An Active skill that deal AoE Water Ranged Physical attack to a target | This skill is pre-requisite for Dragon Knight Skill. | |
| ↑ | A Passive skill that allow us to consume Runestones for self Buff & crafting Runestones | This skill is the most important skill that allow us to use Runestones. Check on Consumables Section. Also for Runestone Crafting Chances. | |
| Dragon Knight | A Passive skill that give reduce damage taken from 10% Small, 15% Medium and 18% Large sized monster | This skill is super good that increase our survivability. | |
| ↑ | When casted on a monster, a buff will be applied on you and last for 5 minutes, it increases our main skill Dragonic Breath (DcB) by A LOT | This skill is the most important buff for Dragon Knight. | |
| ↑ | An Active skill that deal 9x9 AoE Ranged Physical attack to a target | This skill is our Main Skill, it IGNORE Def of monsters and its Damage scale with our POW, Max HP & Max SP. We need to achieve instant cast by getting 530 cast point, the formula is ((dex*2)+int) and 185+ Attack speed for max spam. Try to get 193 (max Attack speed) for seamless |
![]() Be aware that consumables that get marked by "X" next to their name will be Dispelled upon death.
Be aware that consumables that get marked by "X" next to their name will be Dispelled upon death. 
- Only Hagalas Runestone get Dispelled when you Logout.
| Item | Effects | Notes | Where to get |
|---|---|---|---|
| +100% Drop rate for 30 minutes | A must have consumables for field, dungeon & instances farming. | can get from Eden Machine. | |
| +10 All Stats for 30 minutes | One of the essential Food Buff for DcB DK to reach Instant Cast. | can get from Eden Machine. | |
| +500 Def and +200 Mdef for 30 minutes | Optional Scroll since we have High Max HP, use only when you die a lot. | can get from Eden Machine. | |
| X |
+30% Range Physical Attack for 10 minutes | This Scroll increase Damage more than |
can get from Eden Machine. |
| X |
Self Buff a Lv10 |
A super useful scroll if you don't want to keep going back to town for rebuff. | can get from |
| X |
Self Buff a Lv10 |
A super useful scroll if you don't want to keep going back to town for rebuff. | can get from |
| X |
Increases Attack Speed for 30 minutes | The Attack speed from this potion stack with |
can get from any Tool Dealer. |
| Heal 2750 HP | This is the Best HP Potion we have, spam-able and Heal increases with Healing effectiveness and Vit. | can buy from players or created by Genetic, more info here. | |
| Heal 360 SP | This is the Best SP Potion we have, spam-able and Heal increases with Healing effectiveness and Int. | can buy from players or created by Genetic, more info here. | |
| 100% Full Heal HP & SP | This is the only Item that Full Heal your HP & SP, but it has 4 seconds cooldown and is quite heavy to carry. | can buy from players or farm from dungeons and instances. | |
| +10% Attack speed for about 8 minutes+ (500 seconds) | This Potion increases your Attack speed. You can get the 30 Minutes Version by Combining them from Mandy. (main_office 68, 59). | can buy from players or created by Genetic, more info here. | |
| +15% Melee & Range Physical Damage for about 8 minutes+ (500 Seconds) | This Potion increase our Damage by quite a bit, may help to 1 hit Kill the monster you're farming. You can get the 30 Minutes Version by Combining them from Mandy. (main_office 68, 59). | can buy from players or created by Genetic, more info here. | |
| Heal 5% HP, and Max HP increased by 2500 + (10/3)*[Base Level] for 8 minutes+ (500 seconds). | This Potion increases our Max HP by Flat Value and Damage by a bit, You can get the 30 Minutes Version by Combining them from Mandy. (main_office 68, 59). | can buy from players or created by Genetic, more info here. | |
| +20 Vit for 5 minutes | This Food increases our Max HP and Damage by quite a bit, You can get the 30 Minutes Version by Combining them from Mandy. (main_office 68, 59). | can buy from players or created by Genetic, more info here. | |
| X |
Recover 25% Max HP upon usage but the important one is it removes Stun, Sleep, Curse, Stone Curse, Poison Blind, Silence, Bleeding, Confusion, Frozen,Deep Sleep, Burning, Freezing, Guillotine Cross Poisons Marsh of Abyss and Mandragora Howling Debuff. Then Immune to those Debuff for 60 seconds |
A super useful Runestones in Tower of Trials as monster there cast all sorts of Debuff. | have to be crafted by yourself since the Runestones are untradable, more info here. |
| X |
+50% Incoming Healing Effectiveness. Last 15 Minutes. | This Runestone improve Healing from Potion by A Lot, worth to use if you use Potions a lot. | have to be crafted by yourself since the Runestones are untradable, more info here. |
| X |
Increases Weapon ATK by 70+(7 x RuneMasteryLv) Increases Scaling ASPD by (0.4 x RuneMasteryLv). Last 15 Minutes. | This Runestone increases your Damage and Attack Speed. | have to be crafted by yourself since the Runestones are untradable, more info here. |
| Increases Def and Mdef based on this formula: (JobLevel x RuneMasteryLv / 4). Last 15 Minutes. | A Defensive Runestone that help with survivability. | have to be crafted by yourself since the Runestones are untradable, more info here. | |
| X |
+30 Str. Last 15 Minutes. | A Runestone that improve your Damage. | have to be crafted by yourself since the Runestones are untradable, more info here. |
| X |
Increase +30% Physical Damage to All Size, +30% Range & Melee Physical Attack, +30% Critical Damage, +30% Max HP & Max SP. Last 15 Minutes. | This is the Best Runestone, it increase your Damage significantly. | have to be crafted by yourself since the Runestones are untradable, more info here. |
MVP and Farming Gear 
![]() Farm gear are basically gears that provide increase drop rate %, the higher it is the more item drops you'll get. Be wary equipping farm gear may reduce your Damage, and always try to aim for 1 Hit / 2 Hit kill the monster you're farming for maximum efficiency.
Farm gear are basically gears that provide increase drop rate %, the higher it is the more item drops you'll get. Be wary equipping farm gear may reduce your Damage, and always try to aim for 1 Hit / 2 Hit kill the monster you're farming for maximum efficiency. ![]()
| Equipment | Notes | |
|---|---|---|
| Upper Head Gear | +12 A |
Best enchant on 2nd slot is |
| Mid Head Gear | BiS is 10% Long range, but if you get 10% Max HP it works too, use | |
| Mid Head Gear (Farm) | Depends whether you need the card slot for slight damage increase for last hitting monster. Further info can visit here. | |
| Low Head Gear | BiS is 5 Vit and 7% Long range but Prioritize on 7% Long range then follow by stats, use | |
| Low Head Gear (Farm) | BiS is Happy Balloon for the 10% drop rate but if it's too pricey, 2nd best would be | |
| Armor | +12 A |
Best enchant on 2nd slot is Click here for Expert ArcherLv3 VS HealthLv3 on 3rd Enchant. |
| Armor (Farm) | +12 |
Best enchant to get from 1st line is Indestructible, 2nd line would be either Vit or Dex. You can use |
| Weapon | +12 A |
For the enchant you can choose which monster / MVP you want to focus. Further info can visit here.
Tips:- Notice how the 3 MVP listed shared the same |
| Garment | +12 A |
This Garment should be the most expensive gear to make but it has the highest damage boost and should last a very long time. Prioritize to max the enchant on 2nd slot and aim for |
| Shoes | +11 C |
This is like the cheat code damage boost for DcB DK, once the bonus vit is proc from the boots, your damage will be boosted by a large amount. BiS is 10% Max HP, the 2nd line enchant preferably MHP (flat 50~1000) too but can be any as long as you get 10% max HP on the first line enchant. Tips to use Doil the Instance Coin Shop if you don't want to run the instance. Further info can visit here.
Click here for Boots of Unknown Life VS Yorscalp Boots test. |
| Shoes (Farm) |
|
|
| Accessory 1 | Best enchant on 2nd slot is | |
| Accessory 2 | Best enchant on 2nd slot is |
Cards recommendation for MVP / Farming 
| Cards | Notes | |
|---|---|---|
| Upper Head Gear |
|
|
| Mid Head Gear |
|
|
| Low Head Gear | - | - |
| Armor | This MVP Card is BiS for armor, it gives +100% Max HP and is the highest impact card to improve Damage. The downside of this card is -50% of Def & Mdef. Encroached Tan Card is not really good for DcB Build. Click here for MVP Tao Gunka Card VS MVP Encroached Tan Card. | |
| Weapon |
|
|
| Garment |
|
Click here for MVP Rune Knight Seyren Card VS MVP Snow Angel Card |
| Shoes |
|
Click here for MVP Venom Chimera Card VS Specific Monster Race Card |
| Accessory 1 |
|
|
| Accessory 2 |
|
|
Shadow Gears & Costume Stones 
These New Advance Shadow Gear from Tower of Trials triumph when facing High RES monster because of the -20% ignore RES from both sets and it surpasses the Blue Shadow Gear even at RES 0. Click here for the Test Result. Be aware that using this new set may improve Damage but you'll lose Max HP and have to relocate your stats again for Instant Cast.
| Item | Notes | |
|---|---|---|
| Armor | +10 |
Best enchant is Long Range Damage % on 1st line and Pow or P.atk on 2nd line. Prioritize on LR % > Pow / P.atk. Can use |
| Shoes | +10 |
Best enchant is Long Range Damage % on 1st line and Pow or P.atk on 2nd line. Prioritize on LR % > Pow / P.atk. Can use |
| Weapon | +10 |
Best enchant on slot 1 is +3 Pow and for slot 2 is +5 Vit or +5 Dex, pick Vit for Damage or Dex for instant cast. Further info can visit here for enchant, and here for the Shadow Gear. |
| Shield | +10 |
Best enchant on slot 1 is +3 Pow and for slot 2 is +5 Vit or +5 Dex, pick Vit for Damage or Dex for instant cast. Further info can visit here for enchant, and here for the Shadow Gear. |
| Accessory 1 | +10 |
Best enchant is Long Range Damage % on 1st line and Pow or P.atk on 2nd line. Prioritize on LR % > Pow / P.atk. Can use |
| Accessory 2 | +10 |
Best enchant is Long Range Damage % on 1st line and Pow or P.atk on 2nd line. Prioritize on LR % > Pow / P.atk. Can use |
| Item | Notes | |
|---|---|---|
| Top | This stone provide a total of 10% Long Range Damage when Lv10 | |
| Mid | This stone doesn't provide anything on it's own but it combo with Dragon Knight Stone II (Garment). Further info can visit here. | |
| Low | This stone provide 3% Long Range Damage on it's own and combo with Ranged Stone (Dual). We have a few option for Costume Stone (Low), you can even use | |
| Garment | DK Stone II (Garment) Combo with RK Stone II (Top & Mid) which provide +15% physical damage against all size, +5% Max HP and +10% DcB Skill Modifier. Ranged Stone (Dual) provide +4% Long Range Damage on it's own and another +2% Long Range Damage with the combo with Ranged Stone (Low). Further info can visit here for Dragon Knight Stone II (Garment), and here for Ranged Stone (Dual). |
Pets & Runes Tablet System 
| Pet Name | Notes |
|---|---|
 Abysmal Knight (1219) |
The best pet for fighting any Boss Protocol monster, the easiest way to tell is by these symbol on the monster name |
 Blue Moon Loli Ruri (20940) |
One of the best pet for fighting any monster that is NOT Boss Protocol monster. It provide +4 Vit, +5% Max HP and chance to auto cast Lv2 |
 Incubus (1374) |
Good for farming any map that you've already able to 1 hit kill the monster. It provide Max SP +5% with low chance of healing your SP with your 1% damage dealt when intimacy is at Loyal. Further info can visit here. |
 Succubus (1370) |
Good for farming any map that you've already able to 1 hit kill the monster. It provide Max HP +1% with low chance of healing your HP with your 5% damage dealt when intimacy is at Loyal. Further info can visit here. |
| Tablet | Notes |
|---|---|
| Demigod Set | This is the best rune tablet in the game right now if you're fighting Boss Protocol monster
|
| To Activate the Demigod 2 pieces, first you'll need to activate the Phantom Kite Rune and Grey Wolf Rune, after that you can activate the Demigod Set, collect the item listed Below. | |
| Phantom Kite Rune | x450 x3 x3 x150 x50 |
| Grey Wolf Rune | x550 x1 x75 |
| Demigod Set | x1250 x150 x2
|
| Demigod Rune3 pieces |   x750 x1 x1 x100 x100
|
Tips and Tricks 
| MVP | Cards | Consumables Used | Notes |
|---|---|---|---|
 Rigel (22174) (Formless | NeutralLv2 | Large) (RES:1833 | MRES:850) From Hall of Life |
x2 |
|
|
 Betelgeuse (20994) (Dragon | NeutralLv2 | Large) (RES:500 | MRES:500) From Constellation Tower |
x2 |
|
|
 Encroached Tan (22373) (Demi-Human | PoisonLv3 | Large) (RES:868 | MRES:744) From Final Battle |
x2 |
|
|
|
 Depth Salamander (22260) (Formless | FireLv2 | Large) (RES:1987 | MRES:2311)
|
|
|
|
|
|
|
|
|
|
|
Deadly Skills that may 1 shot you:-
|
Skills that are very annoying:-
|
|
Notes:-
Step-by-Step Guide:-
|
![]() All the EXP Bonus from EXP Gear are from Defeating monster, it doesn't boost EXP gain from Board Quest / Daily Quest submission. However, it does provide Bonus EXP from an Even Shared EXP Party Setup even though you are not the one who defeat the monster. Super awesome for Leeching :3
All the EXP Bonus from EXP Gear are from Defeating monster, it doesn't boost EXP gain from Board Quest / Daily Quest submission. However, it does provide Bonus EXP from an Even Shared EXP Party Setup even though you are not the one who defeat the monster. Super awesome for Leeching :3
- EXP Gears are great investment if you are planning to create more Alts.
- By wearing ALL the EXP Gears, potentially you'll get 99% EXP Bonus for any defeated monster.
| Equipment | Notes | Where to get |
|---|---|---|
|
|
|
Under EXP Equipment. |
|
|
|
Under EXP Equipment. |
|
From Costume Enchants Top Box 1. | |
|
|
The stone alone give 2% EXP | From Costume Enchants Mid Box 1. |
|
|
The stone alone give 2% EXP | From Costume Enchants Low Box 1. |
|
|
Click here for crafting Drooping Gunslinger & Spirit Of Chung E & |
|
+5% / +4% EXP & Drop rate. It depends on whether you need the Slot for extra DPS. |
You can get them from Poring Village. |
|
|
All stats +1, combo with Poring Sunglasses to get additional +5 / +4 % EXP. It can be Enchanted. | You can get them from Poring Village. |
|
|
Give +5% EXP and Drop rate. Each refine +100 Max HP & +20 Max SP, Refine at +7 give +3% Max HP & SP, at +9 give +5% Max HP & SP, +12 give +100% HP & SP Recovery Rate | Further info can get from here. |
|
|
All stats +1, give extra 5% EXP. It is Enchantable with |
Click here for crafting Sea Otter Mini Fan. |
|
|
All stats +1, give extra 5% EXP. It is Enchantable with |
Click here for crafting Seal Mini Fan. |
| The main reason for this Shield is the +10% EXP, or use any other shield from Royal Hunt. | Click here for Royal Hunt Shield. | |
|
|
Increase +5% EXP and Drop rate, or use any other Balloon from Poring Family. It can be Enchanted, and most preferably try to get |
Click here for Porings Balloon, and here for the Enchants. |
![]() All of these Cards are to be slotted into Shoes Slot. Super useful if you know which monster you are going to kill the most. (Example:- Abyss Lake 4 consist Half of Dragon Race & Other Half is Undead Race or Einbech 3 most of them are Formless Race.)
All of these Cards are to be slotted into Shoes Slot. Super useful if you know which monster you are going to kill the most. (Example:- Abyss Lake 4 consist Half of Dragon Race & Other Half is Undead Race or Einbech 3 most of them are Formless Race.)
| Cards | Notes |
|---|---|
|
|
Increase +10% EXP from defeating Demi-Human race monster. |
|
|
Increase +10% EXP from defeating Brute race monster. |
|
|
Increase +10% EXP from defeating Insect race monster. |
|
|
Increase +10% EXP from defeating Formless race monster. |
|
|
Increase +10% EXP from defeating Demon race monster. |
|
|
Increase +10% EXP from defeating Undead race monster. |
|
|
Increase +10% EXP from defeating Fish race monster. |
|
|
Increase +10% EXP from defeating Plant race monster. |
|
|
Increase +10% EXP from defeating Dragon race monster. |
|
|
Increase +10% EXP from defeating Angel race monster. |
Best time to level a character is during EXP Event, with proper preparation it is possible to get from Lv1 to Lv275 in under 1 Hour.
|
Consumables and Equipment that i used are listed below. Equipment are entirely Optional and dependent on your budget.
|
| Equipment | Notes | |
|---|---|---|
| Upper Head Gear | It boost your | |
| Mid Head Gear | This is for the 5%/4% Bonus EXP, also combo with Angel Poring Boots. It also depends whether you need the slot for extra Damage or Utility. | |
| Low Head Gear | This is for the 5% Bonus EXP from defeated monster and possible additional 5% Bonus EXP depending on the enchant. Further info can visit here. | |
| Armor i | +12 |
This is for the 5% Bonus EXP from defeated monster. Later on we will change into a stronger Armor. Further info can visit here. |
| Armor ii | +11 |
Best enchant on 2nd slot is |
| Weapon i | +9 |
A super good starter weapon for Wind Cutter Build for the 20% ACD, the enchant could be any but preferably Physical Attack to Normal monster on the 4th Line Enchant. You can use |
| Weapon ii |
|
|
| Garment | +11 |
This Garment . Further info can visit here. |
| Shoes | This is like the cheat code damage boost for DcB DK, once the bonus vit is proc from the boots, your damage will be boosted by a large amount. BiS is 10% Max HP, the 2nd line enchant preferably MHP (flat 50~1000) too but can be any as long as you get 10% max HP on the first line enchant. Tips to use Doil the Instance Coin Shop if you don't want to run the instance. Further info can visit here.
Click here for Boots of Unknown Life VS Yorscalp Boots test. | |
| Shoes (Farm) |
|
|
| Accessory 1 | Best enchant on 2nd slot is | |
| Accessory 2 | Best enchant on 2nd slot is |
| Item | Notes | |
|---|---|---|
| Armor | +10 |
Max HP % increases survivability and Damage improvement when we transition into DcB Build. Having permanent |
| Shoes | +10 |
Max HP % increases survivability and Damage improvement when we transition into DcB Build. Having permanent |
| Weapon | +10 |
Use it for the Bonus +20% EXP Bonus from defeating monster. |
| Shield | +10 |
Use it for the Bonus +20% EXP Bonus from defeating monster. |
| Accessory 1 | +10 |
One of the most versatile Shadow Gear in the game, +10 to All stats for survivability, Damage improvement and getting instant cast when we transition into DcB Build. |
| Accessory 2 | +10 |
One of the most versatile Shadow Gear in the game, +10 to All stats for survivability, Damage improvement and getting instant cast when we transition into DcB Build. |
Test with Screenshots 
This section of the guide provide test for various combination of Cards, Costume Stones and Gears. All the test have been done as fair as possible. Buff used are all self-casted. Test Setup for Dummy are Damage Taken 10% Average Variance | Large | Formless unless stated otherwise under notes.
|
| Screen Shot with Notes at the bottom | |
|---|---|
Weapon Card Test |
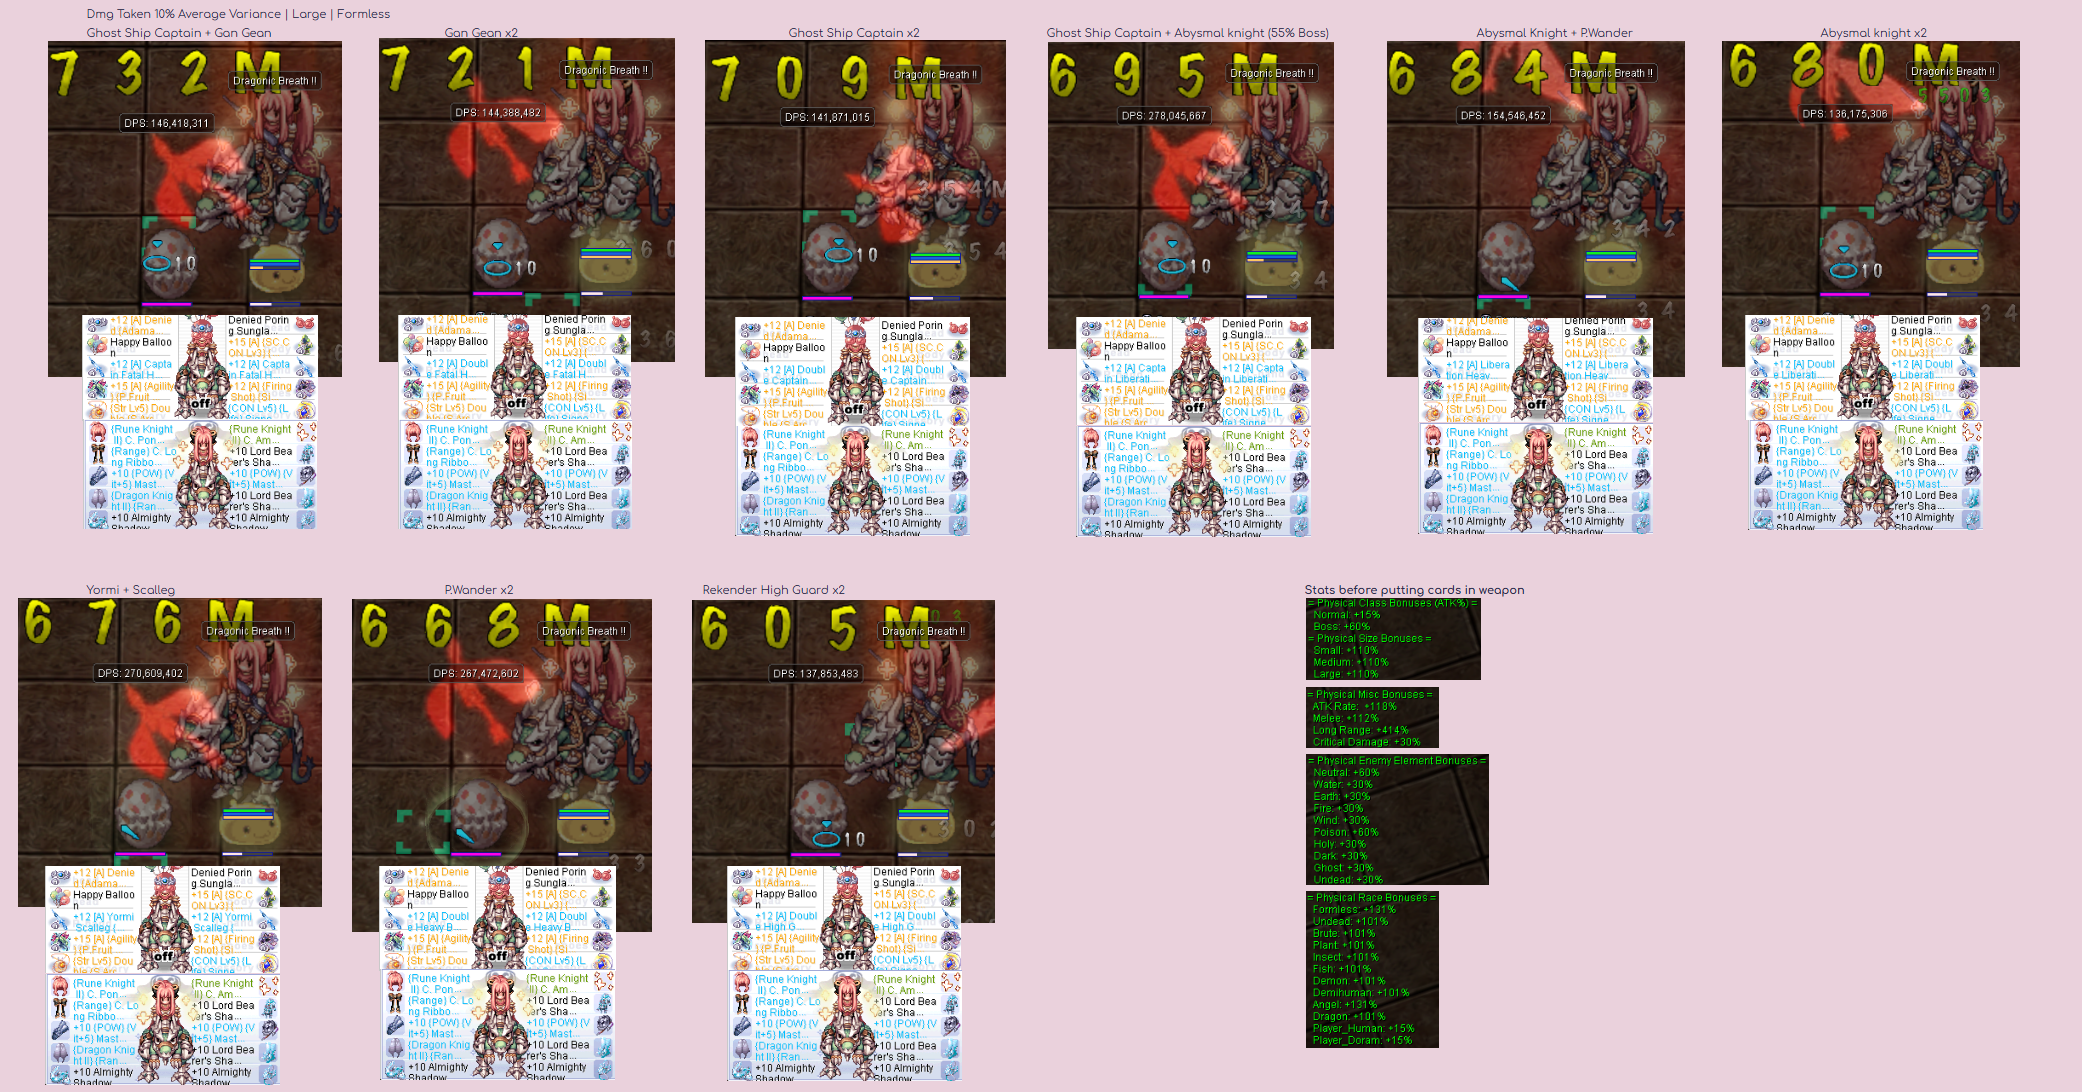 Note:- DK can easily reach high value of Long Range % and Size % Modifier due to Lux Anima Runestone, once reaching around 100% Size Modifier we can start building Boss % Modifier. Hence the result showing Boss + Size yield the highest Damage among all the other combination. |
MVP Rune Knight Seyren Card vs MVP Snow Angel Card |
This test is with RES 0 to make it fair for Almighty Shadow Gear. |
Blue Shadow Gear vs New Advance Shadow Gear |
|
MVP Venom Chimera Card VS Specific Monster Race Card |
|
MVP Tao Gunka Card VS MVP Encroached Tan Card |
|
Costume Stone (Garment Dual & Low) Comparison |
|
Glade Rune Boots VS Gaebolg Boots VS Yorscalp Boots |
|
Stats Test for Damage |
|
Nebula of Expert ArcherLv3 vs Nebula of HealthLv3 |
We get more Damage with Expert Archer Lv3 but loses some Max HP. |
Instant Cast by Stats VS Instant Cast by VCT 100% |
By using VCT 100%, we can drop Almighty Shadow Gear and go for full Damage Bow Master Shadow Gear. But in the process we lose -20% Max HP and -6 Vit from x2 |
Runestone Crafting Chance |
|
Boots of Unknown Life VS Yorscalp Boots |
Notice when Boots of Unknown proc on Right Image, Max HP increases significantly passing 1 Mil Max HP. This improve Damage tremendously, hence the nick name "Cheat code boots" for DcB DK. |
Update Log
05/10/25 -Officially posted the Guide
06/10/25 -Added D2 under Tips and Tricks section
07/10/25 -Added Stats+Traits, Nebula Con EA vs Health & Stats VS VCT Instant Cast
11/10/25 -Added Leveling Tips & EXP Gears under Tips and Tricks section & Runestone Crafting Chances under Screenshot.
