Melee Hyper Novice Guide by Jetago: Difference between revisions
No edit summary |
No edit summary |
||
| Line 214: | Line 214: | ||
== Gear Progression - {{#skill:5451}} == | == Gear Progression - {{#skill:5451}} == | ||
'''Skill Notes:''' Cast Delay: 1.0s | Cooldown: 0.7s | '''Skill Notes:''' | ||
Cast Delay: 1.0s | Cooldown: 0.7s | |||
We're going to need a 30% After Cast Delay reduction to hit the fastest spam rate of Double Bowling Bash, the Attack Speed requirement for it is very low because of the long cooldown. | We're going to need a 30% After Cast Delay reduction to hit the fastest spam rate of Double Bowling Bash, the Attack Speed requirement for it is very low because of the long cooldown. | ||
| Line 339: | Line 341: | ||
|[[Equipment Crafting#Pirate Captain's Coat, Moan of Corruption, Crown of Beelzebub, Fish Head Hat|Equipment Crafting]] | |[[Equipment Crafting#Pirate Captain's Coat, Moan of Corruption, Crown of Beelzebub, Fish Head Hat|Equipment Crafting]] | ||
| - | | - | ||
|This is currently the strongest Upper Headgear for Double Bowling Bash build | |<s>This is currently the strongest Upper Headgear for Double Bowling Bash build</s> | ||
|- | |- | ||
|{{#item:410017}} | |{{#item:410017}} | ||
| Line 353: | Line 355: | ||
|- | |- | ||
! colspan="4" |Armor | ! colspan="4" |Armor | ||
|- | |||
| +9[Na/C] {{#item:450264}} | |||
|[[20 The Immortal#Items and enchants|Episode 20]] | |||
|{{#item:312064}} | |||
{{#item:312061}} | |||
{{#item:312058}} | |||
| rowspan="3" | - | |||
|- | |- | ||
| +11 {{#item:450177}} | | +11 {{#item:450177}} | ||
| Line 360: | Line 369: | ||
{{#item:310506}} | {{#item:310506}} | ||
|- | |- | ||
| +11 {{#item:450206}} | | +11 {{#item:450206}} | ||
| Line 406: | Line 414: | ||
|[[Convertible Wings]] | |[[Convertible Wings]] | ||
| - | | - | ||
| - | |||
|- | |||
| +9[Na/C] {{#item:450266}} | |||
|[[20 The Immortal#Items and enchants|Episode 20]] | |||
|{{#item:312073}} | |||
{{#item:312069}} | |||
{{#item:312056}} | |||
| - | | - | ||
|- | |- | ||
| Line 425: | Line 440: | ||
|- | |- | ||
! colspan="4" |Footgear | ! colspan="4" |Footgear | ||
|- | |||
| +9[Na/C] {{#item:470196}} | |||
|[[20 The Immortal#Items and enchants|Episode 20]] | |||
|{{#item:312079}} | |||
{{#item:312077}} | |||
{{#item:312076}} | |||
| - | |||
|- | |- | ||
| +11 {{#item:470087}} | | +11 {{#item:470087}} | ||
| Line 442: | Line 464: | ||
|- | |- | ||
! colspan="4" |Accessories | ! colspan="4" |Accessories | ||
|- | |||
|{{#item:490328}} | |||
{{#item:490327}} | |||
|[[20 The Immortal#Items and enchants|Episode 20]] | |||
|{{#item:312087}} | |||
{{#item:312083}} | |||
{{#item:312082}} | |||
| rowspan="3" | - | |||
|- | |- | ||
|{{#item:490106}} | |{{#item:490106}} | ||
| Line 448: | Line 478: | ||
|{{#item:310633}} | |{{#item:310633}} | ||
{{#item:310633}} | {{#item:310633}} | ||
|- | |- | ||
|{{#item:490176}} | |{{#item:490176}} | ||
| Line 459: | Line 488: | ||
{{#item:311096}} (L) | {{#item:311096}} (L) | ||
|- | |- | ||
|{{#item:490303}} | |{{#item:490303}} | ||
| Line 487: | Line 515: | ||
|[[Equipment Crafting#Pirate Captain's Coat, Moan of Corruption, Crown of Beelzebub, Fish Head Hat|Equipment Crafting]] | |[[Equipment Crafting#Pirate Captain's Coat, Moan of Corruption, Crown of Beelzebub, Fish Head Hat|Equipment Crafting]] | ||
| - | | - | ||
| - | |||
|- | |||
| +12[A] {{#item:400723}} | |||
|[[21 Age of Heroes#Overview Yorscalp|Episode 21]] | |||
|{{#item:313426}} | |||
{{#item:313409}} | |||
{{#item:4700}}Any | |||
| - | | - | ||
|- | |- | ||
| Line 568: | Line 603: | ||
{{#item:4704}} | {{#item:4704}} | ||
| rowspan="2" | | | rowspan="2" |Glade Boots are just very slightly (around 1~2%) weaker in terms of damage than Flame Boots but also provide a higher MaxHP, this is great if you prefer some extra tankiness | ||
|- | |- | ||
| +12[A] {{#item:470173}} | | +12[A] {{#item:470173}} | ||
|- | |||
| +12[A] {{#item:470303}} | |||
|[[21 Age of Heroes#Equipment|Episode 21]] | |||
|{{#item:313096}} | |||
{{#item:313094}} | |||
{{#item:313090}} | |||
|New best footgear that provides a higher damage in general terms than Varmundt boots, but weaker on fighting specific elemental monsters based on Varmundt's Crystal Enchantments | |||
|- | |- | ||
! colspan="4" |Accessories | ! colspan="4" |Accessories | ||
| Line 631: | Line 673: | ||
== Gear Progression - {{#skill:5452}} == | == Gear Progression - {{#skill:5452}} == | ||
'''Skill Notes:''' Cast Delay: 0.5s | Cooldown: 0.35s | '''Skill Notes:''' | ||
Cast Delay: 0.5s | Cooldown: 0.35s | |||
We're going to need a 30% After Cast Delay reduction and a 183 Attack Speed to hit the fastest spam rate of Mega Sonic Blow | We're going to need a 30% After Cast Delay reduction and a 183 Attack Speed to hit the fastest spam rate of Mega Sonic Blow | ||
| Line 796: | Line 840: | ||
|- | |- | ||
! colspan="4" |Armor | ! colspan="4" |Armor | ||
|- | |||
| +9[Na/C] {{#item:450264}} | |||
|[[20 The Immortal#Items and enchants|Episode 20]] | |||
|{{#item:312064}} | |||
{{#item:312061}} | |||
{{#item:312058}} | |||
| rowspan="3" | - | |||
|- | |- | ||
| +11 {{#item:450177}} | | +11 {{#item:450177}} | ||
| Line 803: | Line 854: | ||
{{#item:310506}} | {{#item:310506}} | ||
|- | |- | ||
| +11 {{#item:450206}} | | +11 {{#item:450206}} | ||
| Line 849: | Line 899: | ||
|[[Convertible Wings]] | |[[Convertible Wings]] | ||
| - | | - | ||
| - | |||
|- | |||
| +9[Na/C] {{#item:450266}} | |||
|[[20 The Immortal#Items and enchants|Episode 20]] | |||
|{{#item:312073}} | |||
{{#item:312069}} | |||
{{#item:312056}} | |||
| - | | - | ||
|- | |- | ||
| Line 875: | Line 932: | ||
{{#item:4995}} | {{#item:4995}} | ||
|Still usable from the previous step | |Still usable from the previous step | ||
|- | |||
| +9[Na/C] {{#item:470196}} | |||
|[[20 The Immortal#Items and enchants|Episode 20]] | |||
|{{#item:312079}} | |||
{{#item:312077}} | |||
{{#item:312076}} | |||
| - | |||
|- | |- | ||
| +11 {{#item:470087}} | | +11 {{#item:470087}} | ||
| Line 892: | Line 956: | ||
|- | |- | ||
! colspan="4" |Accessories | ! colspan="4" |Accessories | ||
|- | |||
|{{#item:490328}} | |||
{{#item:490327}} | |||
|[[20 The Immortal#Items and enchants|Episode 20]] | |||
|{{#item:312087}} | |||
{{#item:312083}} | |||
{{#item:312082}} | |||
| - | |||
|- | |- | ||
|{{#item:490106}} | |{{#item:490106}} | ||
| Line 998: | Line 1,070: | ||
| +12[A] {{#item:500094}} | | +12[A] {{#item:500094}} | ||
|[[Varmundt's Biosphere Depth 2]] | |[[Varmundt's Biosphere Depth 2]] | ||
| | |{{#item:311934}} | ||
{{#item:312800}} | |||
| Choose the enchantments of your preference | |||
|- | |- | ||
! colspan="4" |Shield | ! colspan="4" |Shield | ||
| Line 1,040: | Line 1,113: | ||
{{#item:4704}} | {{#item:4704}} | ||
| rowspan="2" | | | rowspan="2" |Glade Boots are just very slightly (around 1~2%) weaker in terms of damage than Flame Boots but also provide a higher MaxHP, this is great if you prefer some extra tankiness | ||
|- | |- | ||
| +12[A] {{#item:470173}} | | +12[A] {{#item:470173}} | ||
|- | |||
| +12[A] {{#item:470303}} | |||
|[[21 Age of Heroes#Equipment|Episode 21]] | |||
|{{#item:313096}} | |||
{{#item:313094}} | |||
{{#item:313090}} | |||
|New best footgear that provides a higher damage in general terms than Varmundt boots, but weaker on fighting specific elemental monsters based on Varmundt's Crystal Enchantments | |||
|- | |- | ||
! colspan="4" |Accessories | ! colspan="4" |Accessories | ||
| Line 1,147: | Line 1,227: | ||
|{{#item:4393}} | |{{#item:4393}} | ||
|Int +1 per 18 base Str | |Int +1 per 18 base Str | ||
|Combo with {{#item:300271}}: Melee Dmg +15% per 40 base Str, best option for damage | |Combo with {{#item:300271}}: Melee Dmg +15% per 40 base Str, <s>best option for damage</s> | ||
|- | |- | ||
|{{#item:300362}} | |{{#item:300362}} | ||
| Line 1,156: | Line 1,236: | ||
|Def +100, Res +50, if Armor is +12 Atk +10%, MaxHp +30%, if Armor is level 2 Res +50 | |Def +100, Res +50, if Armor is +12 Atk +10%, MaxHp +30%, if Armor is level 2 Res +50 | ||
|Alternative for a lot more tankiness, use only on a +12 Armor, otherwise you'll lose in stats | |Alternative for a lot more tankiness, use only on a +12 Armor, otherwise you'll lose in stats | ||
|- | |||
|{{#item:300524}} | |||
|P.Atk +10, MaxHP -7%, Flee +30, Atk +2% per 10 Base Str, Crit Rate -3 per 10 Base Luk | |||
|Combo With {{#item:300515}}: Melee Dmg +15%, Dmg vs All Elements +15%, Highest Damage combo but reduces Critical Rate by a big amount | |||
|- | |||
|{{#item:300523}} | |||
|Crit Rate +5, Crit Dmg +12%, if Armor is +9 Crit Rate +5, if Armor is +11 Crit Rate +6 | |||
| | |||
|- | |- | ||
! colspan="3" |Weapon | ! colspan="3" |Weapon | ||
| Line 1,197: | Line 1,285: | ||
|{{#item:300271}} | |{{#item:300271}} | ||
|Melee Dmg +10% | |Melee Dmg +10% | ||
|Combo with {{#item:4393}}: Melee Dmg +15% per 40 base Str, Best option for damage | |Combo with {{#item:4393}}: Melee Dmg +15% per 40 base Str, <s>Best option for damage</s> | ||
|- | |- | ||
|{{#item:300422}} | |{{#item:300422}} | ||
| Line 1,204: | Line 1,292: | ||
|- | |- | ||
|{{#item:300261}} | |{{#item:300261}} | ||
| | |Crit Rate +2 per 10 base Luk, if base Luk is 125 Crit Dmg +30% | ||
|Alternative in case you need more Critical Rate | |Alternative in case you need more Critical Rate | ||
|- | |||
|{{#item:300515}} | |||
|Flee +30, Crit Rate -15, Melee Dmg +10%, Melee Dmg +7% per 3 refines | |||
|Combo With {{#item:300524}}: Melee Dmg +15%, Dmg vs All Elements +15%, Highest Damage combo but reduces Critical Rate by a big amount | |||
|- | |- | ||
! colspan="3" |Footgear | ! colspan="3" |Footgear | ||
|- | |- | ||
|{{#item:300380}} | |{{#item:300380}} | ||
| | |Crit Rate +5, if Footgear is +12 Crit Rate +15, Crit Dmg +10%, if Footgear is level 2 C.Rate +5 | ||
|Best Footgear card for Critical build, use only on a +12 Footgear, otherwise you'll lose in stats | |Best Footgear card for Critical build, use only on a +12 Footgear, otherwise you'll lose in stats | ||
|- | |- | ||
| Line 1,224: | Line 1,316: | ||
|- | |- | ||
|{{#item:300278}} | |{{#item:300278}} | ||
| | |Crit Dmg +15% | ||
| - | | - | ||
|- | |- | ||
|{{#item:300467}} | |{{#item:300467}} | ||
|(R) Melee Dmg +15%, if base Luk is 90 | |(R) Melee Dmg +15%, if base Luk is 90 Crit Rate -15 | ||
| - | | - | ||
|- | |- | ||
| Line 1,246: | Line 1,338: | ||
|- | |- | ||
|{{#item:300366}} | |{{#item:300366}} | ||
|(R) | |(R) Crit Rate +6, C.Rate +1 | ||
| rowspan="2" |Combo Effect: | | rowspan="2" |Combo Effect: Crit Dmg +8% | ||
|- | |- | ||
|{{#item:300368}} | |{{#item:300368}} | ||
|(L) | |(L) Crit Rate +6, C.Rate +1 | ||
|- | |||
|{{#item:300526}} | |||
|(R) Crit Rate +5, Variable Cast Time -7% | |||
| rowspan="2" |Combo Effect: C.Rate +2, Crit Dmg +12% | |||
|- | |||
|{{#item:300527}} | |||
|(L) Crit Rate +5, Variable Cast Time -7% | |||
|} | |} | ||
|} | |} | ||
| Line 1,289: | Line 1,388: | ||
|- | |- | ||
|{{#item:9142}} | |{{#item:9142}} | ||
| | |Crit Rate +8 | ||
C.Rate +3 | C.Rate +3 | ||
|Best pet if you need more Critical Rate | |Best pet if you need more Critical Rate | ||
Revision as of 23:12, 1 August 2025
Introduction
Hi~ I'm Jetago, a Hyper Novice Main~
And I decided to write this guide to provide a couple of tips based on my experience for anyone interested in following the path of the Physical Hyper Novice *-*
This guide will be focused on the Melee branch of the Hyper Novice
Double Bowling Bash and Mega Sonic Blow builds.
Hopefully it'll be helpful.
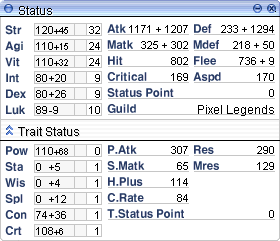
Stats and Traits
First of all, let's go over the basics, Stats, Traits and their benefits.
Skills
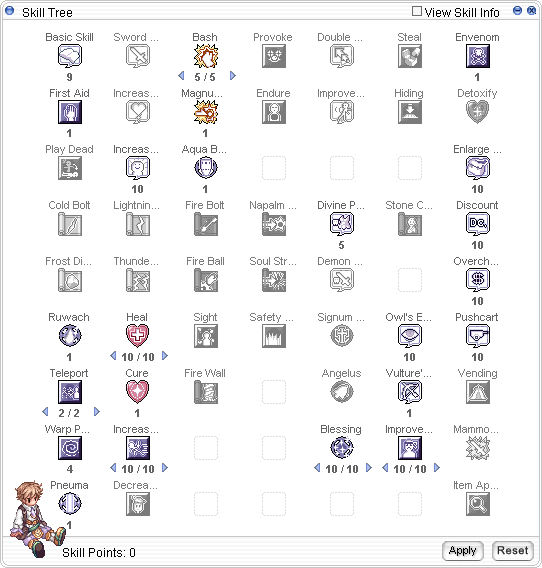
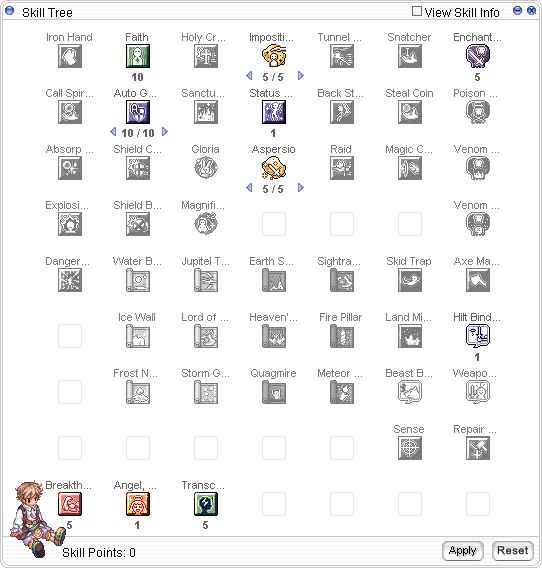
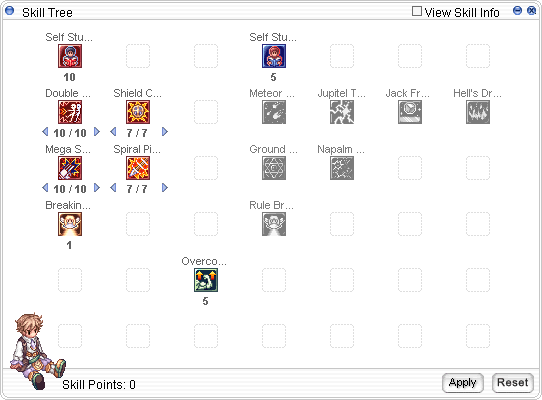
Having such a wide variety of 1st and 2nd class skills, Hyper Novices can be built in many different ways, here i will just mention some of the skills that I personally consider useful and that you may want to keep in mind, but feel free to experiment and pick the ones that fit you best.
| Skills | |||||||||||||||||||||||||||||||||||||||||||||||||||||||||||||||||||||||||||||||||||||||
|---|---|---|---|---|---|---|---|---|---|---|---|---|---|---|---|---|---|---|---|---|---|---|---|---|---|---|---|---|---|---|---|---|---|---|---|---|---|---|---|---|---|---|---|---|---|---|---|---|---|---|---|---|---|---|---|---|---|---|---|---|---|---|---|---|---|---|---|---|---|---|---|---|---|---|---|---|---|---|---|---|---|---|---|---|---|---|---|


| |||||||||||||||||||||||||||||||||||||||||||||||||||||||||||||||||||||||||||||||||||||||
Gear Progression -  Double Bowling Bash
Skill Notes:
Cast Delay: 1.0s | Cooldown: 0.7s
We're going to need a 30% After Cast Delay reduction to hit the fastest spam rate of Double Bowling Bash, the Attack Speed requirement for it is very low because of the long cooldown.
Early Game Gear | |||||||||||||||||||||||||||||||||||||||||||||||||||||||||||||||||||||||||||||||
|---|---|---|---|---|---|---|---|---|---|---|---|---|---|---|---|---|---|---|---|---|---|---|---|---|---|---|---|---|---|---|---|---|---|---|---|---|---|---|---|---|---|---|---|---|---|---|---|---|---|---|---|---|---|---|---|---|---|---|---|---|---|---|---|---|---|---|---|---|---|---|---|---|---|---|---|---|---|---|---|
| |||||||||||||||||||||||||||||||||||||||||||||||||||||||||||||||||||||||||||||||
Mid to Late Game Gear | ||||||||||||||||||||||||||||||||||||||||||||||||||||||||||||||||||||||||||||||||||||||||||||||||||||||||||||
|---|---|---|---|---|---|---|---|---|---|---|---|---|---|---|---|---|---|---|---|---|---|---|---|---|---|---|---|---|---|---|---|---|---|---|---|---|---|---|---|---|---|---|---|---|---|---|---|---|---|---|---|---|---|---|---|---|---|---|---|---|---|---|---|---|---|---|---|---|---|---|---|---|---|---|---|---|---|---|---|---|---|---|---|---|---|---|---|---|---|---|---|---|---|---|---|---|---|---|---|---|---|---|---|---|---|---|---|---|
| ||||||||||||||||||||||||||||||||||||||||||||||||||||||||||||||||||||||||||||||||||||||||||||||||||||||||||||
End Game Gear | |||||||||||||||||||||||||||||||||||||||||||||||||||||||||||||||||||||||||||||||||||||||
|---|---|---|---|---|---|---|---|---|---|---|---|---|---|---|---|---|---|---|---|---|---|---|---|---|---|---|---|---|---|---|---|---|---|---|---|---|---|---|---|---|---|---|---|---|---|---|---|---|---|---|---|---|---|---|---|---|---|---|---|---|---|---|---|---|---|---|---|---|---|---|---|---|---|---|---|---|---|---|---|---|---|---|---|---|---|---|---|
| |||||||||||||||||||||||||||||||||||||||||||||||||||||||||||||||||||||||||||||||||||||||
Shadow Gear and Costume Stones | ||||||||||||||||||||
|---|---|---|---|---|---|---|---|---|---|---|---|---|---|---|---|---|---|---|---|---|
| ||||||||||||||||||||
Gear Progression -  Mega Sonic Blow
Skill Notes:
Cast Delay: 0.5s | Cooldown: 0.35s
We're going to need a 30% After Cast Delay reduction and a 183 Attack Speed to hit the fastest spam rate of Mega Sonic Blow
Additionally our Critical Rate, around 150 to 170 can cover general dungeon/instance farming, newer content like Varmundt's Depths and Garden of Time requires from 190 up to 210
Early Game Gear | |||||||||||||||||||||||||||||||||||||||||||||||||||||||||||||||||||||||||||||||
|---|---|---|---|---|---|---|---|---|---|---|---|---|---|---|---|---|---|---|---|---|---|---|---|---|---|---|---|---|---|---|---|---|---|---|---|---|---|---|---|---|---|---|---|---|---|---|---|---|---|---|---|---|---|---|---|---|---|---|---|---|---|---|---|---|---|---|---|---|---|---|---|---|---|---|---|---|---|---|---|
| |||||||||||||||||||||||||||||||||||||||||||||||||||||||||||||||||||||||||||||||
Mid to Late Game Gear | ||||||||||||||||||||||||||||||||||||||||||||||||||||||||||||||||||||||||||||||||||||||||||||||||||||||||||||||||||||||
|---|---|---|---|---|---|---|---|---|---|---|---|---|---|---|---|---|---|---|---|---|---|---|---|---|---|---|---|---|---|---|---|---|---|---|---|---|---|---|---|---|---|---|---|---|---|---|---|---|---|---|---|---|---|---|---|---|---|---|---|---|---|---|---|---|---|---|---|---|---|---|---|---|---|---|---|---|---|---|---|---|---|---|---|---|---|---|---|---|---|---|---|---|---|---|---|---|---|---|---|---|---|---|---|---|---|---|---|---|---|---|---|---|---|---|---|---|---|---|
| ||||||||||||||||||||||||||||||||||||||||||||||||||||||||||||||||||||||||||||||||||||||||||||||||||||||||||||||||||||||
End Game Gear | |||||||||||||||||||||||||||||||||||||||||||||||||||||||||||||||||||||||||||||||||||||
|---|---|---|---|---|---|---|---|---|---|---|---|---|---|---|---|---|---|---|---|---|---|---|---|---|---|---|---|---|---|---|---|---|---|---|---|---|---|---|---|---|---|---|---|---|---|---|---|---|---|---|---|---|---|---|---|---|---|---|---|---|---|---|---|---|---|---|---|---|---|---|---|---|---|---|---|---|---|---|---|---|---|---|---|---|---|
| |||||||||||||||||||||||||||||||||||||||||||||||||||||||||||||||||||||||||||||||||||||
Shadow Gear and Costume Stones | |||||||||||||||||||||
|---|---|---|---|---|---|---|---|---|---|---|---|---|---|---|---|---|---|---|---|---|---|
| |||||||||||||||||||||
Cards
Here's a list with some recommended cards for general use (No Mvps included)
Note: I recommend testing with different card sets so you can check what fits better on your preferences over damage, tankiness, versatility, Etc.
| Cards | |||||||||||||||||||||||||||||||||||||||||||||||||||||||||||||||||||||||||||||||||||||||||||||||||||||||||||||||||||||||||||||||||||
|---|---|---|---|---|---|---|---|---|---|---|---|---|---|---|---|---|---|---|---|---|---|---|---|---|---|---|---|---|---|---|---|---|---|---|---|---|---|---|---|---|---|---|---|---|---|---|---|---|---|---|---|---|---|---|---|---|---|---|---|---|---|---|---|---|---|---|---|---|---|---|---|---|---|---|---|---|---|---|---|---|---|---|---|---|---|---|---|---|---|---|---|---|---|---|---|---|---|---|---|---|---|---|---|---|---|---|---|---|---|---|---|---|---|---|---|---|---|---|---|---|---|---|---|---|---|---|---|---|---|---|---|
| |||||||||||||||||||||||||||||||||||||||||||||||||||||||||||||||||||||||||||||||||||||||||||||||||||||||||||||||||||||||||||||||||||
Pets
| Pets | ||||||||||||||||||||||||
|---|---|---|---|---|---|---|---|---|---|---|---|---|---|---|---|---|---|---|---|---|---|---|---|---|
|
Utility Equipment
| Utility Equipment | |||||||||||||||||||||||
|---|---|---|---|---|---|---|---|---|---|---|---|---|---|---|---|---|---|---|---|---|---|---|---|
|
Consumables
Just some consumables you might (or might not) need~
| Consumables | ||||||||||||||
|---|---|---|---|---|---|---|---|---|---|---|---|---|---|---|
|
Leveling
Note: This is mostly a reference of a viable leveling path that I tried myself with a brand new Novice using only the free equipment provided by the Eden Group.
Leveling a Super Novice can be tedious, if by any chance you have better equipment, leveling will be smoother and you could even try harder dungeons with better Experience rewards.
| Leveling Tools | ||||||||||
|---|---|---|---|---|---|---|---|---|---|---|
|
Lv 1~10 - Starter Quest
Follow the MuhRO starter quest through Prontera field and the Main Office until you reach the Eden Group and get your Starting Gear from Lothaire and Shadow Gear from Lucy.
 Paradise Mace (590025)
 Paradise Cap (400137)
 Paradise Suit (450183)
 Paradise Manteau (480103)
 Paradise Boots (470067)
 Paradise Ring (490122)
 Paradise Gloves (490123)
 Paradise Shadow Weapon (24687)
 Paradise Shadow Shield (24688)
 Paradise Shadow Armor (24689)
 Paradise Shadow Shoes (24690)
 Paradise Shadow Earring (24691)
 Paradise Shadow Pendant (24692)
Lv 10~45 - Anthell
Once geared, pause the starter quest for a while and use the Warper to Anthell Dungeon and kill some Ant Egg, Andre, Deniro and Piere until you reach the Base level 45 required to change jobs, make sure to use your ![]() Novice Battle Manual (7803) before you reach level 40.
Novice Battle Manual (7803) before you reach level 40.
- Super Novice Priority Skills
 Bash - As main attack skill.
 Blessing - Stat Booster, increases Str/Dex/Int.
 Increase Agility - Stat Booster, increases Agi/Aspd.
 Improve Concentration - Stat Booster, increases Agi/Dex.
 Heal - Self support, HP recovery.
 Sword Mastery - Increases the damage dealt with Swords and Daggers.
 Teleport - Mobility.
Lv 45~90 - Poring Village
Once reached level 45 return to the Main Office, change job to Super Novice, head back to Eden and get a ![]() Paradise Super Novice Sword (500035) from Labraham, then continue with the starter quest, talk to Lunos to be taken to the Poring Village Instance and complete it.
Paradise Super Novice Sword (500035) from Labraham, then continue with the starter quest, talk to Lunos to be taken to the Poring Village Instance and complete it.
Alternative: Level up in Orc Dungeon F1 killing Orc Zombies and Skeletons, and later on in Glast Heim Monastery with Evil Druids and Wraiths.
Lv 90~110 - Stapo Hunt
Get the Stapo hunt quest from the Lv 90 Eden Board, repeat this quest until reaching the level required for the next job change, Stapos are located one map south of Veins Town.
- Lv 99 Stat distribution example
| Str: 90 | Agi: 90 | Vit: 10 | Int: 1 | Dex: 50 | Luk: 1 |
Once you reach 99/99 return to the Main Office and change jobs to Expanded Super Novice.
At this point you must get the Advanced Paradise Equipment Set from Louis and Labraham in Eden.
 Paradise Super Novice Dagger (510039)
 Advanced Paradise Luxury Cap (400139)
 Advanced Paradise Suit (450185)
 Advanced Paradise Manteau (480105)
 Paradise Luxury Boots (470069)
 Advanced Paradise Ring (490126)
 Advanced Paradise Gloves (490127)
You will need the following materials.
- 15x
 Old Pick (7318) - Obtained from Pitmen in Einbech Dungeon.
 - 15x
 Elastic Band (7200) - Obtained from Wootan Shooters, located two maps south of Umbala Town.
 - 3x
 Blue Hair (1034) - Obtained from Kobolds, located two maps north of Lighthalzen Town.
You should also get a ![]() Novice Shield [1] (2113) from the Lighthalzen Weapon Store, this will provide some resistances and allow you to use Auto Guard.
Novice Shield [1] (2113) from the Lighthalzen Weapon Store, this will provide some resistances and allow you to use Auto Guard.
- Expanded Super Novice Priority Skills
 Back Stab - As next main damage skill. Alternative:
  Raid (Sightless Mind).
 Breakthrough - Passive Atk and MaxHP/SP increase.
 Transcendence - Passive MaxHP/SP increase.
 Angel, Help me! - Self Support, HP and SP recovery.
 Auto Guard - Defensive buff, blocks enemy attacks.
Lv 110~150 - Illusion of Moonlight
Illusion Dungeon hunt quests give a great amount of Experience, and this one is especially easy.
Tip: Avoid the Wizard of Veritas mob, they have a larger HP pool and cast harmful magic spells.
- Lv 130 Stat distribution example
| Str: 100 | Agi: 100 | Vit: 80 | Int: 10 | Dex: 60 | Luk: 10 |
Lv 150~170 - Illusion of Vampire
Get ready with some ![]() Holy Water (523) and
Holy Water (523) and ![]() Aspersio in your repertoire of skills, this will be of great help since almost all the monsters in this dungeon have Shadow and Undead elements, be careful when hitting the Black Mushrooms, they can cast Self Destruction which will surely insta-kill you if you are near.
Aspersio in your repertoire of skills, this will be of great help since almost all the monsters in this dungeon have Shadow and Undead elements, be careful when hitting the Black Mushrooms, they can cast Self Destruction which will surely insta-kill you if you are near.
Tip: Avoid the Sweet Nightmare mob, their Ghost element will make you deal less damage on them and their Soul Drain will be rather annoying.
- Lv 170 Stat distribution example
| Str: 110 | Agi: 110 | Vit: 100 | Int: 60 | Dex: 70 | Luk: 60 |
Lv 170~180 - Recon Robot Hunt
Get the Recon Robot hunt quest from the Lv130~190 Eden Board (this quest is unlocked at Lv160), Recon Robots are located one map through the tunnel southeast of Verus Town.
Lv 180~200 - Thanatos Fragments
At this point, leveling may get slower, I highly recommend using the Thanatos Fragments hunt quests from the Main Office board, try buying the following items from the market (@ws ItemID).
(Or get them with an alt character?)
- 10x
 Fragment of Agony (7436)
 - 10x
 Fragment of Misery (7437)
 - 10x
 Fragment of Hatred (7438)
 - 10x
 Fragment of Despair (7439)
And turn them in at the Main Office board, these quests reward you with a great amount of Experience but can only taken once a day, combine delivering these fragments with the hunting quest from the previous step until you finally reach Lv 200.
- Lv 200 Stat distribution example
| Str: 120 | Agi: 110 | Vit: 110 | Int: 80 | Dex: 80 | Luk: 89 |
Final Notes
Hey, you've reached the end~
That's all for now, If you have any question or suggestion, just let me know, send a dm or ping me in discord or ingame as Jetago
Thanks for reading ^^.
