Charleston Crisis: Difference between revisions
Jump to navigation
Jump to search
(Marked this version for translation) |
|||
| (14 intermediate revisions by 2 users not shown) | |||
| Line 1: | Line 1: | ||
<languages/> | |||
<translate> | |||
<!--T:1--> | |||
[[Category:Instances]] | |||
===<span style="color: #B0C4DE;">Requirements and Rewards</span> === | ===<span style="color: #B0C4DE;">Requirements and Rewards</span> === | ||
<!--T:2--> | |||
* Base Level 130+ | * Base Level 130+ | ||
* Go in Verus and find Charleston {{#navi:verus04|75|114}}. She needs replacement parts from the factory. | * 1 day cooldown | ||
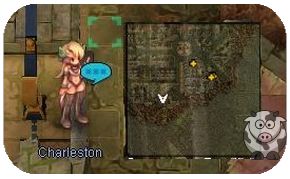
* Go in Verus and find Charleston {{#navi:verus04|75|114}}. She needs replacement parts from the factory. <br> | |||
[[File:CharlestonEnt.jpg]] | |||
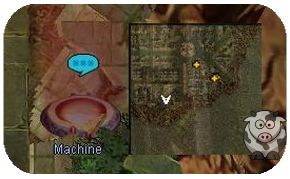
* After gaining her permission, you will be able to use the Machine next to her. | * After gaining her permission, you will be able to use the Machine next to her. | ||
[[File:EntMA.jpg]] | |||
* The party leader has to create the instance and the other members can join afterwards. | * The party leader has to create the instance and the other members can join afterwards. | ||
<!--T:3--> | |||
===<span style="color: #B0C4DE;">Instance</span>=== | ===<span style="color: #B0C4DE;">Instance</span>=== | ||
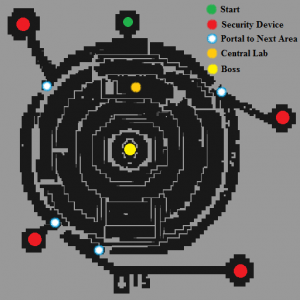
[[File:Charleston Crisis Map.png|right|frameless]] | [[File:Charleston Crisis Map.png|right|frameless]] | ||
<!--T:4--> | |||
'''Destroying the Zone Security Devices''' | '''Destroying the Zone Security Devices''' | ||
<!--T:5--> | |||
* Walk towards Charleston 1 and she'll ask you to destroy the Zone Security Devices to move forward within the factory. | * Walk towards Charleston 1 and she'll ask you to destroy the Zone Security Devices to move forward within the factory. | ||
* Go left and kill the first Zone Security Device (it's a mob). A portal will appear allowing to move forward. | * Go left and kill the first Zone Security Device (it's a mob). A portal will appear allowing to move forward. | ||
| Line 17: | Line 28: | ||
* Moving there might be tricky, it's not easy to navigate. | * Moving there might be tricky, it's not easy to navigate. | ||
<!--T:6--> | |||
'''Lab Requests''' | '''Lab Requests''' | ||
<!--T:7--> | |||
* Inside the lab, go near Dr. Vee to trigger the next scene (you must be really close to him). Accept to help him. | * Inside the lab, go near Dr. Vee to trigger the next scene (you must be really close to him). Accept to help him. | ||
* The party leader has to speak with Charleston 1 {{#navi:2@mcd|121|217}} and she'll ask you to kill 3 Rock Steps. | * The party leader has to speak with Charleston 1 {{#navi:2@mcd|121|217}} and she'll ask you to kill 3 Rock Steps. | ||
| Line 25: | Line 38: | ||
* You only have to go near the generators, you don't have to kill the Kick Step. | * You only have to go near the generators, you don't have to kill the Kick Step. | ||
<!--T:8--> | |||
* {{#navi:2@mcd|175|195}} | * {{#navi:2@mcd|175|195}} | ||
* {{#navi:2@mcd|127|81}} | * {{#navi:2@mcd|127|81}} | ||
* {{#navi:2@mcd|87|230}} | * {{#navi:2@mcd|87|230}} | ||
<!--T:9--> | |||
* Return to the lab once you've investigated all 3 generators. | * Return to the lab once you've investigated all 3 generators. | ||
* Talk with Charleston 1 again and then follow her to the right. | * Talk with Charleston 1 again and then follow her to the right. | ||
| Line 35: | Line 50: | ||
* You will get waves of mobs, they are fairly easy to kill. You must kill all of them to proceed and the portals will re-open. | * You will get waves of mobs, they are fairly easy to kill. You must kill all of them to proceed and the portals will re-open. | ||
<!--T:10--> | |||
'''The Core''' | '''The Core''' | ||
<!--T:11--> | |||
* Walk out of the lab and go all the way south below the middle /navi {{#navi:2@mcd|130|127}}. Charleston 1 and 2 will be waiting for you. | * Walk out of the lab and go all the way south below the middle /navi {{#navi:2@mcd|130|127}}. Charleston 1 and 2 will be waiting for you. | ||
* Move near Charleston 2 to trigger the next dialogues. | * Move near Charleston 2 to trigger the next dialogues. | ||
| Line 43: | Line 60: | ||
* Walk near the NPCs to trigger the next scene. You have to defeat Charleston 3. | * Walk near the NPCs to trigger the next scene. You have to defeat Charleston 3. | ||
<!--T:12--> | |||
'''Charleston Parts''' | '''Charleston Parts''' | ||
<!--T:13--> | |||
* Once the scene between 1 and 2 is over, move downward and go back to Dr. Vee in the lab. A dialogue will trigger once you get close. | * Once the scene between 1 and 2 is over, move downward and go back to Dr. Vee in the lab. A dialogue will trigger once you get close. | ||
* Talk to Shalosh {{#navi:2@mcd|77|167}} and select I want to go back. | * Talk to Shalosh {{#navi:2@mcd|77|167}} and select I want to go back. | ||
* You will be rewarded with 3 {{#item:6752|Charleston Component}}. | * You will be rewarded with 3 {{#item:6752|Charleston Component}}. | ||
===<span style="color: #B0C4DE;">Monsters</span>=== | ===<span style="color: #B0C4DE;">Monsters</span>=== <!--T:14--> | ||
{| class="wikitable mw-collapsible" style="width: 60%;text-align: center;" data-mce-style="width: 100%;" | <!--T:15--> | ||
{| class="wikitable mw-collapsible mw-collapsed" style="width: 60%;text-align: center;" data-mce-style="width: 100%;" | |||
|- style="background-color:#B0C4DE;text-align:center;" data-mce-style="background-color: #aef;" | |- style="background-color:#B0C4DE;text-align:center;" data-mce-style="background-color: #aef;" | ||
| style="width: 20%"|Monster | | style="width: 20%"|Monster | ||
| Line 86: | Line 106: | ||
<br clear="both"> | <br clear="both"> | ||
===<span style="color: #B0C4DE;">Cards</span>=== | ===<span style="color: #B0C4DE;">Cards</span>=== <!--T:16--> | ||
{| class="wikitable mw-collapsible" style="width: 60%;" data-mce-style="width: 100%;" | <!--T:17--> | ||
{| class="wikitable mw-collapsible mw-collapsed" style="width: 60%;" data-mce-style="width: 100%;" | |||
|- style="background-color:#B0C4DE;text-align:center;" | |- style="background-color:#B0C4DE;text-align:center;" | ||
| style="width: 20%"|Card | | style="width: 20%"|Card | ||
| Line 109: | Line 130: | ||
|} | |} | ||
<!--T:18--> | |||
===<span style="color: #B0C4DE;">Equipment and Enchantments</span>=== | |||
For more informations [[Verus Gear|click here.]] | |||
</translate> | |||
===<span style="color: #B0C4DE;"> | |||
Latest revision as of 14:28, 7 March 2025
Requirements and Rewards
- Base Level 130+
- 1 day cooldown
- Go in Verus and find Charleston (verus04 75, 114). She needs replacement parts from the factory.
- After gaining her permission, you will be able to use the Machine next to her.
- The party leader has to create the instance and the other members can join afterwards.
Instance

Destroying the Zone Security Devices
- Walk towards Charleston 1 and she'll ask you to destroy the Zone Security Devices to move forward within the factory.
- Go left and kill the first Zone Security Device (it's a mob). A portal will appear allowing to move forward.
- Repeat the same process 3 more times until Charleston 1 asks you to meet her at the lab.
- The lab is found in the middle (2@mcd 141, 199) of the map.
- Moving there might be tricky, it's not easy to navigate.
Lab Requests
- Inside the lab, go near Dr. Vee to trigger the next scene (you must be really close to him). Accept to help him.
- The party leader has to speak with Charleston 1 (2@mcd 121, 217) and she'll ask you to kill 3 Rock Steps.
- You can see their locations on the minimap.
- Return to Charleston 1 after killing 3 Rock Steps. She tells you there's a problem with the generators, you have to investigate them.
- You only have to go near the generators, you don't have to kill the Kick Step.
- (2@mcd 175, 195)
- (2@mcd 127, 81)
- (2@mcd 87, 230)
- Return to the lab once you've investigated all 3 generators.
- Talk with Charleston 1 again and then follow her to the right.
- Note: For the next part, the portals will get closed so it is recommended to bring everyone in the lab before proceeding.
- Speak with Charleston 2 and a new scene will begin. The portals will close.
- You will get waves of mobs, they are fairly easy to kill. You must kill all of them to proceed and the portals will re-open.
The Core
- Walk out of the lab and go all the way south below the middle /navi (2@mcd 130, 127). Charleston 1 and 2 will be waiting for you.
- Move near Charleston 2 to trigger the next dialogues.
- Charleston 1 wants you to gather 1
 Explosive Powder (6213) . These drop from the Step found in the instance.
 - Return to her and she will warp you inside the Core.
- Walk near the NPCs to trigger the next scene. You have to defeat Charleston 3.
Charleston Parts
- Once the scene between 1 and 2 is over, move downward and go back to Dr. Vee in the lab. A dialogue will trigger once you get close.
- Talk to Shalosh (2@mcd 77, 167) and select I want to go back.
- You will be rewarded with 3
 Charleston Component (6752) .
Monsters
| Monster | Level | HP | Size/Race/Element |
 Step (3125) |
130 | 55,403 | Small / Demon / Neutral 1 |
 Rock Step (3126) |
131 | 71,056 | Medium / Demon / Neutral 2 |
 Kick Step (3127) |
132 | 73,644 | Medium / Demon / Neutral 1 |
 Kick And Kick (3128) |
133 | 68,018 | Medium / Demon / Neutral 2 |
 Charleston 3 (3124) |
145 | 23,671,401 | Large / Demon / Neutral 3 |
Cards
| Card | Description |
| Increases damage of Axe Boomerang by 30%. _______________________ Refine Level +10: Increases damage of Axe Boomerang by additional 30%. _______________________ Type: Card Compound on: Right Hand Weight: 1 | |
| Increases damage of Arms Canon by 20%. _______________________ Refine Level +10: Increases damage of Arms Canon by 20%. _______________________ When equipped with Kick Step Card: Nullifies Mado Gear's Fuel Consumption. _______________________ Type: Card Compound on: Right Hand Weight: 1 | |
| MaxHP +8% _______________________ When equipped by Mechanic: Decreases damage taken from Ranged Physical Damage by 30%. _______________________ Type: Card Compound on: Armor Weight: 1 | |
| Increases damage of Vulcan Arm by 10%. _______________________ Refine Level +10: Increases damage of Vulcan Arm by 20%. _______________________ When equipped with Kick Step Card: Nullifies Mado Gear's Fuel Consumption. _______________________ Type: Card Compound on: Right Hand Weight: 1 | |
| MaxSP -300 Random chance to destroy target's equipped Armor when dealing physical damage. _______________________ When equipped with Kick Step Card: Nullifies Mado Gear's Fuel Consumption. _______________________ Type: Card Compound on: Right Hand Weight: 1 |
Equipment and Enchantments
For more informations click here.

