Nobody expects Eneru's Inquisition - An Inquisitor Crit Guide
_by_Stella.png)
Introduction
Me as a player
Hello! I'm Eneru, nice to meet you and thanks for clicking on this guide!
I started playing MuhRO a few months ago, and it's my first renewal server! Wanted to try some new job and inquisitor caught my eye. After loving it's critical build i knew i had to try and push it's potential to the limit, so here i am, sharing my experiences, tests and results! Hope you enjoy!
Inquisitor as a job
Inquisitor is the most mobile class in the game thanks to it's second job skill, Snap (body relocation). This on itself is enough for many to enjoy the job, zooming around.
This job has two different paths, the tanky and high burst damage maxHP scaling melee build for Third Flame Bomb (TFB), and the critical more glass-cannon ranged critical build for Explosion Blaster (EB) .
Both main skills are Area of Effect (AoE), but TFB is single target cast with an area of 7x7 around the target and Explosion Blaster is an area of 9x9 around the user.
On this guide we will focus only on the ranged critical build. For an overall view and TFB details, please check Cruro's guide.
Stats, Traits and Skills
Basic view on what each Stat and Trait provides to our character. For more information check this wiki article about Stats and Traits.
Stats
| STAT | Basic Information | Value |
|---|---|---|
| STR | Main source of damage. Increases our attack and weight capacity. | 120+ |
| AGI | Increases flee and attack speed (ASPD). ASPD also helps reducing our character animations delay, making our gameplay more fluid. | 80+ |
| VIT | Mainly increases our maximum health points (HP) but also provides soft defense and helps resist to some status such as Stun. | 80+ |
| INT | As physical attackers we use int as a way to increase our spell points (SP) but also reduces variable cast time (VCT) and helps resist some status such as Silence. | 70-80 |
| DEX | Increases our hit, reduces VCT greatly and gives a small bonus to our attack. | 100-120* |
| LUK | Increases our critical attack chance (CRIT), small bonus to our attack and helps resist some status such as Curse. | 1-89+** |
*Since our main offensive skills are crit based, we don't need much DEX. It's mainly to hit ![]() Oleum Sanctum or for the bonuses
Oleum Sanctum or for the bonuses ![]() Observation Card (4392)+
Observation Card (4392)+ ![]() Empathize Card (300270) combo provides.
Empathize Card (300270) combo provides.
**With gears focused on CRIT bonuses, we can get enough that no LUK is required. 89 base LUK is the limit when using ![]() Snow Rabbit Iceslug Card (300468) to not get it's penalty. Otherwise, we can use 89+ to meet any needs we have.
Snow Rabbit Iceslug Card (300468) to not get it's penalty. Otherwise, we can use 89+ to meet any needs we have.
Traits
| TRAIT | Basic Information | Value |
|---|---|---|
| POW | Greatly increases our damage. It gives us P.Attack (increasing attack), also our main skills damage scale based off this trait. | 110 |
| STA | Helps reduce incoming physical damage. | 0+ |
| WIS | Helps reduce incoming magical damage. | 0+ |
| SPL | Increases our magical attack. We won't be using any SPL. | 0 |
| CON | Increases our hit and flee rates. Similar to DEX, it also gives a small boost to our damage in the form of P.Attack. | 75-105* |
| CRT | Increases H.Plus (our healing output with healing skills) and C.Rate (different from CRIT) that greatly boosts our final critical damage. | 77-105-110* |
*Depends if we have to match values for ![]() Star Cluster of CRT or
Star Cluster of CRT or ![]() Star Cluster of CON. Even so, CRT gives more value by itself.
Star Cluster of CON. Even so, CRT gives more value by itself.
Skills

Main used skills of each job.
Acolyte
![]() Teleport: Level 1 is basically a fly wing.
Teleport: Level 1 is basically a fly wing.
![]() Increase Agility: Increase movement speed and AGI stat. Removes Decrease-Agi debuff.
Increase Agility: Increase movement speed and AGI stat. Removes Decrease-Agi debuff.
![]() Blessing: Increases STR/INT/DEX stats. Removes Curse debuff.
Blessing: Increases STR/INT/DEX stats. Removes Curse debuff.
![]() Heal: Easily sustain yourself without relaying on potions. Very situational but still useful.
Heal: Easily sustain yourself without relaying on potions. Very situational but still useful.
![]() Ruwach: Detect hidden enemies. Not many mobs use hiding but it is useful in Varmundt Depth 2.
Ruwach: Detect hidden enemies. Not many mobs use hiding but it is useful in Varmundt Depth 2.
Champion
![]() Body Relocation: Target skill. Instantly teleports the character to the selected tile (fails if target is not on the character view). Once you get used to it, you'll forget that you used to right click to move. Or was it left click?
Body Relocation: Target skill. Instantly teleports the character to the selected tile (fails if target is not on the character view). Once you get used to it, you'll forget that you used to right click to move. Or was it left click?
![]() Dangerous Soul Collect (Zen): Summons all possible spirit spheres (5-15).
Dangerous Soul Collect (Zen): Summons all possible spirit spheres (5-15).
![]() Explosion Spirits: Fury state gives free +20 CRIT for 180 seconds. Can't use
Explosion Spirits: Fury state gives free +20 CRIT for 180 seconds. Can't use ![]() Blazing Flame Blast without being in this state.
Blazing Flame Blast without being in this state.
Sura
![]() Rising Dragon: Increases the number of spirit spheres one can summon up to 15 at level 10, summons those, and puts you in Fury state for 300 seconds.
Rising Dragon: Increases the number of spirit spheres one can summon up to 15 at level 10, summons those, and puts you in Fury state for 300 seconds.
![]() Power Absorb: Consumes all your current spirit spheres and recovers 1% of your max SP for each one.
Power Absorb: Consumes all your current spirit spheres and recovers 1% of your max SP for each one.
![]() Gentle Touch-Change: Consumes 1 spirit sphere to increase ATK and ATK %.
Gentle Touch-Change: Consumes 1 spirit sphere to increase ATK and ATK %.
Inquisitor
![]() Powerful Faith: Greatly increases ATK and P.ATK.
Powerful Faith: Greatly increases ATK and P.ATK.
![]() Oleum Sanctum: Skill with an area of effect of 9x9 around the user. If it hits, targets receive 15% more damage from ranged physical attacks and
Oleum Sanctum: Skill with an area of effect of 9x9 around the user. If it hits, targets receive 15% more damage from ranged physical attacks and ![]() Explosion Blaster deals extra damage.
Explosion Blaster deals extra damage.
![]() Explosion Blaster: Our main offensive skill. Has an AoE of 9x9 around the user and can critically strike, ignoring target's flee and dealing more damage. It also recovers 4 AP per use.
Explosion Blaster: Our main offensive skill. Has an AoE of 9x9 around the user and can critically strike, ignoring target's flee and dealing more damage. It also recovers 4 AP per use.
![]() Massive Flame Blaster: Secondary offensive skill. Has an AoE of 9x9 and deals a good amount of damage when using Time Dimensions Combo (Crown + Weapon). It can critically strike. Consumes 12 AP per use. It has a really long Cool Down (base of 5 seconds, reduced to 3 seconds when using mentioned combo). It gives a buff for 150 seconds mainly used for
Massive Flame Blaster: Secondary offensive skill. Has an AoE of 9x9 and deals a good amount of damage when using Time Dimensions Combo (Crown + Weapon). It can critically strike. Consumes 12 AP per use. It has a really long Cool Down (base of 5 seconds, reduced to 3 seconds when using mentioned combo). It gives a buff for 150 seconds mainly used for ![]() Blazing Flame Blast.
Blazing Flame Blast.
![]() Blazing Flame Blast: Secondary offensive skill. Single target with a range of 8 tiles. It can critically strike and can only be used in Fury state. It also deals increased damage when under
Blazing Flame Blast: Secondary offensive skill. Single target with a range of 8 tiles. It can critically strike and can only be used in Fury state. It also deals increased damage when under ![]() Massive Flame Blaster buff. Recovers 2 AP per use. It will become our main damage skill for single targets in the future.
Massive Flame Blaster buff. Recovers 2 AP per use. It will become our main damage skill for single targets in the future.
-
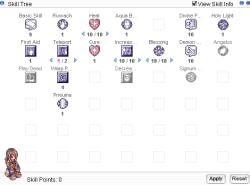 Acolyte skill tree
 -
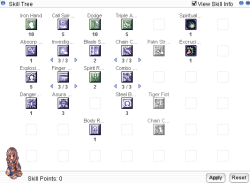 Champion skill tree
 -
 Sura skill tree
 -
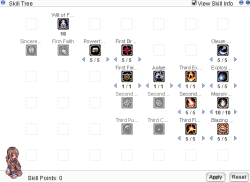 Inquisitor skill tree


Equipment
This section will feature 3 packages of general gears that are susceptible to change according to your own conditions.
First steps
Gears you should try to get your hands on after Eden stage. Focused for Sura or early Inquisitor.
Do not focus too much on cards, but ![]() Empathize Card (300270) and
Empathize Card (300270) and ![]() Observation Card (4392)is cheap and really good.
Observation Card (4392)is cheap and really good.
Gears
| Position | Gear | Enchant | Card | Notes |
|---|---|---|---|---|
| Head (Top) |
|
|
Any combination of those enchants is ok to carry you through this stage but they are listed in the preferred order. | |
| Head (Mid) |
|
Check how to craft New Wave Sunglasses. | ||
| Head (Low) |
|
Check how to craft Blood Sucker. | ||
| Armor |
|
Check Grace Set page for a complete list of enchantments. Don't bother too much if you don't get anything useful. | ||
| Weapon |
|
|
| |
| Shield |
|
|
Any combination of those enchants is ok to carry you through this stage but they are listed in the preferred order. | |
| Garment |
|
| ||
| Shoes |
|
|||
| Accessory (Right) |
|
|
||
| Accessory (Left) |
|
|
|
Check Automatic Equipment page for more detailed information. |
Shadow Gears & Costumes
Eden advanced shadow gears already give 50% defense penetration which is really good and you can forget changing it for quite long time.
| Position | Gear | Enchant | Notes |
|---|---|---|---|
| Costume (Top) | - | ||
| Costume (Mid) | - | ||
| Costume (Low) | - | ||
| Shadow Armor | |||
| Shadow Weapon | |||
| Shadow Shield | |||
| Costume (Garment) | - | ||
| Shadow Shoes | |||
| Shadow Earring | |||
| Shadow Pendant |
Midgame
These gears will get you through the midgame content. Be warned, these start to be somewhat grindy!
Gears
| Position | Gear | Enchant | Card | Notes |
|---|---|---|---|---|
| Head (Top) |
|
|
| |
| Head (Mid) |
|
| ||
| Head (Low) |
|
Check how to craft Blood Sucker. | ||
| Armor |
|
|
| |
| Weapon |
|
Check Issgard Equipment page for more detailed information about Dim Glacier weapons.
| ||
| Shield |
|
|
| |
| Garment |
|
Grade [C] at +9 is more than enough for this stage. If you can get it to +11/12, better but not necessary. | ||
| Shoes |
|
|
Any combination of those enchants is ok to carry you through this stage but they are listed in the preferred order. | |
| Accessory (Right) |
|
|
|
Easy +30 CRIT on one single piece of gear. 4th slot can be random.
Check Gray Wolf Equipment page for more details about the crafting and enchantments. Check Varmundt's Biosphere page for details on how to craft, reform and enchant Soul Rings. |
| Accessory (Left) |
|
|
|
You can also keep on using |
Shadow Gears & Costumes
After getting your hands on some of the equipment from midgame tier, you can start thinking about upgrading your shadow gears.
These should be your first priority, focusing first on Full Penetration Set.
Check Shadow Gears page to find more about how to craft, merge and refine these gears.
| Position | Gear | Enchant | Notes |
|---|---|---|---|
| Costume (Top) | - | ||
| Costume (Mid) | - | ||
| Costume (Low) | - | ||
| Shadow Armor | |||
| Shadow Weapon | +10 |
It requires to be +10 to remove size penalty. | |
| Shadow Shield | |||
| Costume (Garment) | - | ||
| Shadow Shoes | |||
| Shadow Earring | +9 |
Only swap to these from Eden Advanced Shadow if you have both earring and pendant at least at +9. | |
| Shadow Pendant | +9 |
Only swap to these from Eden Advanced Shadow if you have both earring and pendant at least at +9. |
Endgame
Top-tier gears.
Gears
| Position | Gear | Enchant | Card | Notes |
|---|---|---|---|---|
| Head (Top) |
|
|
|
|
| Head (Mid) |
|
|
|
|
| Head (Low) |
|
| ||
| Armor |
|
|
| |
| Weapon |
|
|
(more cards and explanations here) |
|
| Shield |
|
|
|
|
| Garment |
|
|
| |
| Shoes |
|
|
Beware | |
| Accessory (Right) |
|
|
When using | |
| Accessory (Left) |
|
|
|
Shadow Gears & Costumes
Check Shadow Enchanting page and Costume Enchants page for more detailed information on how to enchant these gears.
| Position | Gear | Enchant | Notes |
|---|---|---|---|
| Costume (Top) | |||
| Costume (Mid) | |||
| Costume (Low) | |||
| Shadow Armor |
|
|
Preferred first options C.Rate > POW > CRT.
Preferred second options Ranged Damage % > CRIT I don't like going for critical damage on these enchants. |
| Shadow Weapon |
|
Same. |
|
| Shadow Shield |
|
Same. | Only use it if you have a comfortable amount of ACD. |
| Costume (Garment) |
|
||
| Shadow Shoes |
|
Same. | |
| Shadow Earring |
|
Same. | |
| Shadow Pendant |
|
Same. |
Notes on Master Shadow Gear sets: You can mix them however you want, and the +7 refine option is just in case you want to use ![]() [MVP] Thanatos Card (4399), so you don't get the defense penetration of the SG.
[MVP] Thanatos Card (4399), so you don't get the defense penetration of the SG.
All combinations are acceptable, be it focusing on one skill or both, just take note that maybe full master may be less optimal than some blue gears in some situations.
Utilities
Pets
These are the pets that bring more utility to our build. You can check all the other pets here.
| Monster | Relevant Effect (Loyal) |
|---|---|
Incubus (1374) |
MaxSP +5%
Low chance of gaining 1% of the damage inflicted to an enemy as SP. *Usually my go to pet as EB consumes SP really fast. |
Succubus (1370) |
MaxHP +1%
Low chance of gaining 5% of the damage inflicted to an enemy as HP. |
Abysmal Knight (3145) |
Atk + 5%, P.Atk + 2.
Increases physical damage against boss monsters by 5%. *When facing only boss monsters and not burning through your SP this extra damage can help. |
Mistress (1059) |
Increases Physical Damage against Normal class by 7%.
Nullifies reduction in damage against monsters resulting from monster's size. *When facing Large mobs it opens the Shadow Weapon slot for other options other than Infinity. |
Eddga (1115) |
Cri + 8, C.Rate + 3. |
Corrupted Wanderer (20420) |
AGI +4. CRI +3. Increases Critical Damage by 7%. |
Choco (1214) |
CRI +9. Increases Ranged Physical Damage by 3%. |
Rune tablets
These are the main rune tablets we can get a benefit from. If you have the time, Irritation Set may be the most useful on most scenarios.
Demigod Set shines most when farming in Varmundt Depths or Forgotten Time dungeons.
-
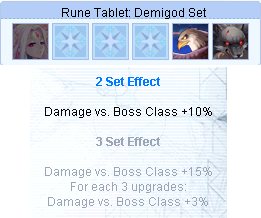 2 set is a pretty good boost against boss monsters.
 -
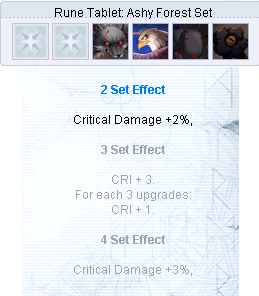 3 set effect for CRIT bonus is enough as it helps a lot
 -
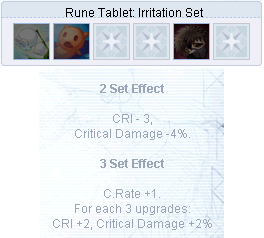 When using 3 set effect and it's upgraded enough, is more useful than Ashy Forest.


Consumables
* All consumables marked with (*) are components of ![]() The One Potion (50035), which includes those and some more, and costs 25
The One Potion (50035), which includes those and some more, and costs 25 ![]() Eden Coin (25223).
Eden Coin (25223).
Damage
| Usable | Relevant Effect | Cost |
|---|---|---|
|
+30% ranged attack damage. Effect is lost when dying. | 3 for |
| +20 ATK. +30 Flee. | 3 | |
| +30 ATK. +5% ASPD .
-10% MaxHP and MaxSP. |
3 | |
| +5% Critical damage. +5% Ranged physical damage.
+5% MaxHP and MaxSP. |
3 | |
| +30 ATK. +1% ATK. +30 Flee. +1 ASPD. | 3 | |
| +10 All Stats. +30 ATK. | 3 | |
| +15% Ranged physical damage. | Zeny / Biolo Craftable | |
| +5 All Traits. +10 P.Atk. | 250 Cash Points for |
Sustain
| Usable | Relevant Effect | Cost |
|---|---|---|
| Restores 5% of MaxSP every 5 seconds. | 3 | |
| Restores 5% of MaxHP every 5 seconds. | 3 | |
| DEF +500 and MDEF +200. | 3 | |
| Restores 7% of MaxHP every 4 seconds. | 4 | |
| Restores 4% of MaxHP every 3 seconds. | 4 | |
| Incrases MaxHP. (not sure of what %). | Zeny / Biolo Craftable |
Utility
| Usable | Relevant effect | Cost |
|---|---|---|
| CRIT +30. | 50 Cash Points |
Extras
After Cast Delay
A very important stat for our character is After Cast Delay (ACD) which allows us to spam skills way faster. Here i'll detail some formulas for each focus.
Regardless of the main damage skill, 80% is recommended to use ![]() Body Relocation with close to no delay after the usage of any other skill.
Body Relocation with close to no delay after the usage of any other skill.
After the ![]() Blazing Flame Blast CD nerf only 60% ACD is needed to spam it, though if you aim for high DPS, 80% is needed to alternate the use of BFB and EB optimally.
Blazing Flame Blast CD nerf only 60% ACD is needed to spam it, though if you aim for high DPS, 80% is needed to alternate the use of BFB and EB optimally.
| Skill | Gears | ACD |
|---|---|---|
|
| |
|
|
Specific maps
Biosphere B - Temple
![]() Biosphere Gem (Vibra-rupt) (311934)on weapon helps you againts 5 out of 7 mobs (6 out of 8 if you count the MVP).
Biosphere Gem (Vibra-rupt) (311934)on weapon helps you againts 5 out of 7 mobs (6 out of 8 if you count the MVP).
![]() Varmundt's Crystal (Ice) Lv3 (311869)further increases the damage on 4 out of those 5 mobs.
Varmundt's Crystal (Ice) Lv3 (311869)further increases the damage on 4 out of those 5 mobs.
Sadly the monsters that are not holy nor angel are of too many combinations to have balance, though i'd recommend ![]() Varmundt's Crystal (Plain) Lv1 (311872)on boots for Temple Anopheles (21925) and Temple Gryphon (21926) .
Varmundt's Crystal (Plain) Lv1 (311872)on boots for Temple Anopheles (21925) and Temple Gryphon (21926) .
Gryphon is the only large sized mob (aside from MVP) so you can use ![]() Infinity Shadow Weapon (24386)or Mistress Pet to remove size penalty or ignore the mob.
Infinity Shadow Weapon (24386)or Mistress Pet to remove size penalty or ignore the mob.
![]() Copo Card (300455) and
Copo Card (300455) and ![]() Gan Ceann Card (300240) gives you the more variety of size damage for the map.
Gan Ceann Card (300240) gives you the more variety of size damage for the map.
-
 Biosphere B - Temple

Biosphere B - Venom
![]() Engkanto Card (4583) if your best friend here.
Engkanto Card (4583) if your best friend here.
![]() Brutal Murderer Card (300241) combined with
Brutal Murderer Card (300241) combined with ![]() Copo Card (300455) covers for all mobs (minus MVP) of the map, since all are mid and small sized.
Copo Card (300455) covers for all mobs (minus MVP) of the map, since all are mid and small sized.
Because of that, ![]() Perfect Size Shadow Weapon (24425) is also best option for this map for it's extra raw damage.
Perfect Size Shadow Weapon (24425) is also best option for this map for it's extra raw damage.
![]() Varmundt's Crystal (Poison) Lv3 (312800)enchant also helps, but you don't benefit from the neutral part of it (on this map).
Varmundt's Crystal (Poison) Lv3 (312800)enchant also helps, but you don't benefit from the neutral part of it (on this map).
Beware the Venom Kukre (21932) !! It's fast and it full strips you!!
Video: MuhRo Eneru (Judhe) - Venom farm
-
 Biosphere B - Venom

Varmundt's Biosphere Depth 1
![]() Brutal Murderer Card (300241)and
Brutal Murderer Card (300241)and ![]() Brutal Murderer Card (300241). ALL mobs are MEDIUM size.
Brutal Murderer Card (300241). ALL mobs are MEDIUM size.
![]() Perfect Size Shadow Weapon (24425)is also a better option than
Perfect Size Shadow Weapon (24425)is also a better option than ![]() Infinity Shadow Weapon (24386).
Infinity Shadow Weapon (24386).
All mobs are boss, so Abyssmal Knight pet is algo better over Mistress Pet.
There is a lot of variety in element and race, though, so enchants can be of many combinations.
Depth Lava Toad (22143) can easily strip your shield!!
-
 Biosphere Depth

Varmundt's Biosphere Depth 2
Running +12 [A] ![]() Time Gap Judgment Knuckle [2] (560072) with
Time Gap Judgment Knuckle [2] (560072) with ![]() Biosphere Gem (Dragon Fishing) (311928)and
Biosphere Gem (Dragon Fishing) (311928)and ![]() Varmundt's Crystal (Plain) Lv3 (311874), while having
Varmundt's Crystal (Plain) Lv3 (311874), while having ![]() Varmundt's Crystal (Flame) Lv5 (311866)on boots (lucky me) i can almost one shot all mobs in the map with all own buffs and consumibles mentioned before using
Varmundt's Crystal (Flame) Lv5 (311866)on boots (lucky me) i can almost one shot all mobs in the map with all own buffs and consumibles mentioned before using ![]() Blazing Flame Blast , without
Blazing Flame Blast , without ![]() Oleum Sanctum.
Oleum Sanctum.
All mobs in this map are mid and large size, so using x2 ![]() Polluted Wander Man Card (27361) seems more efficient.
Polluted Wander Man Card (27361) seems more efficient.
Matching enchants for all races and elements is hard, just test what you need more according to what you get (in my case i got really lucky with boots enchant, therefore i can go for something else in weapon).
Videos:
- (old) Critical Inquisitor - Depth 2 short run
- (new): [1]MuhRO - Inquisitor Critic Build - Depth 2 run
-
 Biosphere Depth 2

Forgotten Time
All monsters there are Formless. Swap your ![]() Void Mimic Card (300278)for a
Void Mimic Card (300278)for a ![]() Giant Caput Card (300249).
Giant Caput Card (300249).
![]() Elite Rgan Guardian Card (300465) provides elemental damage vs all monsters minus contaminated ones, which are neutral element.
Elite Rgan Guardian Card (300465) provides elemental damage vs all monsters minus contaminated ones, which are neutral element.
Since the harder mobs to kill by far are large sized, we can use ![]() Gan Ceann Card (300240) and
Gan Ceann Card (300240) and ![]() Polluted Wander Man Card (27361)for extra damage on large and a bit more on medium.
Polluted Wander Man Card (27361)for extra damage on large and a bit more on medium.
Medium and small sized mobs have almost the same HP pool, so you can also just use double ![]() Gan Ceann Card (300240).
Gan Ceann Card (300240).
![]() Biosphere Gem (Vibra-rupt) (311934)enchant on weapon can help you a lot with it's 30% extra damage.
Biosphere Gem (Vibra-rupt) (311934)enchant on weapon can help you a lot with it's 30% extra damage.
-
 Zone 1
 -
 Zone 2


Min-Maxing DPS
Enchantments
![]() Nebula Suit of Creative and
Nebula Suit of Creative and ![]() Signet of Circulation Winter enchants
Signet of Circulation Winter enchants
After investing time and materials i finally got my hands on two ![]() Signet of Circulation Winter [1] (490486). One with
Signet of Circulation Winter [1] (490486). One with ![]() Signet of Creative Lv5 (313006) and the other with
Signet of Creative Lv5 (313006) and the other with ![]() Signet of Concentration Lv5 (312991) , along with two
Signet of Concentration Lv5 (312991) , along with two ![]() Nebula Suit of Creative [1] (450172) with matching enchants, one with
Nebula Suit of Creative [1] (450172) with matching enchants, one with ![]() Star Cluster of Creative Lv.3 (310685) and other with
Star Cluster of Creative Lv.3 (310685) and other with ![]() Star Cluster of Concentration Lv.3 (310682) .
Star Cluster of Concentration Lv.3 (310682) .
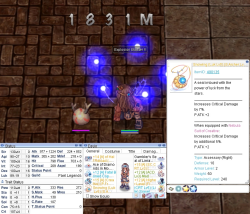
It's not by much, but CON wins over CRT. With my current gears:
- +15 [A]
 Nebula Suit of Creative [1] (450172)(
 Star Cluster of Creative Lv.3 (310685)/
  Nebula of Expert Archer Lv.3 (310732)/
 STR+5 (4704)) - 1841M / EB.
 - +12 [A] Nebula Suit of Creative [1] (450172)(
 Star Cluster of Concentration Lv.3 (310682) / Nebula of Expert Archer Lv.3 (310732)/ STR+5 (4704)) - 1789M / EB.
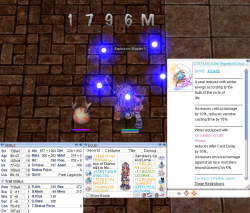
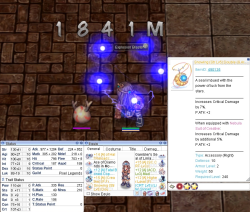
Those +3 refine are equal to +17% critical damage, +13 atk and +3% all element damage (and +3 CRIT). We can get closer numbers by removing the ![]() Void Mimic Card (300278)which gives +15% critical damage.
Void Mimic Card (300278)which gives +15% critical damage.
Results with no ![]() Void Mimic Card (300278)when using +15
Void Mimic Card (300278)when using +15 ![]() Nebula Suit of Creative [1] (450172)are 1796M/EB, which is way closer to the 1789/EB of the CON combo (7M difference).
Nebula Suit of Creative [1] (450172)are 1796M/EB, which is way closer to the 1789/EB of the CON combo (7M difference).
In the end we can deduce that +2% critical damage, +13 atk and +3% all element will compensate those 7M by far.
Concluding: It is worth to go for CON combo when min-maxing but it seems like such small difference is not mandatory.
-
 CRT build test
 -
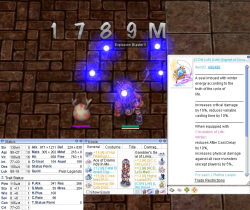 CON build test


![]() Creative Signet of Star enchants
Creative Signet of Star enchants
I tested two different ![]() Creative Signet of Star [1] (490135).
Creative Signet of Star [1] (490135).
One with
 Star Cluster of Luck Lv5 (313033)/
  Star of Sharp Lv.5 (310706) /
  Star of Master Archer Lv5 (310701).
And another with
 Star Cluster of Strength Lv5 (313028) / Star of Master Archer Lv5 (310701) / Star of Master Archer Lv5 (310701)
Results are that, even with only 75 CON, the second one, (STR, MA, MA) outperforms the first one even when running 105/110 CRT.
Take into consideration that ![]() Star Cluster of Luck Lv5 (313033)with 105 CRT also gives +14 CRIT, which is pretty useful.
Star Cluster of Luck Lv5 (313033)with 105 CRT also gives +14 CRIT, which is pretty useful.
-
 Signet with LUK lv5, Master Archer lv5, Sharp lv5 - 75 CON 107 CRT
 -
 Signet with STR lv5, double Master Archer lv5 - 75 CON 107 CRT


Refines
- Aim for +15 [A]
 Circulation of Life Winter [1] (480352) and +15 [A] Nebula Suit of Creative [1] (450172)first. Garment comboes with
  Signet of Circulation Winter [1] (490486) and Armor has combo with the garment itself.
 - +15
 Dimensions Judgment Claw [2] (560061) or +15
  Time Gap Judgment Knuckle [2] (560072), depending on which skill you want to focus.
 - +15 [A]
 Time Dimensions Rune Crown (Inquisitor) [1] (400538)for the small bonus of
  Time Dimension Jewel (Luck) Lv3 (312712)and more so if you use
  Sealed Kiel Card (4480).
 - +14 [A]
 Mad Bunny-LT [1] (460020). It only provides bonus every 2 refines, so +14 is perfectly fine.
Cards
- The two most important card to min-max in the endgame are
 [MVP] Snow Angel Card (300473) and
  [MVP] Encroached Tan Card (300533) . [MVP] Snow Angel Card (300473) really hurts your CRIT, but is a great boost of 55% Ranged Damage (and +10% physical damage vs boss). When compounded on a +15 Circulation of Life Winter [1] (480352)you still get +1 CRIT (using 89 LUK). [MVP] Encroached Tan Card (300533) is just a beast of a card. Best in slot (BiS) for a reason.
After that, since it breaks Empathize Card (300270)and
  Observation Card (4392), you can use
  Hearthunter AT Card (300381) on armor, which gives +20% Ranged Physical Damage when armor is +15. And +10% atk when used together with
  Limacina Card (300363).
- Upgrade your ACD cards. Aim for a Sealed Kiel Card (4480) or
 [MVP] Kiel Card (4403).
DPS Tests
- Test on Depth 2:
Footage of full run on Depth 2 (new): MuhRO - Inquisitor Critic Build - Depth 2 run
- On 27/12/2025 remains to test Yorscalp Boots + Yorscalp Crown + Dim Glacier weapon (knuckle or mace). Given that Chapter 1 update may be near, this setup may never be tested.
DATA BELOW THIS POINT IS OUTDATED
- First test on Depth 1:
Here is the video: Crit Inquisitor - Damage testing on Depth 1
Build had some things to polish, but it was the first time i got to one-shot on Depth 1.
Following DPS images are also with this build, so way before ![]() Time Gap Judgment Knuckle [2] (560072) was implemented.
Time Gap Judgment Knuckle [2] (560072) was implemented.
-
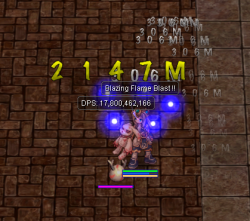
 Oleum Sanctum -> EB -> MFB -> EB
 -
 Oleum Sanctum -> EB -> BFB (with MFB buff)


- "Final" test on Depth 1 (to be updated)
// need footage, but now i can actually one shot on Depth 1, using incubus pet and without external buffs (only consumables listed here)
- Test on Depth 2
Footage of a short run on Depth 2: Critical Inquisitor - Depth 2 short run (build used: Build 2025-04-26)
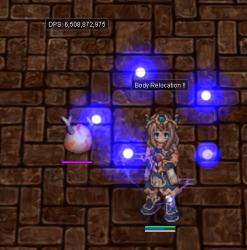
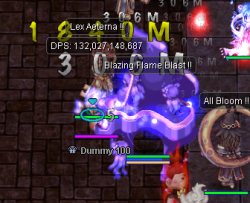
- Dummy slayer
I don't know the reason, but can't upload the newer max DPS screenshots. Max DPS by itself without consumibles sits at 19.7B and with party + consumibles, at 438B.
-
 *As of 05 June 2025, Max is 19.7B. DPS with no enchant vs dummy (neutral/formless) but using all cards possible vs it.
 -
 *Current maximum DPS with full party sits at 438B as of 05 June 2025.


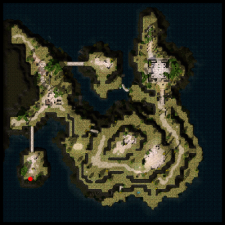
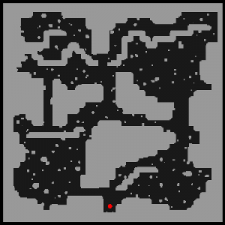
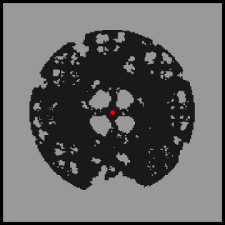
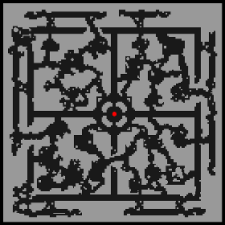
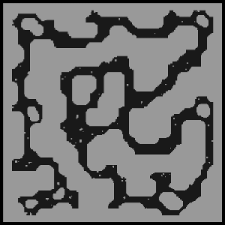
GRF file
I've been asked about the GRF i use (gray map on dungeons but no gray map on cities and some "non-mob" maps such Varmundt's Mansion interior) so here is the link: