Sarah and Fenrir: Difference between revisions
No edit summary |
(Marked this version for translation) |
||
| Line 1: | Line 1: | ||
<languages/> | <languages/> | ||
<translate> | <translate> | ||
<!--T:1--> | |||
[[Category:Instances]] | [[Category:Instances]] | ||
=Overview= | =Overview= | ||
| Line 7: | Line 8: | ||
* Sarah can drop {{#item:1000874}} | * Sarah can drop {{#item:1000874}} | ||
<!--T:2--> | |||
'''Enter the Dimensional Crack and talk to Professor Bernhard {{#navi:dali02|97|142}}, or use the Warper and select Instances > Sarah and Fenrir to enter this instance.''' <br> | '''Enter the Dimensional Crack and talk to Professor Bernhard {{#navi:dali02|97|142}}, or use the Warper and select Instances > Sarah and Fenrir to enter this instance.''' <br> | ||
[[File:Bernhard.jpg]] | [[File:Bernhard.jpg]] | ||
<br clear="both"> | <br clear="both"> | ||
==Instance== | ==Instance== <!--T:3--> | ||
<!--T:4--> | |||
[[File:safmap.png|alt=|right]] | [[File:safmap.png|alt=|right]] | ||
# Go to the dungeon entrance by talking to the Warper > Heroes' Trails > Sarah and Fenrir. | # Go to the dungeon entrance by talking to the Warper > Heroes' Trails > Sarah and Fenrir. | ||
| Line 24: | Line 27: | ||
#* Kill Ancient Gigantes and farm Shard of Gigantes for '''Professor Bernhard'''. | #* Kill Ancient Gigantes and farm Shard of Gigantes for '''Professor Bernhard'''. | ||
<!--T:5--> | |||
It is possible to do a mix of both stories to get the maximum amount of Shard of Gigantes. | It is possible to do a mix of both stories to get the maximum amount of Shard of Gigantes. | ||
<!--T:6--> | |||
'''''If you choose to help Fenrir.''''' | '''''If you choose to help Fenrir.''''' | ||
# Keep walking left and then go all the way up to meet with Fenrir. The party leader has a marking on the minimap to indicate the location.<br />You have 5 minutes to reach this location. If you don't make it in time, the next part of the story will trigger. | # Keep walking left and then go all the way up to meet with Fenrir. The party leader has a marking on the minimap to indicate the location.<br />You have 5 minutes to reach this location. If you don't make it in time, the next part of the story will trigger. | ||
| Line 37: | Line 42: | ||
# You will now be warped back to the center of the map. | # You will now be warped back to the center of the map. | ||
<!--T:7--> | |||
'''''If you choose to help Professor Bernhard.''''' | '''''If you choose to help Professor Bernhard.''''' | ||
# There is a total of 6 Ancient Gigantes which can be found in the following locations (check the image above). | # There is a total of 6 Ancient Gigantes which can be found in the following locations (check the image above). | ||
| Line 44: | Line 50: | ||
# You will now go back with the main storyline and need to escape, otherwise Sarah will kill you with Lord of Vermillon. | # You will now go back with the main storyline and need to escape, otherwise Sarah will kill you with Lord of Vermillon. | ||
<!--T:8--> | |||
'''Back with the main storyline''' | '''Back with the main storyline''' | ||
# You now have to escape back to the entrance. You have roughly 2 minutes to do so. | # You now have to escape back to the entrance. You have roughly 2 minutes to do so. | ||
| Line 49: | Line 56: | ||
# You can leave the instance by going into the top right portal where you spawned. | # You can leave the instance by going into the top right portal where you spawned. | ||
<!--T:9--> | |||
==Enemies== | ==Enemies== | ||
{| class="wikitable" style="text-align: center; width: 60%" | {| class="wikitable" style="text-align: center; width: 60%" | ||
| Line 114: | Line 122: | ||
<br clear="both"> | <br clear="both"> | ||
<!--T:10--> | |||
==Cards== | ==Cards== | ||
{| class="wikitable" style="text-align: center; width: 60%" | {| class="wikitable" style="text-align: center; width: 60%" | ||
| Line 126: | Line 135: | ||
|} | |} | ||
<!--T:11--> | |||
{{:Sarah's_Gear}} | {{:Sarah's_Gear}} | ||
</translate> | </translate> | ||
Latest revision as of 16:07, 2 April 2025
Overview
- Base Level 145
- 1 day cooldown
- Sarah can drop
 Enchant Ticket (1000874)
Enter the Dimensional Crack and talk to Professor Bernhard (dali02 97, 142), or use the Warper and select Instances > Sarah and Fenrir to enter this instance.

Instance

- Go to the dungeon entrance by talking to the Warper > Heroes' Trails > Sarah and Fenrir.
- As the party leader, talk to Professor Bernhard to create the instance.
- Enter the instance by talking to the Dimensional Device NPC right next to it.
- Walking near Fenrir will trigger the first animation. Some Mutant Galion will appear and attack you.
They are fairly easy to kill. Fenrir will finish them off once her progress bar ends. - Move on to the next part by walking down.
- Keep walking south and then go left up until you meet with Fenrir again.
- The storyline is now split into two parts and you have to choose what you're going for:
- Follow the main story by meeting with Fenrir at the top left section of the map.
- Kill Ancient Gigantes and farm Shard of Gigantes for Professor Bernhard.
It is possible to do a mix of both stories to get the maximum amount of Shard of Gigantes.
If you choose to help Fenrir.
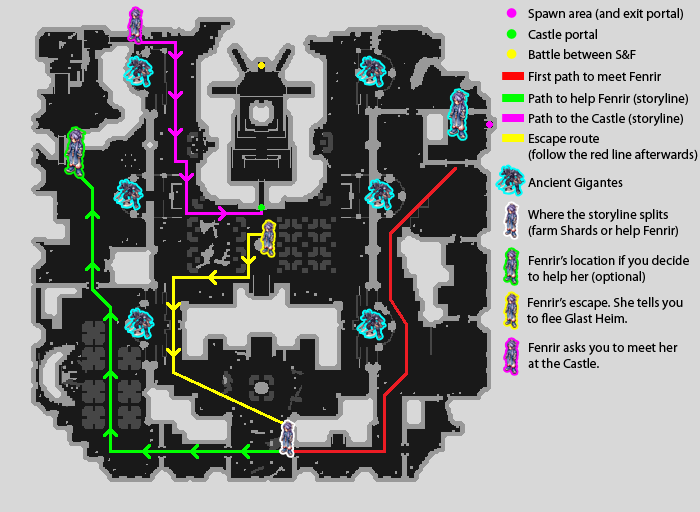
- Keep walking left and then go all the way up to meet with Fenrir. The party leader has a marking on the minimap to indicate the location.
You have 5 minutes to reach this location. If you don't make it in time, the next part of the story will trigger. - Once you walk near Fenrir, an animation will trigger.
You must kill both Gigantes to progress, one of them is immune to physical damage and the other is immune to magic damage.
You can wait it out and hide, the Gigantes will eventually die and you'll be able to progress. - Another animation will trigger and you'll be warped out.
- You'll meet Fenrir again and she tells you to meet her at the castle (middle of the map).
You have 5 minutes to reach the castle. - An animation with Sarah and Fenrir fighting each other will start.
- Some Gigantes will appear and they're quite hard to kill.
- Near the end of the animation, you have 50 seconds to kill Sarah. She has 200 HP.
- Sarah drops 2 Shard of Gigantes and a Sarah Combat Robe.
- You will now be warped back to the center of the map.
If you choose to help Professor Bernhard.
- There is a total of 6 Ancient Gigantes which can be found in the following locations (check the image above).
- Killing them will drop 1 Shard of Gigantes with 80% chance and is a party drop. These mobs can do a lot of damage and are fairly hard to kill.
- After 5 minutes, the middle portal to enter the Castle will be active (it will be announced).
- You now have 5 minutes to decide whether you go and help Fenrir or keep killing the Gigantes.
- You will now go back with the main storyline and need to escape, otherwise Sarah will kill you with Lord of Vermillon.
Back with the main storyline
- You now have to escape back to the entrance. You have roughly 2 minutes to do so.
- Once you reach the end, Fenrir will reward you with a Yggdrasil Berry and allow you to make and enchant Sarah Earrings.
- You can leave the instance by going into the top right portal where you spawned.
Enemies
| Monster | Level | HP | Size / Race / Element |
|---|---|---|---|
 Sarah (3190) |
160 | 100,000,000 | Medium / Demi Human / Neutral 1 |
 Gigantes (3191) |
160 | 1,126,300 | Medium / Demon / Dark 1 |
 Gigantes (3192) |
160 | 1,126,300 | Medium / Demon / Dark 1 |
 Ancient Medium Gigantes (3193) |
160 | 1,126,300 | Medium / Demon / Dark 1 |
 Large Gigantes (3194) |
160 | 12,063,464 | Large / Demon / Dark 1 |
 Large Gigantes (3195) |
160 | 12,063,464 | Large / Demon / Dark 1 |
 Ancient Gigantes (3196) |
160 | 12,063,464 | Large / Demon / Dark 1 |
 Gargoyle (3197) |
150 | 256,780 | Medium / Demon / Wind 3 |
 Galion (3198) |
150 | 293,165 | Medium / Brute / Wind 2 |
 Mutant Dragon (3199) |
150 | 283,165 | Large / Dragon / Fire 2 |
 Wicked Chimera (3200) |
150 | 301,158 | Large / Brute / Fire 3 |
Cards
| Card | Description |
|---|---|
| ATK +20 _______________________ Base STR at least 120: ATK +20 Increases After Attack Delay by 3%. _______________________ Type: Card Compound on: Left Accessory Weight: 1 | |
| When the damage taken exceeds the user's MaxHP, user will only take the amount that exceeds the user's MaxHP. However, it cannot decrease the static damage. _______________________ Type: Card Compound on: Armor Weight: 1 |
Gear
| Item | Description |
|---|---|
| Sarah's robe that imbued with spiritual power. _______________________ Random chance to increase MATK by (8*Refine Level) for 10 sec when dealing magical damage. _______________________ Type: Armor Position: Armor Defense: 35 Armor Level: 1 Refinable Weight: 80 Required Level: 145 | |
| Sarah's Left Earring. Enables wearer to use Sarah's power. _______________________ Enables the use of Level 1 Heal. _______________________ Type: Armor Position: Left Accessory Armor Level: 1 Weight: 10 Required Level: 145 | |
| Sarah's Right Earring. Enables wearer to use Sarah's power. _______________________ Enables the use of Level 1 Teleport. _______________________ Type: Armor Position: Right Accessory Armor Level: 1 Weight: 10 Required Level: 145 | |
| Fragment of Gigantes. It seems that some people want these fragments. _______________________ Type: Valuable _______________________ Type: Etc Position: Unknown Weight: 1 |
Enchanting
You must complete the instance and talk to Fenrir (at the end of the instance) to unlock the Sarah Earring's enchanting NPCs. Upon finishing it for the first time, talk to Professor Bernhard to receive your first ring. You only get one free ring per character.
You can purchase additional rings from the Assistant Professor in exchange of 1 ![]() Fragment of Gigantes (6803) .
Fragment of Gigantes (6803) .
Assistant Professor will allow you to enchant your equipped rings. The enchantments are random, but you can choose which category of bonuses you want. Each ring can be enchanted twice (3rd and 4th slot) and every attempt costs 4 ![]() Fragment of Gigantes (6803) . There is a chance of breaking.
Fragment of Gigantes (6803) . There is a chance of breaking.
| 1st enchant (3rd slot) |
|
| |||||||||||||||||||||||||
|
| |||||||||||||||||||||||||
| 2nd enchant (4th slot) |
|
| |||||||||||||||||||||||||||||||||
|
| |||||||||||||||||||||||||||||||||