|
|
| Line 48: |
Line 48: |
| * Glade Rune Boots have higher damage IF hitting the monster that match the element of the 2nd enchant of the boots at Lv5 (Example:- {{#item:311876}} against Wind and Earth element, other elements Glade Rune Boots fall behind in Damage compared to Yorscalp. Further info can visit [[Varmundt%27s_Biosphere#Rune_Armors_Enchant|here.]] | | * Glade Rune Boots have higher damage IF hitting the monster that match the element of the 2nd enchant of the boots at Lv5 (Example:- {{#item:311876}} against Wind and Earth element, other elements Glade Rune Boots fall behind in Damage compared to Yorscalp. Further info can visit [[Varmundt%27s_Biosphere#Rune_Armors_Enchant|here.]] |
| * Sombre Shoe provide 10% drop rate or any other drop rate shoe. If you have trouble 1 shot killing the monster, considering not using drop rate shoe and go for Yorscalp or Glade Rune Boots. Further info can visit [[Increase_item_drop_gears#Equipment_that_increases_drop_rate|here.]] | | * Sombre Shoe provide 10% drop rate or any other drop rate shoe. If you have trouble 1 shot killing the monster, considering not using drop rate shoe and go for Yorscalp or Glade Rune Boots. Further info can visit [[Increase_item_drop_gears#Equipment_that_increases_drop_rate|here.]] |
| |-
| |
| | Accessory 1 || | {{#item:490133}} || Best enchant on 2nd slot is {{#item:313028}} 3rd and 4th slot is {{#item:310701}} (RNG involved to get double Master Archer). Further info can visit [[Constellation_Tower#Stellar_Seal_Accessories_Enchantment|here.]]
| |
| |-
| |
| | Accessory 2 || | {{#item:490484}} || Best enchant on 2nd slot is {{#item:312991}} (There's a perfect enchant concentration Lv1 but cost x20 times the materials) 3rd slot is {{#item:312981}}. Further info can visit [[Circulation_of_Life_Accessories#Circulation_of_Life_Accessory_Enchantment|here.]]
| |
| |}
| |
| <br><br>
| |
|
| |
| ===== '''End Game Gears for Field Farming and Instances''' =====
| |
|
| |
| {| class="wikitable"
| |
| |+ style="white-space:nowrap; border:1px solid; padding:3px; | End Game Equipment for Field Farming & Instances Farming
| |
| |-
| |
| ! !! Item!! Notes
| |
| |-
| |
| | Upper Head Gear || +12 A {{#item:400529}} || Best enchant on 2nd slot is {{#item:312783}} 3rd slot is {{#item:312706}} 4th slot can go for any stats. Further info can visit [[Dimensions_Rune_Crowns|here.]]
| |
| |-
| |
| | Mid Head Gear || | {{#item:19117}} or {{#item:19118}} || Depends whether you need the card slot for slight damage increase for last hitting monster. Further info can visit [[Increase_item_drop_gears#Equipment_that_increases_drop_rate|here.]]
| |
| |-
| |
| | Low Head Gear || | {{#item:19095}} or {{#item:19143}} || BiS is Happy Balloon for the 10% drop rate but if it's too pricey, 2nd best would be {{#item:19147}} because of the +2 Dex but can get any balloon from [[Poring_Family_Balloons#Poring_Family_Balloons|Poring Family]] for 5% drop rate if you don't need the stats. Balloons from Poring Family can be Enchanted, BiS for the enchant is {{#item:310991}} more info [[Poring_Family_Balloons#Enchantment|here]]. Further info for drop rate can visit [[Increase_item_drop_gears#Equipment_that_increases_drop_rate|here.]]
| |
| |-
| |
| | Armor || | +12 A {{#item:450171}} || Best enchant on 2nd slot is {{#item:310682}} 3rd slot is {{#item:310732}} 4th slot can go for Vit or Dex. Further info can visit [[Constellation_Tower#Nebula_Armor_Enchantment|here.]]
| |
| |-
| |
| | Weapon || | +12 A {{#item:630041}} || For the enchant you can choose which monster / MVP you want to focus. Further info can visit [[Dimension_Weapons#Dimensions_Weapons_Enchants|here.]]
| |
| * For {{#linkmob:22174}} (Formless | Neutral) hence, {{#item:311934}} & {{#item:312800}}
| |
| * For {{#linkmob:20994}} (Dragon | Neutral) hence, {{#item:311928}} & {{#item:312800}}
| |
| * For {{#linkmob:22373}} (Demi-Human | Poison) hence, {{#item:311937}} & {{#item:312800}}
| |
| * For [[Varmundt%27s_Biosphere_Depth_2#Monsters_Info|Biosphere Depth 2]] my build rely on these 2 enchant {{#item:311934}} & {{#item:311874}}
| |
| Tips:- Notice how the first 3 MVP shared the same {{#item:312800}}, you can save some zeny to use 1 lance against 3 of them.
| |
| |-
| |
| | Garment || | +12 A {{#item:480350}} || This Garment should be the most expensive gear to make but it has the highest damage boost and should last a very long time. Prioritize to max the enchant on 2nd slot and aim for {{#item:313015}} (RNG involved to get Concentration). After 2nd enchant then only start focusing on 3rd enchant {{#item:312538}}. The last enchant to focus is the 4th enchant {{#item:312513}}. Further info can visit [[Divine Beast's Cloak: Summer|here.]]
| |
| |-
| |
| | Shoes || |
| |
| * +12 A {{#item:470303}}
| |
| * +12 A {{#item:470174}}
| |
| *+12 {{#item:22048}}
| |
| ||
| |
| * BiS Boots for general farming and higher HP for higher survivability, best enchant on 2nd slot is {{#item:313097}} 3rd slot is {{#item:313094}} 4th slot is {{#item:313090}} Further info can visit [[21_Age_of_Heroes#Footgear_Enchants|here.]]
| |
| * Glade Rune Boots have higher damage IF hitting the monster that match the element of the 2nd enchant of the boots at Lv5 (Example:- {{#item:311876}} against Wind and Earth element, other elements Glade Rune Boots fall behind in Damage compared to Yorscalp. Further info can visit [[Varmundt%27s_Biosphere#Rune_Armors_Enchant|here.]]
| |
| * Sombre Shoe provide 10% drop rate or any other drop rate shoe. If you have trouble 1 shot killing the monster, considering not using drop rate shoe and go for Yorscalp or Glade Rune Boots. Further info can visit [[Increase_item_drop_gears#Equipment_that_increases_drop_rate|here.]]
| |
|
| |
| |- | | |- |
| | Accessory 1 || | {{#item:490133}} || Best enchant on 2nd slot is {{#item:313028}} 3rd and 4th slot is {{#item:310701}} (RNG involved to get double Master Archer). Further info can visit [[Constellation_Tower#Stellar_Seal_Accessories_Enchantment|here.]] | | | Accessory 1 || | {{#item:490133}} || Best enchant on 2nd slot is {{#item:313028}} 3rd and 4th slot is {{#item:310701}} (RNG involved to get double Master Archer). Further info can visit [[Constellation_Tower#Stellar_Seal_Accessories_Enchantment|here.]] |
Introduction
Hello everybody, Sakura here, i've been playing MuhRO for over a year at the time of writing this guide. I love the class a lot, being able to carry lots of stuff, hit hard and not afraid of being hit :< and you get to have a mount. The purpose of this guide is to show the Best in slot (BiS) equipment and some tips and tricks for playing Dragon Knight mainly Dragonic Breath. As this is my first guide please be lenient >//< and enjoy reading!
Video
A short video show casing the end game of Dragon Knight - Dragonic Breath Build Featuring Biosphere Depth 2, CT 25* and HoL Lv20.
Bossing and Farming Gear
Farm gear are basically gears that provide increase drop rate %, the higher it is the more item drops you'll get. Be wary equipping farm gear may reduce your Damage, and always try to aim for 1 Hit / 2 Hit kill the monster you're farming for maximum efficiency.
End Game Equipment for MVP & Farming
|
Item |
Notes
|
| Upper Head Gear |
+12 A  Time Dimensions Rune Crown (Dragon Knight) [1] (400529) Time Dimensions Rune Crown (Dragon Knight) [1] (400529) |
Best enchant on 2nd slot is  Adamantine Jewel Lv5 (312783) 3rd slot is Adamantine Jewel Lv5 (312783) 3rd slot is  Time Dimension Jewel (Vitality) Lv3 (312706) 4th slot can go for any stats. Further info can visit here. Time Dimension Jewel (Vitality) Lv3 (312706) 4th slot can go for any stats. Further info can visit here.
|
| Mid Head Gear |
 Gambler's Seal [1] (410233) Gambler's Seal [1] (410233) |
BiS is 10% Long range, but if you get 10% Max HP it works too, use  Loki's Black Coin (102343) to enchant. Further info can visit here. Loki's Black Coin (102343) to enchant. Further info can visit here.
|
| Mid Head Gear (Farm) |
 Poring Sunglasses (19117) or Poring Sunglasses (19117) or  Poring Sunglasses+ [1] (19118) Poring Sunglasses+ [1] (19118) |
Depends whether you need the card slot for slight damage increase for last hitting monster. Further info can visit here.
|
| Low Head Gear |
 Ace of Diamonds in Mouth (Ranged Physical) (420220) Ace of Diamonds in Mouth (Ranged Physical) (420220) |
BiS is 5 Vit and 7% Long range but Prioritize on 7% Long range then follow by stats, use  Loki's Advice (Ranged Physical) (102342) to enchant. Further info can visit here. Loki's Advice (Ranged Physical) (102342) to enchant. Further info can visit here.
|
| Low Head Gear (Farm) |
 Happy Balloon (19095) or Happy Balloon (19095) or  Poring Balloon (19143) Poring Balloon (19143) |
BiS is Happy Balloon for the 10% drop rate but if it's too pricey, 2nd best would be  Drops Balloon (19147) because of the +2 Dex but can get any balloon from Poring Family for 5% drop rate if you don't need the stats. Balloons from Poring Family can be Enchanted, BiS for the enchant is Drops Balloon (19147) because of the +2 Dex but can get any balloon from Poring Family for 5% drop rate if you don't need the stats. Balloons from Poring Family can be Enchanted, BiS for the enchant is  MaxHP Lv.2 (310991) more info here. Further info for drop rate can visit here. MaxHP Lv.2 (310991) more info here. Further info for drop rate can visit here.
|
| Armor |
+12 A  Nebula Suit of Concentration [1] (450171) Nebula Suit of Concentration [1] (450171) |
Best enchant on 2nd slot is  Star Cluster of Concentration Lv.3 (310682) 3rd slot is Star Cluster of Concentration Lv.3 (310682) 3rd slot is  Nebula of Expert Archer Lv.3 (310732) 4th slot can go for Vit or Dex. Further info can visit here. Nebula of Expert Archer Lv.3 (310732) 4th slot can go for Vit or Dex. Further info can visit here.
|
| Armor (Farm) |
+12  Kafra Uniform [1] (15186) Kafra Uniform [1] (15186) |
Best enchant to get from 1st line is Indestructible, 2nd line would be either Vit or Dex. You can use  Uniform Repair Kit (23175) for the enchant. Further info can visit here. Uniform Repair Kit (23175) for the enchant. Further info can visit here.
|
| Weapon |
+12 A  Dimensions Dragon Lance [2] (630041) Dimensions Dragon Lance [2] (630041) |
For the enchant you can choose which monster / MVP you want to focus. Further info can visit here.
Tips:- Notice how the first 3 MVP shared the same  Varmundt's Crystal (Poison) Lv3 (312800) , you can save some zeny to use 1 lance against 3 of them. Varmundt's Crystal (Poison) Lv3 (312800) , you can save some zeny to use 1 lance against 3 of them.
|
| Garment |
+12 A  Circulation of Life Summer [1] (480350) Circulation of Life Summer [1] (480350) |
This Garment should be the most expensive gear to make but it has the highest damage boost and should last a very long time. Prioritize to max the enchant on 2nd slot and aim for  Life of Summer (Concentration) (313015) (RNG involved to get Concentration). After 2nd enchant then only start focusing on 3rd enchant Life of Summer (Concentration) (313015) (RNG involved to get Concentration). After 2nd enchant then only start focusing on 3rd enchant  Physical Fruit Lv20 (312538) . The last enchant to focus is the 4th enchant Physical Fruit Lv20 (312538) . The last enchant to focus is the 4th enchant  Physical Flower Lv5 (312513) . Further info can visit here. Physical Flower Lv5 (312513) . Further info can visit here.
|
| Shoes |
+11 C  Boots of Unknown Life [1] (470073) Boots of Unknown Life [1] (470073) |
This is like the cheat code damage boost for DcB DK, once the bonus vit is proc from the boots, your damage will be boosted by a large amount. BiS is 10% Max HP, the 2nd line enchant preferably MHP (flat 50~1000) too but can be any as long as you get 10% max HP on the first line enchant. Tips to use Doil the Instance Coin Shop if you don't want to run the instance. Further info can visit here.
|
| Shoes (Farm) |
|
- BiS Boots for general farming and higher HP for higher survivability, best enchant on 2nd slot is
 Forest Magic Orb (Firing Shot) (313097) 3rd slot is Forest Magic Orb (Firing Shot) (313097) 3rd slot is  Forest Magic Orb (Size Attack) (313094) 4th slot is Forest Magic Orb (Size Attack) (313094) 4th slot is  Forest Magic Orb (HP) (313090) Further info can visit here. Forest Magic Orb (HP) (313090) Further info can visit here.
- Glade Rune Boots have higher damage IF hitting the monster that match the element of the 2nd enchant of the boots at Lv5 (Example:-
 Varmundt's Crystal (Plain) Lv5 (311876) against Wind and Earth element, other elements Glade Rune Boots fall behind in Damage compared to Yorscalp. Further info can visit here. Varmundt's Crystal (Plain) Lv5 (311876) against Wind and Earth element, other elements Glade Rune Boots fall behind in Damage compared to Yorscalp. Further info can visit here.
- Sombre Shoe provide 10% drop rate or any other drop rate shoe. If you have trouble 1 shot killing the monster, considering not using drop rate shoe and go for Yorscalp or Glade Rune Boots. Further info can visit here.
|
| Accessory 1 |
 Stamina Signet of Star [1] (490133) Stamina Signet of Star [1] (490133) |
Best enchant on 2nd slot is  Star Cluster of Strength Lv5 (313028) 3rd and 4th slot is Star Cluster of Strength Lv5 (313028) 3rd and 4th slot is  Star of Master Archer Lv5 (310701) (RNG involved to get double Master Archer). Further info can visit here. Star of Master Archer Lv5 (310701) (RNG involved to get double Master Archer). Further info can visit here.
|
| Accessory 2 |
 Signet of Circulation Summer [1] (490484) Signet of Circulation Summer [1] (490484) |
Best enchant on 2nd slot is  Signet of Concentration Lv5 (312991) (There's a perfect enchant concentration Lv1 but cost x20 times the materials) 3rd slot is Signet of Concentration Lv5 (312991) (There's a perfect enchant concentration Lv1 but cost x20 times the materials) 3rd slot is  Token of Life (312981) . Further info can visit here. Token of Life (312981) . Further info can visit here.
|
Cards recommendation for MVP / Farming
Cards
|
Item |
Notes
|
| Upper Head Gear |
|
- This Card give +7% Max HP, if refine +10 additional +3% Max HP and if refine +14 additional +2% Max HP. With a Total +12% Max HP.
- Use this Card if you lack Damage against Encroached Tan (22373) since his Element is Poison. It 30% increased damage against poison monster.
|
| Mid Head Gear |
|
- This Card can be used for general farming give +10% Max HP and a total of 4% decreased damage from Earth and Poison elemental @ base vit 130.
- Use this Card if you lack Damage against Encroached Tan (22373) since his Element is Poison. It 30% increased damage against poison monster.
- Use this card only when fighting Neutral type MVP (Rigel and Betelgeuse) when proc it will double your damage against neutral monster and must use with the Singing Pere Card (Accessory slot) and Playing Pere Card (Accessory slot), not recommended to use for farming since the proc is unreliable and it hinders movement.
|
| Low Head Gear |
- |
-
|
| Armor |
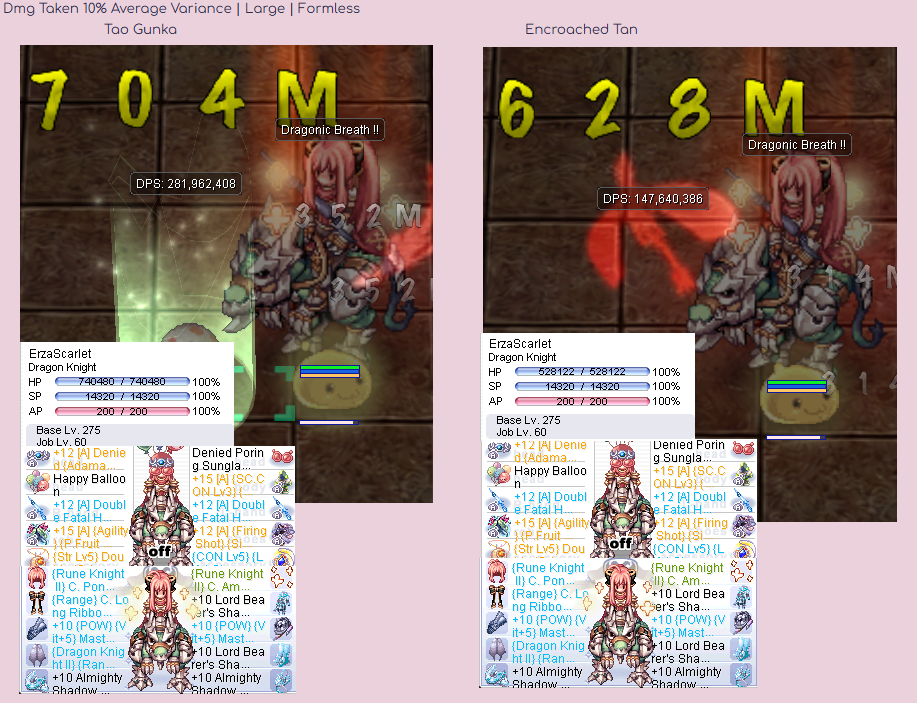
 [MVP] Tao Gunka Card (4302) [MVP] Tao Gunka Card (4302) |
This MVP Card is BiS for armor, it gives +100% Max HP and is the highest impact card to improve Damage. The downside of this card is -50% of DEF & MDEF.
Encroached Tan Card is not really good for DcB Build.
MVP Tao Gunka Card VS MVP Encroached Tan Card.
|
| Weapon |
|
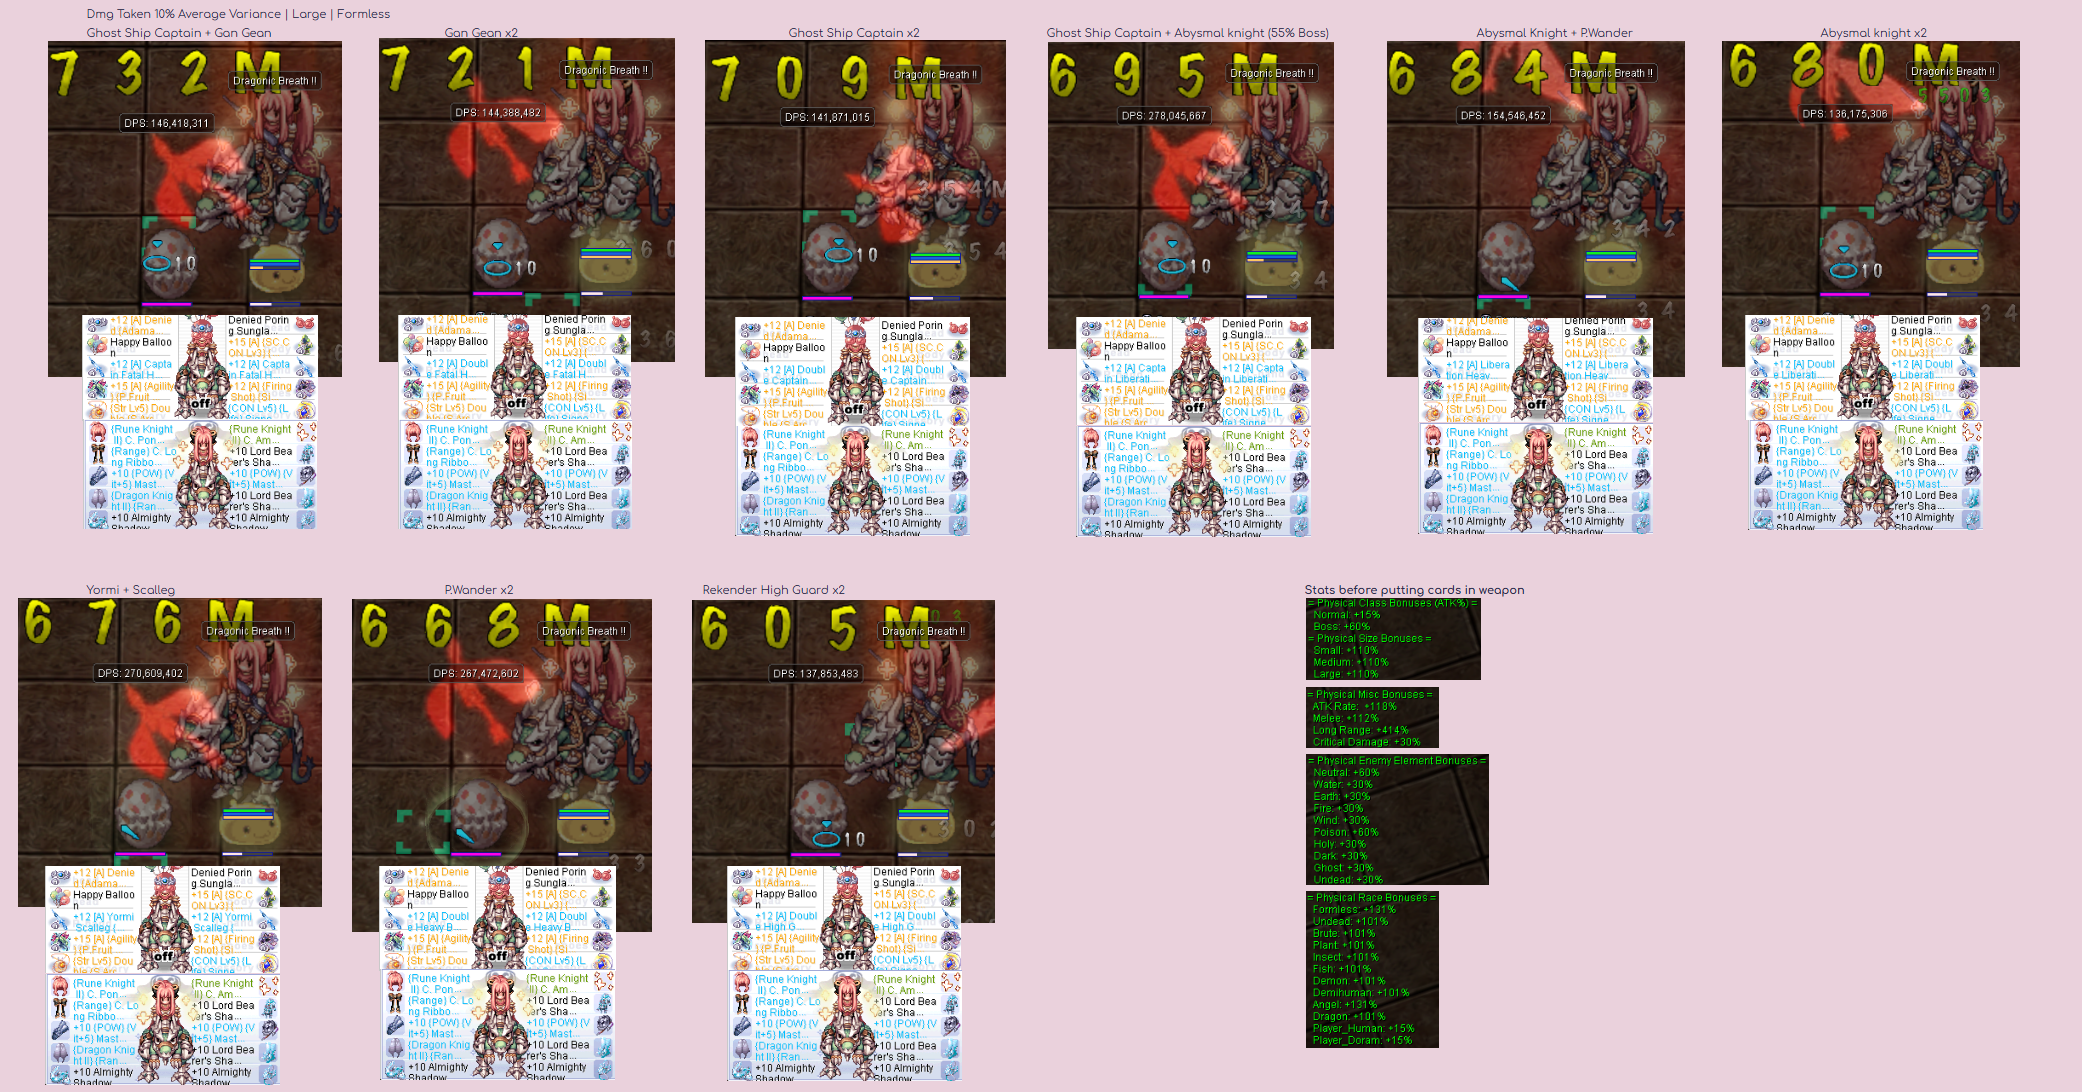
- x2 MVP Ghost Ship Captain Card is BiS for farming Boss Protocol Monster
  where their sizes are mix (Example:- Biosphere D1, D2 and Tower of Trials) where their sizes are mix (Example:- Biosphere D1, D2 and Tower of Trials)
- Abysmal Knight Card + Polluted Wander Man Card are 2nd Best for Fighting Boss Protocol Monster
  if there's only Large and Medium sized monster. (Example:- Biosphere D2) if there's only Large and Medium sized monster. (Example:- Biosphere D2)
- Yormi Card + Scalleg Card is a good combo if fighting non-boss protocol and good for Small, Medium and Large sized monster.
- x2 Gan Ceann Card is good for ONLY fighting Large sized Monster. (Example:- Rigel and Betelgeuse)
- x2 Brutal Murderer Card is good for ONLY fighting Medium sized Monster. (Example:- Biosphere D1)
- The Highest Damage output for weapon card combo from this list is to have Boss + Size (MVP Ghost Ship Captain Card + Gan Ceann Card for Large sized monster or MVP Ghost Ship Captain Card + Brutal Murderer Card for Medium sized monster)
Click here for Weapon Card Test Result
|
| Garment |
|
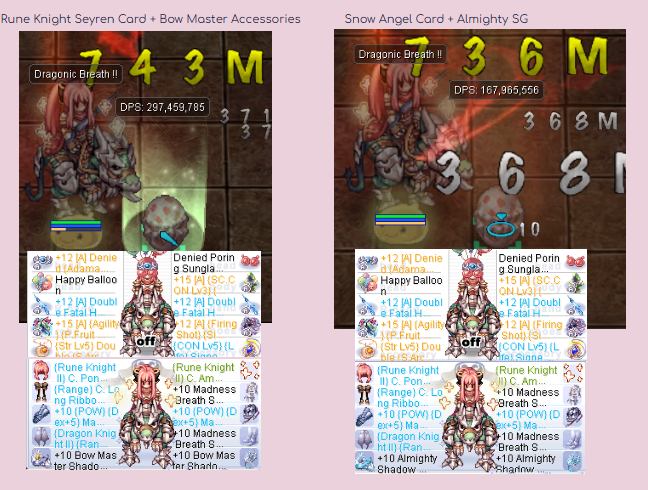
- This card is Bis and provide the best utility for DcB DK, +2 Aspd, +15% physical damage to all races and most importantly +20 to all stats which help reaching instant cast tremendously.
- This card give a huge boost to Long Range damage, @ +15 refine it gives 55% LR%, but the important one is +10% boss damage as this modifier is quite rare.
Click here for Rune Knight Seyren Card VS Snow Angel Card
|
| Shoes |
|
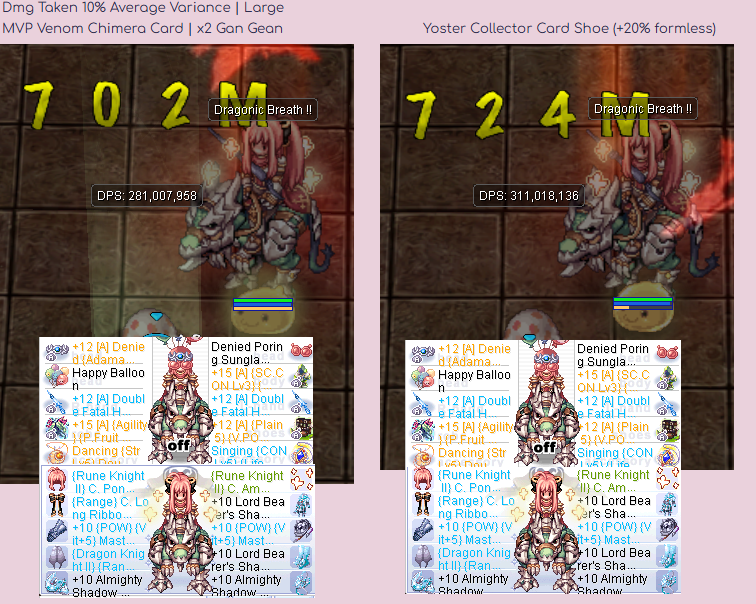
- BiS card for ALL purpose farm as it provide 15% Max HP & Max SP which scale with DcB damage, the flat Max HP boost is a bonus since with the rest of the card and gear, we will reach a very high % Max HP and flat Max HP will provide a slight boost.
- BiS card for farming a specific monster race (Insect).
- BiS card for farming a specific monster race (Demon).
- BiS card for farming a specific monster race (Undead). Can be use on MVP Ghost Ship Captain or MVP Lasgand.
- BiS card for farming a specific monster race (Dragon). Can be use on MVP Betelgeuse.
- BiS card for farming a specific monster race (Formless). Can be use on MVP Rigel, or field farming Forgotten Time Zone 1 or Zone 2.
Click here for MVP Venom Chimera Card VS Specific Monster Race Card
|
| Accessory 1 |
|
- BiS card for all purpose farm, any Vit stats + % Max HP are welcome.
- Only use this card in combo with Jitterbug card (Headgear slot).
|
| Accessory 2 |
|
- BiS card for all purpose farm, any Vit stats + % Max HP are welcome.
- Only use this card in combo with Jitterbug card (Headgear slot).
|
Shadow Gears & Costume Stones
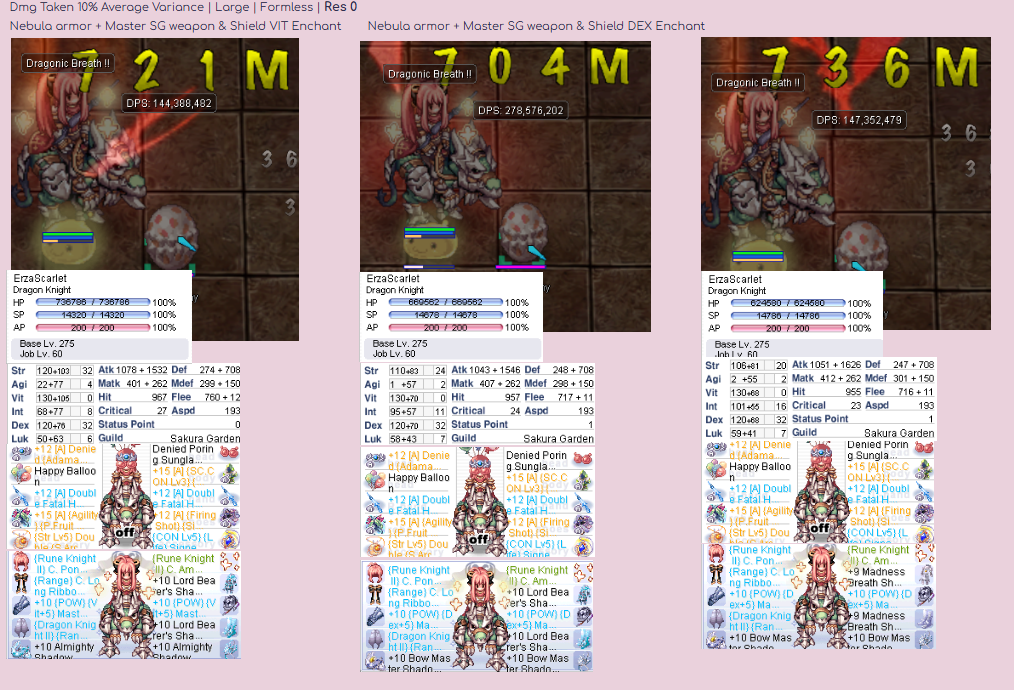
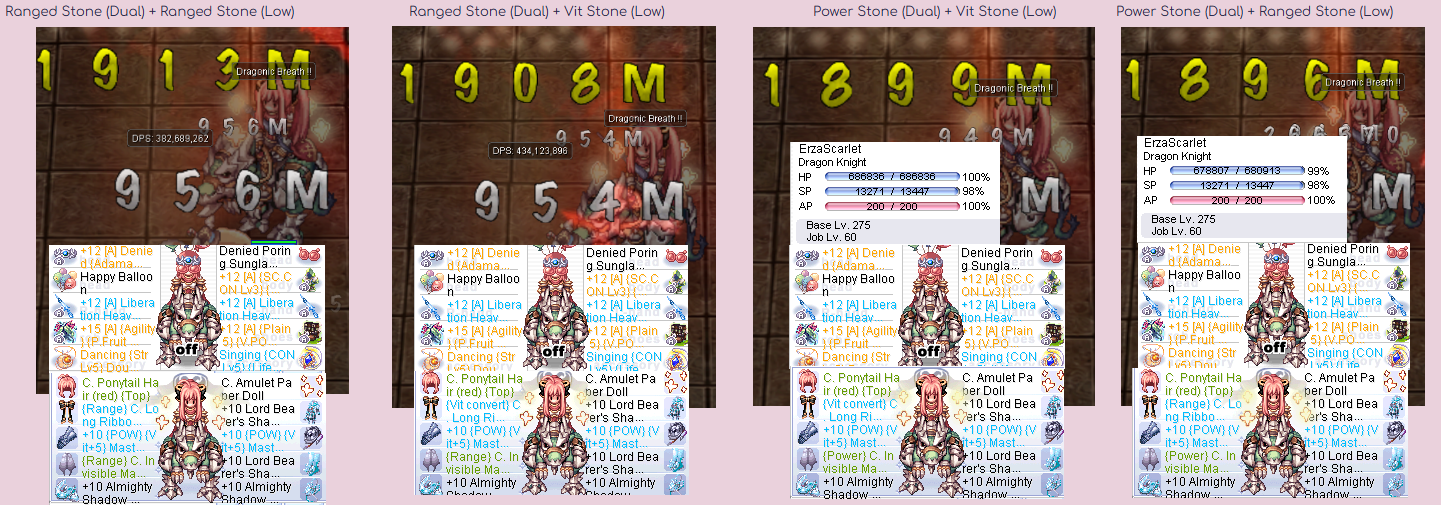
These New Advance Shadow Gear from Tower of Trials surpasses the Blue Shadow Gear even at
RES 0.
Click here for the Test Result. Be aware that using this new set may improve Damage but you'll lose Max HP and have to relocate your stats again for Instant Cast.
Pets & Runes Tablet System
Pets
| Pet Name |
Notes
|

Abysmal Knight (1219) |
The best pet for fighting any Boss Protocol monster, the easiest way to tell is by these symbol on the monster name  and and  . It provide Atk + 5%, P.Atk + 2 Increases physical damage against boss monsters by 5% when intimacy level is at Loyal. Further info can visit here. . It provide Atk + 5%, P.Atk + 2 Increases physical damage against boss monsters by 5% when intimacy level is at Loyal. Further info can visit here.
|

Blue Moon Loli Ruri (20940) |
One of the best pet for fighting any monster that is NOT Boss Protocol monster. It provide +4 Vit, +5% Max HP and chance to auto cast Lv2  Kyrie Eleison on yourself when receiving physical damage (not very important) when intimacy is at Loyal. Further info can visit here. Kyrie Eleison on yourself when receiving physical damage (not very important) when intimacy is at Loyal. Further info can visit here.
|

Incubus (1374) |
Good for farming any map that you've already able to 1 hit kill the monster. It provide Max SP +5% with 1% chance of healing your SP with your damage dealt when intimacy is at Loyal. Further info can visit here.
|

Succubus (1370) |
Good for farming any map that you've already able to 1 hit kill the monster. It provide Max HP +1% with %% chance of healing your HP with your damage dealt when intimacy is at Loyal. Further info can visit here.
|
Runes Tablet
| Tablet |
Notes
|
| Demigod Set |
This is the best rune tablet in the game right now if you're fighting Boss Protocol monster   . It may look intimidating to fully activate it (3 pieces set) but you can just activate the 2 pieces set to get +10% increase damage against Boss Protocol . It may look intimidating to fully activate it (3 pieces set) but you can just activate the 2 pieces set to get +10% increase damage against Boss Protocol   when its fully activated and upgraded at +15, you'll get +40% Damage increase damage against Boss Protocol when its fully activated and upgraded at +15, you'll get +40% Damage increase damage against Boss Protocol   . Further info can visit here. . Further info can visit here.
|
Test with Screenshots
This section of the guide provide test for various combination of Cards, Costume Stones and Gears. All the test had been done as fair as possible. Buff used are all self-casted. Test Setup for Dummy are Damage Taken 10% Average Variance | Large | Formless
![]() here, i've been playing MuhRO for over a year at the time of writing this guide. I love the class a lot, being able to carry lots of stuff, hit hard and not afraid of being hit :< and you get to have a mount. The purpose of this guide is to show the Best in slot (BiS) equipment and some tips and tricks for playing Dragon Knight mainly Dragonic Breath. As this is my first guide please be lenient >//< and enjoy reading!
here, i've been playing MuhRO for over a year at the time of writing this guide. I love the class a lot, being able to carry lots of stuff, hit hard and not afraid of being hit :< and you get to have a mount. The purpose of this guide is to show the Best in slot (BiS) equipment and some tips and tricks for playing Dragon Knight mainly Dragonic Breath. As this is my first guide please be lenient >//< and enjoy reading!


