User:Vanyr Maelstrom and Villa of Deception: Difference between pages
(Difference between pages)
No edit summary |
|||
| Line 1: | Line 1: | ||
[[Category:Instances]] | |||
=Villa of Deception= | |||
==Overview== | |||
* Level Required: 170 (Normal) or 200 (Advanced) | |||
* Party Count: 2+ | |||
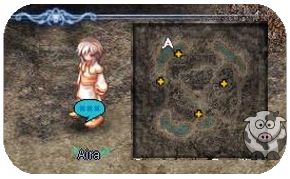
* Start at {{#navi:wolfvill|79|260}} <br> [[File:Aira18.jpg]] | |||
* Cooldown: 1 Day | |||
* Prerequisite: Episode 18 - Main Story <br> Villa Basement Key for Advanced mode | |||
* Rewards: Different between Normal and Advanced modes. See Rewards Section below. | |||
|[[ | ==Instance== | ||
The instance is split into 3 areas with 2 boss fights. Each area has its own gimmicks. <br> Inside the instance, all normal monsters use Relieve On Level 9 which reduces damage taken by 90%. <br> | |||
In advanced mode all normal monsters use Relieve On Level 10 which reduces damage taken by 99%.<br> | |||
[[File:MapVilla.png]] | |||
===Area 1=== | |||
* Defeat all 35 monsters (Optional for this Area). | |||
* Avoid the Reapers in the lower hallways which takes 50% of the players Max HP when colliding. | |||
* Two players must talk to the Ghost NPC simultaneously (within 3 seconds of each other) shown as Orange Stars on each side of the room to open the portal to the next area. | |||
===Area 2=== | |||
* Defeat all 35 monsters. | |||
* Interact with 4 center tables shown as Red Boxes to reduce the amount of Corrupted Plague in Area 3. Players will receive a negative status effect when doing so. | |||
* There will be an announcement when you've reached the maximum reduction. | |||
* Talk to the 2 statues at the top of the room to open the portal to the next area. | |||
===Area 3=== | |||
* Defeat all 35 monsters. | |||
* Avoid the Corrupted Plague which cast Gradual Gravity that reduces the players Max HP by approximately 30% per second. | |||
* Once all monsters are defeated, the portal will open to the Schulang Fight. | |||
===Schulang Fight=== | |||
* The party leader must approach and talk to Schulang to initiate the fight. | |||
* A series of Thunderstorm is casted in a pattern across the room with 1 random safe position. However, this damage is minor and can be mitigated with a Thunderproof Potion. | |||
* Schulang will randomly change elements between Wind, Holy, and Ghost. | |||
* Additionally, he will use Relieve On Level 1 which reduces damage taken by 10%. | |||
* On Advanced Mode he has a 90% damage reduction. | |||
===Twisted God Freya Fight=== | |||
* The party leader must interact with the altar located north of the room to summon the Twisted God Freya. <br> | |||
Mechanics and Gimmicks: <br> | |||
* Center Chandelier - Freya will become stronger the further away she is from the center chandelier which amplifies all of her skill damage. Additionally, she will cast Relieve On from Level 1 (reduces damage taken by 10%) to Level 10 (reduces damage taken by 99%) depending on this distance. Players must try to lure Freya back to the center. However, she will annoyingly cast Run which forces her to move away from her target. (Similar to Beelzebub) | |||
* Magic Circle - In Normal mode, 1 small Magic Circle and 1 large Magic Circle will spawn near the center. Each circle will move independently in a semi-random pattern, preferring a player. If it comes into contact with a player, a teleport will occur. The small Magic Circle will teleport the colliding player back to the one of the two ghosts in Area 1. The large Magic Circle will deal damage to the player in addition teleporting the player back to Area 1. Players can interact with the White Aura NPCs near the windows to temporarily disable one of the Magic Circles by sacrificing a random amount of SP. However, it will only be disable for a short amount of time. The party must have sufficient active players to keep the Magic Circles disabled. In Advanced mode, there will be 4 Magic Circles and 4 White Aura NPCs located at each corner of the room. | |||
* Cane of Evil Eye - Freya likes to use Cane of Evil Eye which places a ground spell of lasers that deals 15,000 fixed damage per second. The area is large and can quickly kill a player. | |||
* Health Regeneration - Freya has substantial health regeneration per second which is connected to the number of magic circles active. Players can reduce her regenerative powers by disabling the magic circles. | |||
* On Advanced Mode Freya has at least 90% damage reduction active all the time. | |||
==Monsters== | |||
{| class="wikitable mw-collapsible" style="width: 100%;text-align:center;" | |||
|- style="background-color:#E1C7C1;" | |||
|Monster | |||
|Normal Mode | |||
|Advanced Mode | |||
| | |||
|style="background-color: # | |||
| | |||
| | |||
| | |||
|- | |- | ||
| | |{{#mob:21318}} | ||
|Level 170 <br> HP 5,000,000 <br> Demi Human/Holy 2/Medium | |||
|Level 210 <br> HP 5,000,000 <br> Demi Human/Holy 2/Medium | |||
|- | |- | ||
| | |{{#mob:21319}} | ||
| | | Level 170 <br> HP 5,000,000 <br> Demi Human/Neutral 2/Medium | ||
| | |Level 210 <br> HP 5,000,000 <br> Demi Human/Neutral 2/Medium | ||
|- | |- | ||
| | |{{#mob:21316}} | ||
| | | Level 185 <br> HP 300,000,000 <br> Demon/Ghost 4/Medium | ||
|Level 217 <br> HP 300,000,000 <br> Demon/Ghost 4/Medium | |||
| | |||
|- | |- | ||
|{{#mob:21317}} | |||
|Level 185 <br> HP 200,000,000 <br> Angel/Holy 2/Medium | |||
|Level 217 <br> HP 200,000,000 <br> Angel/Holy 2/Medium | |||
|} | |} | ||
== | ==Rewards== | ||
Rewards are collected from monster drops and upon interacting with the altar at the end of the instance. | |||
{| class="wikitable mw-collapsible" style="width: 100%;" | |||
{| class="wikitable" style=" | |- style="background-color:#E1C7C1;text-align:center;" | ||
|Normal Mode | |||
|Advanced Mode | |||
|- | |||
| | |||
| | |||
|- | |- | ||
| | | | ||
* All monsters have a chance to drop: | |||
** {{#item:100650}} | |||
** {{#item:100651}} | |||
* Schulang and Freya has a chance to drop any of [[Adulter and Vivatus Fides Weapons|Adulter Weapons]] pre-enchanted with 2 line options and a {{#item:1000471}}. | |||
- | * The altar will grant all party members 8x {{#item:1000405}} and a small chance to acquire 1x {{#item:1000471}}. | ||
| | | | ||
* All monsters have a chance to drop: | |||
** {{#item:100652}} | |||
** {{#item:100653}} | |||
** {{#item:1000501}} | |||
** {{#item:1000503}} | |||
** {{#item:1000502}} | |||
** {{#item:100655}} | |||
* Schulang and Freya has a chance to drop any of [[Adulter and Vivatus Fides Weapons|Vivatus Weapons]] pre-enchanted with 2 line options. | |||
* The altar will grant all party members 16x {{#item:1000405}}. | |||
| | |||
|} | |} | ||
{{:Adulter_and_Vivatus_Weapon_Enchantment}} | |||
Revision as of 13:06, 15 October 2022
Villa of Deception
Overview
- Level Required: 170 (Normal) or 200 (Advanced)
- Party Count: 2+
- Start at (wolfvill 79, 260)
- Cooldown: 1 Day
- Prerequisite: Episode 18 - Main Story
Villa Basement Key for Advanced mode - Rewards: Different between Normal and Advanced modes. See Rewards Section below.

Instance
The instance is split into 3 areas with 2 boss fights. Each area has its own gimmicks.
Inside the instance, all normal monsters use Relieve On Level 9 which reduces damage taken by 90%.
In advanced mode all normal monsters use Relieve On Level 10 which reduces damage taken by 99%.

Area 1
- Defeat all 35 monsters (Optional for this Area).
- Avoid the Reapers in the lower hallways which takes 50% of the players Max HP when colliding.
- Two players must talk to the Ghost NPC simultaneously (within 3 seconds of each other) shown as Orange Stars on each side of the room to open the portal to the next area.
Area 2
- Defeat all 35 monsters.
- Interact with 4 center tables shown as Red Boxes to reduce the amount of Corrupted Plague in Area 3. Players will receive a negative status effect when doing so.
- There will be an announcement when you've reached the maximum reduction.
- Talk to the 2 statues at the top of the room to open the portal to the next area.
Area 3
- Defeat all 35 monsters.
- Avoid the Corrupted Plague which cast Gradual Gravity that reduces the players Max HP by approximately 30% per second.
- Once all monsters are defeated, the portal will open to the Schulang Fight.
Schulang Fight
- The party leader must approach and talk to Schulang to initiate the fight.
- A series of Thunderstorm is casted in a pattern across the room with 1 random safe position. However, this damage is minor and can be mitigated with a Thunderproof Potion.
- Schulang will randomly change elements between Wind, Holy, and Ghost.
- Additionally, he will use Relieve On Level 1 which reduces damage taken by 10%.
- On Advanced Mode he has a 90% damage reduction.
Twisted God Freya Fight
- The party leader must interact with the altar located north of the room to summon the Twisted God Freya.
Mechanics and Gimmicks:
- Center Chandelier - Freya will become stronger the further away she is from the center chandelier which amplifies all of her skill damage. Additionally, she will cast Relieve On from Level 1 (reduces damage taken by 10%) to Level 10 (reduces damage taken by 99%) depending on this distance. Players must try to lure Freya back to the center. However, she will annoyingly cast Run which forces her to move away from her target. (Similar to Beelzebub)
- Magic Circle - In Normal mode, 1 small Magic Circle and 1 large Magic Circle will spawn near the center. Each circle will move independently in a semi-random pattern, preferring a player. If it comes into contact with a player, a teleport will occur. The small Magic Circle will teleport the colliding player back to the one of the two ghosts in Area 1. The large Magic Circle will deal damage to the player in addition teleporting the player back to Area 1. Players can interact with the White Aura NPCs near the windows to temporarily disable one of the Magic Circles by sacrificing a random amount of SP. However, it will only be disable for a short amount of time. The party must have sufficient active players to keep the Magic Circles disabled. In Advanced mode, there will be 4 Magic Circles and 4 White Aura NPCs located at each corner of the room.
- Cane of Evil Eye - Freya likes to use Cane of Evil Eye which places a ground spell of lasers that deals 15,000 fixed damage per second. The area is large and can quickly kill a player.
- Health Regeneration - Freya has substantial health regeneration per second which is connected to the number of magic circles active. Players can reduce her regenerative powers by disabling the magic circles.
- On Advanced Mode Freya has at least 90% damage reduction active all the time.
Monsters
| Monster | Normal Mode | Advanced Mode |
 Goddess Guardian (21318) |
Level 170 HP 5,000,000 Demi Human/Holy 2/Medium |
Level 210 HP 5,000,000 Demi Human/Holy 2/Medium |
 Cottage Keeper (21319) |
Level 170 HP 5,000,000 Demi Human/Neutral 2/Medium |
Level 210 HP 5,000,000 Demi Human/Neutral 2/Medium |
 Schulang (21316) |
Level 185 HP 300,000,000 Demon/Ghost 4/Medium |
Level 217 HP 300,000,000 Demon/Ghost 4/Medium |
 Twisted God Freyja (21317) |
Level 185 HP 200,000,000 Angel/Holy 2/Medium |
Level 217 HP 200,000,000 Angel/Holy 2/Medium |
Rewards
Rewards are collected from monster drops and upon interacting with the altar at the end of the instance.
| Normal Mode | Advanced Mode |
|
|
Adulter and Vivatus Enchantment
Adulter Fides can be item reformed into Vivatus Fides weapons.
The enchanting process for the Adulter Fides and Vivatus Fides weapons is Lapine Upgrade item.
- Adulter Fides Weapons can be enchanted with
 Pontifex Courage (100650) (physical) or
  Pontifex Wisdom (100651) (magical) and have 2 Line Options.
 - Vivatus Fides Weapons can be enchanted with
 Pontifex Tenacity (100652) (physical) or
  Pontifex Belief (100653) (magical) and have 2 Line Options.
| Adulter Fides Weapons | |||
| Line Option 1 | Line Option 2 | Line Option 1 | Line Option 2 |
|
|
|
|
| Vivatus Fides Weapons | |||
| Line Option 1 | Line Option 2 | Line Option 1 | Line Option 2 |
|
|
|
|